
Wow, that’s a pretty long title! There’s a lot of moving parts involved with this setup but ultimately you will have a more secure environment with a better user experience in my opinion. The Table of Contents is below, I would urge you to read why you should consider this setup for your environment and watch the videos I have created before jumping into the technical portions of this guide or it’s very easy to get lost with some of these concepts.
Why you should consider SAML authentication for NetScaler, StoreFront, XenApp, & XenDesktop
A few years ago I gave you a brief introduction to SAML (Security Assertion Markup Language) claims-based authentication and AD FS 3.0 when integrating these authentication methods with Citrix ShareFile:
Since then I have seen more and more Enterprises wanting to integrate SAML authentication into all sorts of applications in their companies specifically for single sign on use cases. Using a combination of NetScaler Unified Gateway, Citrix FAS, and a SAML IdP like AD FS, you can achieve single sign on for Citrix XenApp, XenDesktop, and StoreFront as well.
We’re at a point where users have too many passwords to remember. I’ve had discussion with some non-IT people in different verticals and it’s the same story every time, they have to remember 15-20 account credentials for work. Some are resorting to their own password management through the use of mobile password safes or online password manager services. Others are taking the old approach of writing down their credentials with paper and pen in notebooks, or worse saving them .docx or .txt files somewhere in plaint text. IT staff are just as guilty of this. I can’t tell you how many times I’ve walked into an organization with a “secure” share for IT containing an IP spreadsheet and several .txt or .docx files with passwords in them. If an attacker was to gain access to that share, you have just saved them a ton of work having to scan and document your environment. Your IP spreadsheet shows every server and what it does plus they have the passwords now. Many high profile hacks in recent years were enabled by bad processes. From an operational standpoint, how many hours are spent by help desks all over the world resetting people’s passwords for them for all the various systems they access?

An organizations perimeter these days is actually pretty hardened through the use of advanced firewalls, content filters, reverse proxies, IDS, IPS, etc. You’ll notice scans against your external firewalls but for the most part, they are just probing. The real threat to enterprises these days are the users, not the systems. Users are human, they make mistakes. They are not always as mindful as an IT person, heck half the time IT isn’t. This is why spear phishing and other attacks against the end user are so successful vs. trying to knock down the perimeter defenses. That attacks are coming from within the organization, and in some cases don’t even originate on the organizations network!
So how do we protect the organizations network from end user originated attacks while still making the systems easy to use? This is where SAML authentication (whether on premises or in the cloud) with single sign-on to all systems the user uses begins to help. Added bonus it saves countless man hours in password reset calls to the help desk. Couple that with multi-factor authentication depending on where the user is connecting from and you’ve just taken the first steps to help mitigate a lot of the problems many enterprises and their users are facing.
If you saw the latest CUGC Networking Special Interest Group (SIG) presentation, you saw Dave Brett (fellow CTP) and myself talk about different cloud authentication options for your Citrix environment using NetScaler. If you missed it the webinar recording is here:
https://www.mycugc.org/p/do/sd/sid=218
I referenced Dave’s excellent 6 part series on using AD FS 3.0 with NetScaler Unified Gateway you can read here:
With this approach you gain quite a few benefits over a traditional Citrix deployment:
- SAML auth all the way through your Citrix environment
- Use a single FQDN internal and external with NetScaler Unified Gateway
- Multi-factor authentication for external users with logic on AD FS rather than NetScaler
- Eliminating the need for AD FS WAP servers in the DMZ
- Integrated windows authentication/single sign-on (IWA/SSON) for internal users
- SSO ability into all your other SaaS web applications
- If using AD FS logins with Office 365 this offers a familiar “unified” login experience for users
- HDX Insight data gathered in NetScaler MAS for all this traffic
I wanted to switch my own environment from using AD FS 3.0 on Server 2012 to the newer AD FS 4.0 with Server 2016 as well as use the RfWebUI theme with my Unified Gateway. I also wanted to integrate some of my existing Azure MFA infrastructure with AD FS rather than having it all on the same server and this required a bit of extra setup. This guide is going to show you a lot of what Dave has documented as well as a few things I’ve done to get this working the way I wanted in my environment. I’ll go over some of the challenges you might face if attempting to do the same in your environment. Ultimately you can make it all work and it’s a very polished user experience! Let’s get started examining the user experience first and then work our way into the how-to sections.
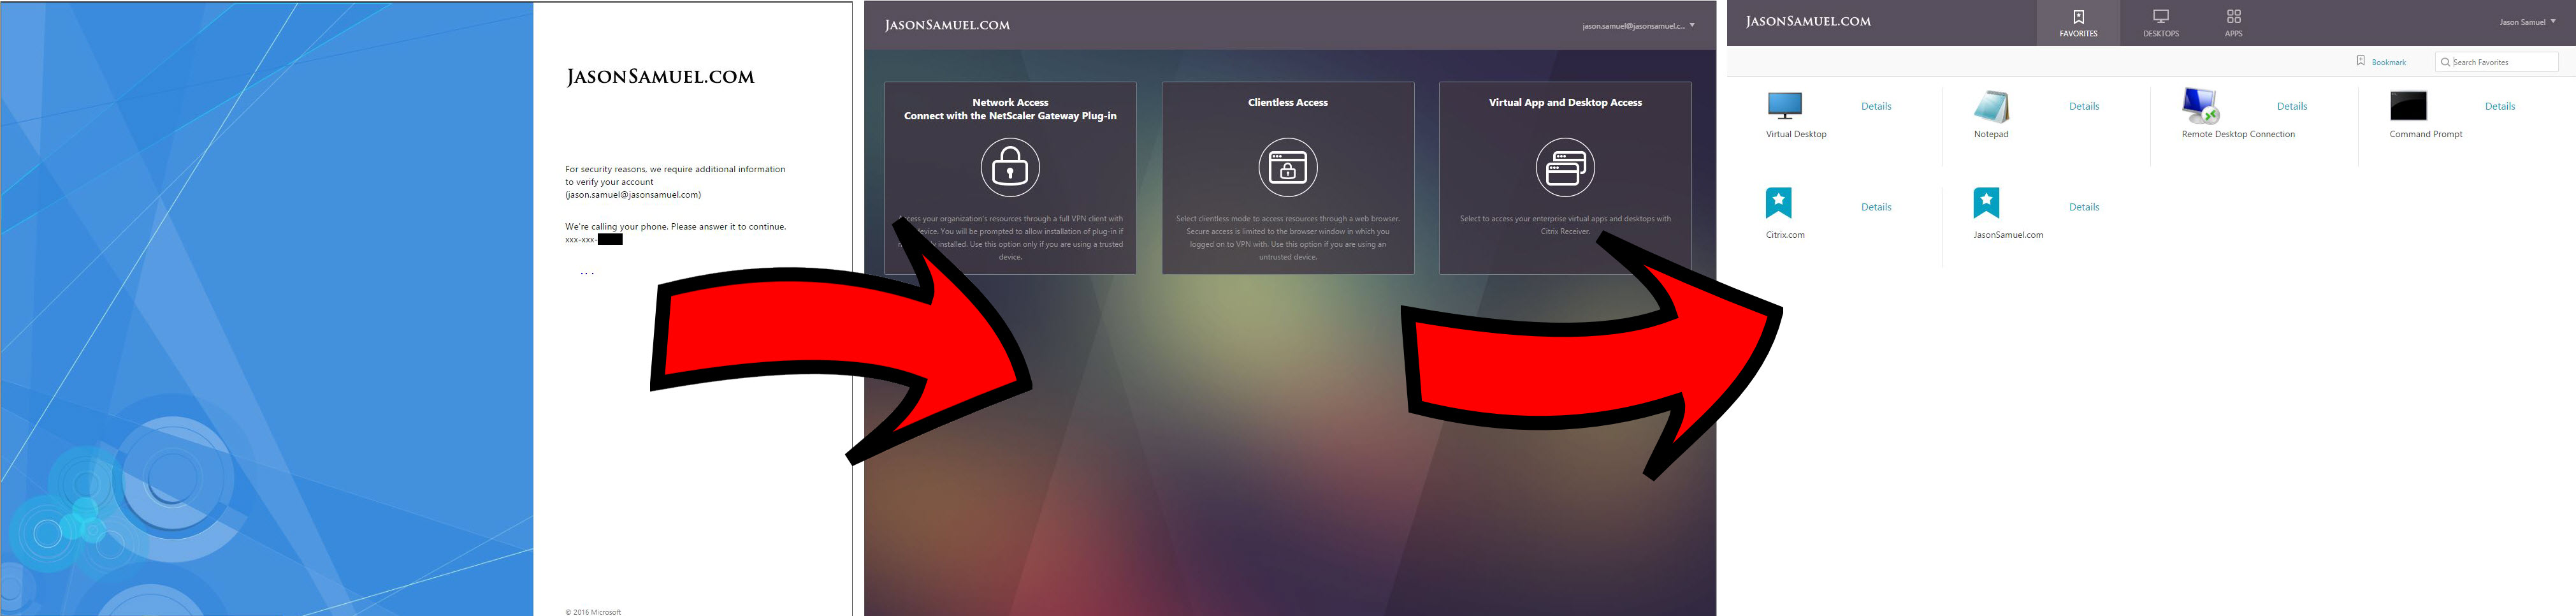
Videos of the user experience
This is what you’re really here for so let me show you the 2 videos first so you can decide if this is the right approach for your company.
Internal user experience:
External user experience:
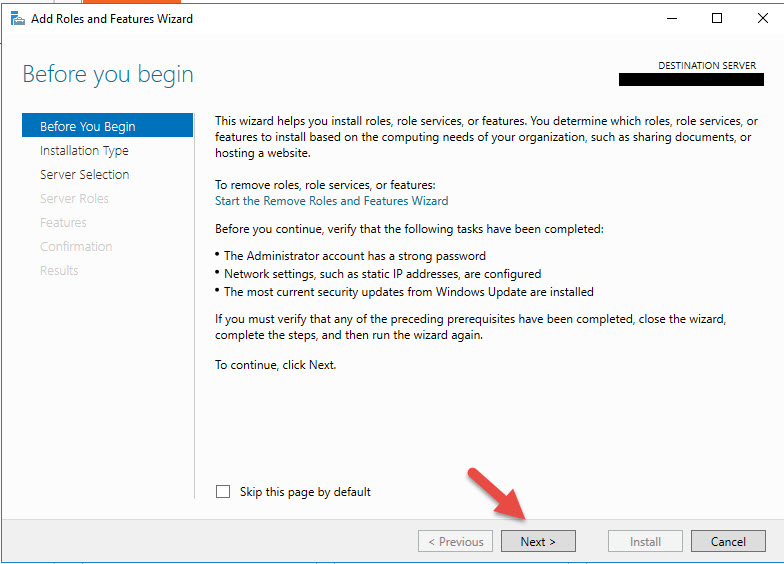
Installing AD FS 4.0 on Windows Server 2016
1. AD FS 4.0 is a server role. Go to the Add Roles and Features Wizard and hit Next.
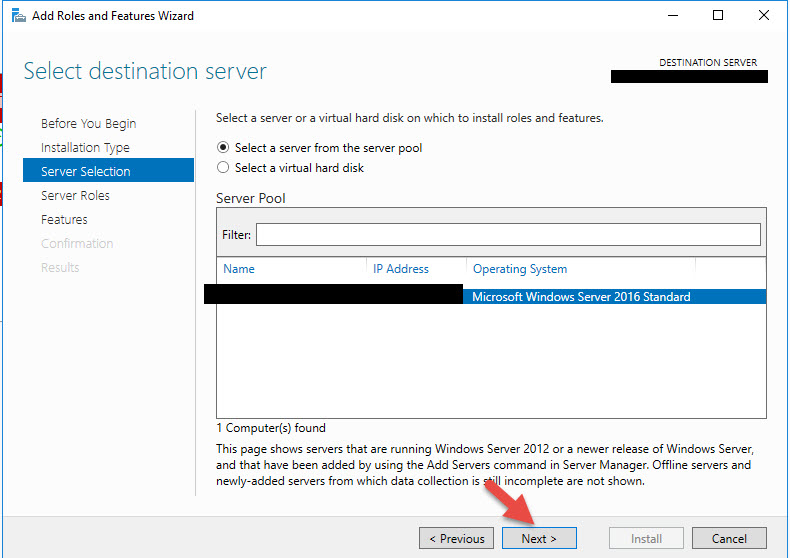
2. Next

3. Next
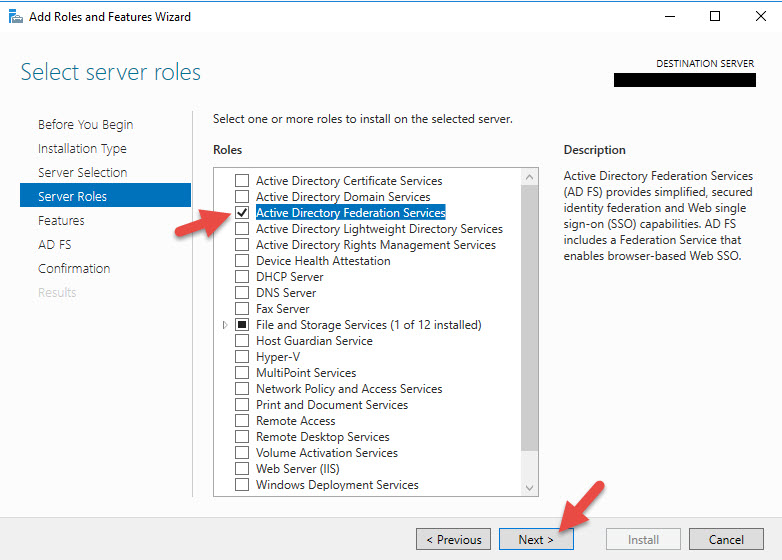
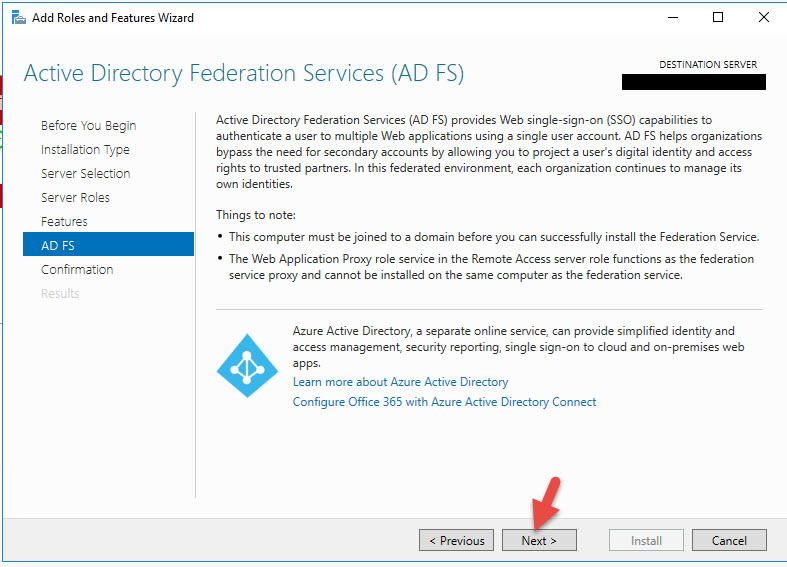
4. Choose Active Directory Federation Services and hit Next.
5. Next
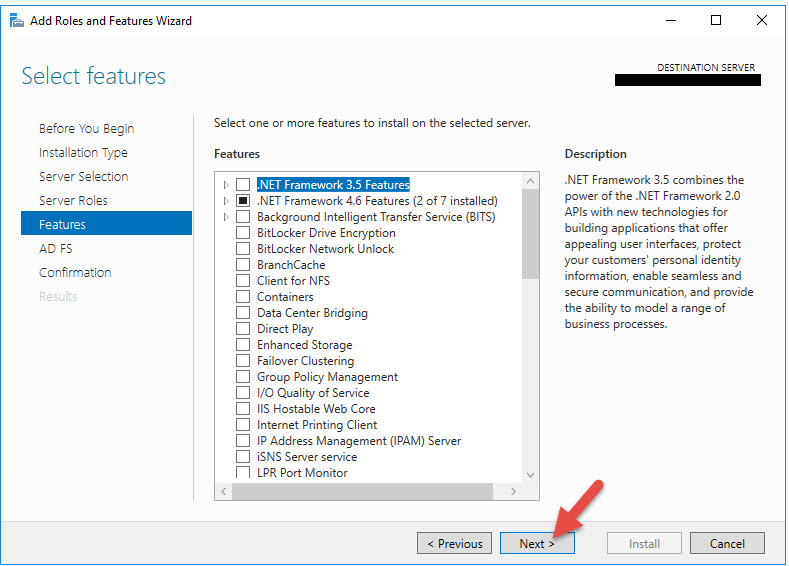
6. Next
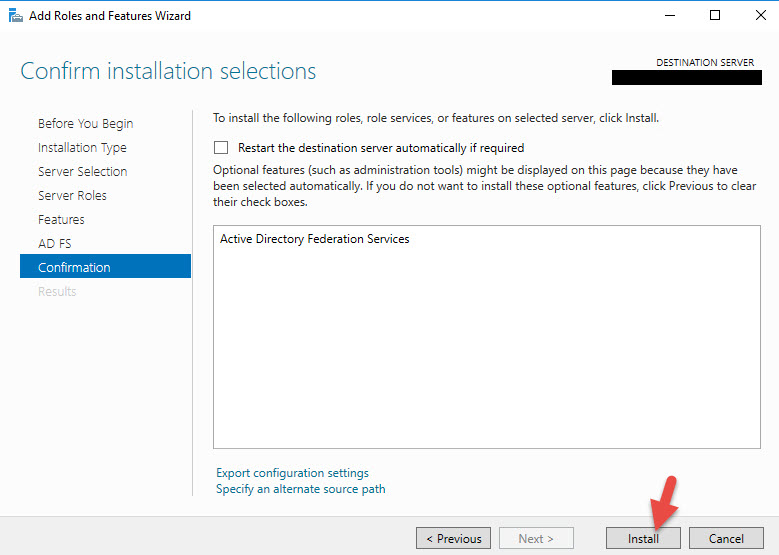
7. Now hit Install
Configuring your AD FS 4.0 Federation Farm
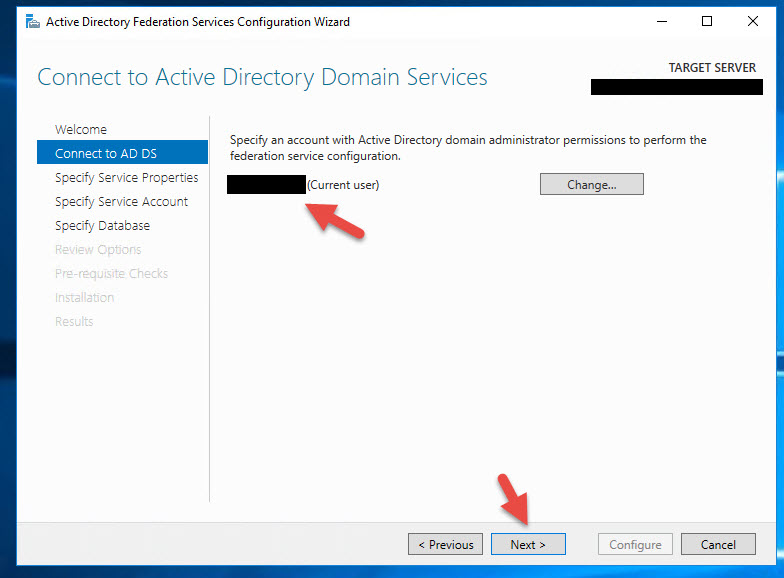
8. Once it’s done, click the “Configure the federation service on this server” link.

9. Since this is the first server in the farm click “Create the first federation server in a federation server farm” option and hit Next. You will also notice it asks if you are configuring single-sign on for Office 365 and telling you to exit the AD FS wizard and install Azure AD Connect. These days when people decide to migrate to Office 365 they usually use password hash sync so there is no need for AD FS in that kind of setup. For what we’re using AD FS for however, internal and external authentication with NetScaler Gateway rather than the cloud, we need AD FS so ignore this message and keep going.

10. Choose a domain administrator account to perform the AD FS configuration. Don’t worry, you don’t need to specify an elevated service account here. That comes later. Just enter your domain admin credentials, it’s only used to do the config.
11. Import your SSL Certificate you intend to use with AD FS. Most companies I see are using something like adfs.yourdomain.com. You can pick whatever domain you like. I encourage you to use a standard single domain certificate in a production environment rather than a wildcard or SAN certificate. Sure it will work with any but there are some security implications you need to be aware of. More on this later.
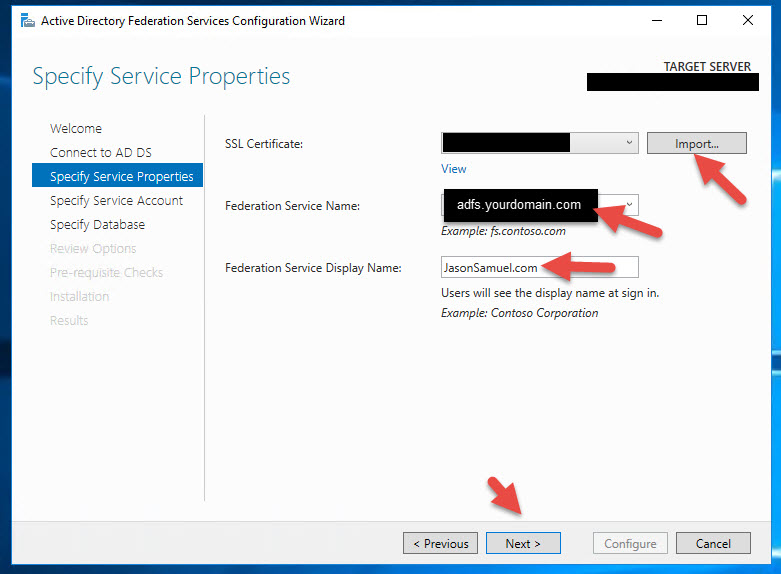
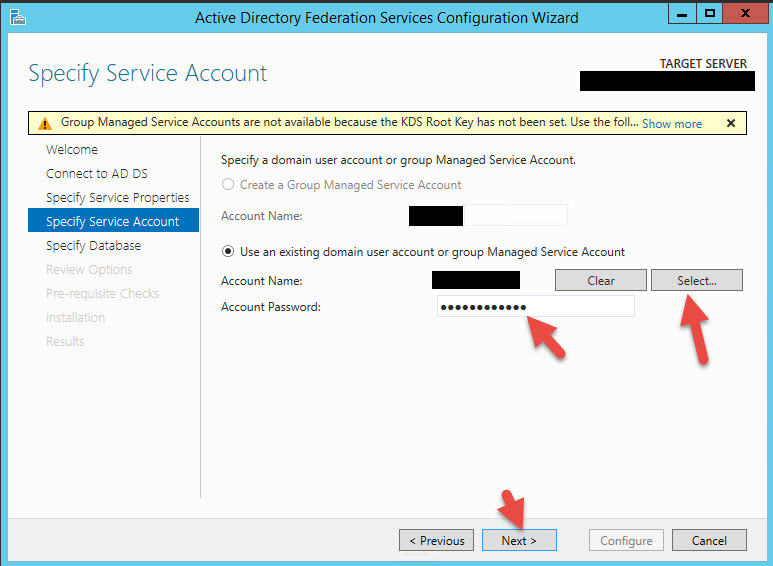
12. Specify your AD FS service account here. No special permissions required, just a regular service account with no group membership is all it needs.
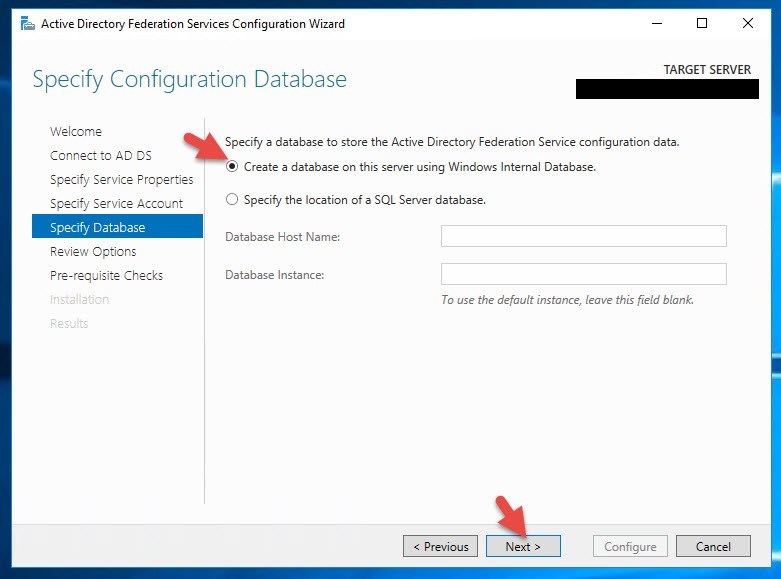
13. You can specify a SQL Server database (please ensure you have a solid SQL environment first) or you can use the Windows Internal Database (WID). This will hold the AD FS Configuration Database. Using WID is fine in dev environments but if doing a production environment the recommendation is to use SQL (please verify you have a solid SQL environment first). There are limitations on the number of nodes in your AD FS farm and the number of relaying parties allowed when using WID vs. SQL so it’s better to use SQL. This will prevent headaches later as your company grows.
14. Next
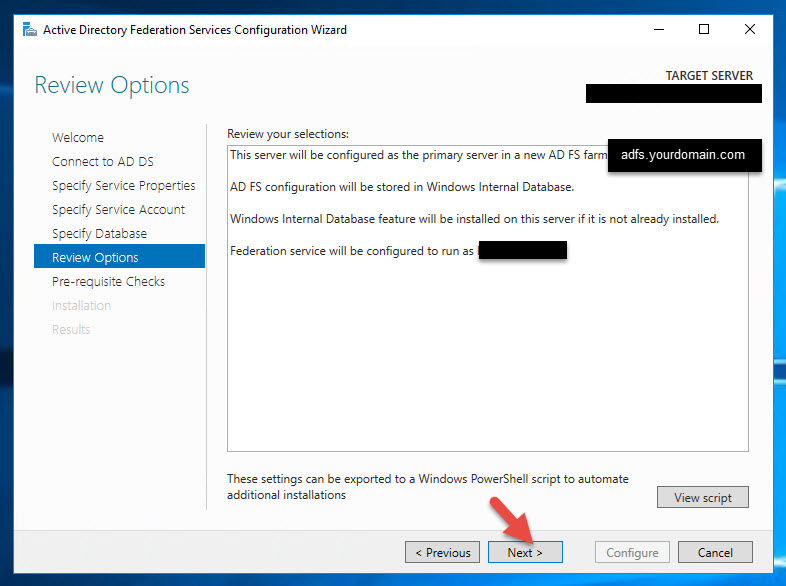
15. Verify the pre-reqs check goes green and then hit Configure.
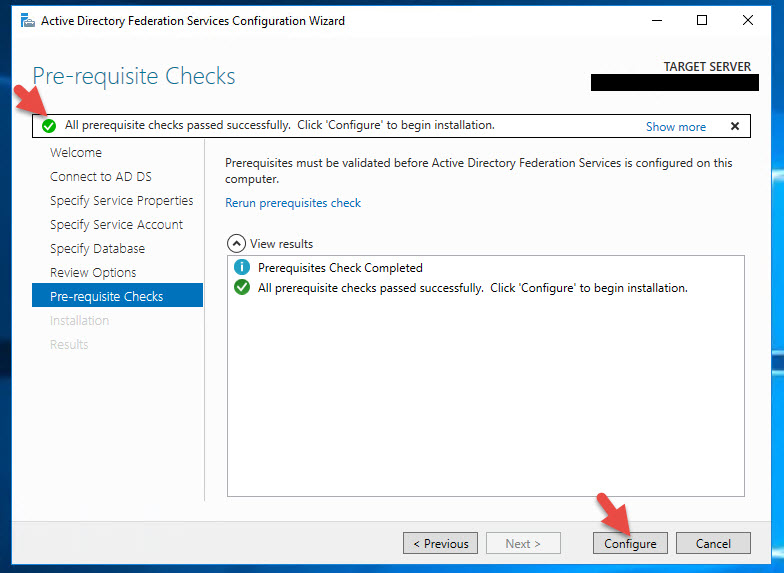
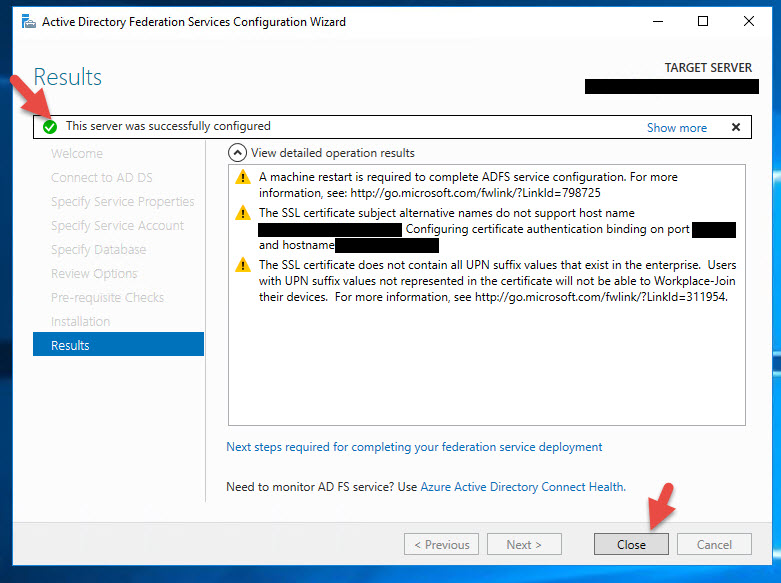
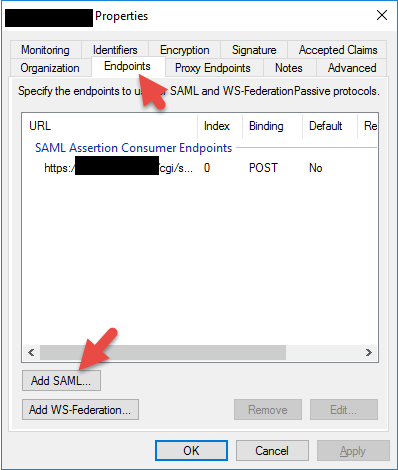
16. Once completed it should show a green check saying the server was successfully configured.
Creating an AD FS 4.0 Relying Party Trust with NetScaler Unified Gateway
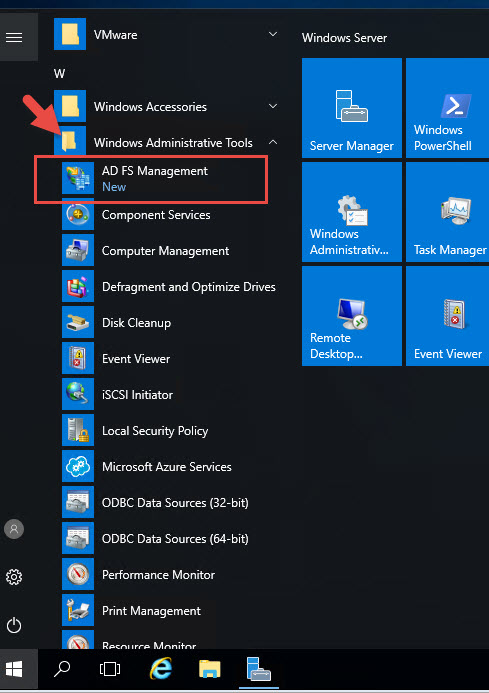
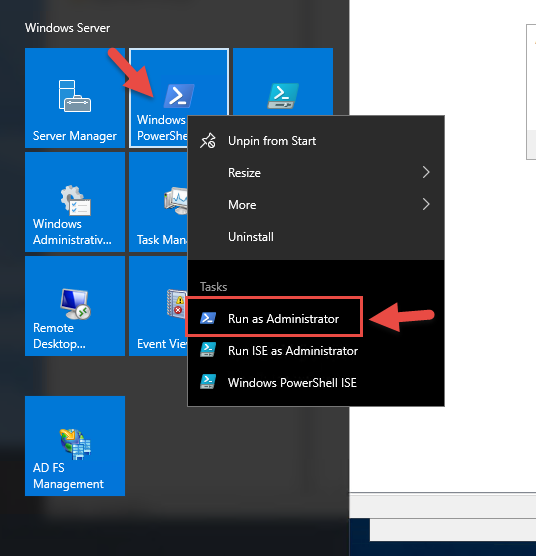
17. Hit Start and right click on the AD FS Management console
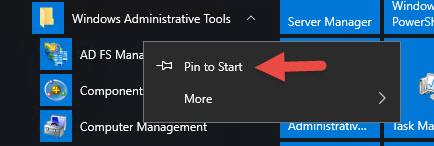
18. Hit Pin to Start since you’ll be using it a lot.
19. Now click the new icon to launch the console.
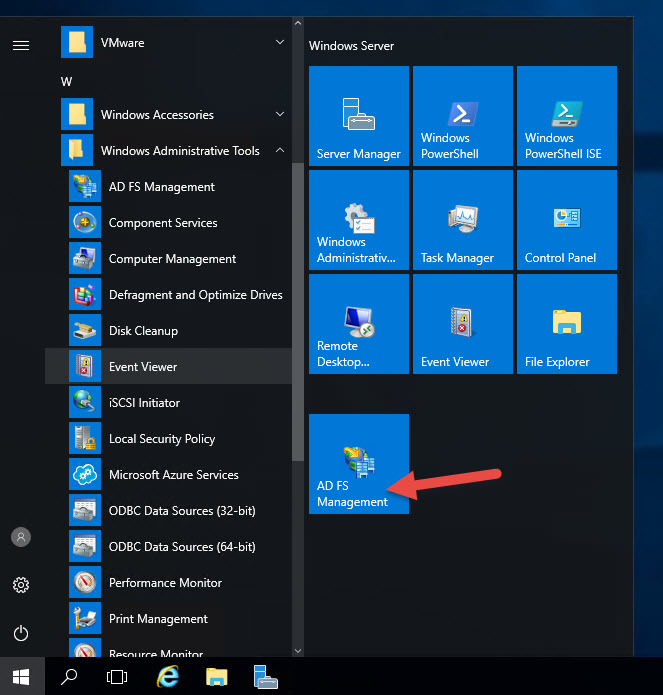
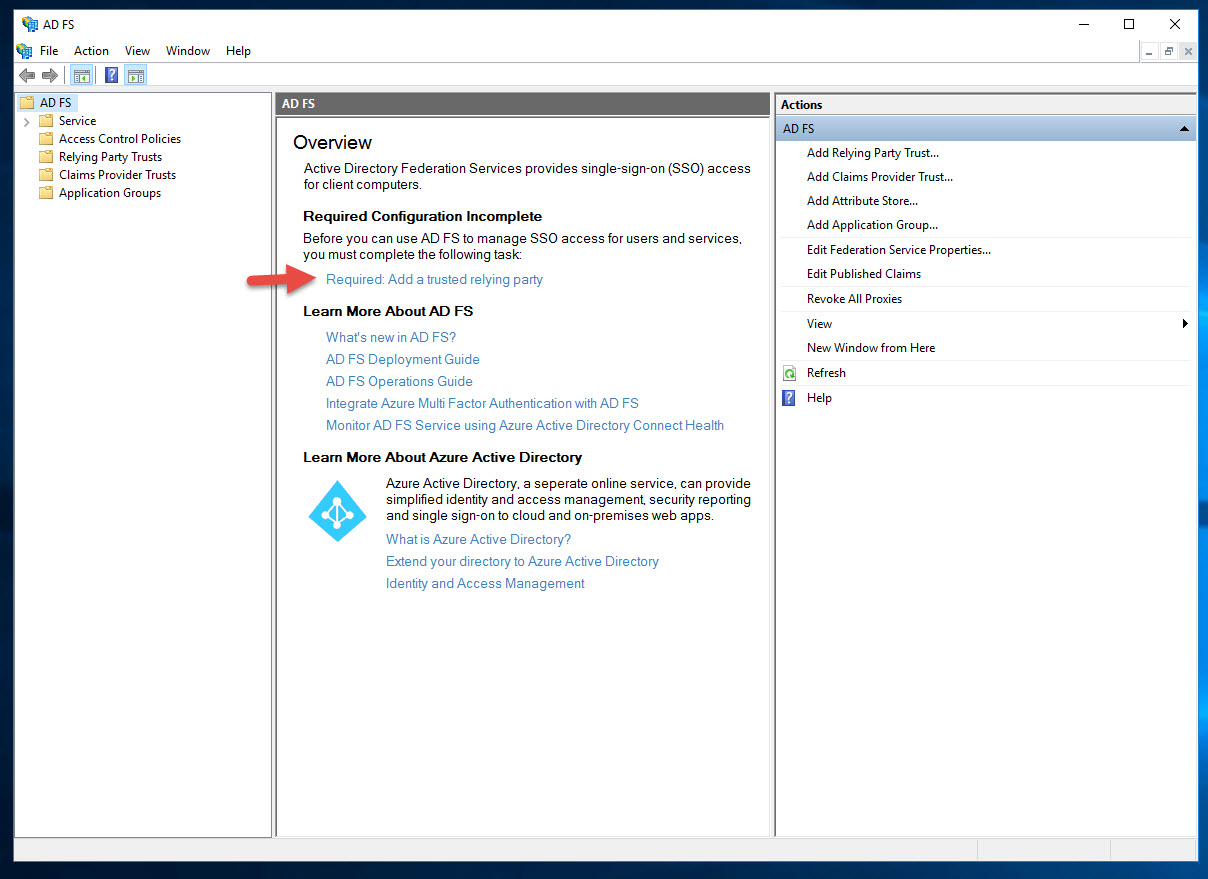
20. Right in the center there is a link saying “Required: Add a trusted relying party”. Click it.
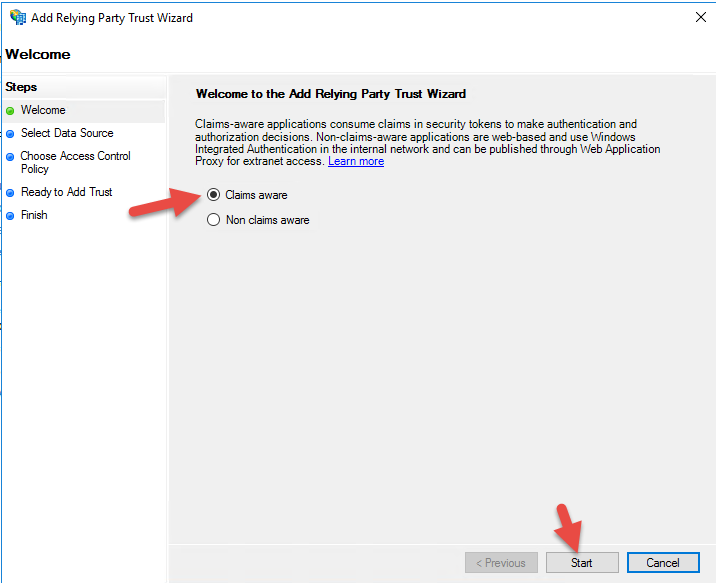
21. Select Claims aware and hit Start
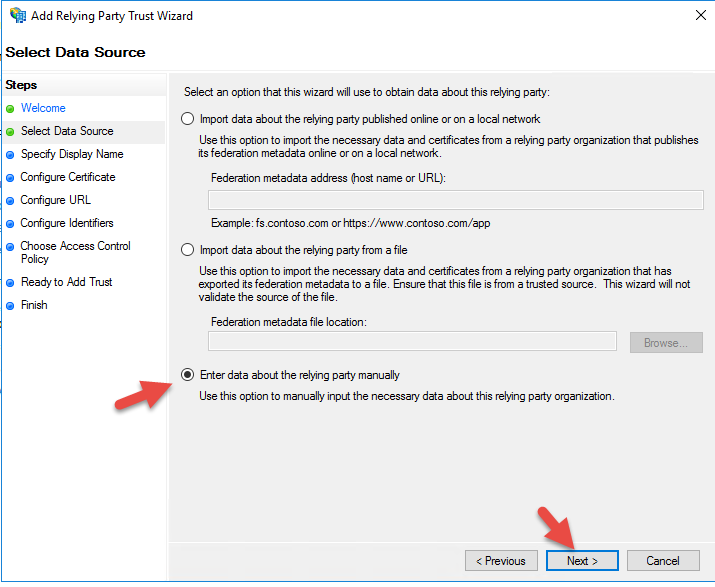
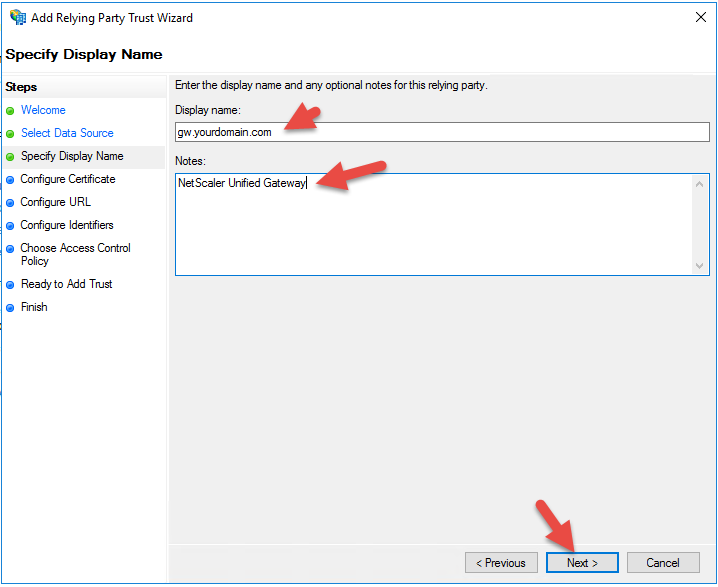
22. Enter data about the relying party manually
23. Give it your Unified Gateway URL and add some notes if you like
24. Don’t configure a cert, just hit Next

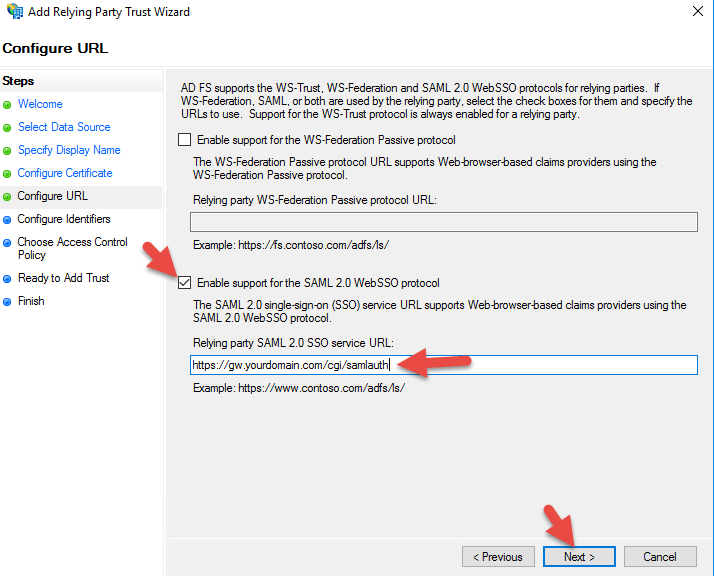
25. Check support for SAML 2.0 WebSSO protocol and give it the URL:
|
1 |
https://gw.yourdomain.com/cgi/samlauth |
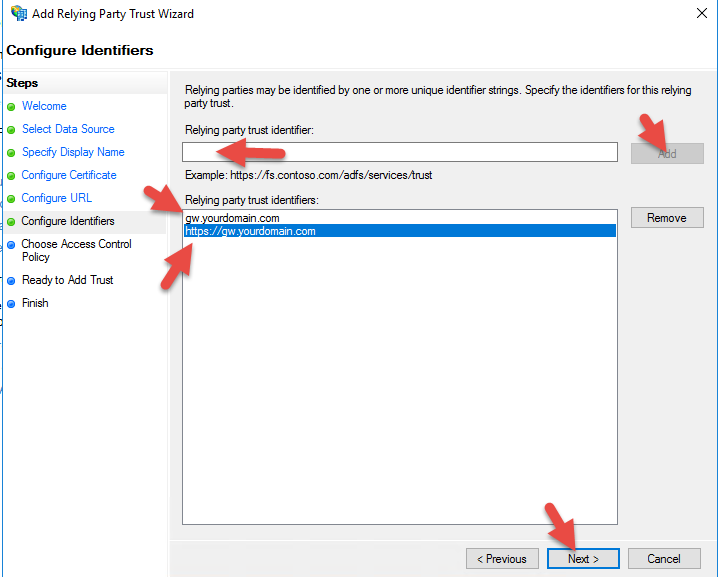
26. For the Relying party trust identifier, it’s a good idea to add both gw.yourdomain.com and https://gw.yourdomain.com so it will succeed on either identifier.
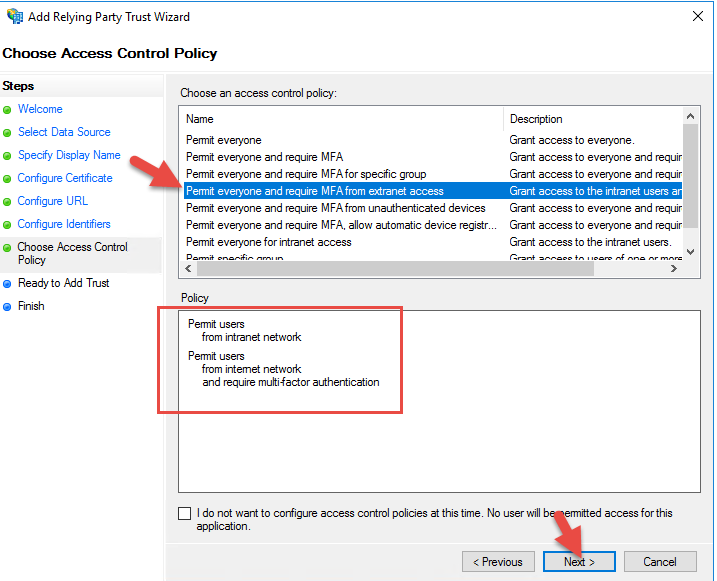
28. For the Access Control Policy, you can initially leave it as “Permit everyone” for testing purposes until you have MFA ready to go. To role it into production where internal users get no MFA and external users get the MFA phone call, you will need to select the “Permit everyone and require MFA for extranet access” option.
29. Next
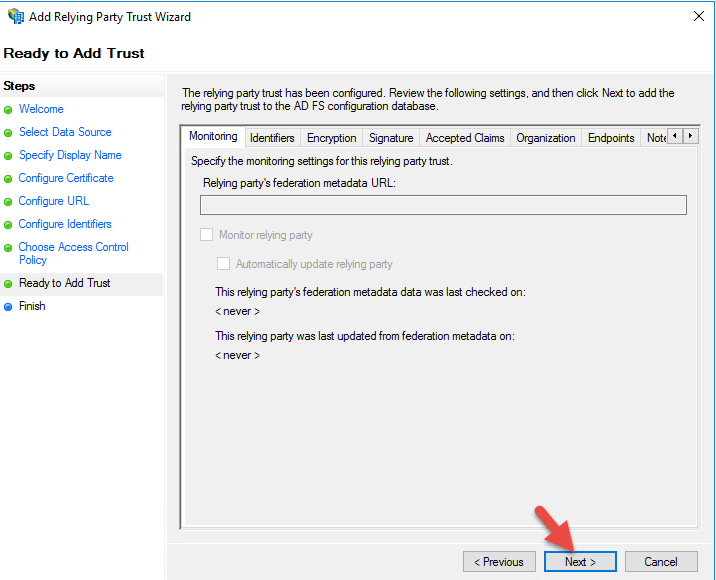
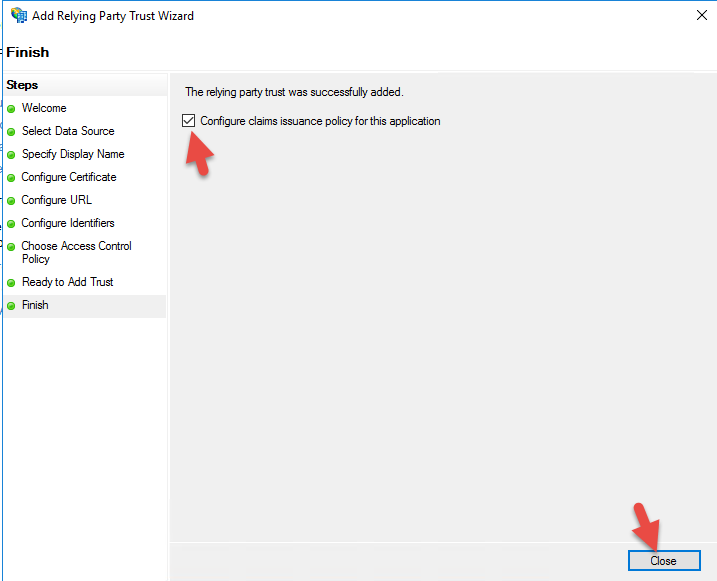
30. Check “Configure claims issuance policy for this application”
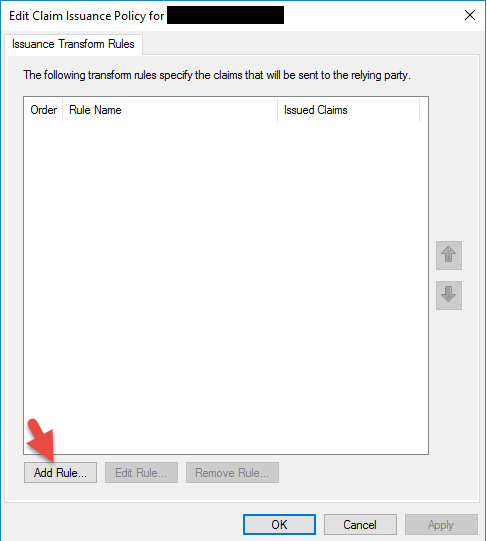
31. Add Rule
32. Select “Send LDAP Attribute as Claims”
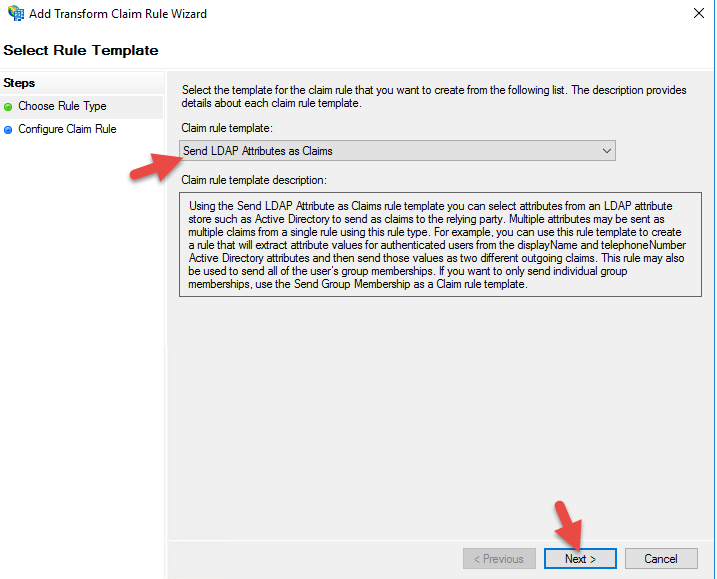
33. I am setting it to send UserPrincipalName as Name ID but you can also set AD FS to pass SAMAccountName as NameID instead of UPN if your environment needs it. Just remember that you must go into your session policy on your NetScaler Unified Gateway and add your domain in the “Single Sign-on Domain” field. If using UPN you can leave that field blank. There are some implications adding an SSO field later with CitrixAGBasic and FAS so I prefer to stick with UPN for the easiest trouble free deployment.

34. Click Add Rule again
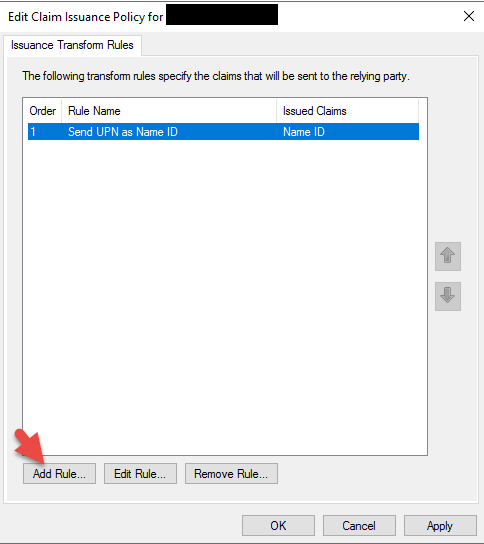
35. Select “Send Claims Using a Custom Rule”

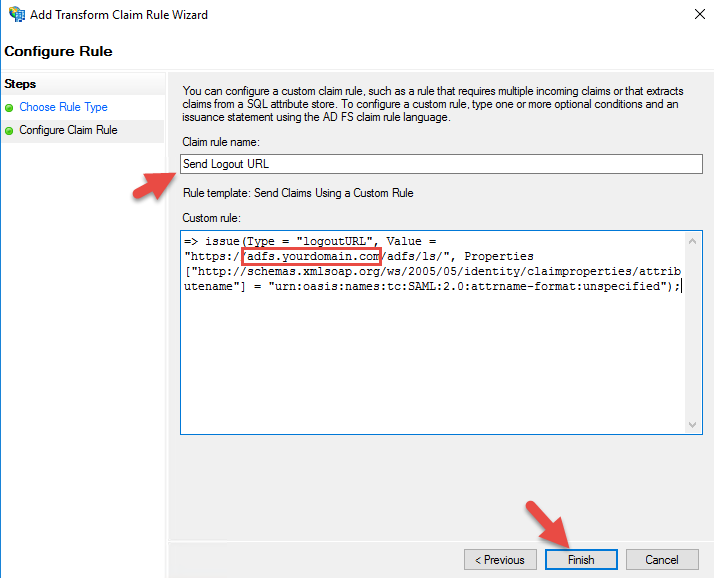
36. For the claim rule name it Send Logout URL or whatever makese sense to you. The custom rule is the same you may have used before on AD FS 3.0, should be:
|
1 |
=> issue(Type = "logoutURL", Value = "https://adfs.yourdomain.com/adfs/ls/", Properties["http://schemas.xmlsoap.org/ws/2005/05/identity/claimproperties/attributename"] = "urn:oasis:names:tc:SAML:2.0:attrname-format:unspecified"); |
37. OK

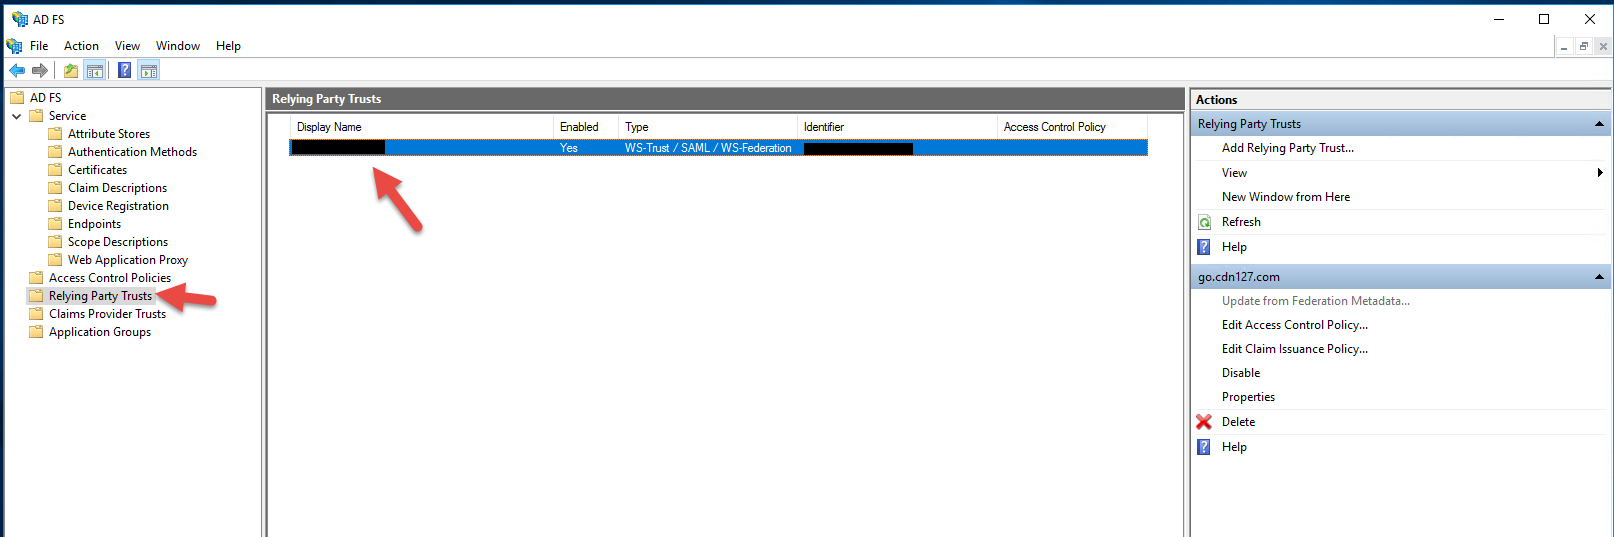
38. It will now show up under the Relying Party Trusts. Double click it.
39. Go to the Signature tab and add your cert. We could have done this when you were building out the Relying Party as well but it’s kind of buried in that wizard.
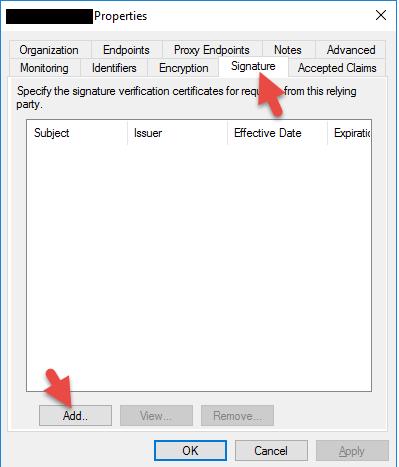
40. Hit Apply

41. Go to the Endpoints tab and click Add SAML
42. Enter the AD FS signout URL. It should be:
|
1 |
https://adfs.yourdomain.com/adfs/ls/?wa=wsignout1.0 |
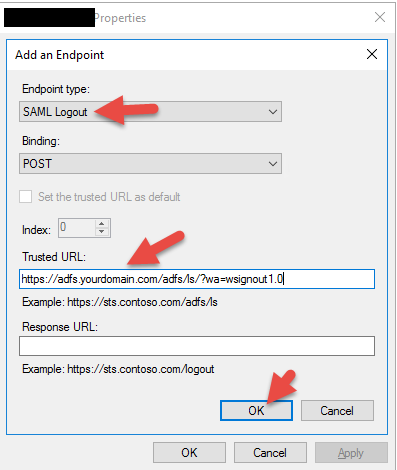
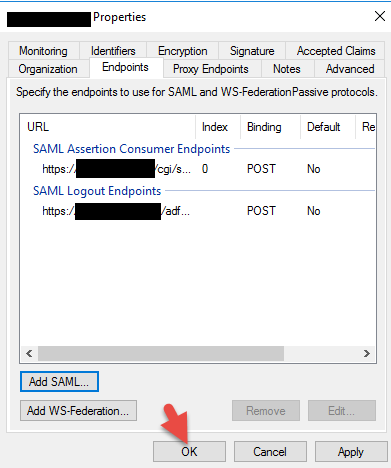
43. Now you’ll have both the SAML Assertion Consumer Endpoint and SAML Logout Endpoint specified. Hit OK.
44. Go to Certificates. You may or may not want to change your self signed Token-decrypting and Token-signing certs. If you try to change them you’ll notice you’ll get an error saying:
“Certificates cannot be modified while the AD FS automatic certificate rollover feature is enabled. Disable the automatic certificate rollover feature using Windows PowerShell command 'Set-ADFSProperties -AutoCertificateRollover $false' and then try again”.
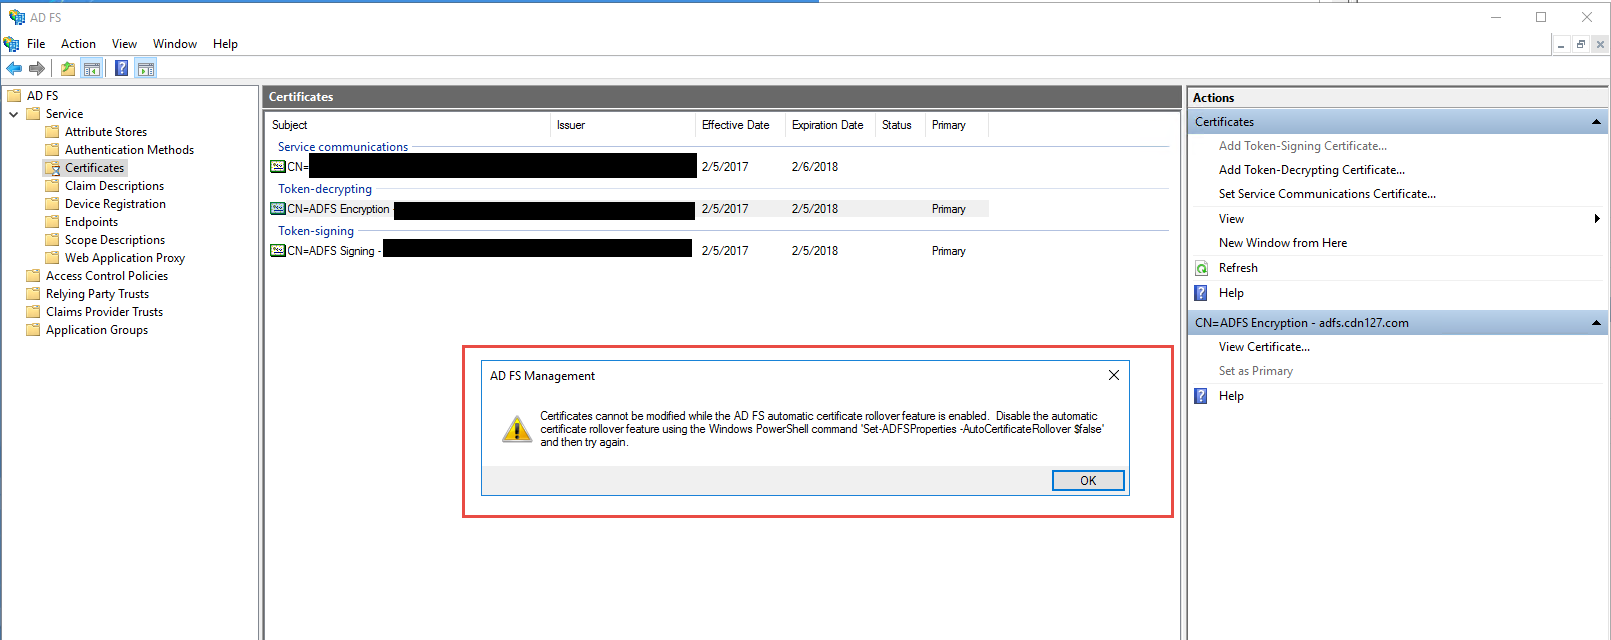
45. Open PowerShell as an Administrator
46. Type in the command and press enter:
|
1 |
Set-ADFSProperties -AutoCertificateRollover $false |

47. Now you’ll be able to actually add new certs. Start with the signing cert:
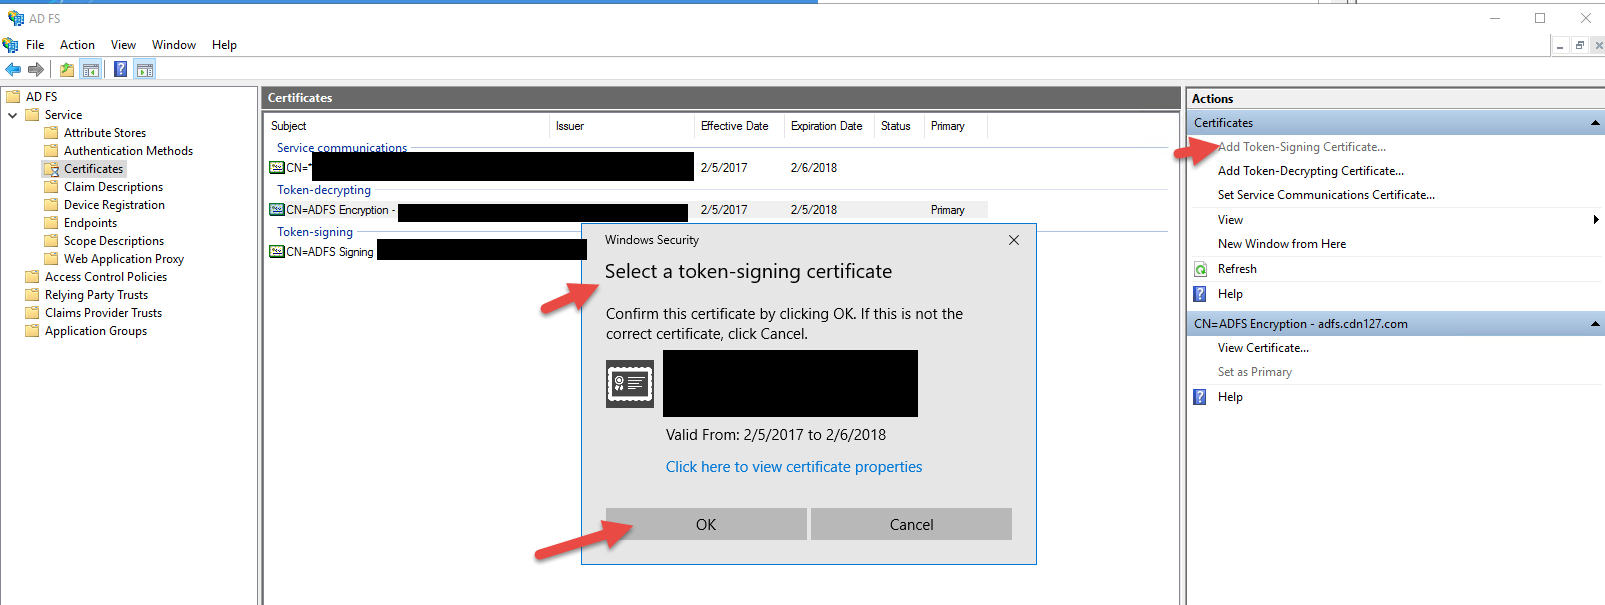
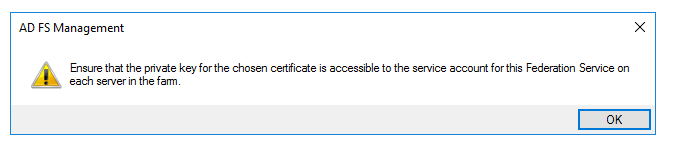
48. You’ll get a warning about having the private key on each server in the AD FS farm. Make sure you do.
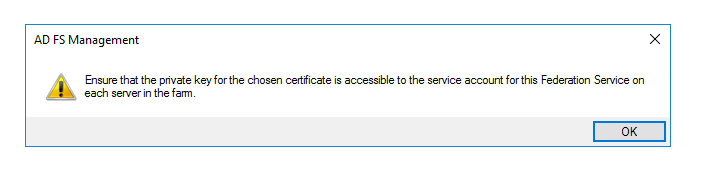
49. Now add your decrypting cert
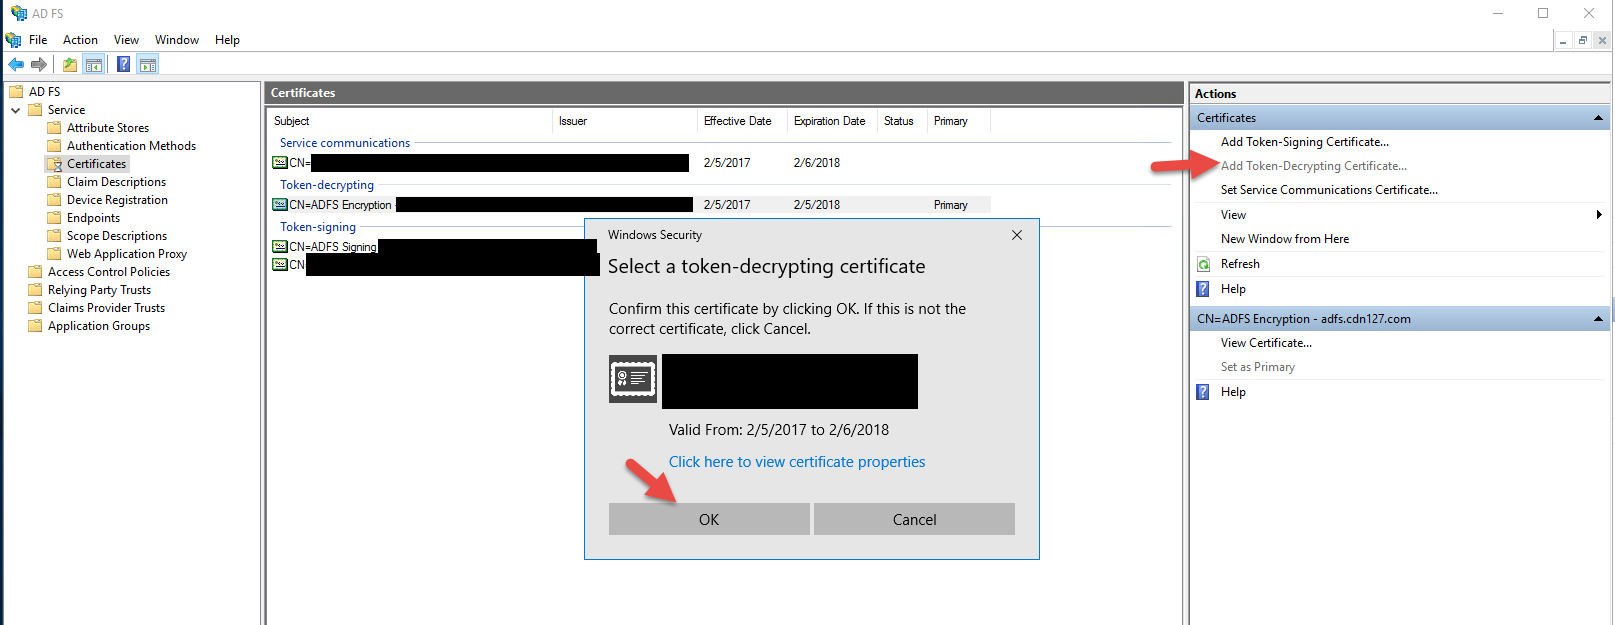
50. Same message about the key
51. Set your new signing cert as primary
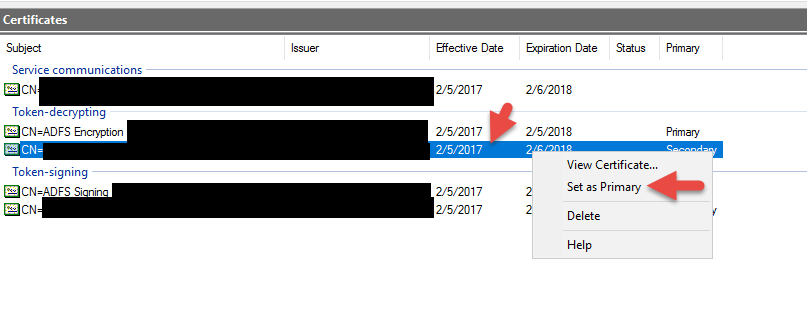
52. Set your new decrypting cert as primary
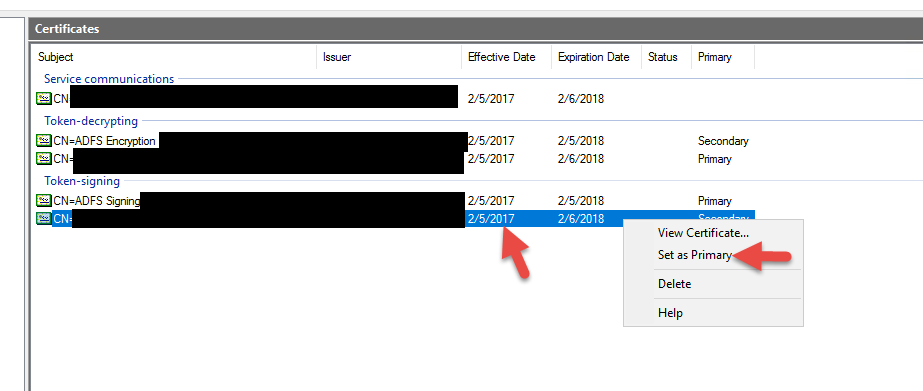
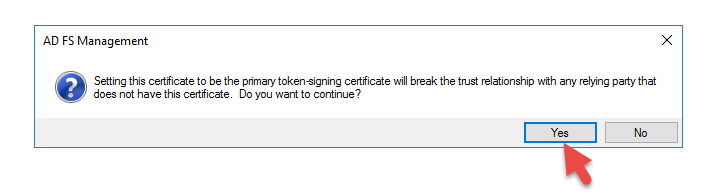
53. Yes
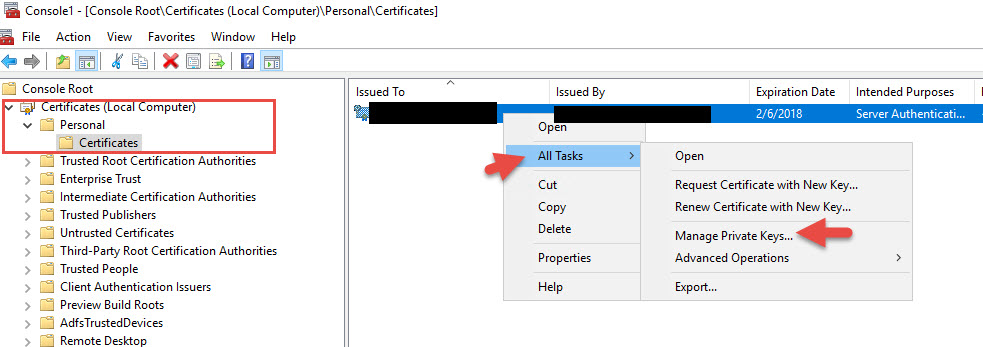
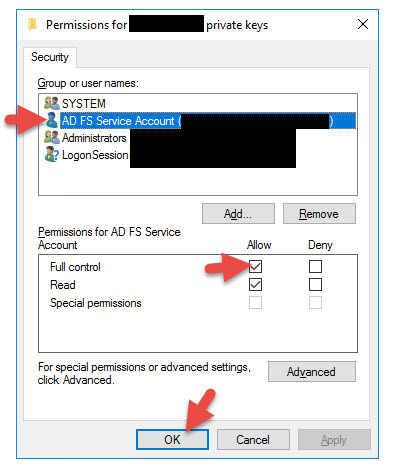
I also want to point out that your AD FS service account should have Full Control rights to the cert or you might see something like this Event ID 102 error message in the AD FS Admin event log when you reboot your server or restart the AD FS service.
|
1 2 3 4 5 6 7 8 9 10 11 12 13 |
There was an error in enabling endpoints of Federation Service. Fix configuration errors using PowerShell cmdlets and restart the Federation Service. Additional Data Exception details: System.ArgumentNullException: Value cannot be null. Parameter name: certificate at System.IdentityModel.Tokens.X509SecurityToken..ctor(X509Certificate2 certificate, String id, Boolean clone, Boolean disposable) at Microsoft.IdentityServer.Service.Configuration.MSISSecurityTokenServiceConfiguration.Create(Boolean forSaml, Boolean forPassive) at Microsoft.IdentityServer.Service.Policy.PolicyServer.Service.ProxyPolicyServiceHost.ConfigureWIF() at Microsoft.IdentityServer.Service.SecurityTokenService.MSISConfigurableServiceHost.Configure() at Microsoft.IdentityServer.Service.Policy.PolicyServer.Service.ProxyPolicyServiceHost.Create() at Microsoft.IdentityServer.ServiceHost.STSService.StartProxyPolicyStoreService(ServiceHostManager serviceHostManager) at Microsoft.IdentityServer.ServiceHost.STSService.OnStartInternal(Boolean requestAdditionalTime) |
To fix this open MMC > Add Certificates snap-in (Local Computer) > right click SSL cert > All Tasks > Manage Private Keys > give Full Control to your AD FS service account the AD FS Windows Service is running under. After this restart the AD FS service and the errors will go away.
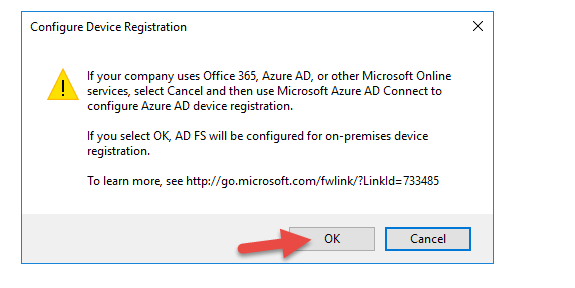
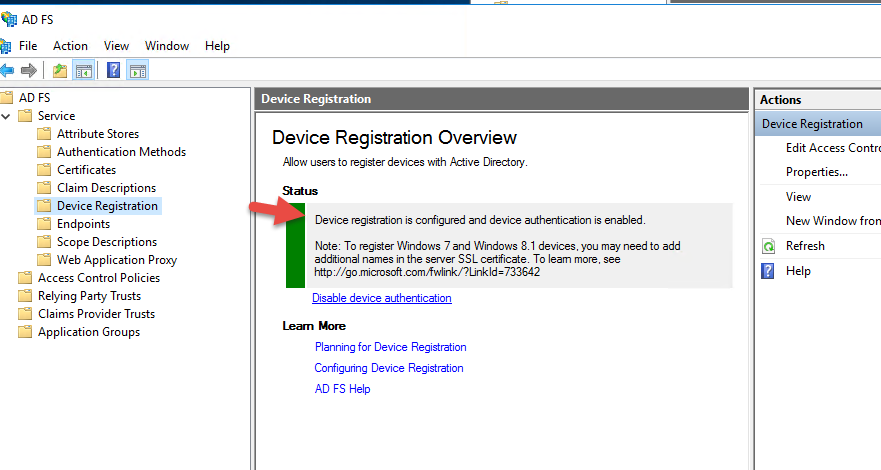
54. You’ll notice that Device Registration may or may not be configured depending on your domain’s functional level. You don’t really need DRS for what we’re doing but I like to make sure AD FS is configured fully in case I want to use it later.

55. OK
56. Enter Enterprise Administrator credentials
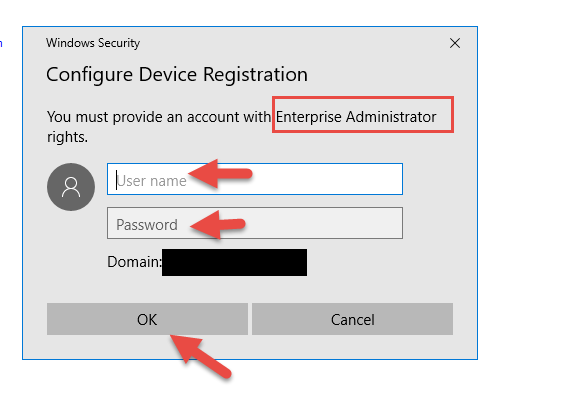
57. I am unable to add it because the Active Directory schema needs to be upgraded to Windows Server 2016. Right now all my DCs are Windows Server 2012 so I can’t raise the functional level until I add a Server 2016 Domain Controller. I am going to go ahead and do that real quick and not bore you with screenshots of my Server 2016 VM being promoted to a DC, DNS, Global Catalog, using the DSRM password, migrating FSMO roles, etc. Don’t worry, if your organization can’t raise the functional level as quickly as I can you can still use AD FS 4.0 on Server 2016 but in 2012 mode so you only get the features of AD FS 3.0. This is still fine for what we’re doing. You can read more about using AD FS 4.0 in a mixed AD FS farm without raising your domain functional level here: https://technet.microsoft.com/en-us/windows-server-docs/identity/ad-fs/deployment/upgrading-to-ad-fs-in-windows-server-2016

58. Once you’re on on a 2016 schema it will say it is configured successfully.
59. At this point you can go to:
https://adfs.yourdomain.com/adfs/ls/IdpInitiatedSignOn.aspx
and see the AD FS login page like you can with AD FS 3.0 and you will get an error message by default. Something like:
Activity ID: 00000000-0000-0000-0f00-0080010000ef
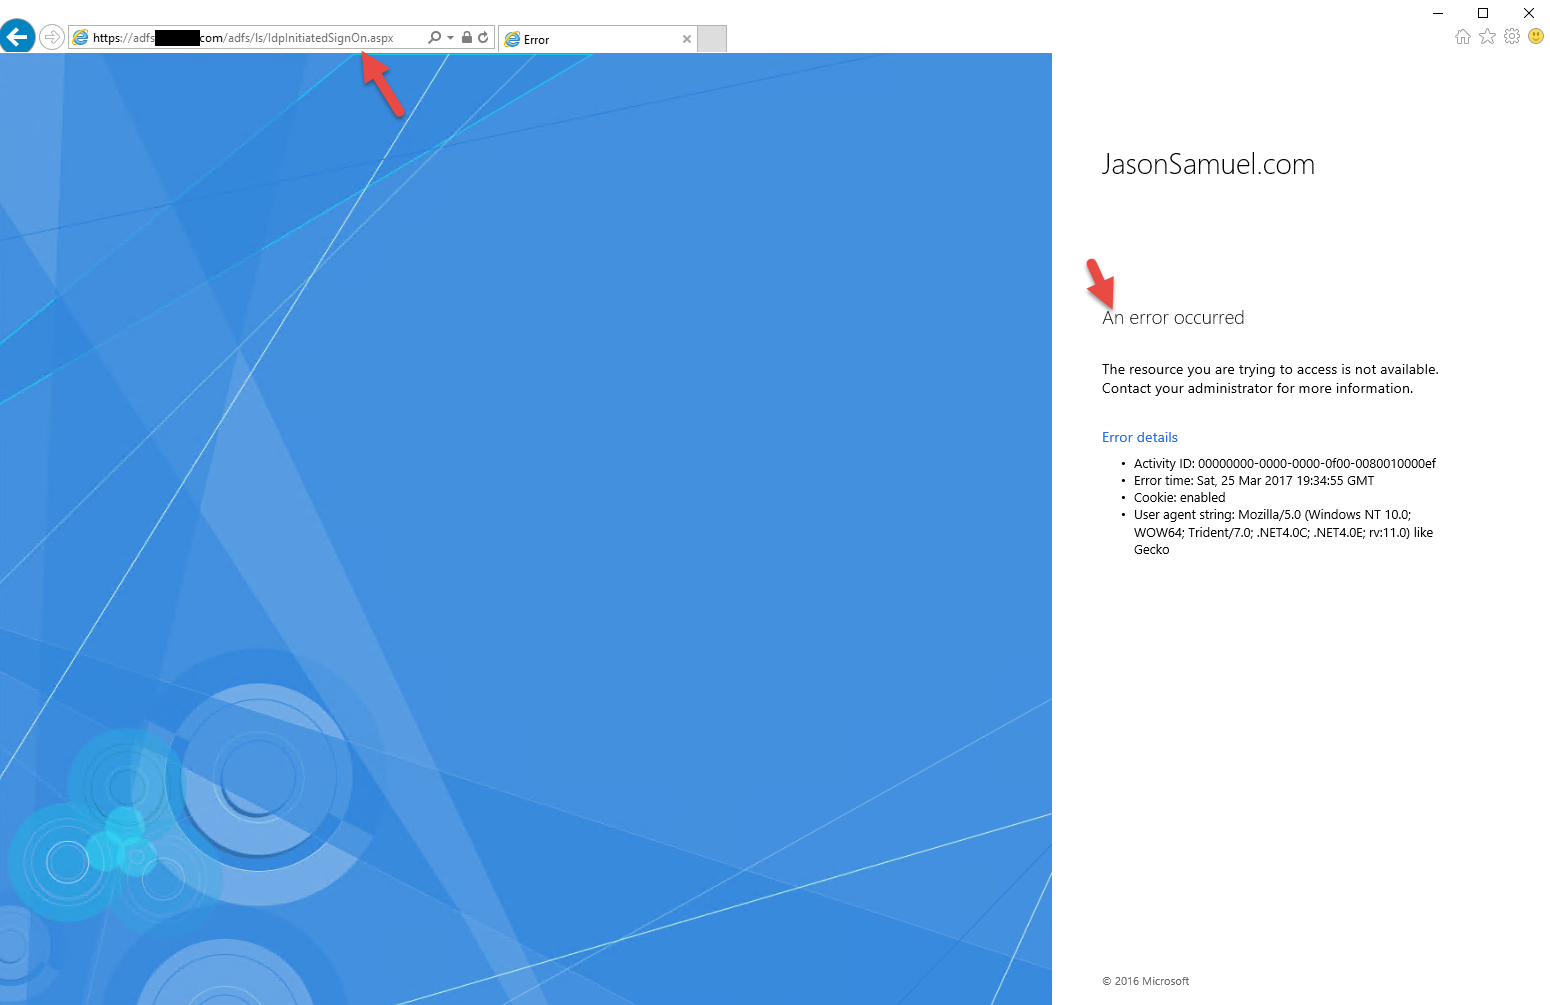
and if you go to Event Viewer under the Applications and Services Logs > AD FS > Admin you will see Event ID 364:
Encountered error during federation passive request.

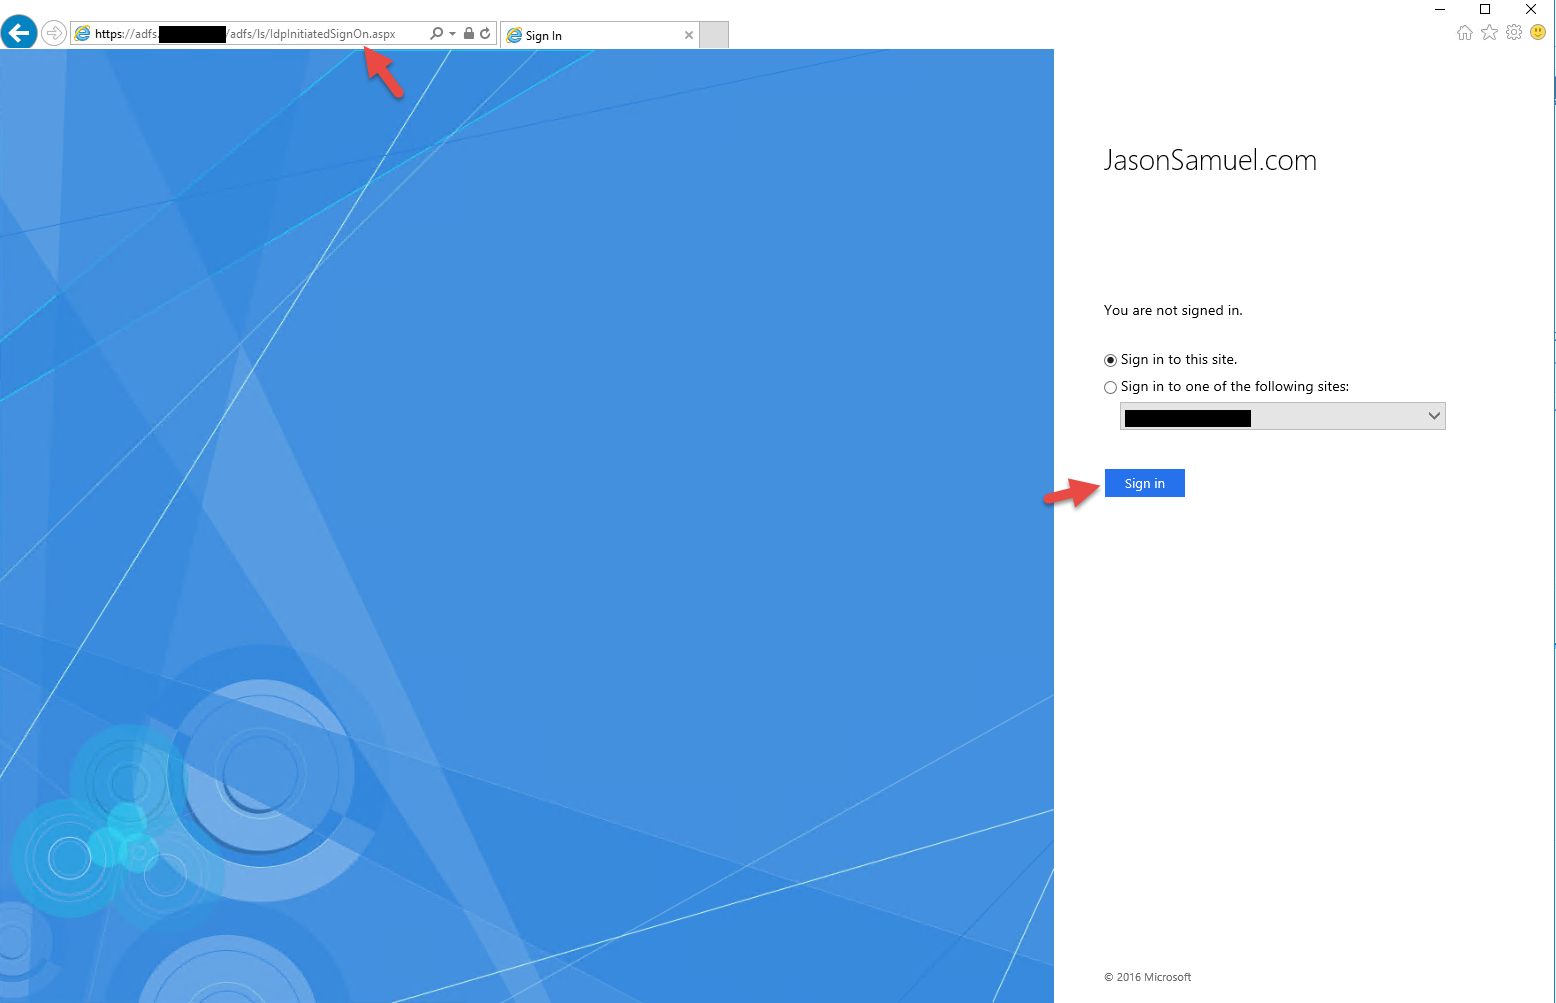
60. The reason is AD FS 4.0 and Server 2016 have this URL disabled by default. You need to open PowerShell as an admin and run:
|
1 |
Set-AdfsProperties -EnableIdPInitiatedSignonPage $true |

61. Now if you refresh the page the AD FS 4.0 sign on page will display normally:
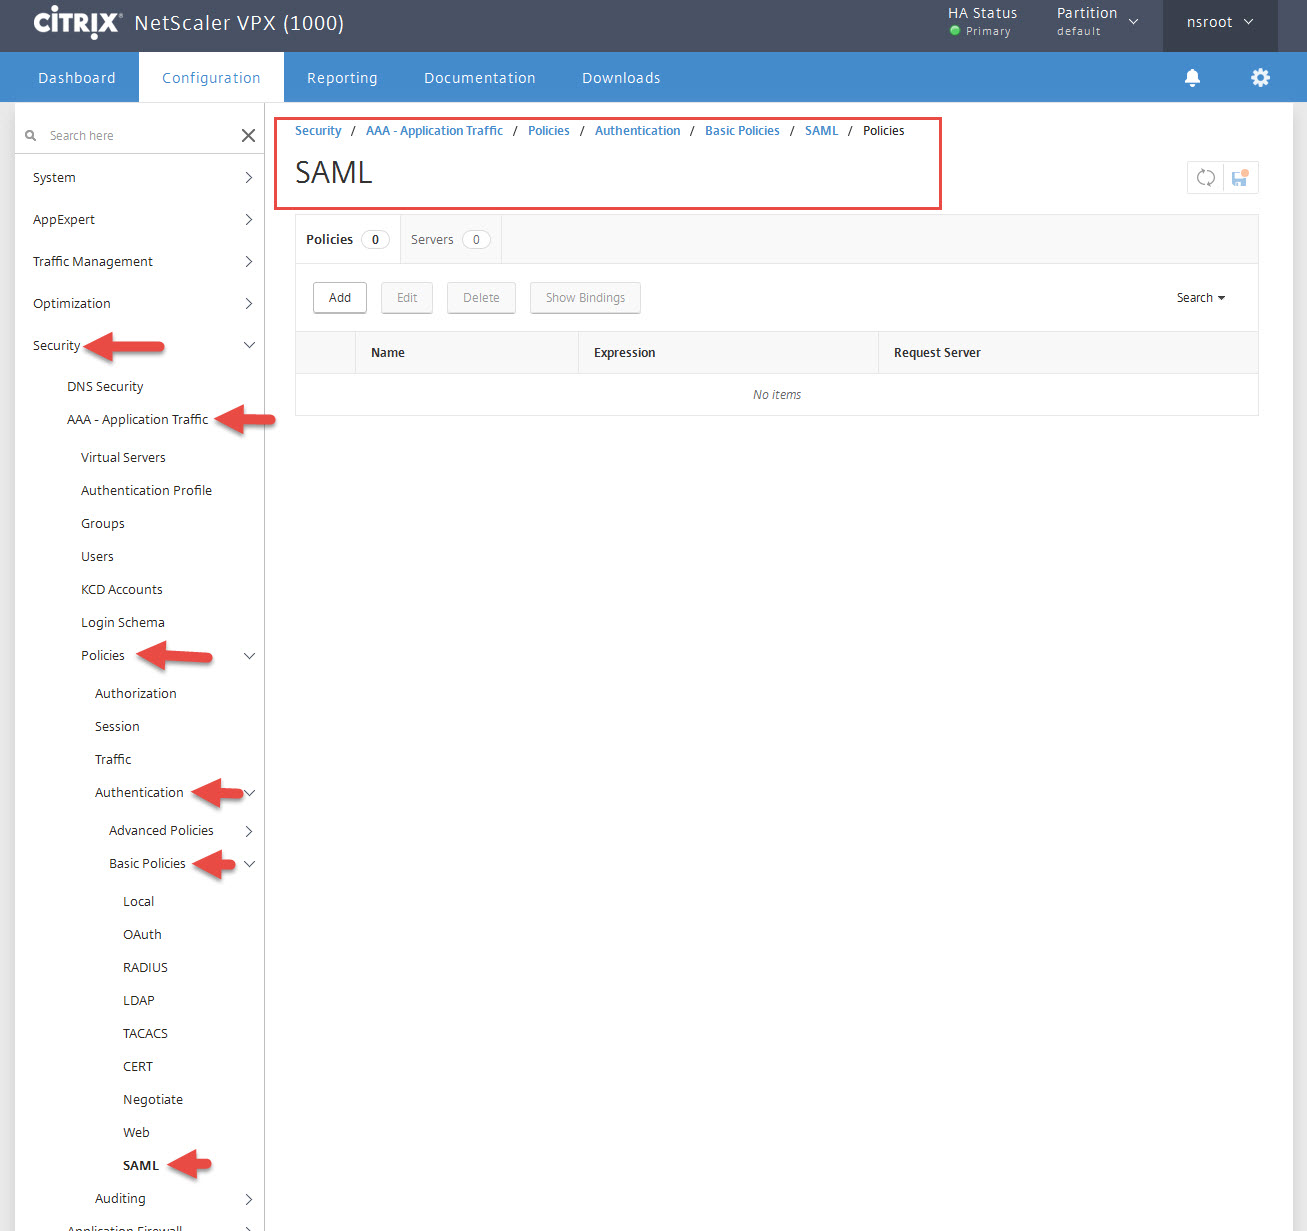
Configuring NetScaler SAML authentication policy
Now you’re ready to create a SAML Authentication Policy on your NetScaler.
1. Go to Security > AAA – Application Traffic > Policies > Authentication > Basic Policies > SAML
2. Click Servers tab and hit Add
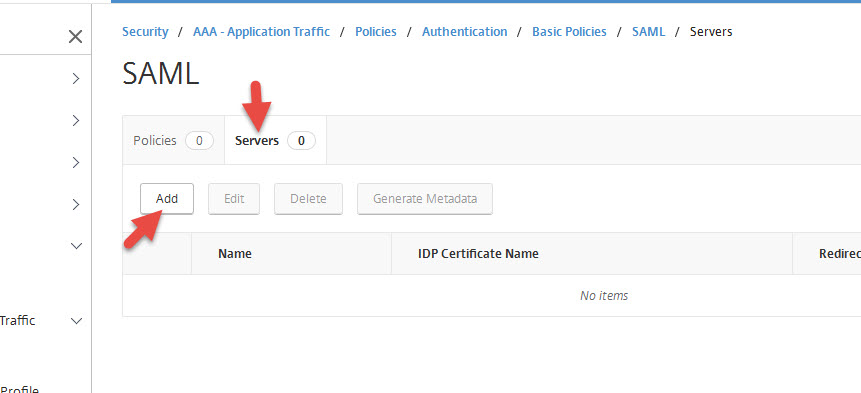
3. Give it a name and choose your IDP certificate for adfs.yourdomain.com and the Signing Certificate (must match what you have in AD FS, next step will show you how to export this). For the other fields, you should enter:
Redirect URL:
https://adfs.yourdomain.com/adfs/ls
Single Logout URL:
https://adfs.yourdomain.com/adfs/ls
User Field:
Name ID
Issuer Name:
gw.yourdomain.com
DO NOT hit Create yet. Go to the next step to export your Signing Certificate OR go to step 10 below to configure the additional options on this page under More.

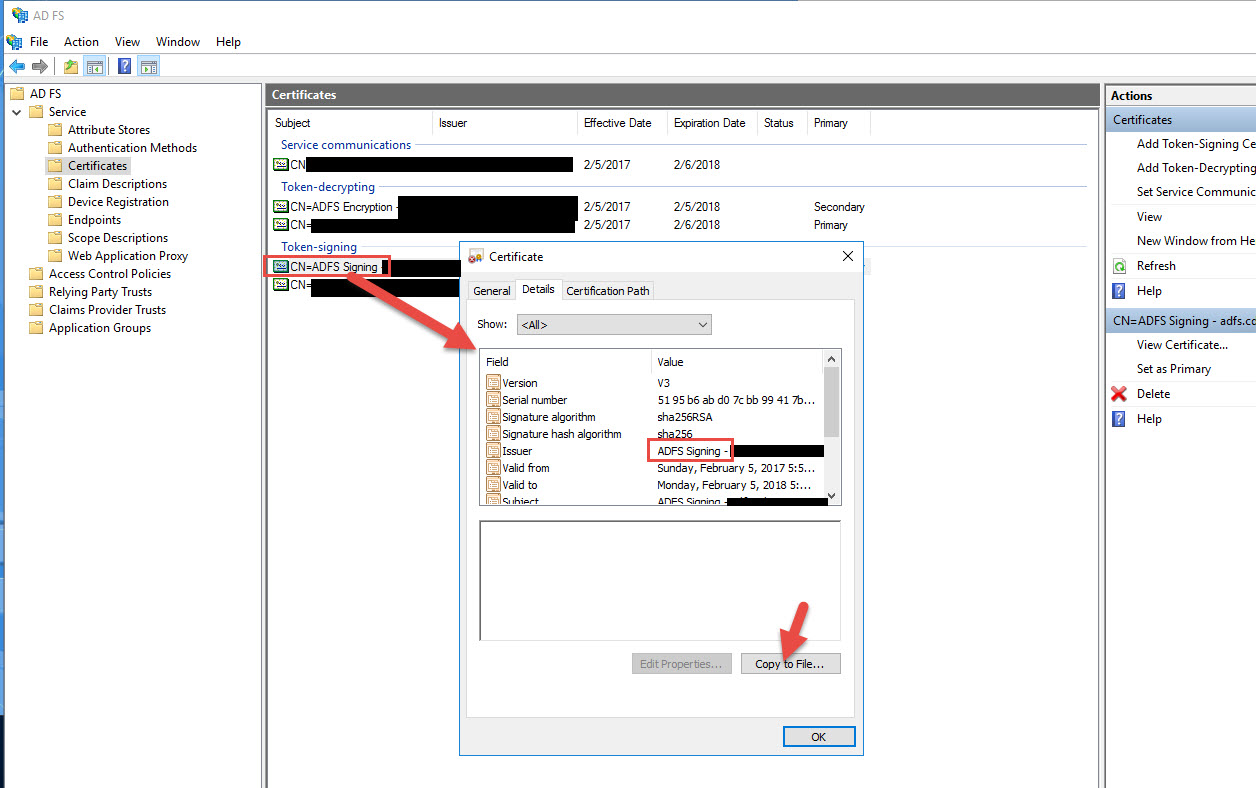
4. You can export your AD FS Signing Cert (the one you have set to Primary). In my example I am exporting the self signed since I just set that to Primary and will be using that instead of the public one I uploaded. It’s your choice.
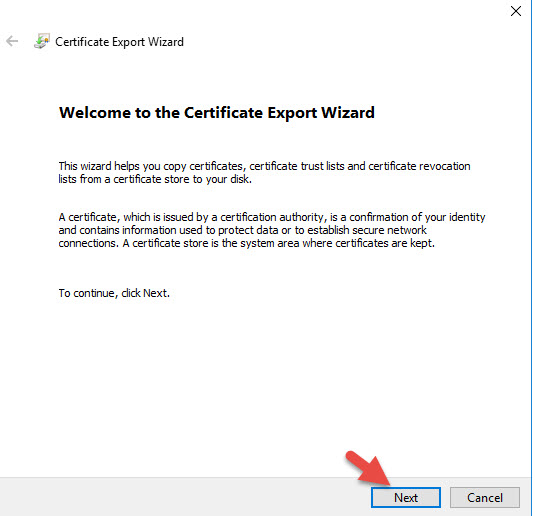
5. Next
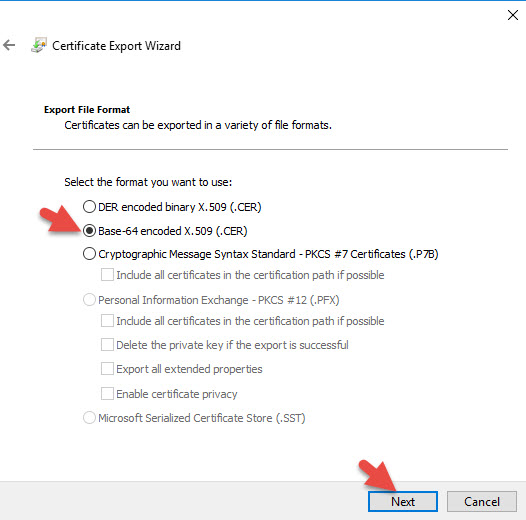
6. Base-64 encoded X.509 (.CER) format
7. Give it a name
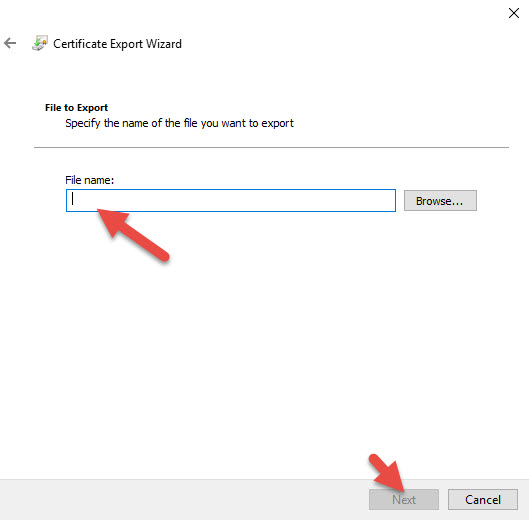
8. Finish
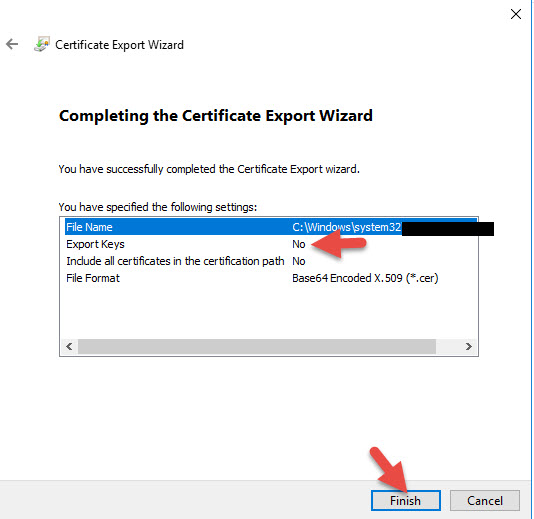
9. Install the .cert file like any other cert but under the Install CA Certificate section of your NetScaler and not under Server Certificates.

10. Continuing the SAML Server config dialog, click More.
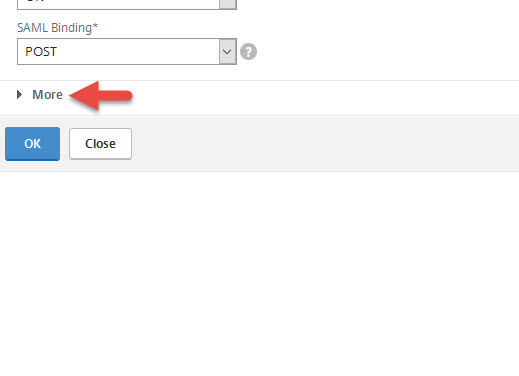
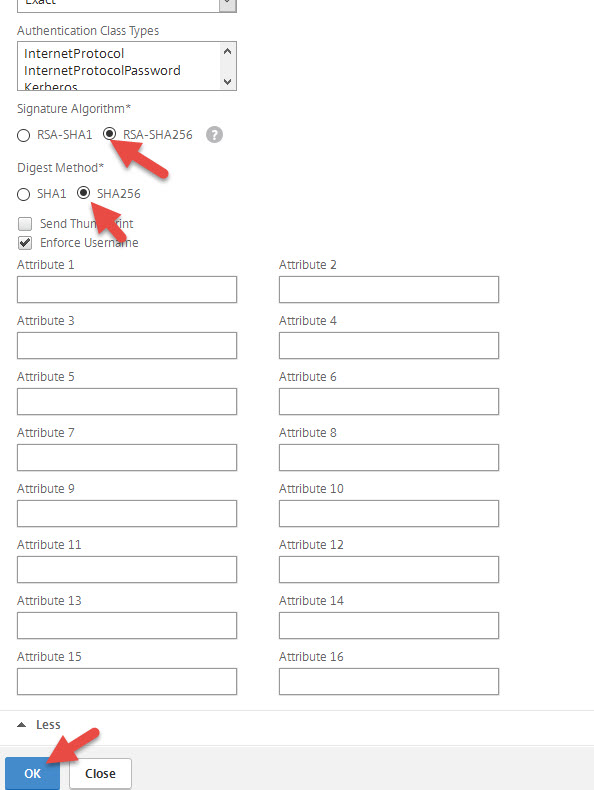
11. Set the Signature Algorithm to RSA-SHA256 and Digest Method to SHA256. Then press OK.
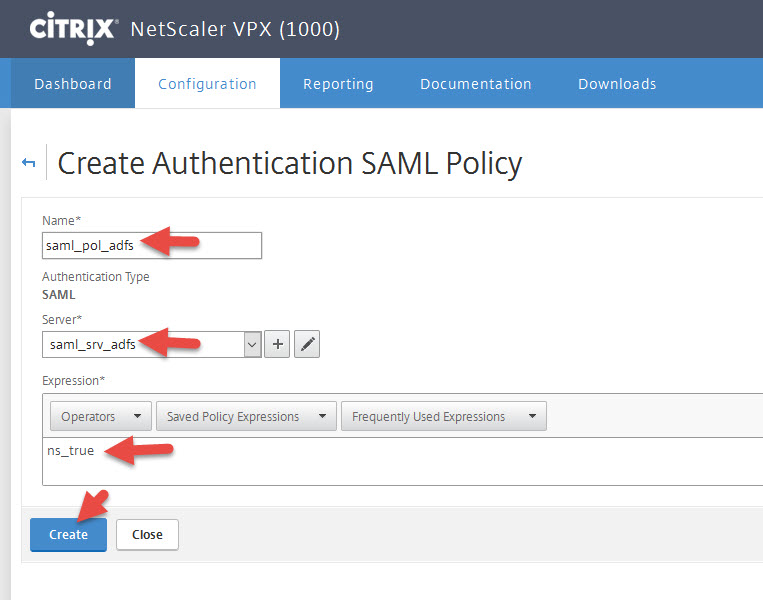
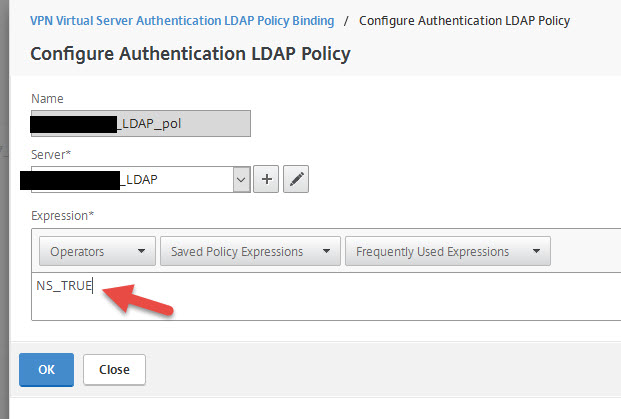
12. Go to the Policies tab and hit Add
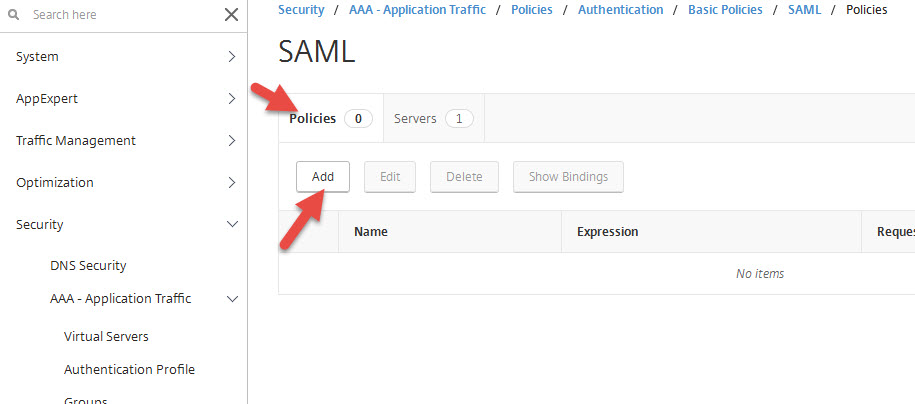
13. Give it a name and choose the Server you just created. Set the expression to:
ns_true
and hit Create.
14. Go to your Unified Gateway vserver and open it
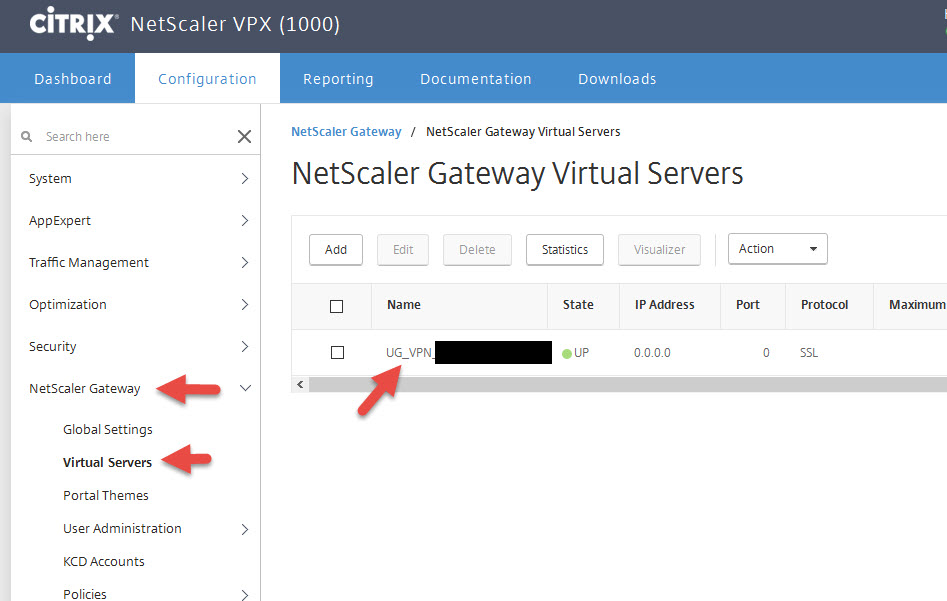
15. Click the plus button for Basic Authentication

16. Set Policy to SAML and hit Continue
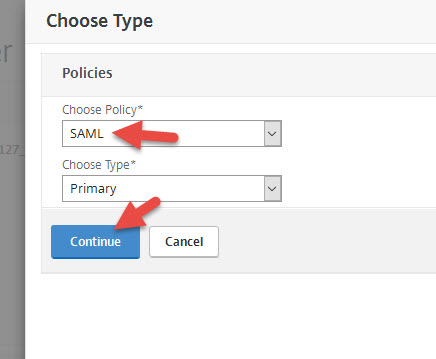
17. Select the SAML policy you just created and hit Bind

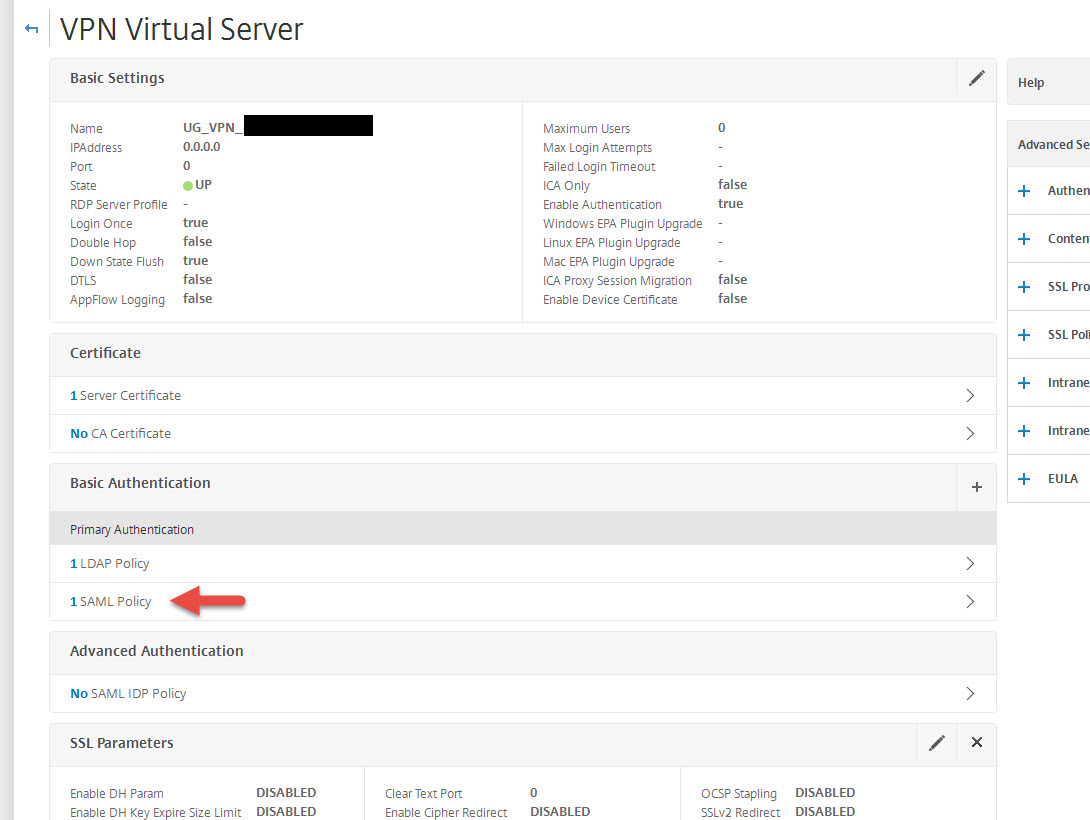
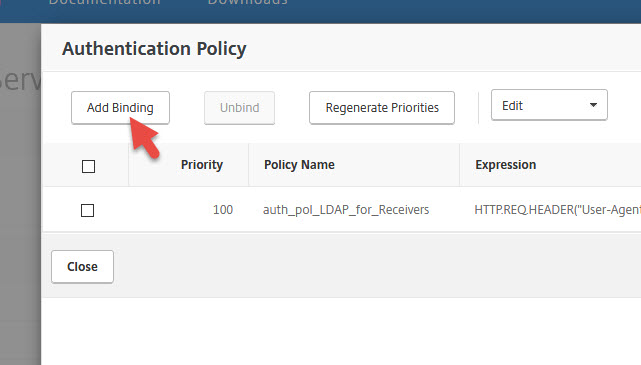
18. Your SAML policy will now be under Basic Authentication under Primary Authentication. We still need to have an LDAP policy for native Receivers since they don’t support SAML authentication right now with a higher priority also under Primary Authentication.
Normally your LDAP policy would look something like this with an “ns_true” expression:
we need to change the expression to:
REQ.HTTP.HEADER User-Agent CONTAINS CitrixReceiver
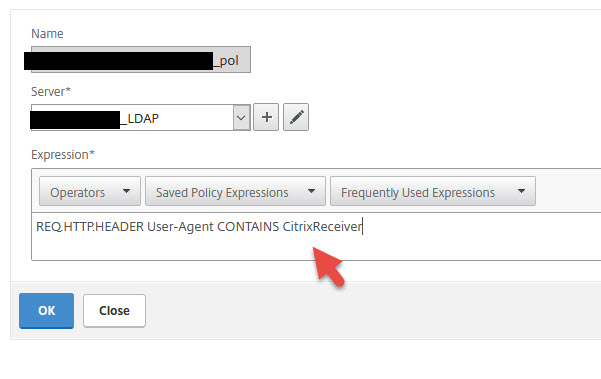
similar to how we do session policy filtering. This way Receiver will get the LDAP auth policy and web browsers will be skipped and use the SAML policy when cascading authentication takes place.
19. Go ahead and test internally now with DNS for adfs.youdomain.com pointed directly at your AD FS server. You can also add more AD FS servers to your farm and choose to load balance AD FS on your NetScaler at this point (recommended before rolling into production). When you type in your Unified Gateway URL it will automatically redirect you to AD FS and perform single sign on using IWA (Integrated Windows Authentication) as long as your browser has added the website to Local Intranet or Trusted Sites which can you do via GPO for all your desktops and laptops.
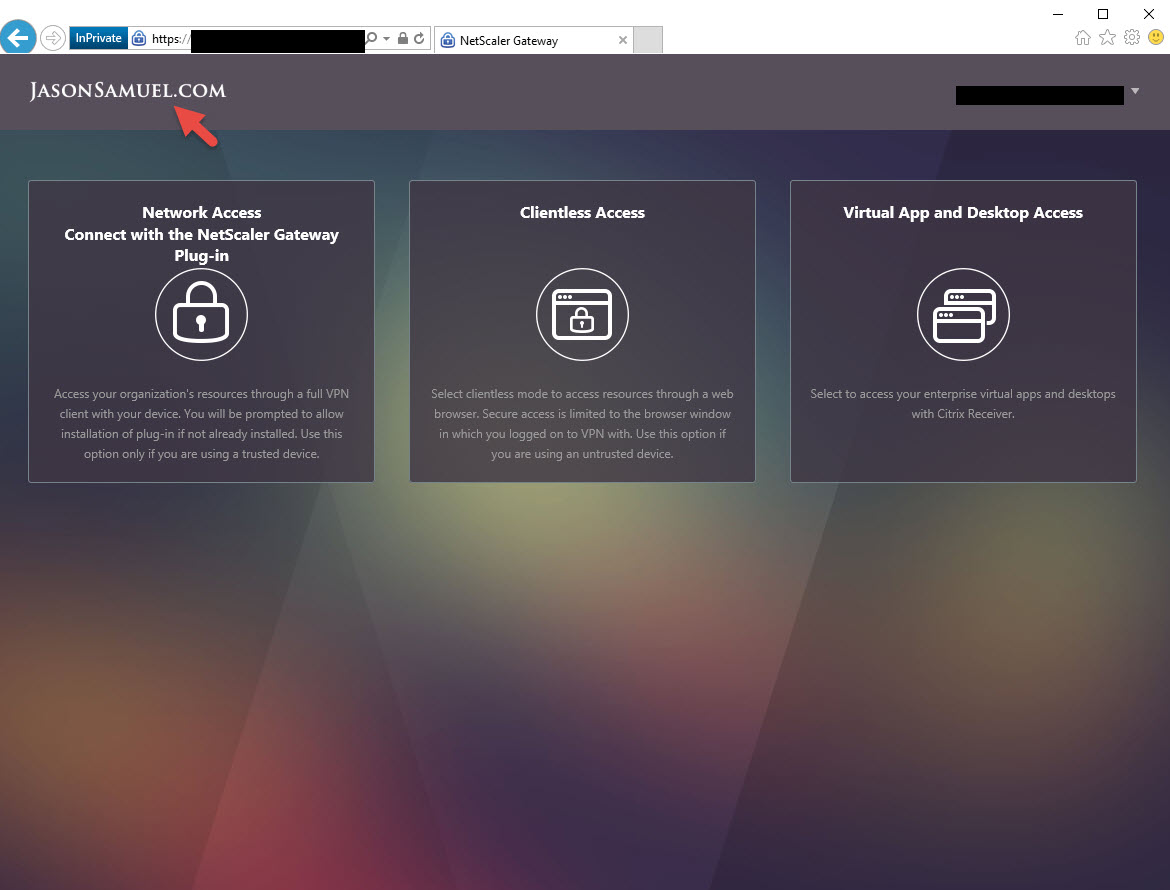
If you attempt to click on “Virtual App and Desktop Access” and launch an app and you get a “Cannot Complete Request” from StoreFront that is normal at this point. This is because FAS has not been setup. Errors you would see in the Citrix Delivery Services log before setting up FAS are:
Event ID 7

CitrixAGBasic single sign-on failed because the credentials failed verification with reason: FailedPasswordComplexity.

The credentials supplied were;

user: jdoe

domain: yourdomain
and
Event ID 10

A CitrixAGBasic Login request has failed.
which is fine because CitrixAGBasic auth doesn’t know what to do with SAML and StoreFront just yet until FAS is setup to help out. This leads us into the next step.
Using Citrix FAS (Federated Authentication Service) with NetScaler Unified Gateway
Citrix Federated Authentication Service (FAS) is an optional component that comes with the XenApp/XenDesktop .iso. You can install this lightweight service on a Windows server (I prefer dedicated servers for FAS for easy HA later) and it will begin talking to Active Directory Certificate Services. As the user logs into NetScaler Gateway/Unified Gateway or StoreFront, a certificate is dynamically created and issued as if they had a “virtual smart card”. This virtual smart card is then used to login to the XenApp or XenDesktop session instead of the user’s regular Windows user ID and password. The user won’t even know they’re using it. Basically what we’re going to do is login to the NetScaler Unified Gateway using SAML and then let FAS get us through StoreFront down to the VDA.
Andrew Innes (Product Architect for Authentication at Citrix) wrote a great blog introducing FAS last year and the authentication flow in plain English. It’s a really good read that I recommend you take a look at before deploying FAS. You can read up on all the benefits of using it here:
There are also some very good diagrams of the FAS authentication flow located here:
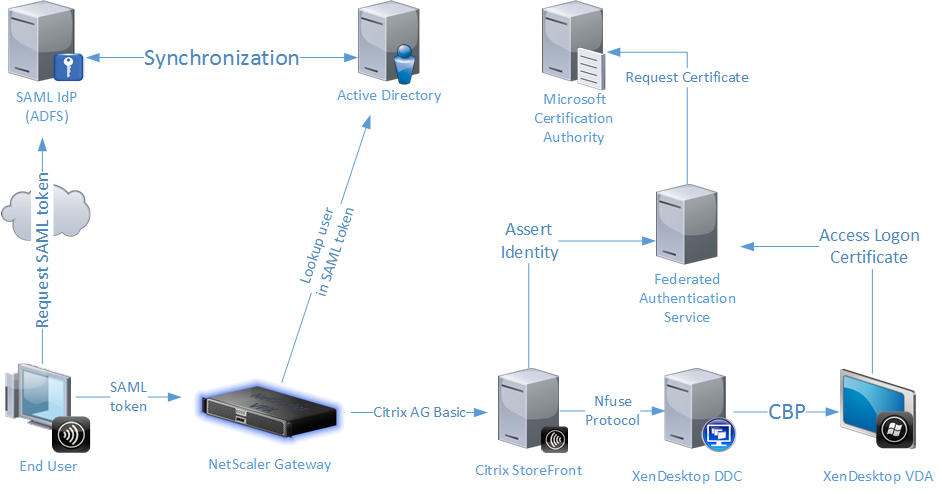
and here:

Installing Citrix FAS (Federated Authentication Service)
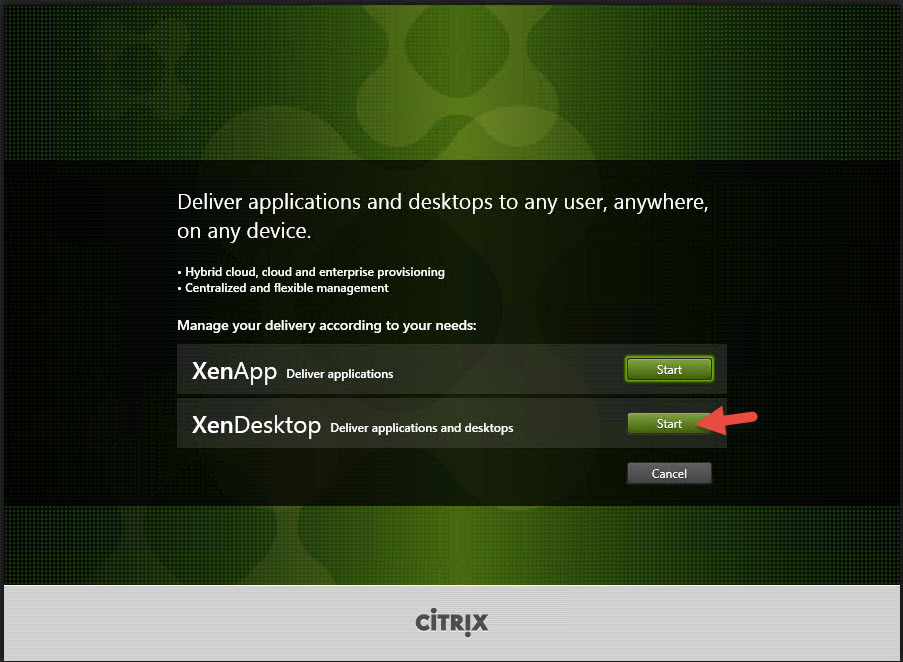
1. Launch the XA/XD media and click Start
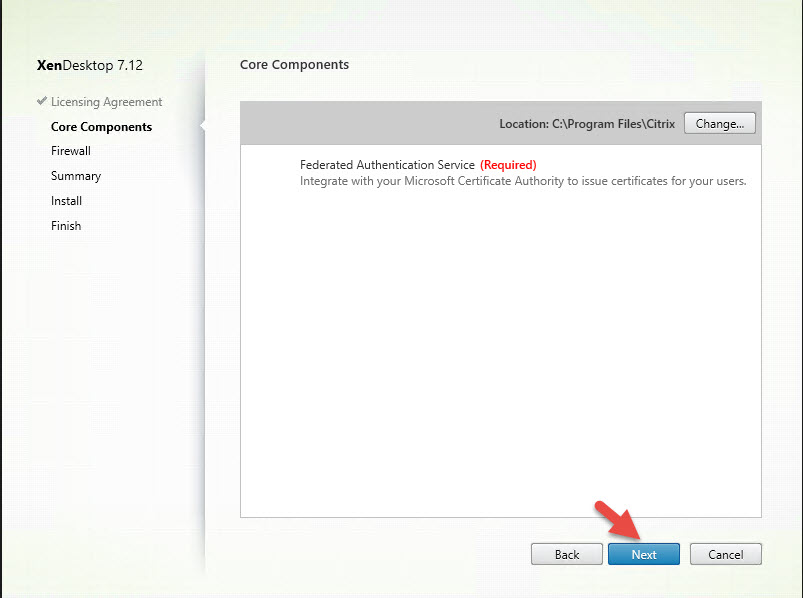
2. Note installing FAS from the XenApp/XenDesktop 7.13 is the same but the FAS option is moved to the bottom of the screen. In this example I had used 7.12 so it was still on the right side:

3. Next

4. Next
5. Next
6. Install
7. Finish

8. FAS will be installed now

9. Right click and Pint to Start

10. Click the FAS tile.

11. You should get the prompt to connect to FAS which means you are in good shape.

Modifying Citrix StoreFront configuration to accept FAS logins
Landon Fraley (Principal Sales Engineer at Citrix) hosts some PowerShell scripts on GitHub to help you set this next part up easily. Go download the EnableFASPlugin.ps1 script from here:
https://github.com/landonfraley/fas-utilities
and then go one of your StoreFront servers and run this PowerShell script in an Administrator powershell window:
Propagate changes so other StoreFront servers in your server group will get the changes.
Modifying Broker Site to accept FAS logins
You will also need to go to a Delivery Controller and run this to accept FAS logins:
|
1 2 |
asnp citrix.* Set-BrokerSite -TrustRequestsSentToTheXmlServicePort $true |
Alternatively run Landon’s TrustXML.ps1 script to save a bit of time.
Configuring Citrix FAS (Federated Authentication Service)
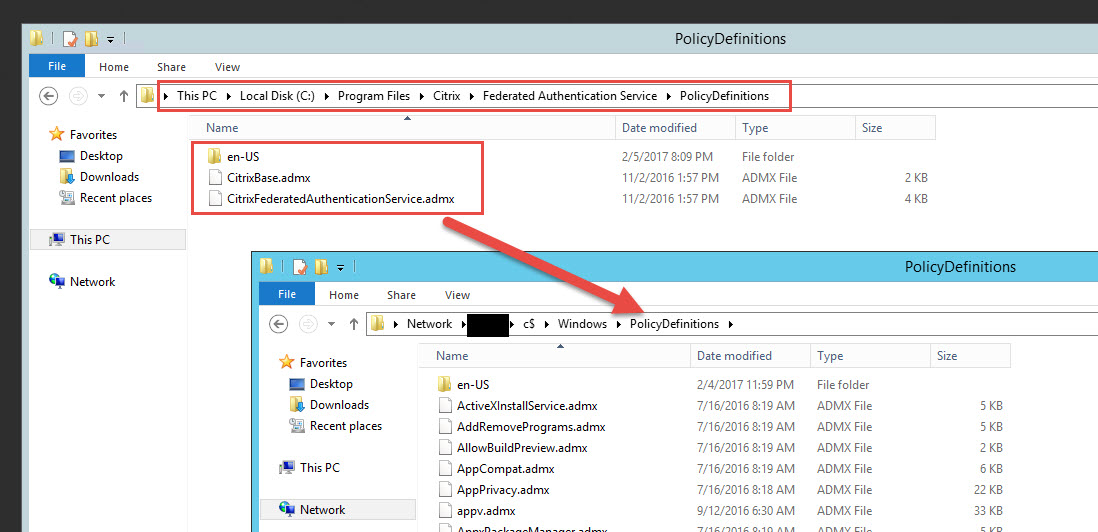
1. First we need to copy over the FAS group policies that allows StoreFront and the VDAs (both XenApp and XenDesktop) to actually use FAS. They are located under:
|
1 |
C:\Program Files\Citrix\Federated Authentication Service\PolicyDefinitions |
and you will want to copy them to your DC’s PolicyDefintions folder:
|
1 |
\\yourDC\c$\Windows\PolicyDefinitions |
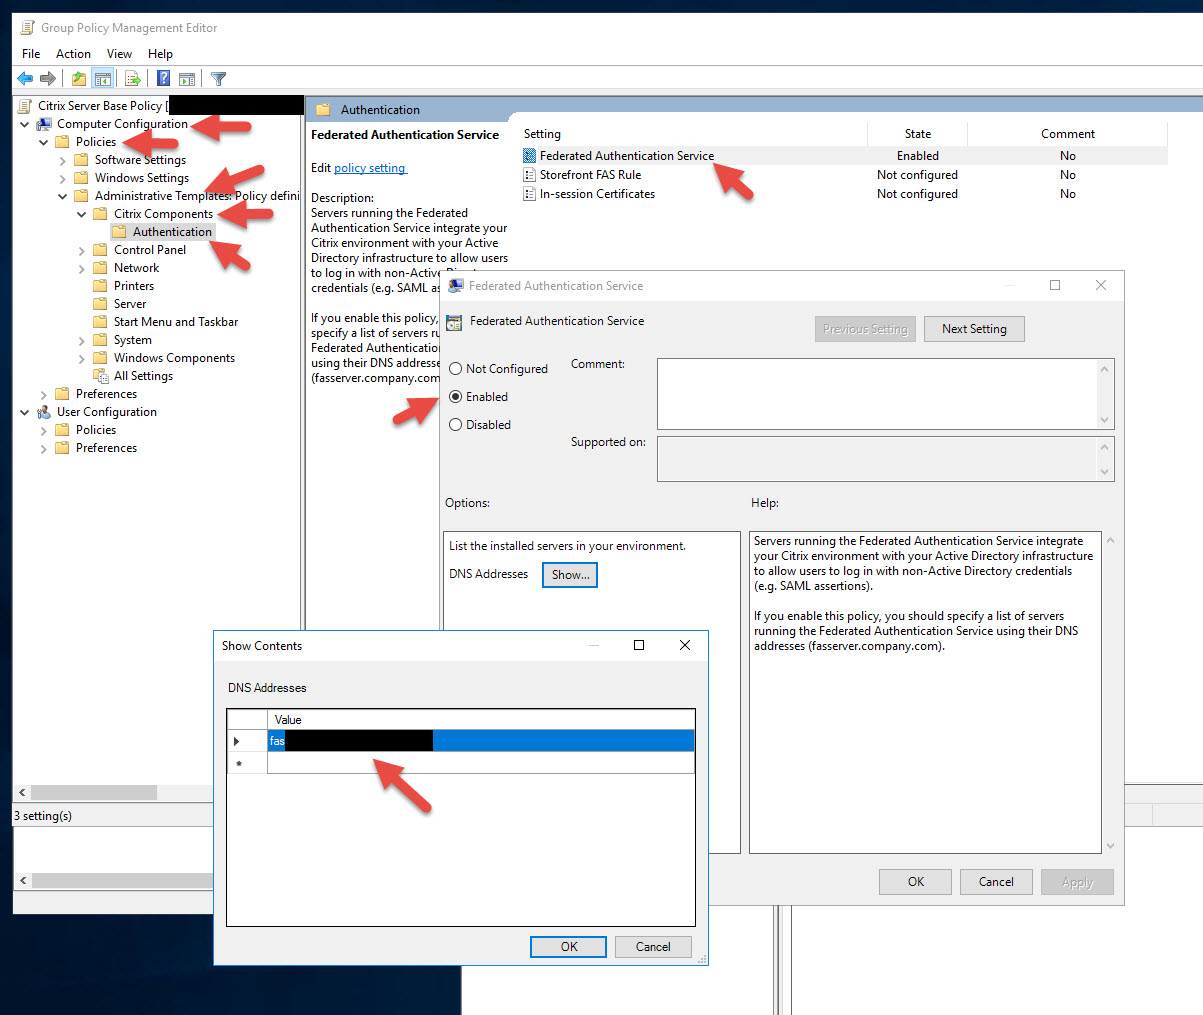
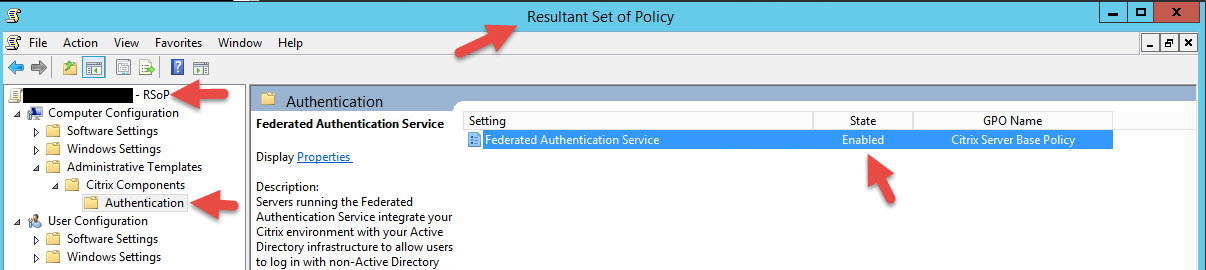
2. Now we need to set our Group Policy. You can edit your existing “Citrix Base Policy” if you have one like that in your organization or just create a new policy. This policy will need to be linked to OUs that contain all your StoreFront, XenApp, and XenDesktop VMs or FAS authentication won’t work. In the policy go to Computer Configuration > Policies > Administrative Templates > Citrix Components > Authentication > double click Federated Authentication Service. Enable it and put in the FQDN of your FAS server. If you are doing HA you need to put in all your FAS servers here.
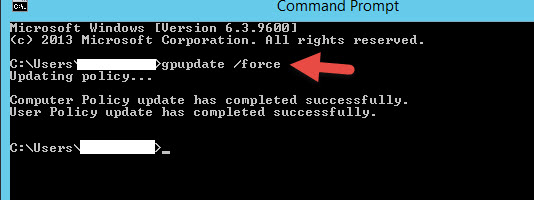
3. Do a gpupdate /force on the FAS server so it can get this policy. On some occasions I’ve had to reboot the FAS server and then did an RSOP to verify it was getting the policy.
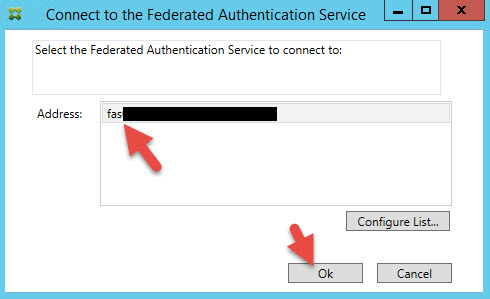
4. On your FAS Server, earlier we verified it was working by launching the FAS console. Close that if you still have it open and instead right click on the tile and Run as Administrator. If you don’t it will prompt for a password later so easier to just Run as Administrator now. You should see your FAS server in your list. Hit Ok to connect:
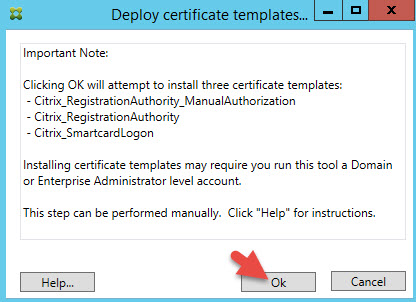
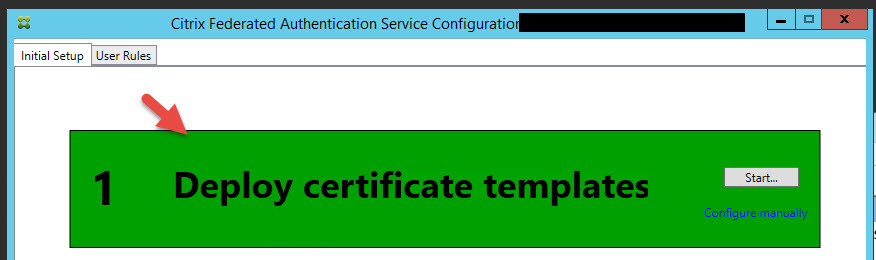
5. You’re gonna see 3 steps and all will be white. Our goal is to make them light up green which is a very quick process. Press Start in step 1 to Deploy certificate templates.

6. You must be logged in as a domain admin or enterprise administrator to be able to do this since it will be installing the following 3 certificate templates for your CA (Certificate Authority):
-Citrix_RegistrationAuthority_ManualAuthorization
-Citrix_RegistrationAuthority
-Citrix_SmartcardLogon
7. Now step 1 will be lit up green like this:
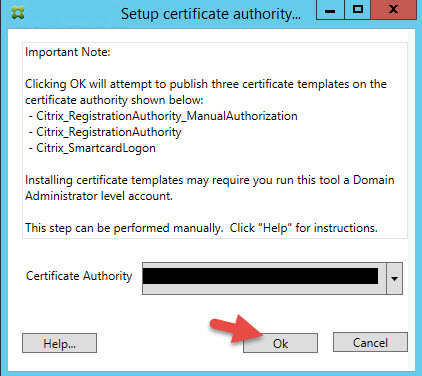
8. Now click Step 2 to Setup Certificate Authority to deploy the certs to your CA. Choose your CA in the drop down and hit Ok.
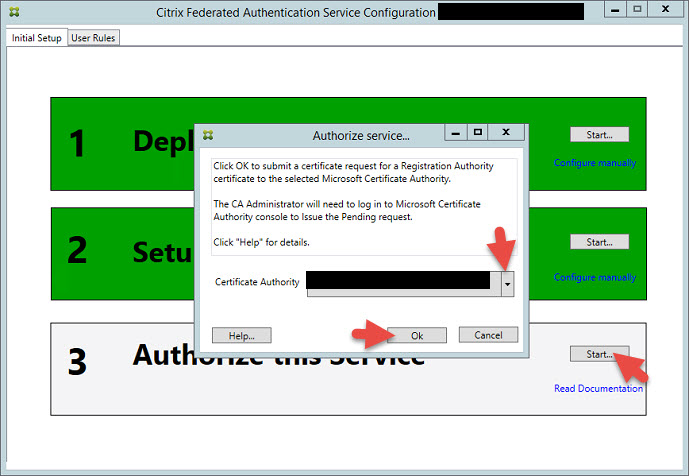
9. Now click Step 3 Authorize this Service. Choose your CA in the drop down and hit Ok.
10. You’ll notice Step 3 will go yellow and say Waiting for Approval. It will ask you to login to your CA and authorize FAS.
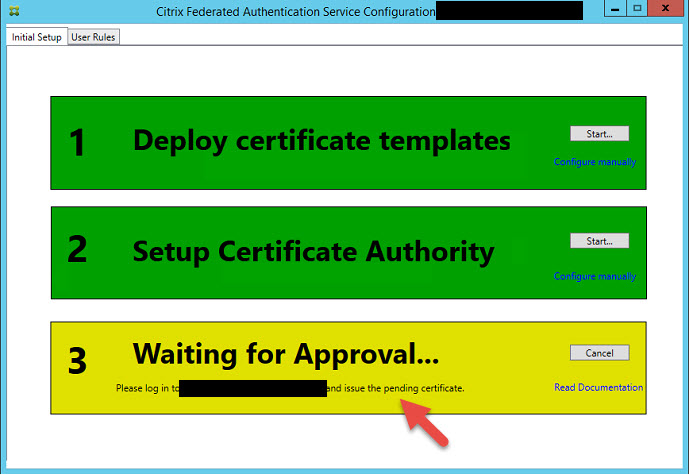
11. Log into your CA, open up the Certficate Authority console and go to the Pending Requests folder. You will see the request from FAS. Just right click on it, All Tasks > Issue.

12. Now go back to FAS and it should go green like this.

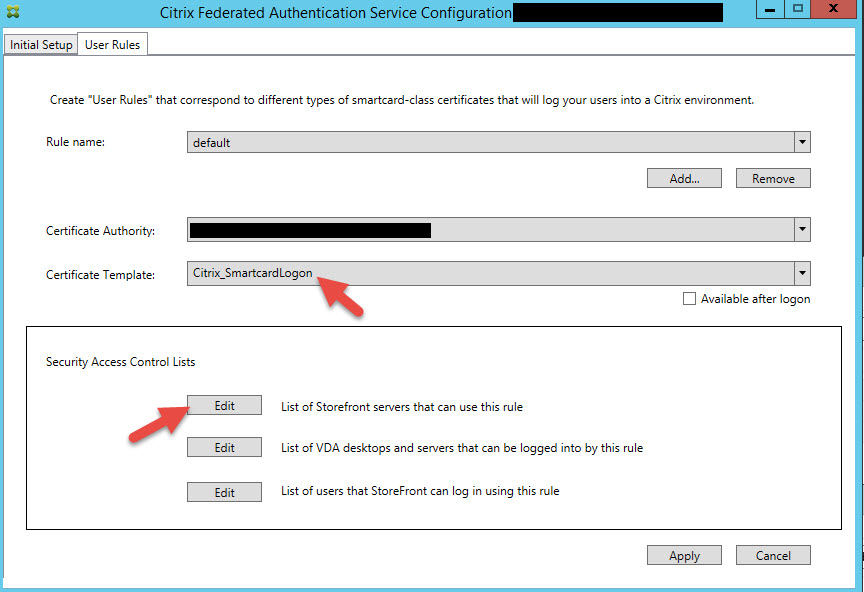
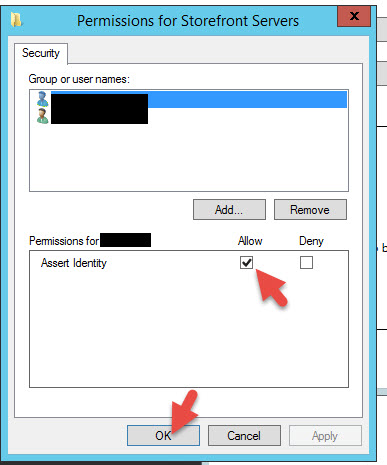
13. Now click the User Rules tab. Just keep the default rule name and ensure the Citrix_SmartcardLogon template is chosen in the dropdown. Then click Edit for the List of StoreFront servers that can use this rule.
14. Make sure all your StoreFront servers are added with “Assert Identity” set to Allow. You can remove the default Domain Computers from here to keep your environment locked down.
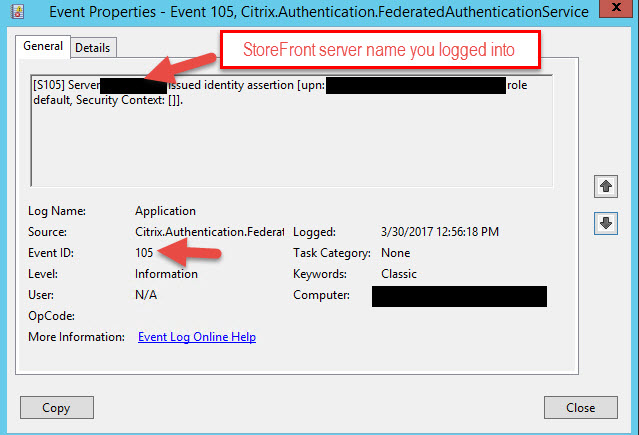
15. Now here’s something I’ve run into with every FAS deployment I’ve done so far that may help you save you a bit of troubleshooting time. Go reboot your CA. Once you get everything wired up in a bit and attempt a login FAS may not work for you and you’re wondering why the FAS event log isn’t issuing certs (Event ID 105, 120, 204 in the Application event log). In my experience the CA always kind of just sits there. Every time I reboot it forces it to wake up and then starts issuing certs normally. This has happened on several of my FAS deployments now so I just reboot at this point to prevent any headaches later.
Event ID 105 will be the StoreFront login:
Event ID 120 will be part of that first login:

Event ID 204 will be the ICA launch from the VDA (either XenApp or XenDesktop):

If you have trouble launching apps it may be because you’re not passing the UPN. This can be verified in the StoreFront Citrix Delivery Services event log if you see messages with launch failures and “The user principal name could not be found” in the body.
I’ve also run into issues before where I was getting a “Request Not Supported” message when trying to launch something in StoreFront. This is caused by the Domain Controller Authentication certificate missing. Citrix actually has a good CTX article here telling you how to fix this: https://support.citrix.com/article/CTX218941
I strongly advise you forward these 3 event logs to a SIEM like Splunk as the Application event log will get overwritten really quickly in production environments with these messages.
Configuring NetScaler AD FS for internal vs. fake AD FS WAP for external
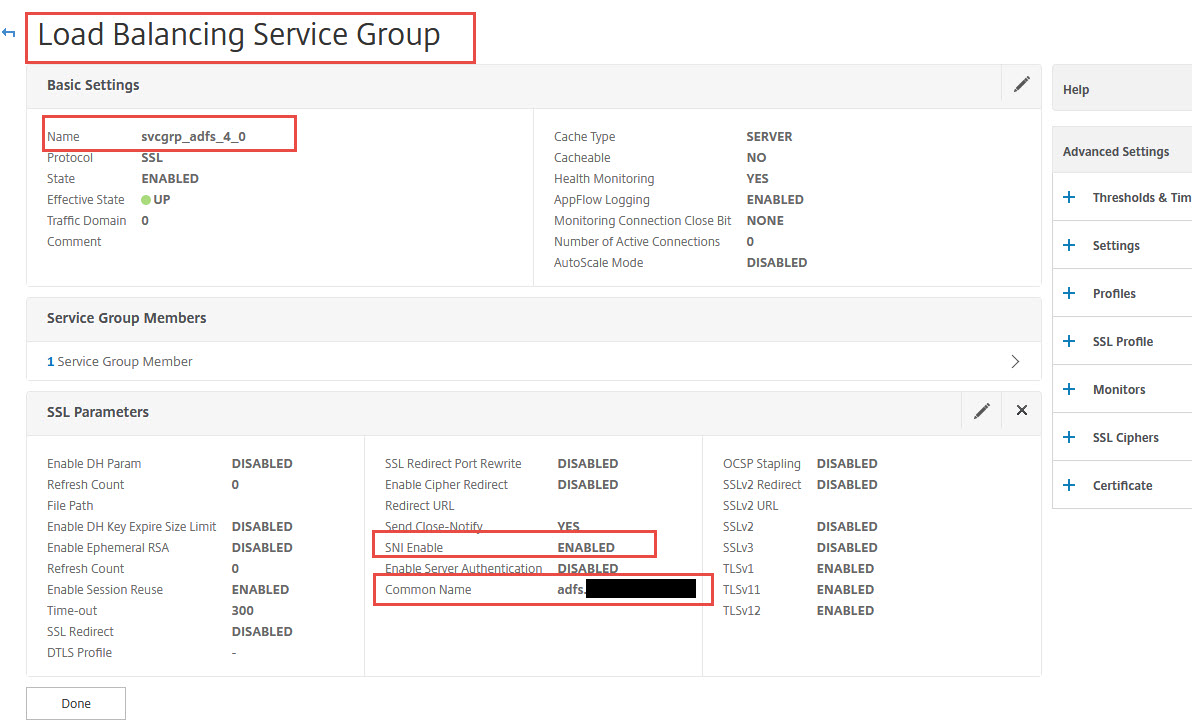
Before we were testing directly against AD FS. You can actually go and load balance both internal AD FS and your fake AD FS WAP (Web Application Proxy) with the necessary rewrite policies on 2 different load balanced vservers. Just remember if using a wildcard you will need to enabled Backend SNI on the service groups/services for your AD FS servers (I’ll talk about this more a bit later). If you don’t do this then when you get redirected to AD FS by your Unified Gateway it will just sit there and time out and never actually bring up the AD FS login page because it can’t complete the SSL negotiation.
If you get a “Malformed Assertion sent to Netscaler; Please contact your administrator” error upon redirection, check your AD FS Access Control policy. Try setting it to Permit Everyone for easier troubleshooting.
To actually create your “fake” AD FS WAP follow Eric Haavarstein’s (fellow CTP) guide here under the “NetScaler ADFS Proxy – Configuration”. He has a nice little script you can run on your NetScaler line by line to set this up instead of doing it through the GUI:
https://xenappblog.com/2016/netscaler-adfs-proxy/
I have done this with his script as well as through the GUI and they both work as long as you are careful and go through all the steps. Ultimately, your “fake” AD FS WAP is just a load balanced vserver pointed at your internal AD FS servers with 2 Rewrite policies that mimic WAP functionality in the DMZ:
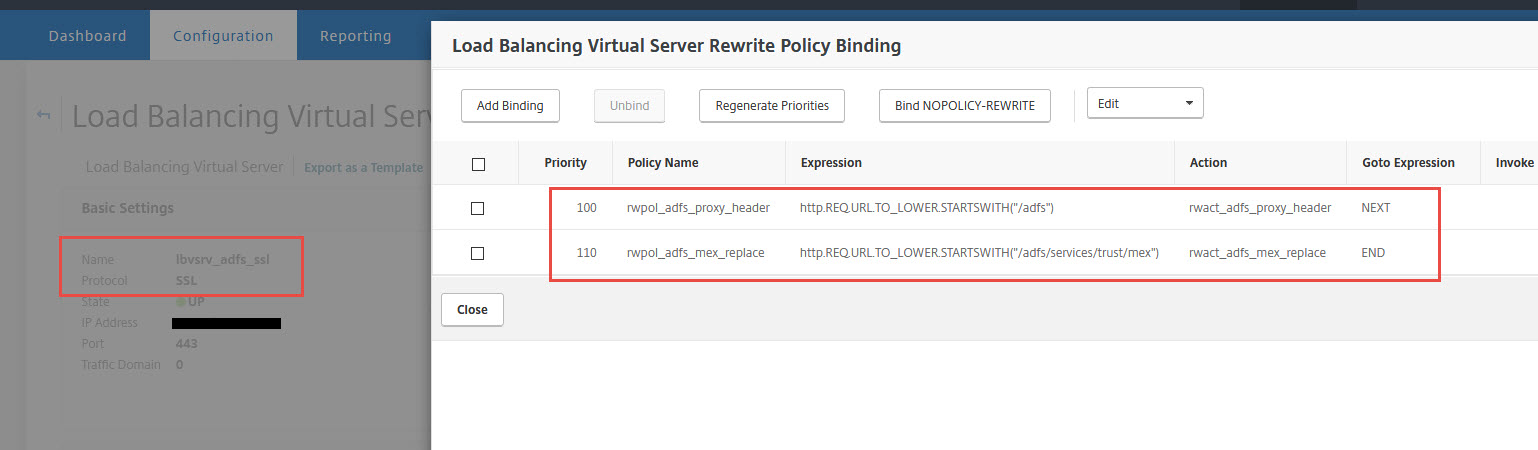
First we modify the Header value for AD FS requests. A policy looking for:
|
1 |
http.REQ.URL.TO_LOWER.STARTSWITH("/adfs") |
which has an action to INSERT_HTTP_HEADER with the Header Name:
|
1 |
X-MS-Proxy |
with the Expression set to:
|
1 |
"NETSCALER" |
and then move on to the NEXT expression in the priority order. This next expression is to replace MEX so the policy looks for:
|
1 |
http.REQ.URL.TO_LOWER.STARTSWITH("/adfs/services/trust/mex") |
and uses an action to to REPLACE the target location:
|
1 |
HTTP.REQ.URL.PATH_AND_QUERY |
with the Expression:
|
1 |
"/adfs/services/trust/proxymex" + HTTP.REQ.URL.SET_TEXT_MODE(IGNORECASE).PATH_AND_QUERY.STRIP_START_CHARS("/adfs/services/trust/mex").HTTP_URL_SAFE |
so that it gets routed through the proxymex. Then END the policy evaluation.
Make your external DNS for adfs.yourdomain.com point at this lb vserver on your DMZ NetScalers and your internal DNS record for adfs.yourdomain.com point at your regular straight through lb vserver on your internal NetScalers. If you don’t separate your security zones you can also put both lb vservers on the same set of NetScalers.
Configuring Azure MFA Adapter to separate MFA servers for external Unified Gateway access
I talked about Azure MFA with NetScaler in depth before in my How to deploy Microsoft Azure MFA & AD Connect with Citrix NetScaler Gateway guide: http://www.jasonsamuel.com/2015/09/18/how-to-deploy-microsoft-azure-mfa-ad-connect-with-citrix-netscaler-gateway/
and
How to deploy Microsoft Azure MFA User Portal on separate servers in the DMZ guide: http://www.jasonsamuel.com/2017/03/06/how-to-deploy-microsoft-azure-mfa-user-portal-on-separate-servers-in-the-dmz/
The Web Service SDK comes into play when setting up the Azure MFA Adapter when your AD FS servers are seperate from your Azure MFA authentication servers. I’ll go over how to configure them so you can get them talking correctly.
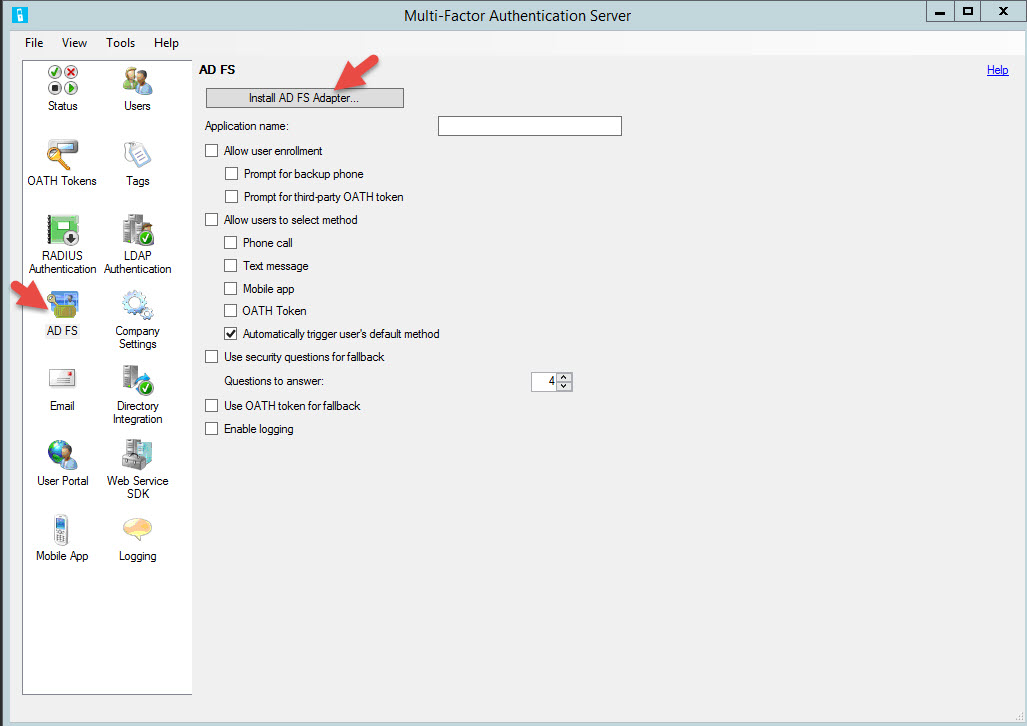
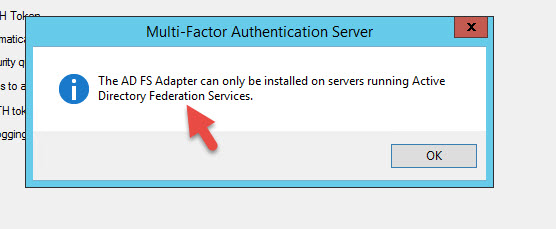
1. Go to one of your Azure MFA servers, open the console and hit AD FS. Now click the Install AD FS Adapter option.
2. You’ll get a message saying the AD FS Adapter can only be installed on servers running Active Directory Federation Services.
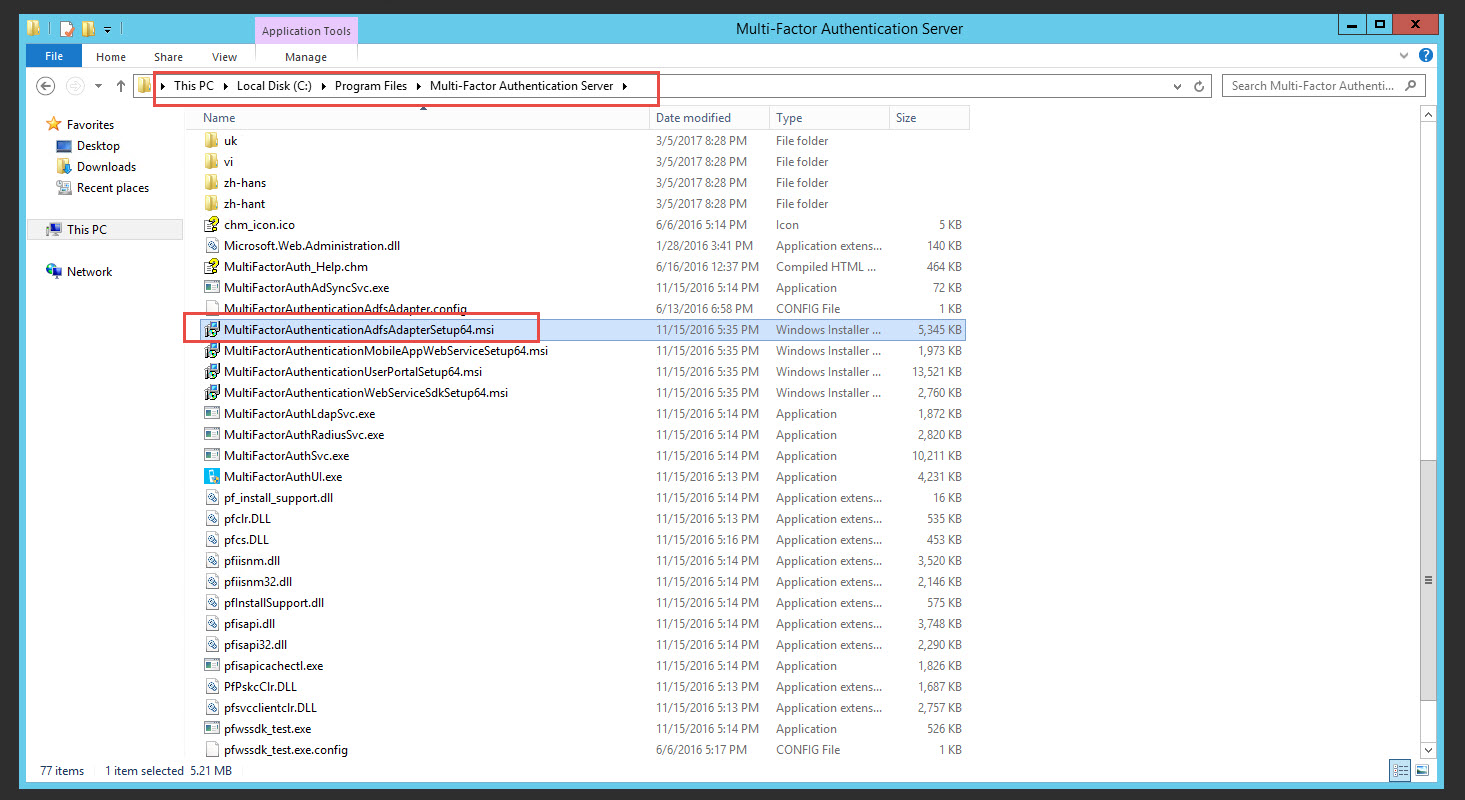
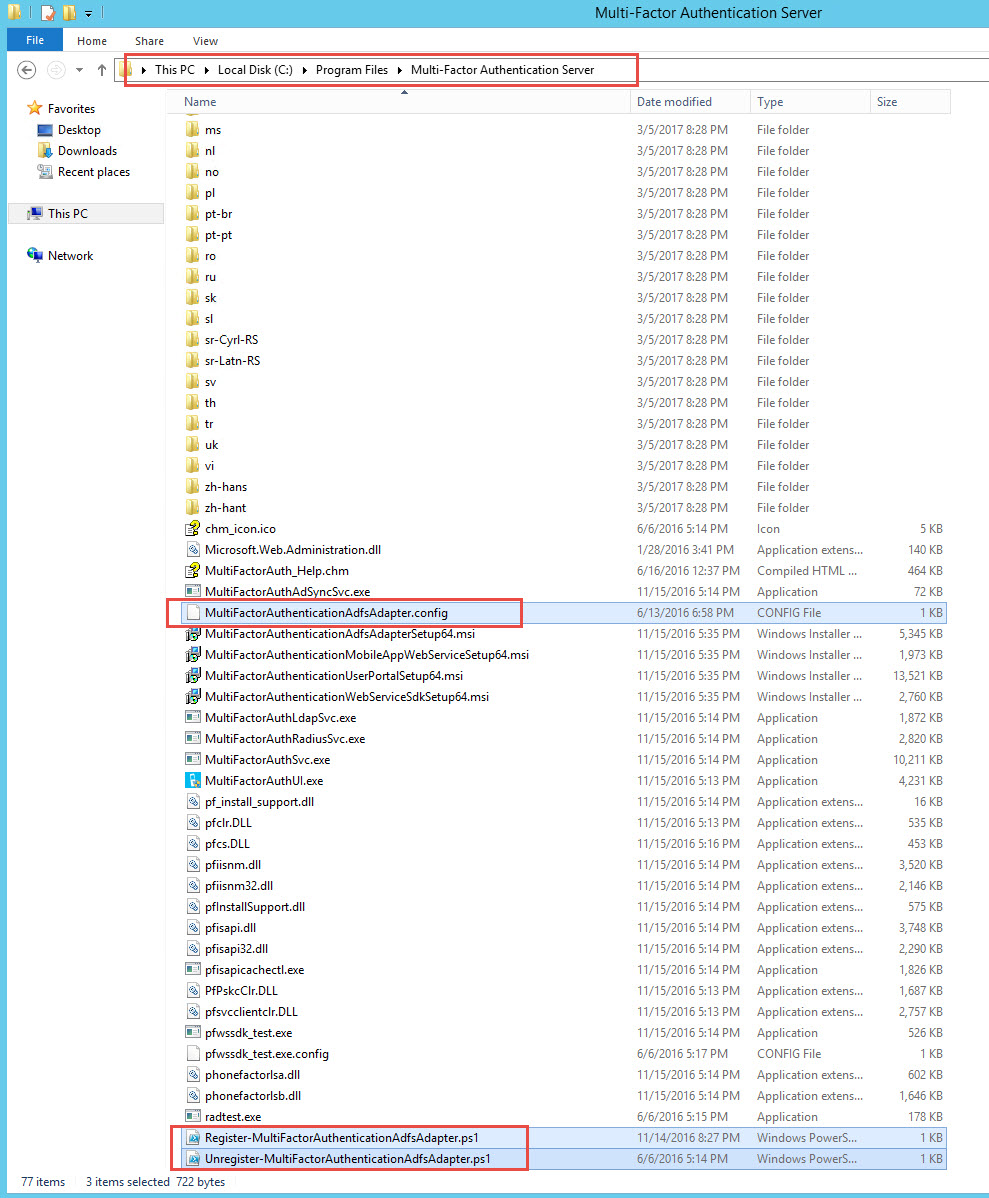
3. Go to the Mutlti-Factor Authentication Server folder and copy out the MultiFactorAuthenticationAdfsAdapterSetup64.msi to your AD FS server.
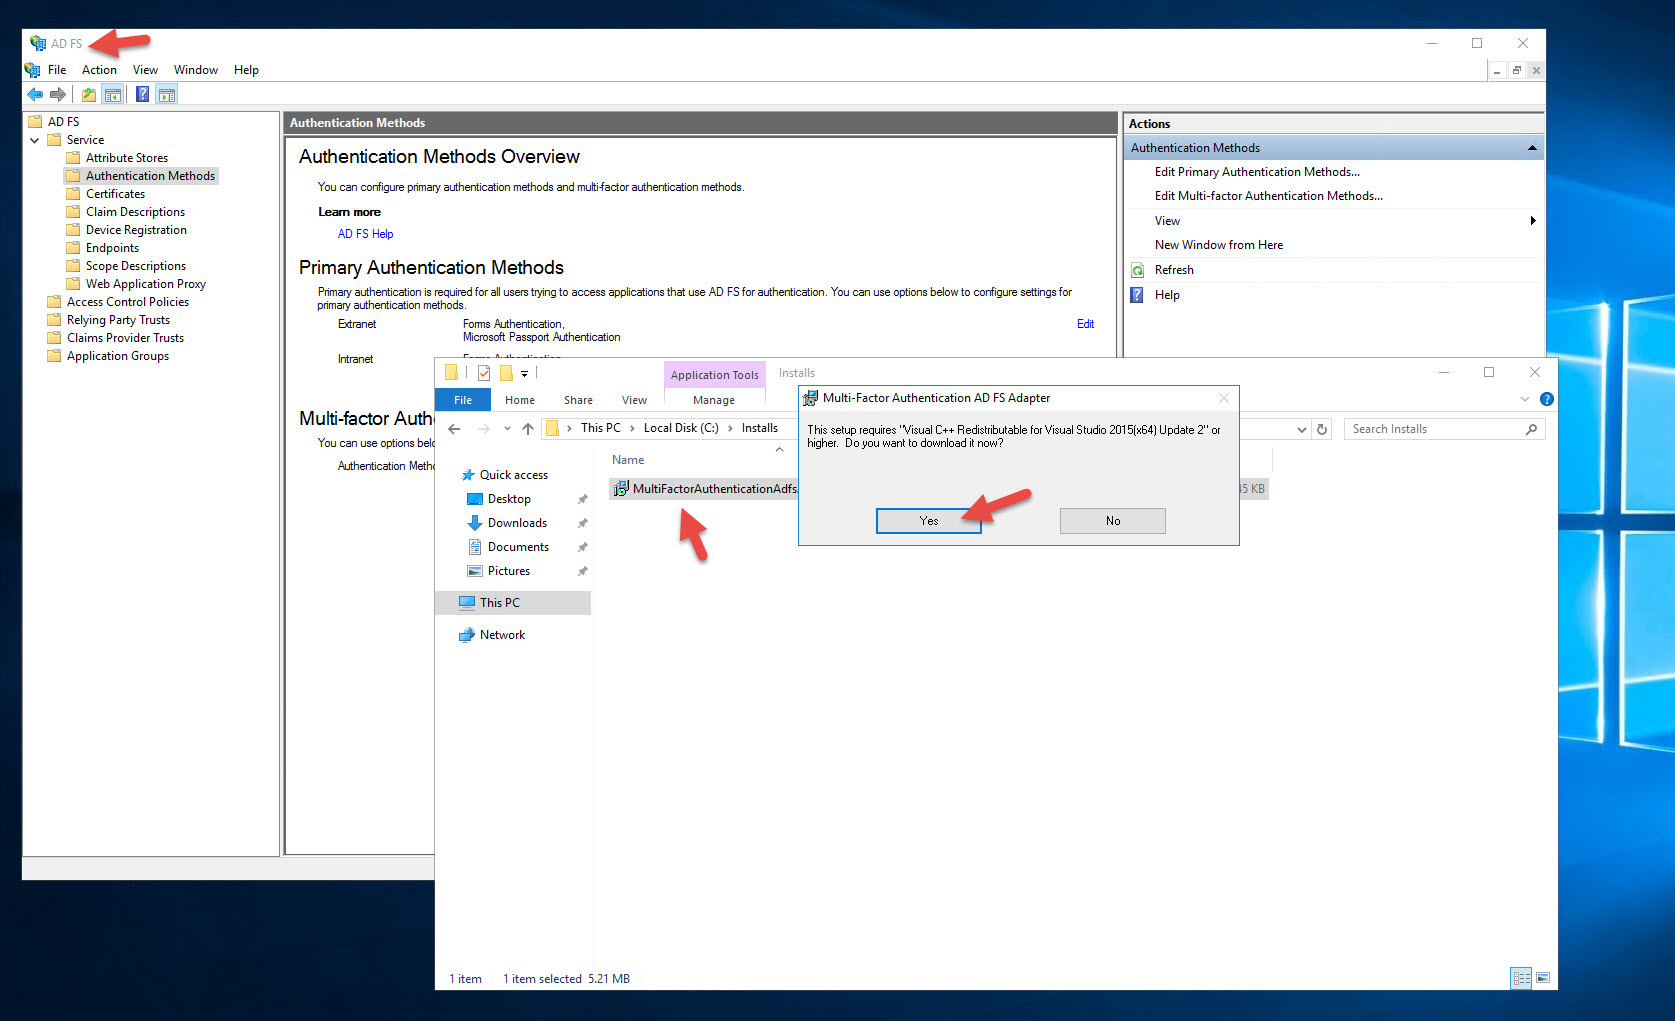
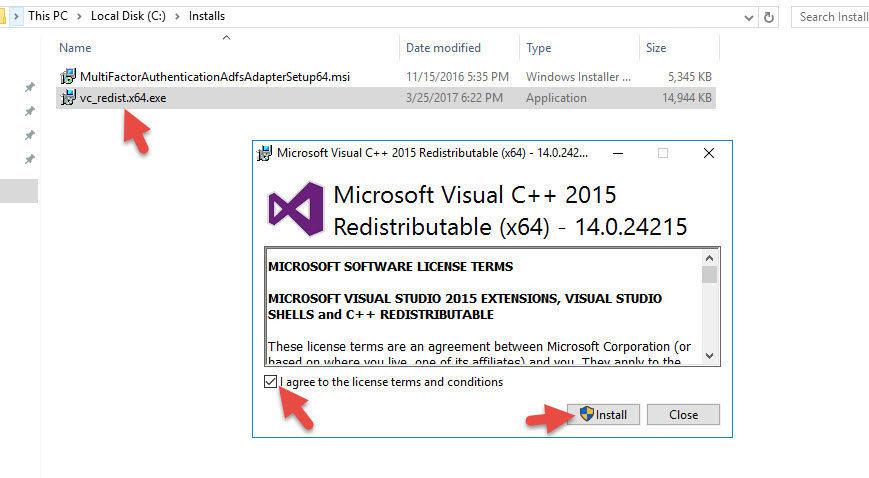
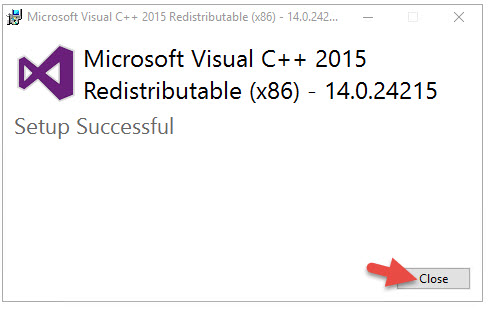
4. Run it on your AD FS server. It will say you need Visual C++ Redistributable for Visual Studio 2015 (x64) Update 2. Click Yes to download.
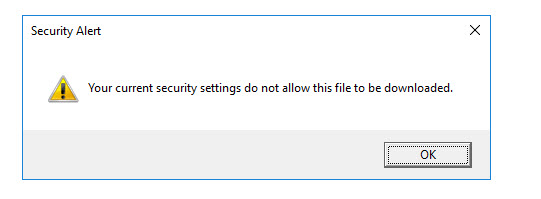
5. You might get an alert saying your current security settings do not allow this file to be downloaded so fiddle with your IE settings on your server or download it from a workstation and copy it over.
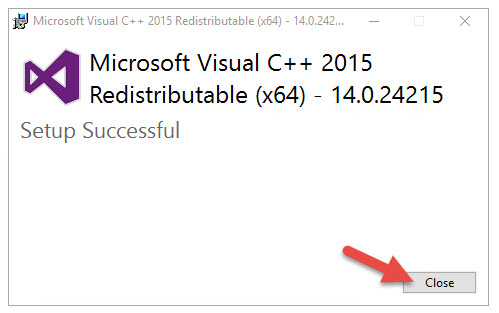
6. Install it
7. Close
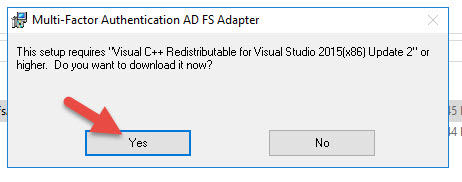
8. Run the MultiFactorAuthenticationAdfsAdapterSetup64.msi again and it will now want to install the x86 version. Go through the same steps for this.
9. Install
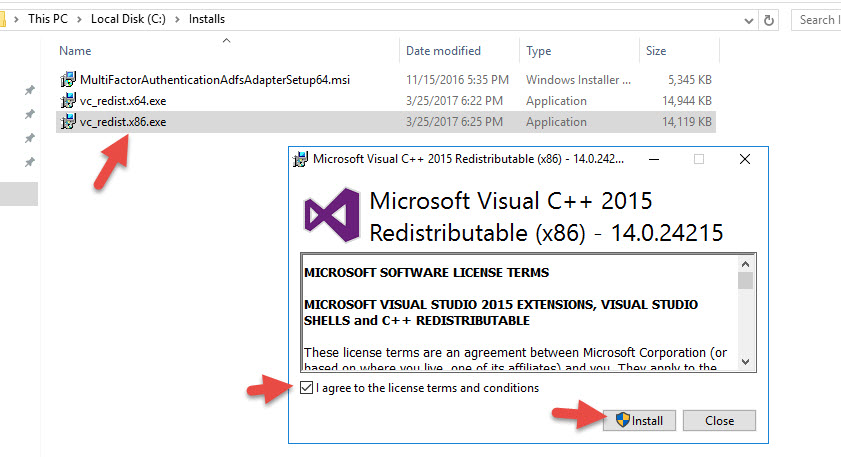
10. Close
11. Now run MultiFactorAuthenticationAdfsAdapterSetup64.msi for the 3rd time and it will let you move on. Hit Next.
12. Close
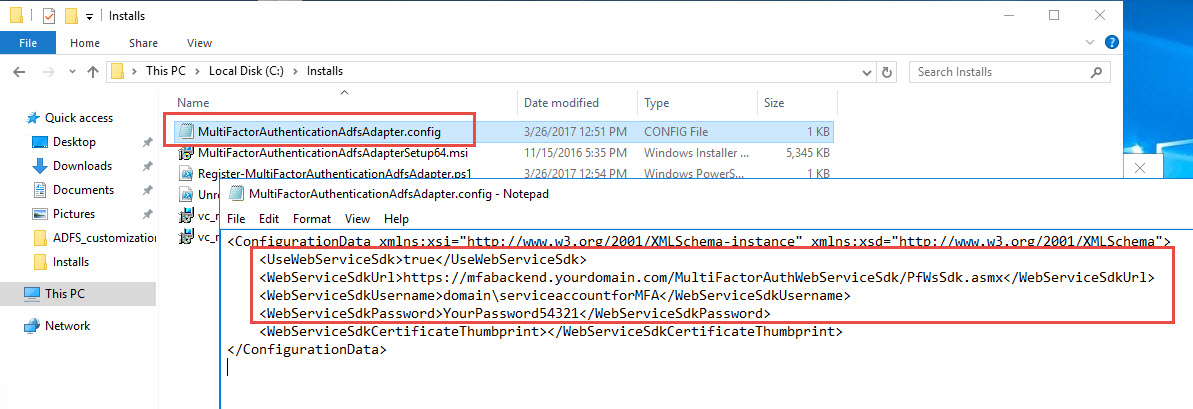
13. Go back to your MFA server and copy over the MultiFactorAuthenticationAdfsAdapter.config, Register-MultiFactorAuthenticationAdfsAdapter.ps1, and Unregister-MultiFactorAuthenticationAdfsAdapter.ps1 files to your AD FS server.
14. Run Notepad as an administrator

15. Open the MultiFactorAuthenticationAdfsAdapter.config file. Edit the values for UseWebServiceSdk, WebServiceSdkUrl, WebServiceSdkUsername, and WebServiceSdkPassword. The backend URL should be your Web Service SDK URL I have referenced in my previous article (http://www.jasonsamuel.com/2017/03/06/how-to-deploy-microsoft-azure-mfa-user-portal-on-separate-servers-in-the-dmz/):
|
1 |
https://mfabackend.yourdomain.com/MultiFactorAuthWebServiceSdk/PfWsSdk.asmx |
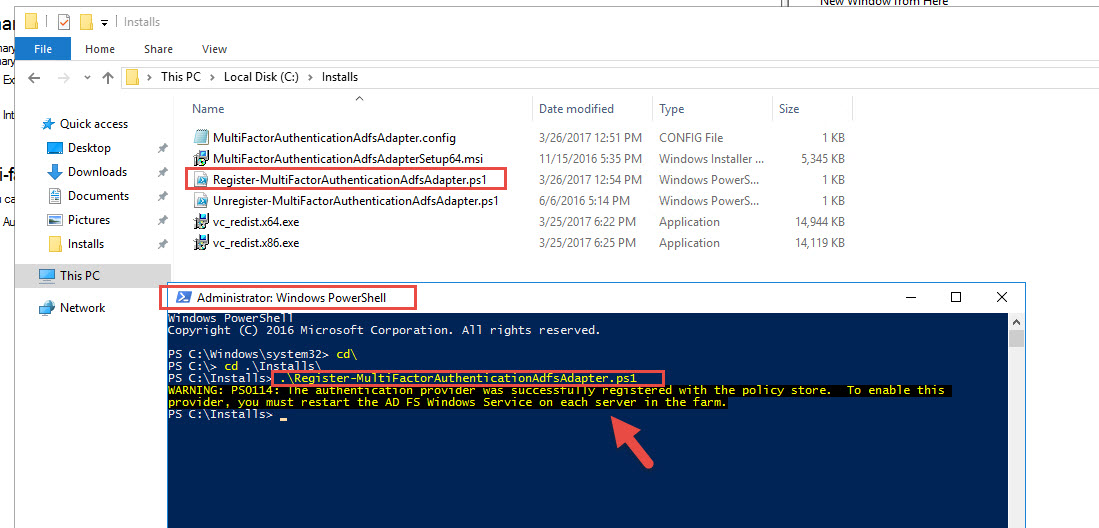
16. Open up the Register-MultiFactorAuthenticationAdfsAdapter.ps1 in Notepad and set the path to the .config file.

17. Open an Administrator PowerShell window and run the Register-MultiFactorAuthenticationAdfsAdapter.ps1 script
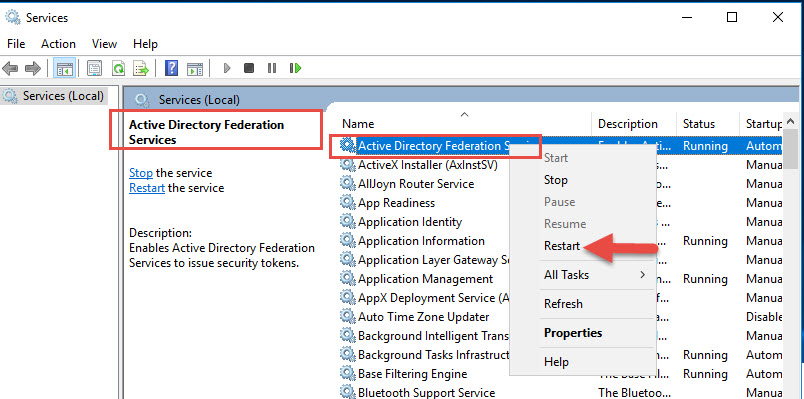
18. Restart the AD FS Windows service
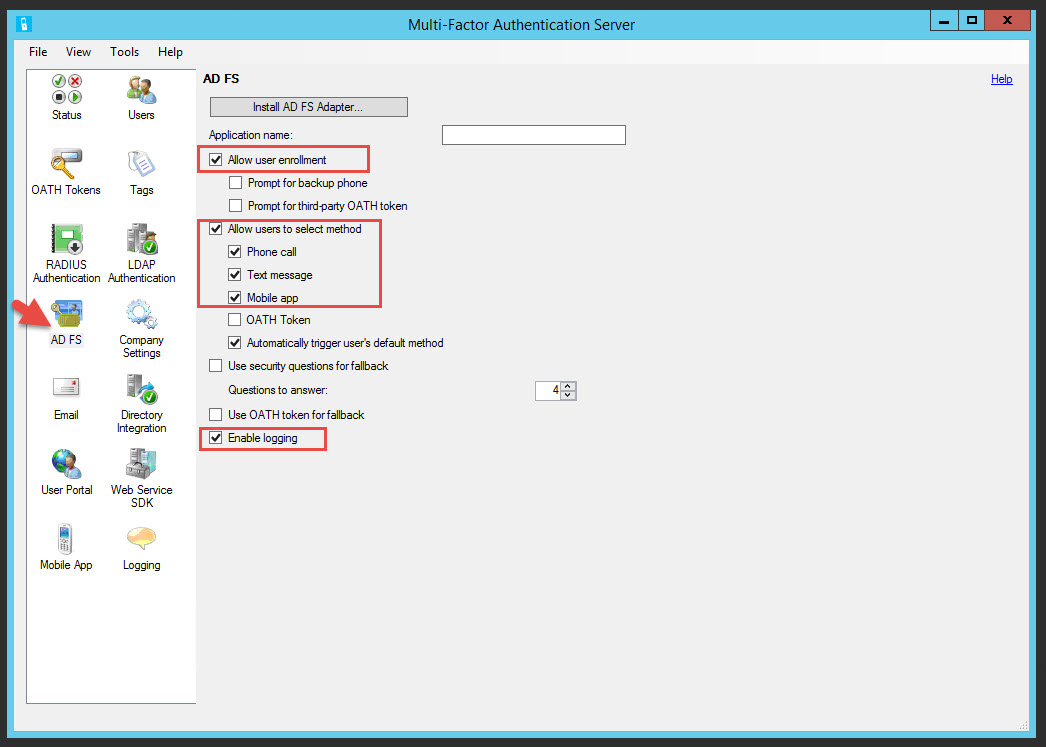
19. Go back to your MFA console and set the options you like.
20. Go to your AD FS console > Services > Authentication Methods and hit Edit under Multi-factor Authentication Methods
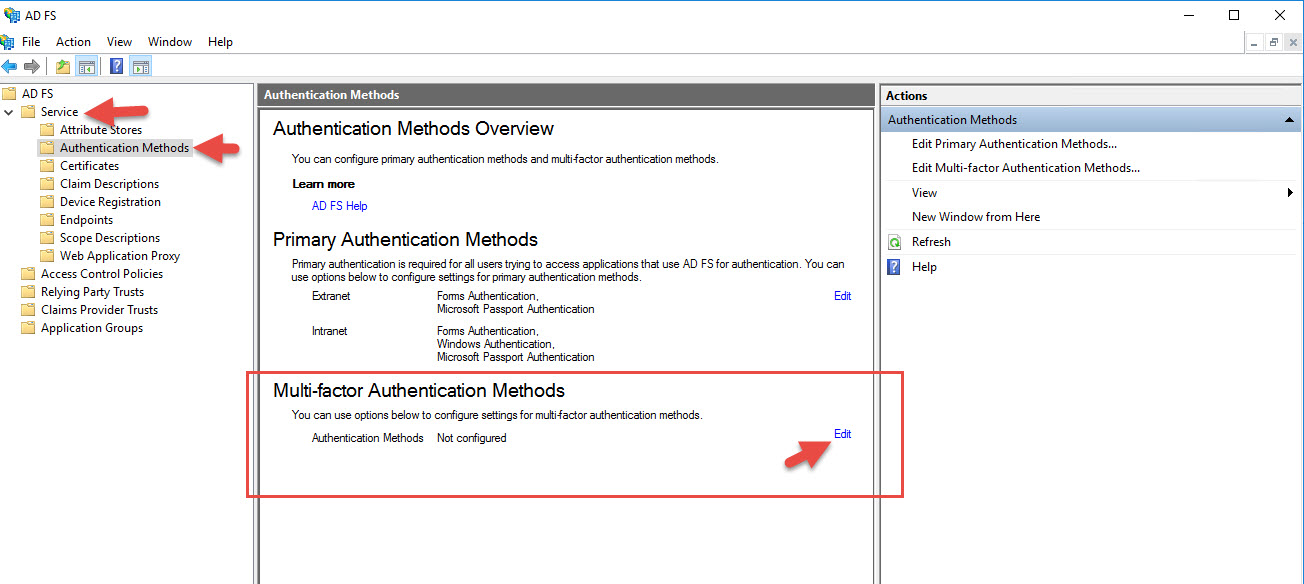
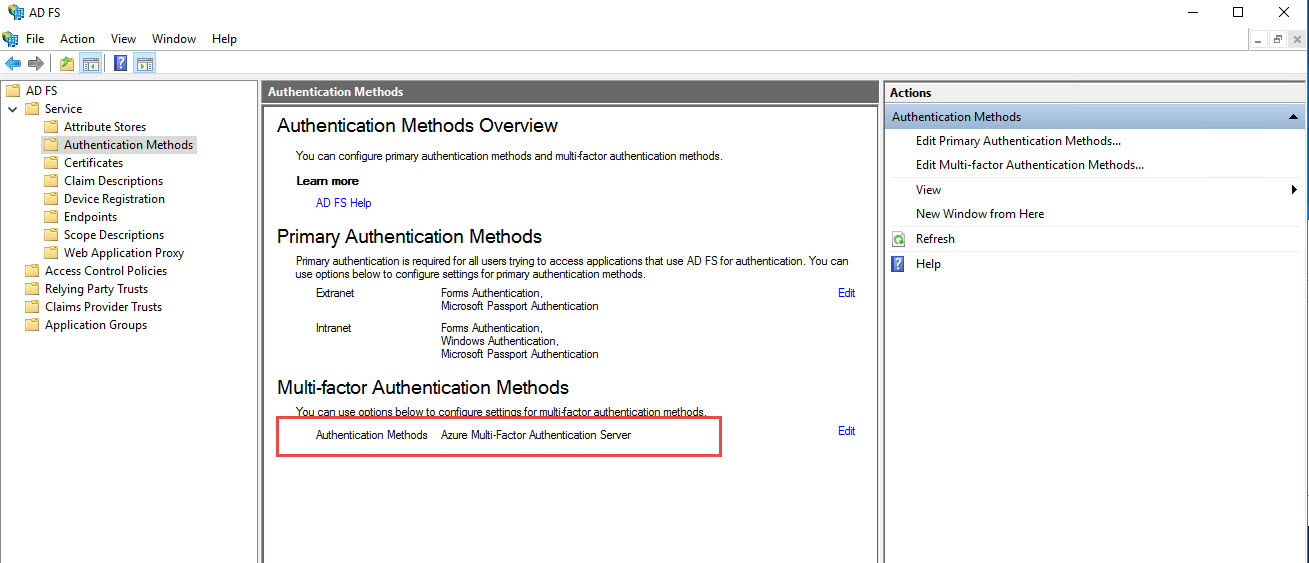
21. You will see an option called “Azure Multi-Factor Authentication Server” now. Check it and hit OK.

22. Verify it apperas on the Authentication Methods Overview page.
Now would also be a good time to check your NetScaler Gateway session policy for Receiver for Web and verify SSO is cleared. If you don’t CitrixAGBasic will fail when using SAML with Event ID 2, 7, and 10 in the StoreFront logs and you’ll get a “Cannot Complete Request” message in StoreFront after Unified Gateway login from the client choices page.
Unified Gateway limitations with RfWebUI Portal Theme and SAML IWA
If you use RfWebUI with AD FS 3.0 or AD FS 4.0 it will not automatically redirect you to the AD FS login page. instead it will sit on the NetScaler Gateway login page. You can put a junk user ID and password and hit Login and then it will finally take you to AD FS for the true authentication. This seems to be a bug with RfWebUI and should hopefully be fixed soon. The alternative is to use X1 which I don’t like using with Unified Gateway. The user experience with Clientless VPN is not ideal and the sucessor RfWebUI theme is so much better. The other work around is to use nFactor and Advanced Authentication instead of regular authentication policies. This is actually very easy to do. A SAML policy for web browsers and keep the usual LDAPS policy for mobile devices.
Getting around this using nFactor authentication
Note, SAML does not work with native Receivers yet (but will soon hopefully since we can use it with StoreFront 3.9 and AD FS already…more on this later). nFactor does not support native Receivers either. I am hoping we will see support for native Receivers soon here as well. I am going to show you how to create a SAML policy for web and keep the usual LDAPS policy for mobile devices.
1. We need to edit your Content Switching policy for the Unified Gateway and add a bit at the end. In my testing I found it’s not necessary for what we’re doing, it works fine without it. But in a discussion I had with Carl Stalhood (fellow CTP) he mentioned he has come across some nFactor deployments where some authentication requests were not redirected to the Unified Gateway correctly without this expression in place. So it’s a pretty good idea to go ahead and add it now to avoid potential issues later. Carl mentioned this is actually referenced in a KB from Citrix at https://support.citrix.com/article/CTX214483 so it’s a good idea to add it.
|
1 |
|| HTTP.REQ.URL.STARTSWITH("/nf") |

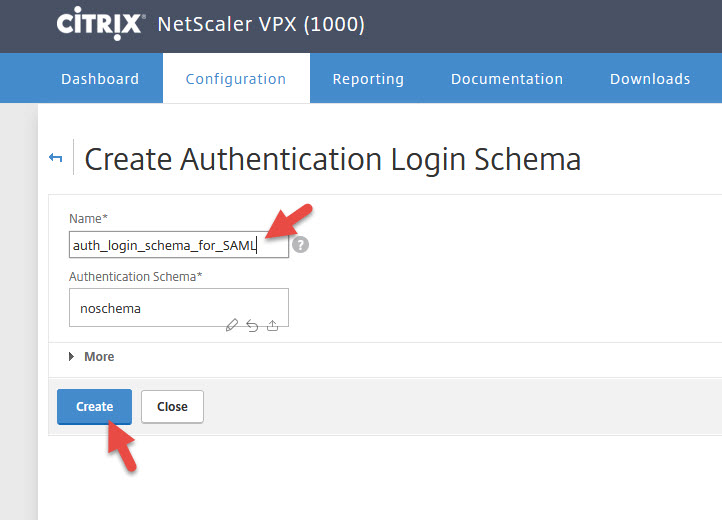
2. Go to Security > AAA – Application Traffic > Login Schema > Profiles tab > Add

3. Give it a name and leave the Authentication Schema as “noschema”. You won’t need a login page since AD FS will be replacing that.
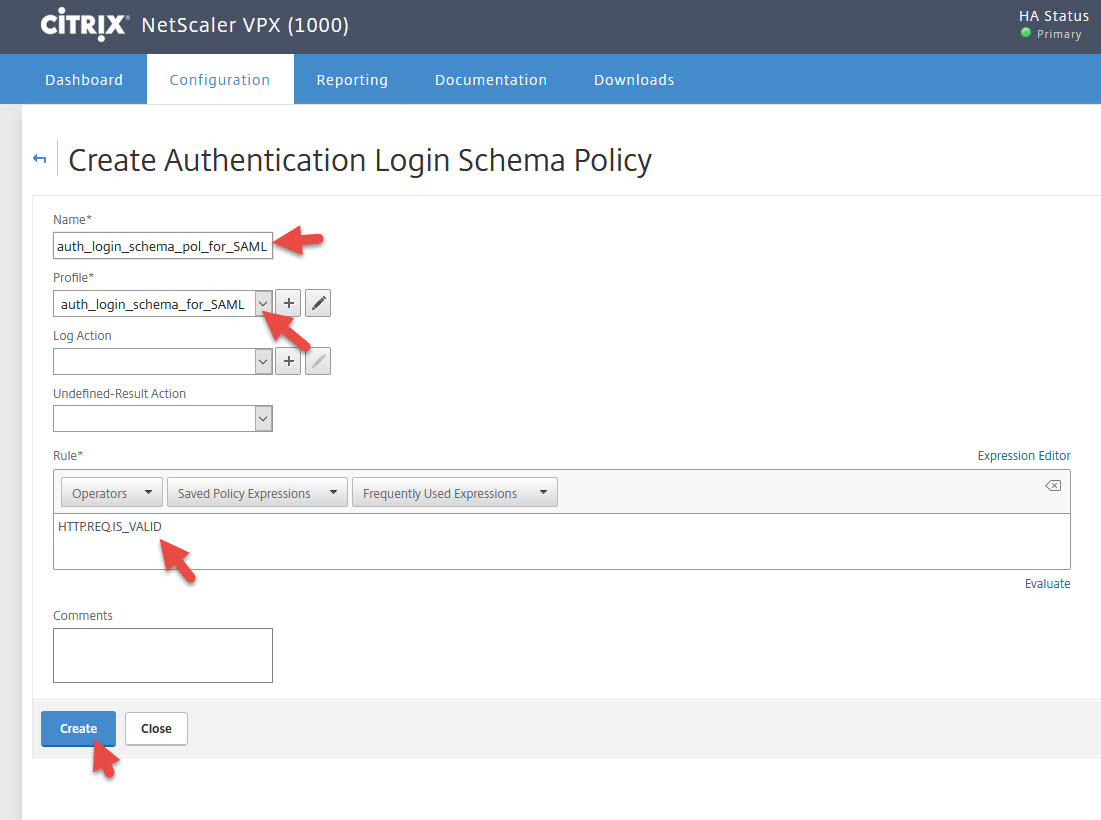
4. Now create a Login Schema Policy under Security > AAA – Application Traffic > Login Schema > Policies tab > Add

5. Give it a name and select the policy you created. The Rule should be set to:
|
1 |
HTTP.REQ.IS_VALID |
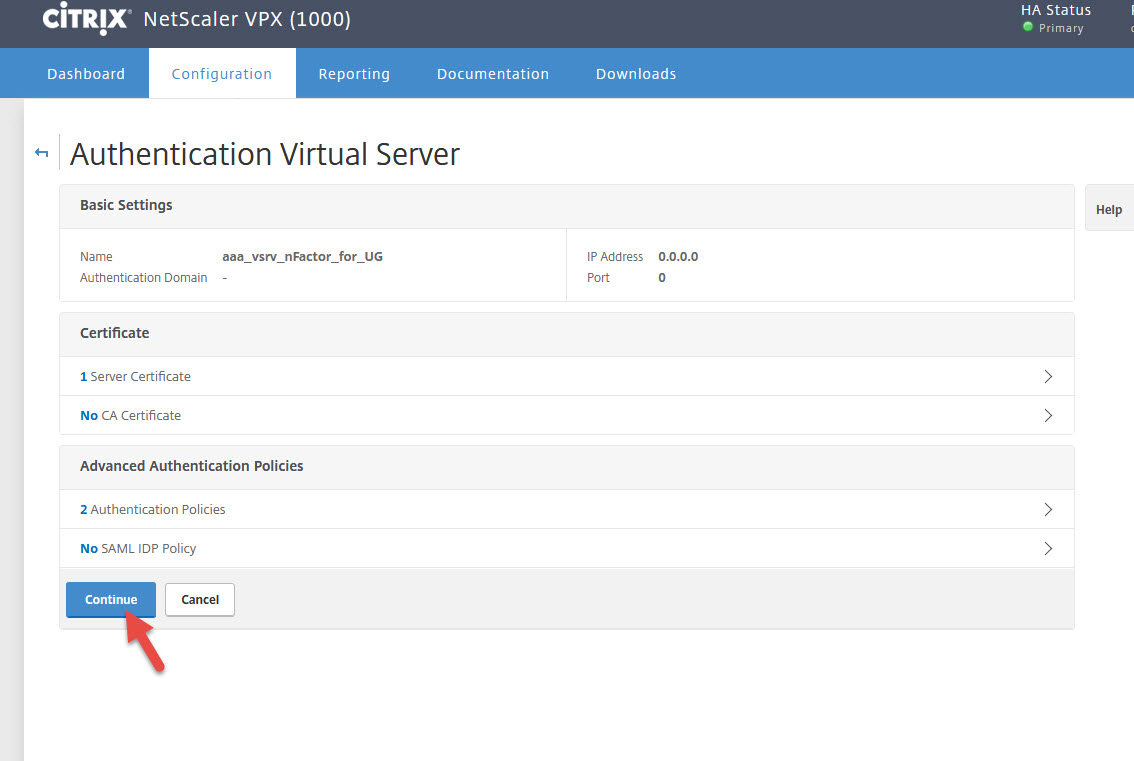
6. Now go to Security > AAA – Application Traffic > Virtual Servers > Add
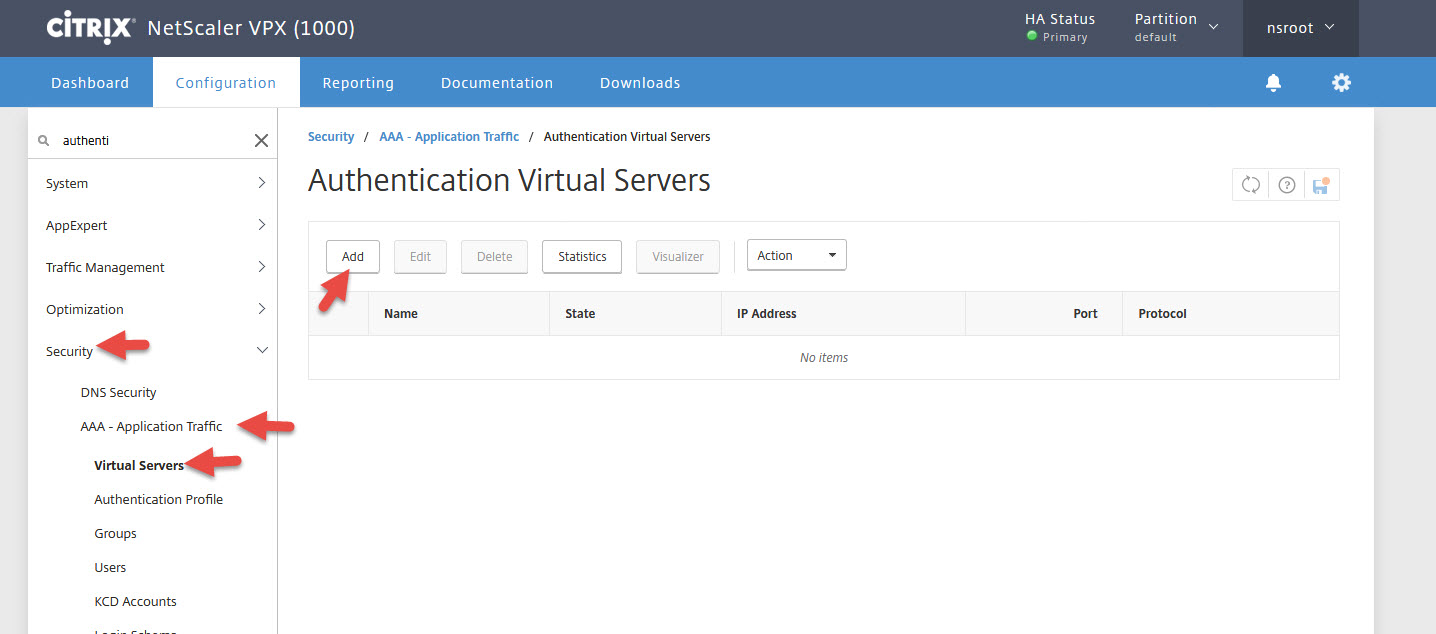
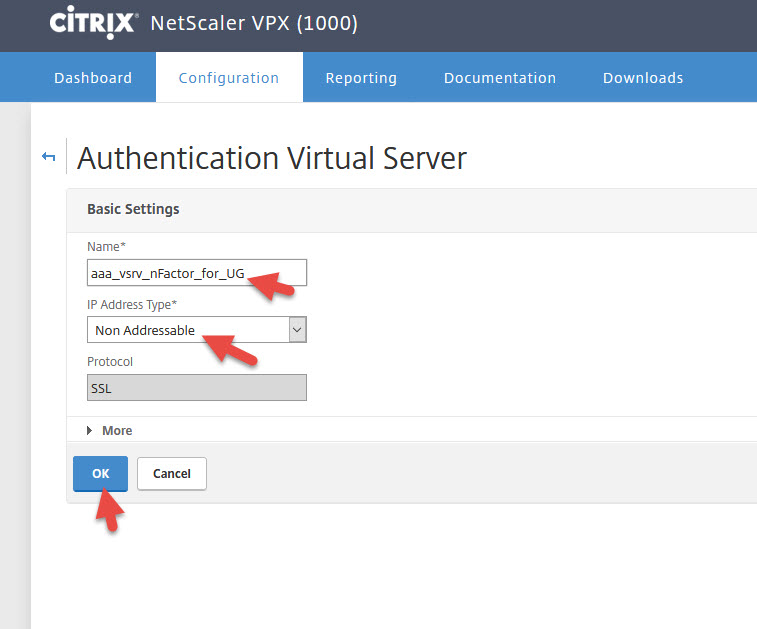
7. Give it a name and set the IP type to Non Addressable so it gets 0.0.0.0
8. Click Server Certificate

9. Bind a cert to it. Can be the same one you use for AD FS.
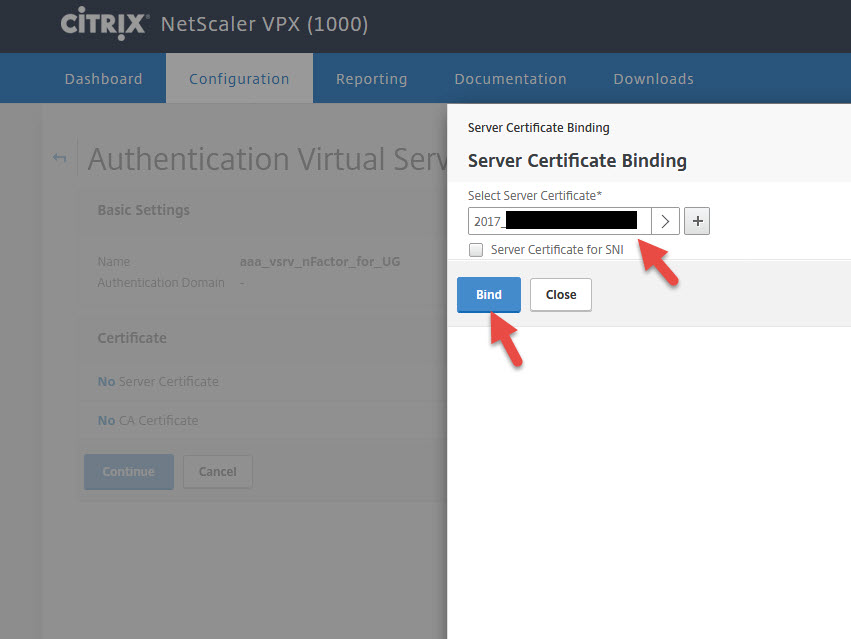
10. Hit Continue

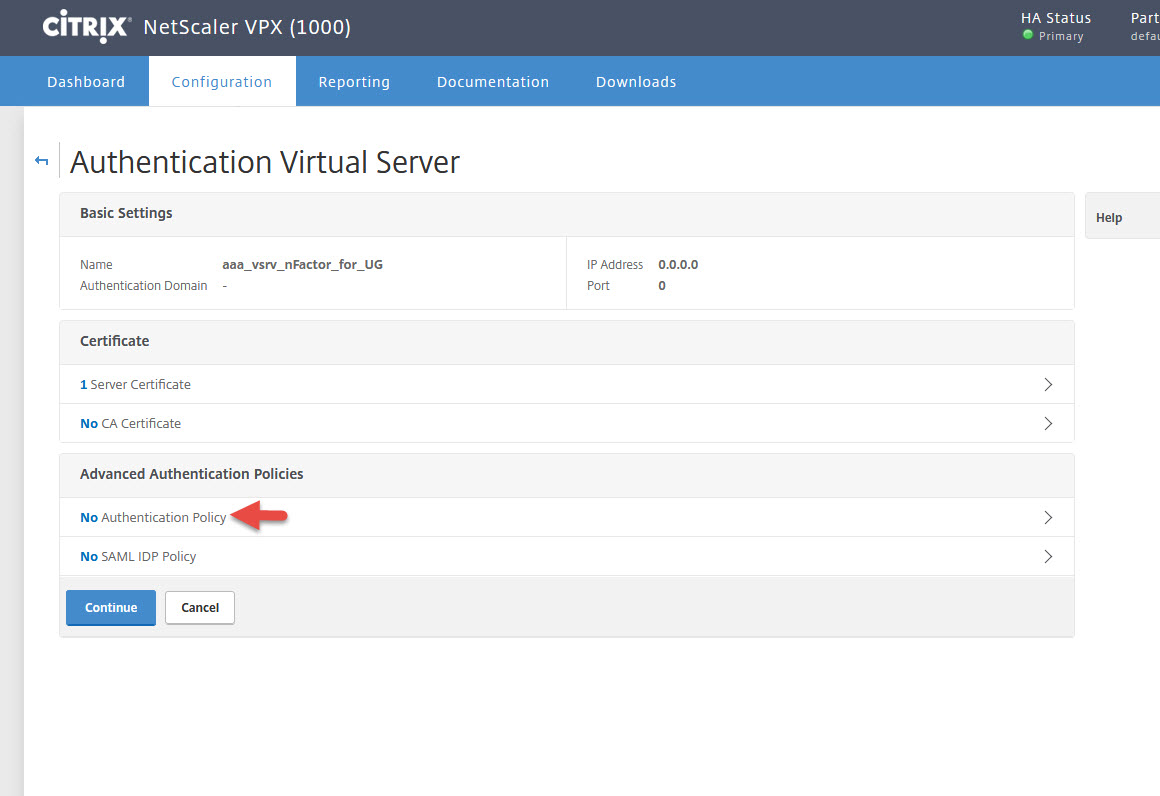
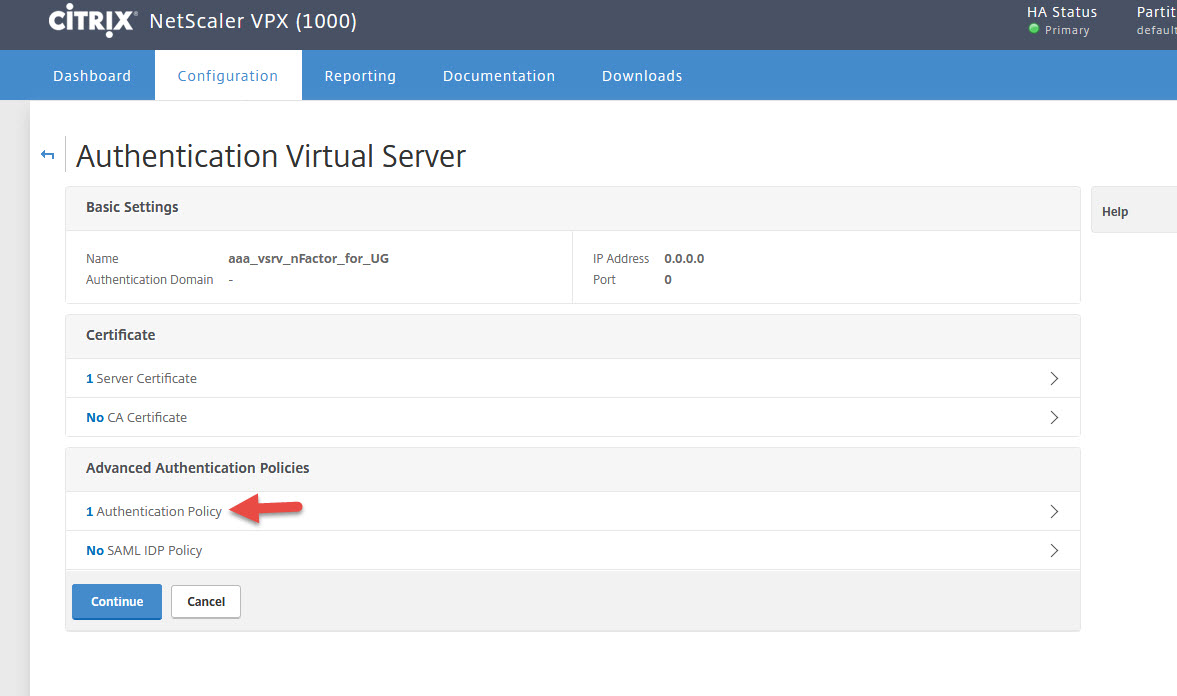
11. Advanced Authentication Policies will appear. Click Authentication Policy
12. Hit the plus button

13. First we need to create an LDAP policy for native Receivers (Windows Receiver, mobile Receivers, etc.). Give it a name, select LDAP as the action type, and select same LDAP/LDAPS profile you usually use here. Can be hitting a domain controller or even your MFA servers if you like. The expression should be:
|
1 |
HTTP.REQ.HEADER("User-Agent").CONTAINS("CitrixReceiver") |

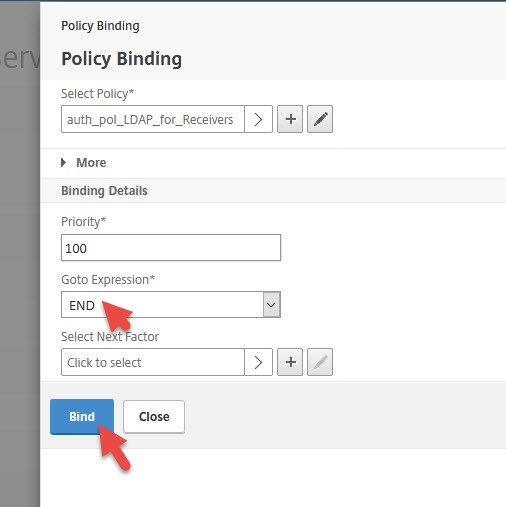
14. Set Goto Expression to END and hit Bind
15. Add another Authentication Policy
16. Add Binding
17. Hit the plus
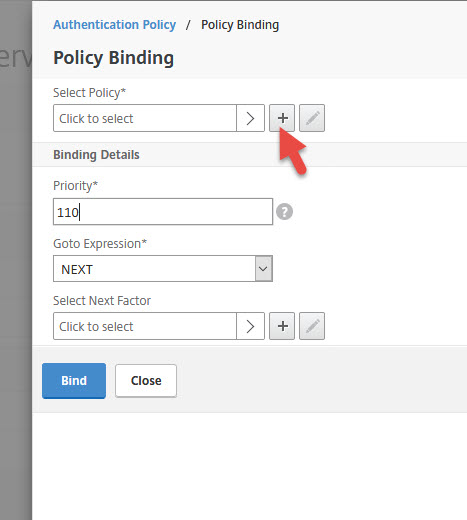
18. Give it a name, select SAML as Action Type, select your AD FS 4.0 action, and set the Expression to:
|
1 |
HTTP.REQ.IS_VALID |
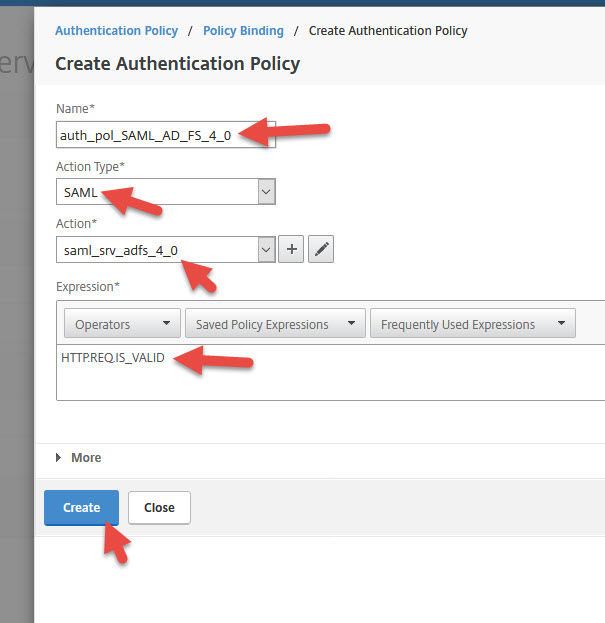
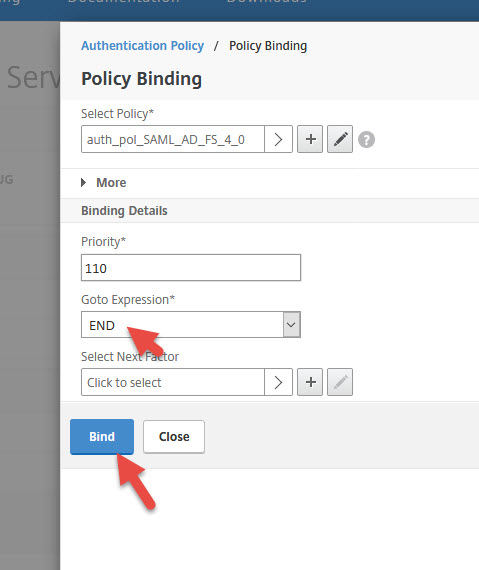
19. Set Goto Expression to END and hit Bind
20. Hit Continue
21. Hit the blue plus sign on the right side next to Login Schemas

22. Scroll down and click Login Schema

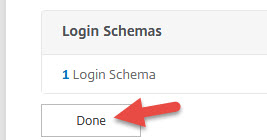
23. Select the Login Schema you created earlier and bind it
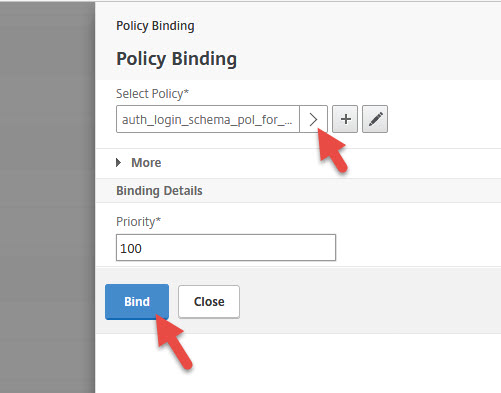
24. Hit Done
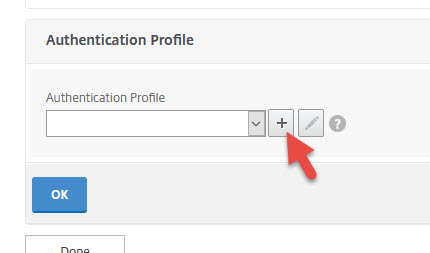
25. Go to your Unified Gateay vserver and unbind all your Basic Authentication policies. You don’t need them anymore. Click the blue plus button for Authentication Profile.

26. Hit the plus button
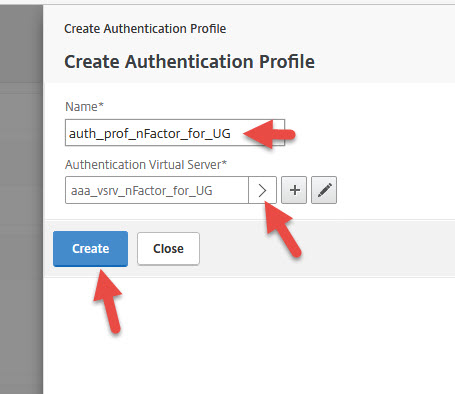
27. Give it a name and choose the AAA vserver you created earlier. Then hit Create.
28. Hit OK
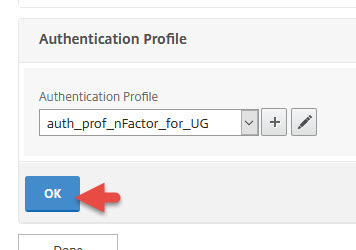
29. Hit Done

Now your Receivers will use the LDAP policy and Receiver for Web will use the SAML policy. Make sure your Unified Gateway vserver is set to RfWebUI and it will redirect to the AD FS login page just fine now.
Customizing AD FS login pages and RfWebUI theme
Trond Eirik Haavarstein (fellow CTP) also has a great article and PowerShell script here you can use to customize your AD FS login pages. I just wanted to change my logo only and used just the first couple of lines but as you can see you can go much further as Trond has done:
https://xenappblog.com/2016/customize-internal-web-resources/
I created a “jasonsamuel_adfs.ps1” and dropped this in it, then ran it. It will work just fine with AD FS 4.0:

|
1 2 |
Import-Module ADFS Set-AdfsWebTheme -TargetName default -Logo @{path="C:\ADFS_customizations\jasonsamuel_logo_black.png"} |
If you want to use the true Office 365 background image used at portal.office.com for your AD FS logins you can click the image below and right click > save as for the full size image:
In addition to this Sam Jacobs (CTP) has written an incredeibly detailed guide on RfWebUI customization here including a handy cheat comparing comparing Green Bubble/X1 vs. RfWebUI places to change things:
https://www.mycugc.org/blog/adding-text-links-and-other-elements-to-the-netscaler-logon-page-part-2
I wanted to keep it simple for this example so only changed the RfWebUI Header Logo and Center Logo for this example as I usually do. Use Sam’s guide if you want to take it further and beyond the default options you can change under Portal Themes.

NetScaler MAS with HDX Insight working both Internally and Externally
The NetScaler Unified Gateway used internally and externally works with NetScaler MAS and HDX Insight. The AppFlow data is sent every time. I had written a guide a few years back on Using Citrix NetScaler Gateway internally and externally with a single URL: http://www.jasonsamuel.com/2015/02/17/using-citrix-netscaler-gateway-internally-and-externally-with-a-single-url/
I recently did a presentation at the local Houston CUGC describing the different ways to use NetScaler Gateway internally and externally and the pros and cons of each method. I covered 5 different ways to accomplish this actually (Split DNS, Optimal Gateway Routing, LAN User Mode/SOCKS Proxy, Policy Based Routing, etc). I will do a post explaining each method in depth and the necessary configurations at some point. The take away is using the method described here in this guide allows you to have more pros than cons when comparing against some other methods. Ultimately you have to use the method that fits your company. This means user workflow, scale, resources on your NetScaler to process AppFlow, etc. You can’t go into a healthcare org for example and lock it down like a financial institution or else the users (doctors, nurses, etc.) will chase you right out of the hospital!
Allowing users to login again without having to close their browser
One of the annoying features of Smart Card logins is that StoreFront and NetScaler Unified Gateway wants you to close the browser after the session expires or is logged out of. Remember, Citrix FAS is basically like a virtual smart card. StoreFront won’t let you reuse the browser session by hitting refresh and getting back to the login page. Your users will see this message:
Cannot log on using smart card.
Please close your browser to protect your account.

Sacha Thomet (fellow CTP) wrote an excellent guide here to get around his after confirming the issue with Feng Huang (Principal Software Architect at Citrix) who provided an explanation and really cool workaround for this. To clarify, this is not a bug and is actually by design. This is for increased security of your environment and is the intended behavior when using smart card based logon, yes even virtual smart cards. But if you want to relax this then use the workaround Feng and Sacha have here:
https://blog.sachathomet.ch/2017/01/03/storefront-allowreloginwithoutbrowserclose/
This works great with StoreFront but doing it for RfWebUI on your NetScaler does not work. On StoreFront you edit the script.js file located at:
|
1 |
C:\inetpub\wwwroot\Citrix\StoreWeb\custom |
with
|
1 |
CTXS.allowReloginWithoutBrowserClose = true |
as Sacha shows you. On your NetScaler, it can vary depending on if you’re using the default RfWebUI or a custom one based on it:
|
1 |
/var/netscaler/logon/LogonPoint/custom/script.js |
or
|
1 |
/var/netscaler/logon/themes/<your_custom_theme_name>/script.js |
If using a custom RfWebUI based theme, please note that script.js will not exist. You have to WinSCP in and copy it in manually from the default location (the first link above from the LogonPoint location). Just put it right in the root of the your custom theme’s folder just like the 2nd URL above. You do not have to create a “custom” folder for it like the original location has.
I have tested script.js changes sucessfully with both the “Clientless Access” and “Virtual App and Desktop Access” options:
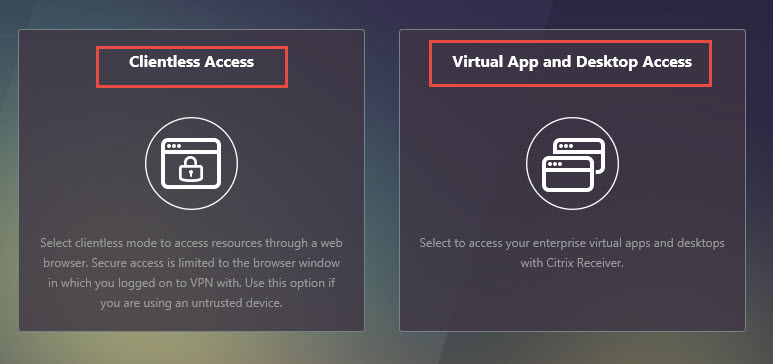
When you use “Virtual App and Desktop Access”, it will pull customizations from the script.js file on your StoreFront servers. When you use the “Clientless Access” option, it will pull customizations from your script.js file in your RfWebUI theme on the NetScaler. As long as they match both client choice options presented by Unified Gateway will work with your customizations.
Unfortunately this particular customization of allowing re-login without browser close does not work with the “Clientless Access” option. It only works with “Virtual App and Desktop Access” (using the script.js from StoreFront). For some reason “Clientless Access” (using script.js in the RfWebUI theme location) does not want to apply this particular change. Other changes done in the script.js work just fine in my testing.
I suspect there is a conflict going on beteween the NetScaler and StoreFront. I am trying to get more clarification on this from both the StoreFront and NetScaler product teams. I will update as soon as I find out something. If you are able to get it to work in the meantime, please leave a comment below. I was thinking about using a Rewrite policy to clear whatever it is holding on to here but this will need some testing first.
Allowing other browsers to use AD FS 4.0
I’ve covered this in my prior AD FS 3.0 guide but it works the same in AD FS 4.0. You may need to white list the User Agents of other browsers or they won’t be able to use AD FS. With AD FS 4.0 popular modern browsers like Chrome, Firefox, Edge, etc. are supported out of the box. There is no need to do anything but I still want to show you this in case you have a 3rd party browser that needs it in your organization.
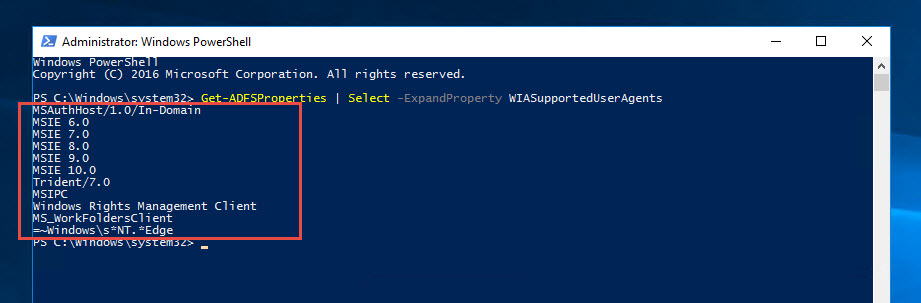
1. You can check the default User Agents allowed by opening a PowerShell window as administrator and running this:
|
1 |
Get-ADFSProperties | Select -ExpandProperty WIASupportedUserAgents |
The default WIASupportedUserAgents in AD FS 4.0 will be. Notice the very last line, this takes care of pretty much every modern web browser now:
|
1 2 3 4 5 6 7 8 9 10 11 |
MSAuthHost/1.0/In-Domain MSIE 6.0 MSIE 7.0 MSIE 8.0 MSIE 9.0 MSIE 10.0 Trident/7.0 MSIPC Windows Rights Management Client MS_WorkFoldersClient =~Windows\s*NT.*Edge |
2. When you update this list, you need to specify the existing ones plus the ones you want to add. For grins I’m dropping in Mozilla/5.0 and Citrix Receiver in there as well in the hope it will support SAML auth via NetScaler and AD FS sometime soon in the future:
|
1 |
Set-AdfsProperties –WIASupportedUserAgents @("MSAuthHost/1.0/In-Domain","MSIE 6.0","MSIE 7.0","MSIE 8.0","MSIE 9.0","MSIE 10.0","Trident/7.0", "MSIPC","Windows Rights Management Client","MS_WorkFoldersClient","=~Windows\s*NT.*Edge","Mozilla/5.0","CitrixReceiver") |
and you should see your list look like this now:
|
1 |
Get-ADFSProperties | Select -ExpandProperty WIASupportedUserAgents |
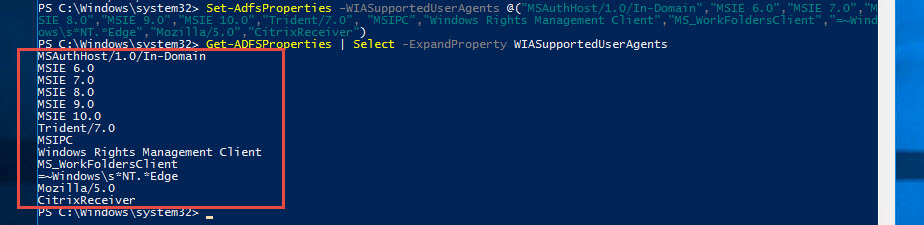
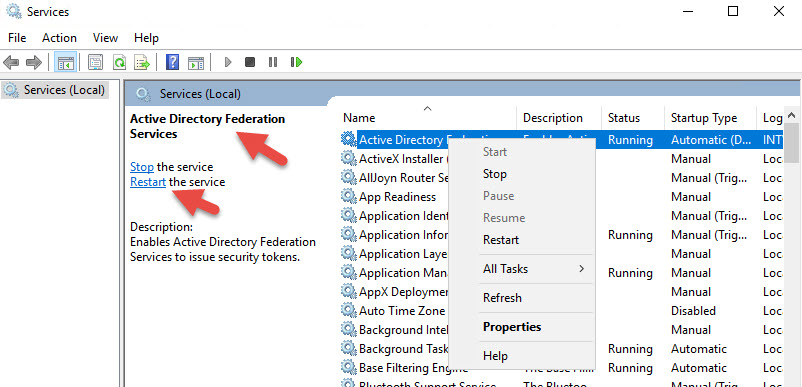
3. Now restart the AD FS Windows service. Do these steps on all servers in your farm.
Another point to note. With iOS Safari browser, I’ve seen an error like this happen:
|
1 2 3 4 5 6 7 |
An error occurred. Contact your administrator for more information. Error details Activity ID: 00000000-0000-0000-c600-0080010000e9 Error time: Sun, 02 Apr 2017 17:28:37 GMT Cookie: enabled User agent string: Mozilla/5.0 (iPhone; CPU iPhone OS 10_2_1 like Mac OS X) AppleWebKit/602.4.6 (KHTML, like Gecko) Version/10.0 Mobile/14D27 Safari/602.1 |
If you check the AD FS servers you’ll notice an error like this with Event ID 364 error in the AD FS Admin event log:
|
1 2 3 4 5 6 |
Encountered error during federation passive request. Additional Data Protocol Name: Relying Party: Exception details: Microsoft.IdentityServer.Web.CookieManagers.InvalidSamlContextException: MSIS7046: The SAML protocol parameter 'RelayState' was not found or not valid. If the context was stored in cookies, the cookies that were presented by the client were not valid. Ensure that the client browser is configured to accept cookies from this website and retry this request. |
This is because the mobile Safari browser does not allow cookies over 4096 bytes. If the claim data is too large then the cookie is not sent properly and authentication fails. AD FS sets multiple cookies and it seems the iOS device is not sending all of them back causing an incomplete SAML request with no RelayState data. You can try minimizing claim issuance policy which I tried but even with just the Name ID I was having problems. This is a longstanding issue with Apple from my research and has been a problem they have not fixed yet. As a work around you can use my guide to create a custom page to help encourage users to use Citrix Receiver: http://www.jasonsamuel.com/2015/03/09/how-to-force-users-to-use-the-citrix-receiver-app-on-mobile-devices-using-netscaler/
SSL Certificates, NetScaler, and AD FS tips
I’ve spoken about not using wildcard certs if you can help it (watch the CUGC Networking SIG webinar recording from earlier in this guide for my thoughts on this). If you do decide to use a wildcard SSL cert with AD FS it becomes very easy with Backend SNI now on your service/service group:
vs. the old way of changing cert bindings on each of your AD FS servers:
|
1 2 |
netsh http show sslcert netsh http add sslcert ipport=0.0.0.0:443 certhash=<certhash> appid=<appid> certstorename=MY |
Using Azure AD in the cloud as your SAML IdP instead of AD FS in your datacenter
If you want to use Azure AD instead of AD FS as your SAML IdP check out these posts by Anton van Pelt (fellow CTP/Alumni) and Aaron Parker (fellow CTP):
Use Azure AD as IdP for Citrix NetScaler (FAS): https://www.antonvanpelt.com/use-azure-ad-idp-citrix-federated-authentication-service/
Integrating Citrix NetScaler with Azure AD and Conditional Access: http://stealthpuppy.com/netscaler-azure-ad-conditional-access/
Final Thoughts
Now I’ve shown you how to configure both the internal and external user experience as in the videos at the opening of this guide. I have also verified NetScaler MAS is taking the AppFlow data from both external and internal. I am able to offer a nice user experience with MFA based on where the user is logging in from. It is a similar login experience as when they log into Office 365 with AD FS using my UPN which is set as my email address. They will appreciate a common authentication workflow.
I’m really looking forward to native Receivers (Windows Receiver, mobile Receivers, etc.) having the ability to use SAML authentication. In a discussion with Carl one evening he found that Receiver 4.6 and 4.7 both actually have SAML functionality but only against StoreFront 3.9 when you configure SAML there natively (without a NetScaler): http://www.carlstalhood.com/citrix-federated-authentication-service-saml/#samlstorefront

Andrew Innes further clarified it was briefly mentioned in the blog post by John Ashman for StoreFront 3.9 and SAML. It states it as being supported on Receiver 4.5 onward:
https://www.citrix.com/blogs/2017/03/15/introducing-storefront-3-9-saml-support/.
though the edocs says Receiver 4.6 and higher: https://docs.citrix.com/en-us/storefront/3-9/about.html. I have only tested on Receiver 4.7 personally.
Fingers crossed we will see compatability through NetScaler Gateway and Unified Gateway soon. This is the missing piece for me that really makes this solution 100% polished for the end users.
Hope this guide has helped you! Please leave any questions or comments below.


ylzjyu
July 7, 2017 at 2:18 AM
good,thanks!!!
Bob Harrison
August 9, 2017 at 12:32 PM
Jason, I get this message when I launch an app. I get a windows sign in screen with “The user name or password is incorrect” I have looked for events on the S.F., FAS, and DC servers. I am using your instructions, but using the gateway instead of the unified gateway. Any ideas where to look? Thanks.
Varinder Singh
October 1, 2017 at 4:17 PM
wow, very good instruction. How is this working with to domains like two separate companies? I don’t want to create a domain trust between these domains.
In my scenario I have two MS Active Directory forests. and want to authenticate from Forest A to B, where my Citrix Farm ist running. Do I need shadow Accounts on the B-Side? And if this is so, do I have to put the Users on B-Side to any Groups like ACLs etc.? And is this working also for NTFS-Fileserver and Printer?
Regards, Varinder
Peter
November 12, 2017 at 12:47 PM
Very nice article, I used it to set up my servers, just skiped mfa part for azure as i don’t have budget for it, but using a free version from http://www.securemfa.com …. works fine.
Rajneesh Saraswat
November 21, 2017 at 9:49 AM
Is it possible if you can provide the logon flow process as well step by step with port details for both type of user like user login from External network and local network as well.
Roberto
January 25, 2018 at 3:45 AM
Hey Jason, very nice article. I just tried to configure a SAML authentication Server in Netscaler (v12.0-53.13). For IDP Certificate I choosed our Wildcard Certificate (Domain in fqdn match ADFS URL) and in the Signing Certificate Name I choosed the exported Signing Certificate from our ADFS Server (installed as CA Certificate).
When I click on create, I receive the error “Invalid certificate”.
Any idea why Netscaler don’t accept my certificate?
Thank you and cheers,
Roberto
Roberto
January 25, 2018 at 7:43 AM
Hey Jason… Problem solved. I had to change the certificates. IDP = Signing Certificate and Signing Certificate the Wildcard. Now it works fine 🙂
David
April 4, 2018 at 9:16 PM
Thanks Jason. Citrix says that NetScaler can be used as SAML IdP as well as SAML SP. Is ADFS superior as a SAML IdP somehow?
Jeroen
April 6, 2018 at 5:27 PM
Hi Jason, Do you have an update on the allowReloginWithoutBrowserClose using the RfWebUI? WE are using Clientless Access by default and though we get the button. Clicking on it we get an error that the page cannot be found. Thanks in advance.
Tiberiu
May 25, 2018 at 12:16 PM
Hi, when I’m trying to create the Authentication SAML Server with the signing certificate that I exported from ADFS I am getting an “Invalid certificate” error. I am currently talking to Citrix support and they’re telling me that I need a PFX cert with a key in order to implement this. Do you happen to know why I am getting that error?
James
September 21, 2018 at 1:58 PM
Hi Jason,
Am I correct to say that there are no configurations to be done on the StoreFront server to accommodate MS MFA?
mborhot
October 24, 2018 at 10:43 AM
Hi Jason,
Wondering if you have worked with the new ADFS feature:
https://docs.microsoft.com/en-us/windows-server/identity/ad-fs/operations/configure-ad-fs-extranet-smart-lockout-protection
https://www.microsoft.com/en-us/microsoft-365/blog/2018/03/05/azure-ad-and-adfs-best-practices-defending-against-password-spray-attacks/
I have enabled it on ADFS but it does not appear to be working properly and may have something to do how we are using Netscaler ADFS proxy.
Thanks for your help.
Stefan
November 13, 2018 at 8:08 AM
Hi Jason,
Thanks for your guide. We are getting the “Malformed Assertion sent to Netscaler; Please contact your administrator” on certain web browsers after enabling the conditional access to use MFA.
When we disable conditional access everything works fine. Do you have any idea how to trouble shoot this? Thanks in advance!
Kind regards, Stefan
Dan
July 19, 2020 at 4:38 PM
Were you able to get more clarification on the Clientless Access / RFWebUI issues you described ?
We have this exact issue and have not been able to work around it