
I’ve deployed a lot of 2 factor authentication products with Citrix NetScaler Gateway in my career but the one I’ve always liked a lot is Microsoft Azure Multi-Factor Authentication (MFA). I used to deploy this product years ago when it was called PhoneFactor. Microsoft purchased PhoneFactor in 2012 and I was worried that would be the end of the service. But Microsoft has really taken the product to the next level.
There are several steps involved in deploying it now that PhoneFactor is integrated with Microsoft Azure. I’m going to break it down step-by-step for you and cover the following in this article:
WHY YOU SHOULD DEPLOY A 2 FACTOR OR MULTI-FACTOR AUTHENTICATION SOLUTION

There are many reasons why you should endeavor to deploy a 2 factor or multi-factor authentication system at any size organization. Privacy and security have never been so prevalent subjects of discussion in organizations as it has been in recent times. Pretty much any consumer level service worth mentioning has some form of 2 factor authentication available for users. I would almost call it a necessity these days.
https://en.wikipedia.org/wiki/Two-factor_authentication
A NetScaler is a very powerful device and you can setup all sorts of authentication methods on it (LDAP/LDAPS, RADIUS, SAML, OAuth, etc.) and the list keeps growing. But if someone were to guess your user’s ID and domain password they’re in and there’s nothing you can do about it unless you authenticate based on another factor. This is where the “something you have” part of 2 factor authentication comes in. A One Time Passcode/Password (OTP) usually in the form of a PIN number is provided to the user on something they have in their possession to verify they are who they say they are.
Years ago I used to deploy solutions using little tokens people had to carry around on their keychains like RSA SecurID. Nobody wanted to carry those little tokens around. If they loose it, there’s a cost to IT to have to replace it. It was tough for the Help Desk to manage them. And when the 2 factor system itself gets hacked like it did in 2011, you’re now having to face an organization wide token replacement dilemma: https://en.wikipedia.org/wiki/RSA_SecurID#March_2011_system_compromise
Then came phone apps like Google Authenticator, Symantec VIP, etc. with “soft tokens” that could be installed on the user’s phone. This has become more convenient for users but it still slows down the login process. It requires the user to have to transcribe a PIN code into the NetScaler Gateway logon page. One that changes every 60 seconds so if you have 10 seconds left on the countdown clock within the authentication app, type fast like it’s Mission Impossible or stand there and stare at your phone aimlessly for 10 seconds before the code changes and you can continue with the login process. People want things to be simple. They want to get in quickly. So this became a real hassle for them.
Citrix technologies are first and foremost about the User Experience. Whatever solution you choose needs to be easy on the users. If you don’t make technology easy and convenient to use they will reject the solution. They’ll circumvent it using an easier to use consumer level technology if they can. I covered this last year in article about User Experience and MDM. The same holds true for anything customer facing you deploy:

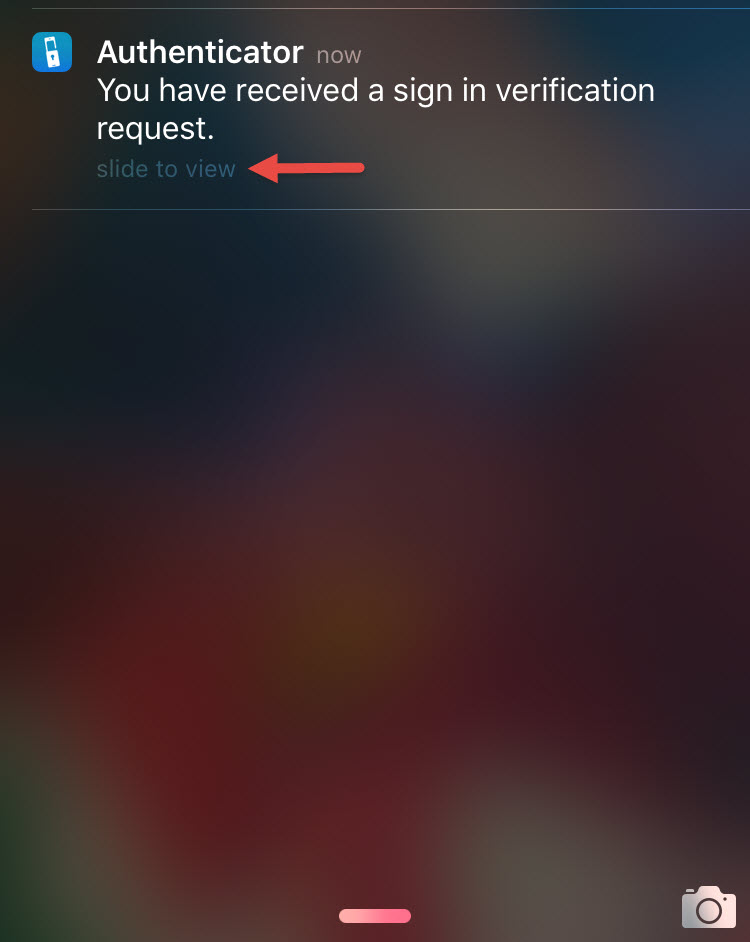
The two solutions that work quickly for the user are phone calls and SMS text messages. This is what many of my clients prefer now for their organizations. They are fast and convenient methods to verify a user’s identity. Azure MFA/PhoneFactor, SMSPasscode, Duo Security, etc. are all very well received in this space. With a phone call based system you simply answer the call and hit the “#” or other key you specify in the system and the user is in. With a text message you simply respond back to the text message or type in the PIN code presented to you and you’re in. Most all vendors support multiple paths to authenticate as fallback. Azure MFA for example has options like using a mobile app as well as a self service user portal website where the user can do a One-Time Bypass of MFA or enter security questions authenticate. Azure MFA even has support for OATH (Initiative For Open Authentication) tokens so it’s compatible with a variety of hard token manufacturers that support this standard.
You can get even more advanced than this. You can look at each login in real-time and compare several factors like the IP address for geo-location, company device vs. personal, time of day the login is occurring, etc. to analyze and react accordingly to the login. Let’s say a hacker in another country compromised the user’s cell phone carrier account and is forwarding calls and texts to their cell phone. They can get the One Time Password now but because their IP is coming from a different country or untrusted device, you can now react to this and deny access even though they have all the right credentials. Many of the services I have described can do this and you can also leverage some of these protection features on the NetScaler itself but that’s a whole other article. 🙂
SETTING UP AZURE ACTIVE DIRECTORY
I’m going to write this article assuming you have 0 presence in the Azure cloud right now. If you already have Azure AD up and running, skip to the next section. If you don’t, the first thing you’ll need to do is sign up for an Azure subscription followed by setting up AD Connect which will get you connected to the cloud. Even a trial subscription of Azure is fine:
Once that’s done, follow these steps to link your on premise Active Directory to Azure using AD Connect:
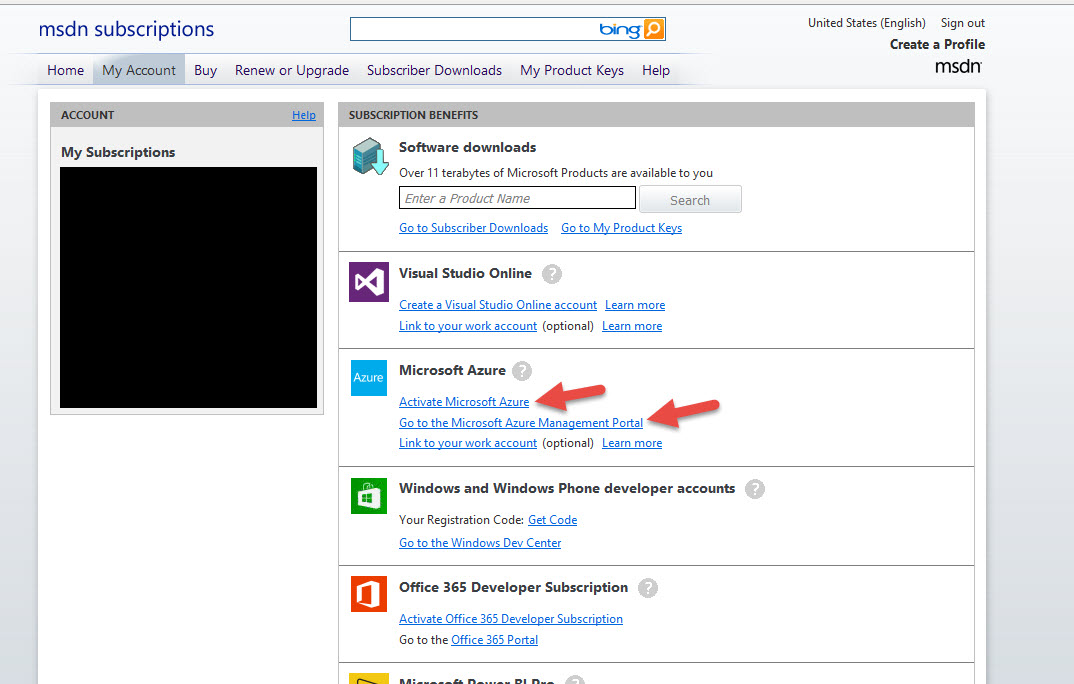
1. First login to to your Microsoft Azure account. For this example I’m using an MSDN subscription with a certain amount of monthly credit for Microsoft Azure included. Just sign in at:
https://msdn.microsoft.com/subscriptions/manage/
and click “Activate Microsoft Azure” to activate your subscription if you haven’t done so already (will take about 3-4 min to get it setup). Otherwise you can go directly to the “Microsoft Azure Management Portal”:
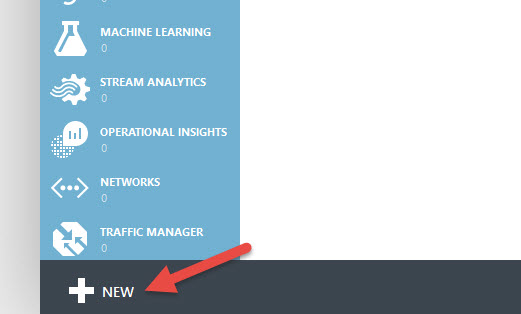
2. In the Azure Management Portal (https://manage.windowsazure.com/), click the + New button in the bottom left:
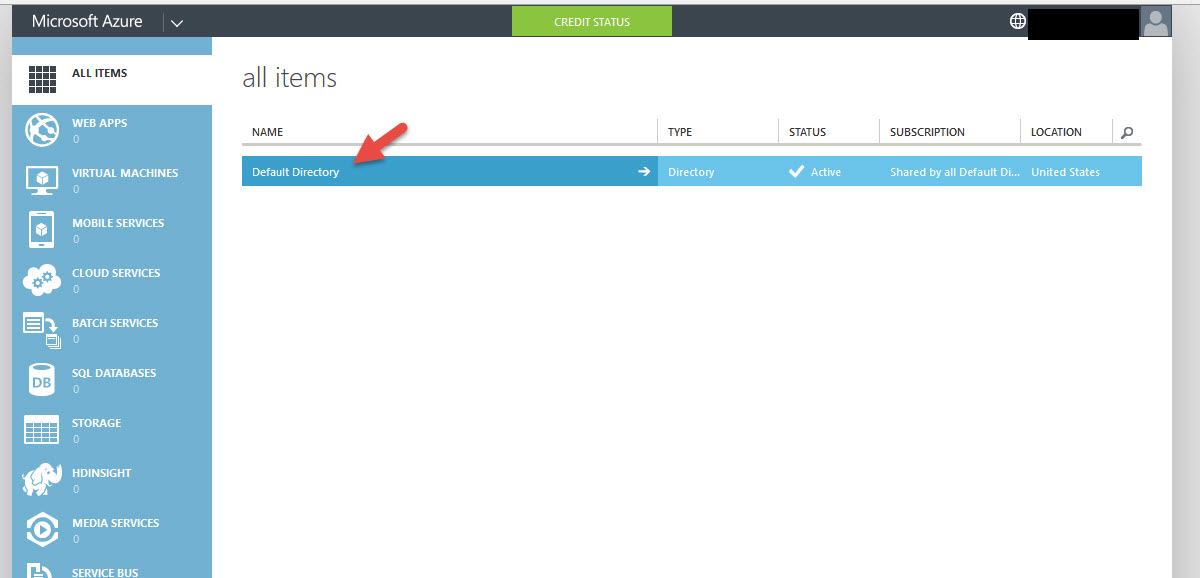
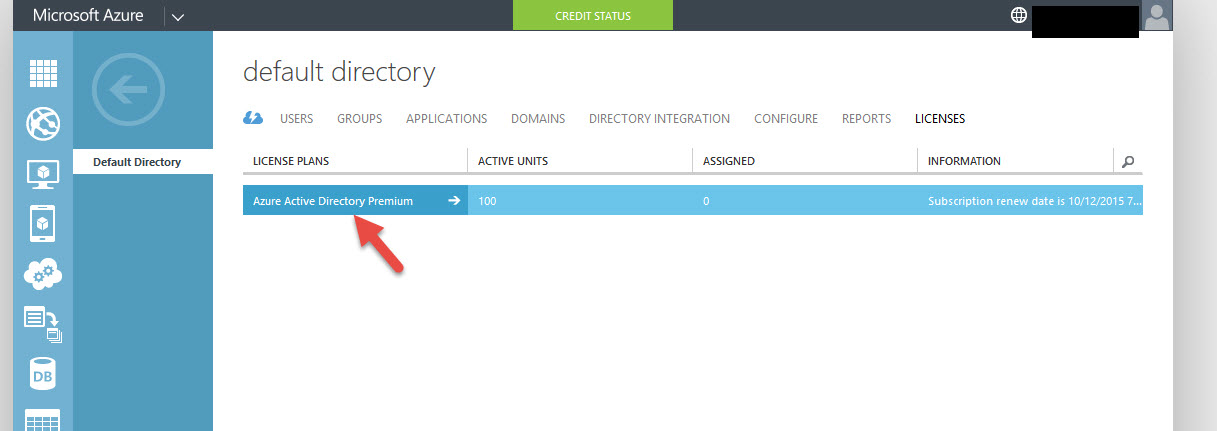
3. You’ll be presented with a quick tour and then finally the All Items section where the only thing you’ll see is Default Directory. Go ahead and click on it:
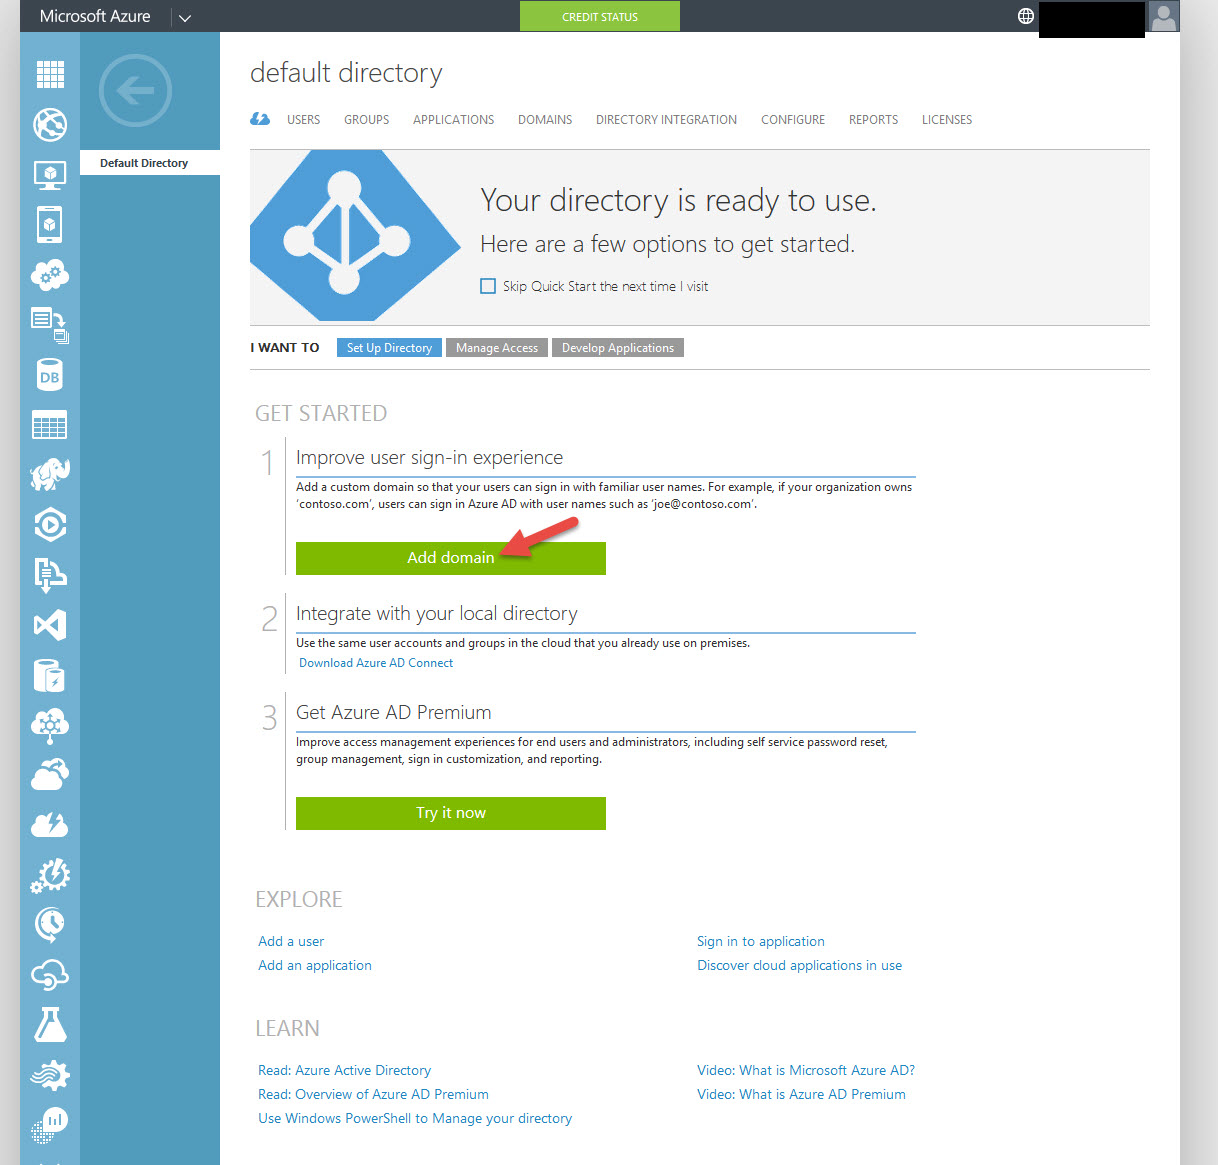
4. First thing to do is create your domain. So go ahead and click “Add domain”. Please make sure this is a domain you already own by the way.
5. Add your domain name and click the check box saying “I plan to configure this domain for single sign-on with my local Active Directory”:
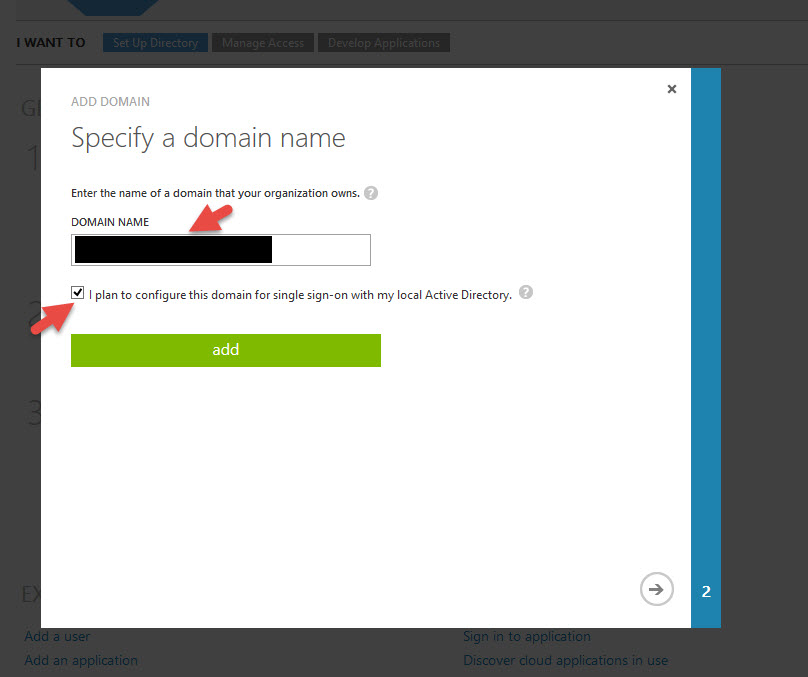
6. On the next screen it wants to take you to the Directory Integration page to verify domain ownership. Hit the check icon in the bottom right:

SETTING UP AZURE AD CONNECT
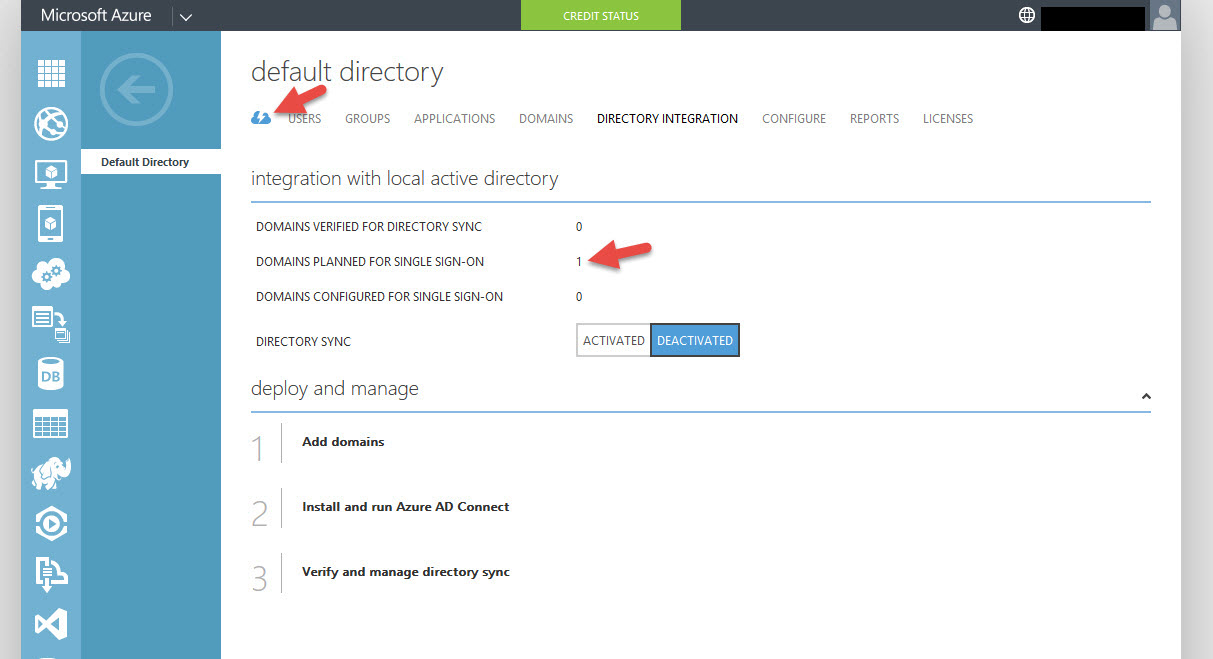
Note, AD Connect is not necessary if all you have is an on premise AD. I wanted to show you the whole cloud setup but if you only have an on premise Active Directory, then skip to the AD Premium setup in the next section.
7. You’ll notice you have 1 domain planned for single sign-on. So the next step is to run Azure AD Connect. Click the little blue cloud next to Users to get back to the Quick Start screen.
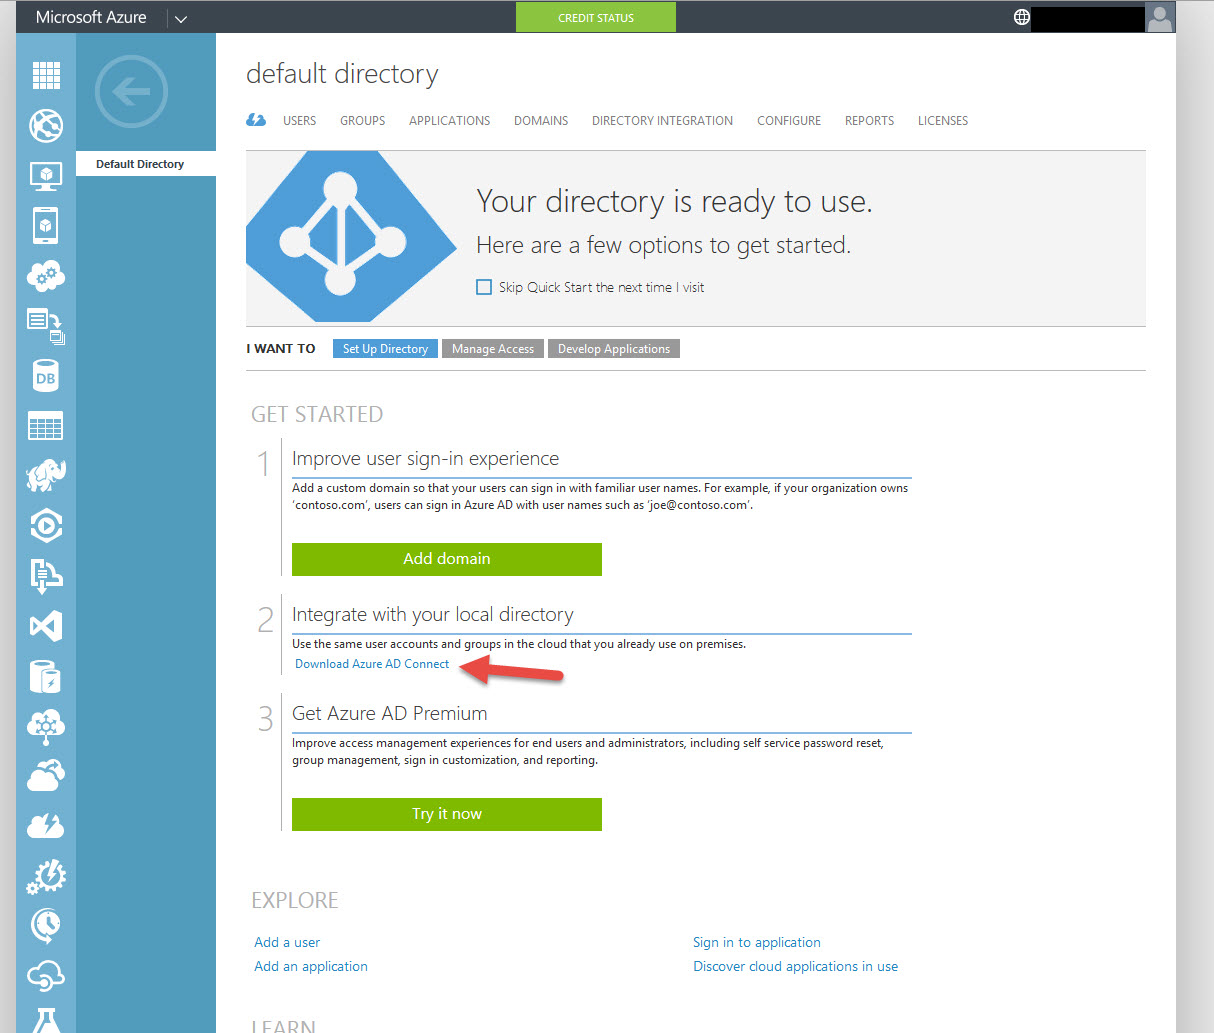
8. Download Azure AD Connect, it’s a 62 MB file called AzureADConnect.msi:
9. Run Azure AD Connect on a DC or a member server, both are supported. For production environments I always recommend have dedicated servers for everything. It does install a very light weight SQL Express LocalDB database on the server so I really recommend keeping it off a DC if you can. I know what you’re thinking, “What is this thing going to do to my Active Directory?”. Don’t be afraid. It’s just a simple sync tool and won’t do anything to your AD. Bill Mather wrote a great guide on integrating your on-premise Active Directory user IDs with Azure Active Directory here:
https://azure.microsoft.com/en-us/documentation/articles/active-directory-aadconnect/
Hit Agree, then Continue
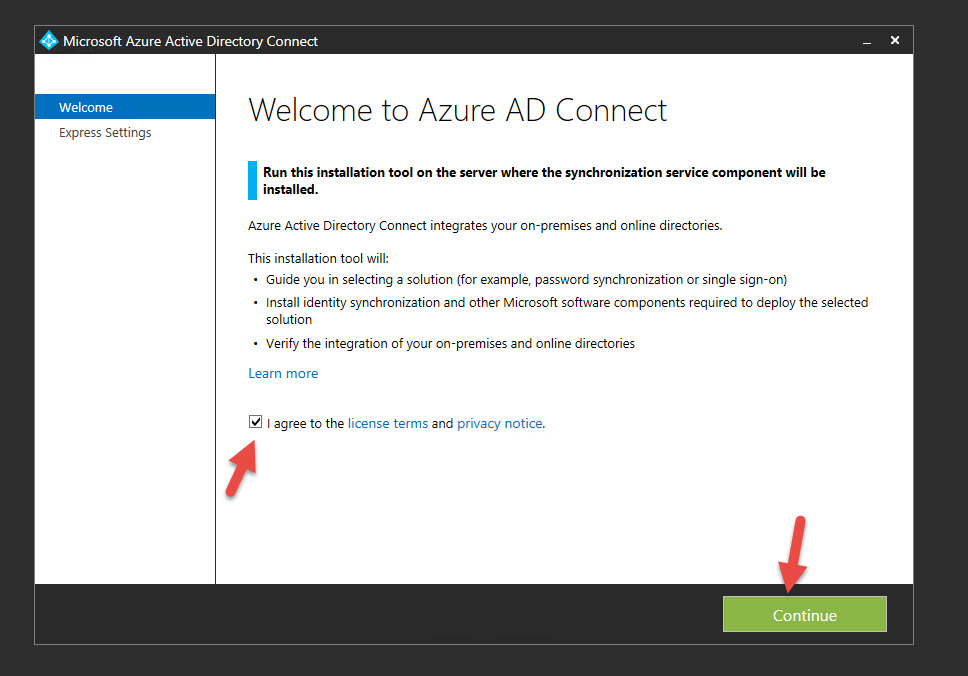
10. I chose Express Settings but you can Customize if you want to. You can point at a SQL Server, use a different service account, create custom sync groups, etc. You’ll want to do a Custom install if doing this in a production environment so you know everything it’s doing.

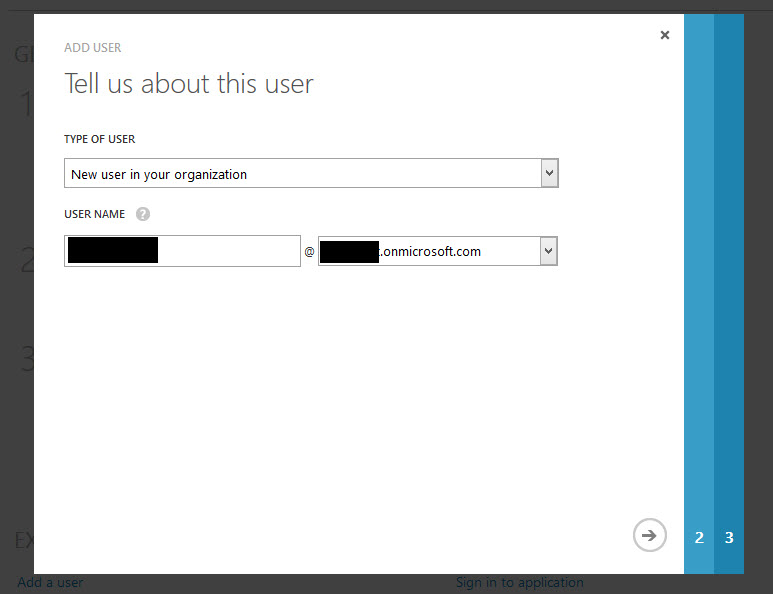
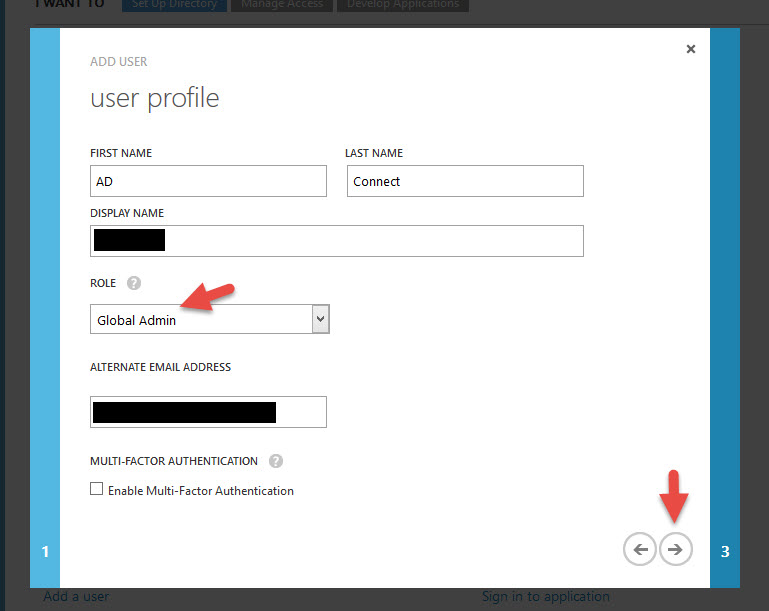
11. Type in your Azure AD credentials. Note, this account must end with “.onmicrosoft.com” and be a Global Admin in Azure. I just created a new user in Azure with the Global Administrator role for this purpose:
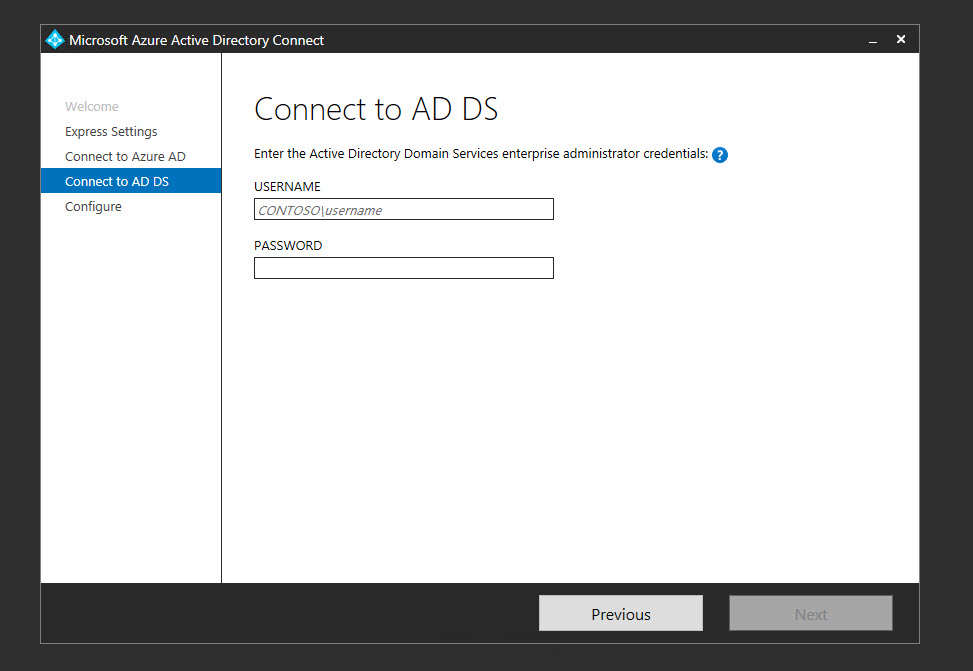
12. Next type in the credentials for an Enterprise Administrator in your local Active Directory
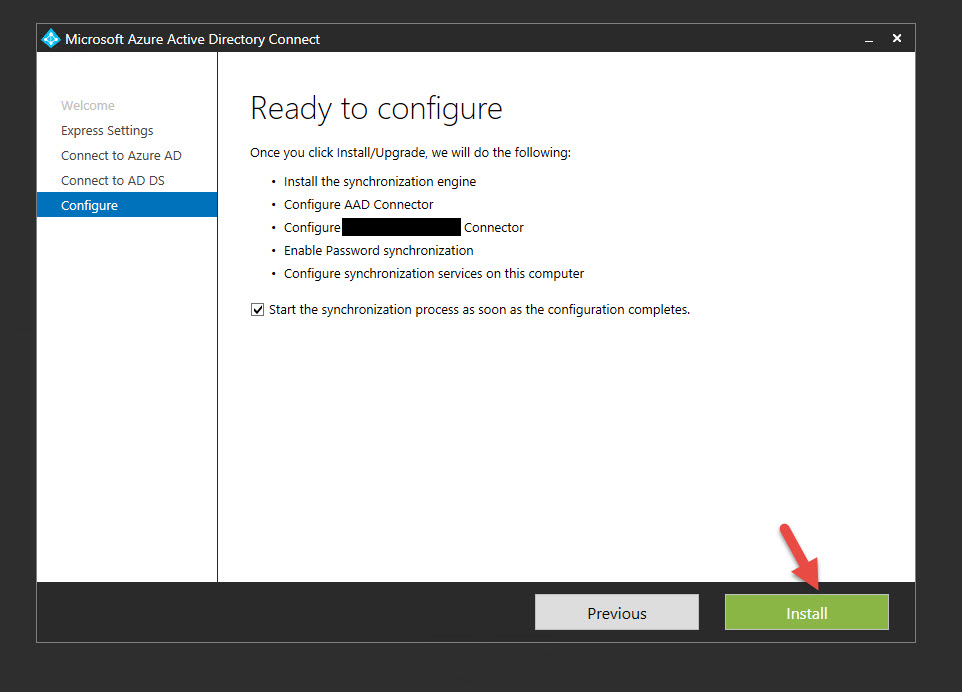
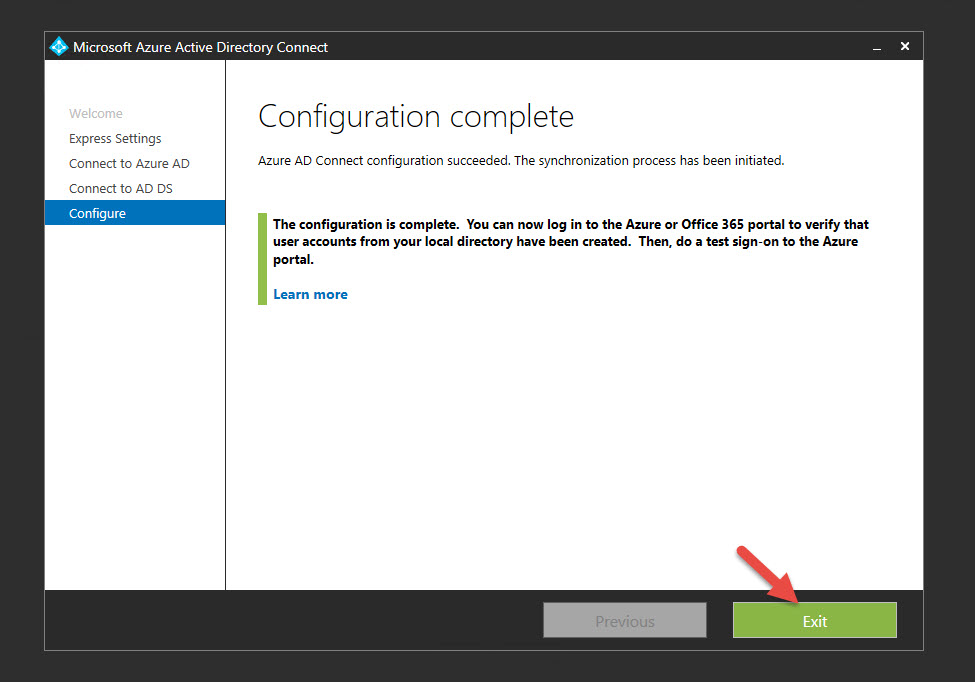
13. Click Install and it will immediately install and start syncing your Active Directory to Azure
14. Once it’s done hit Exit and confirm your local AD accounts are now in Azure AD.
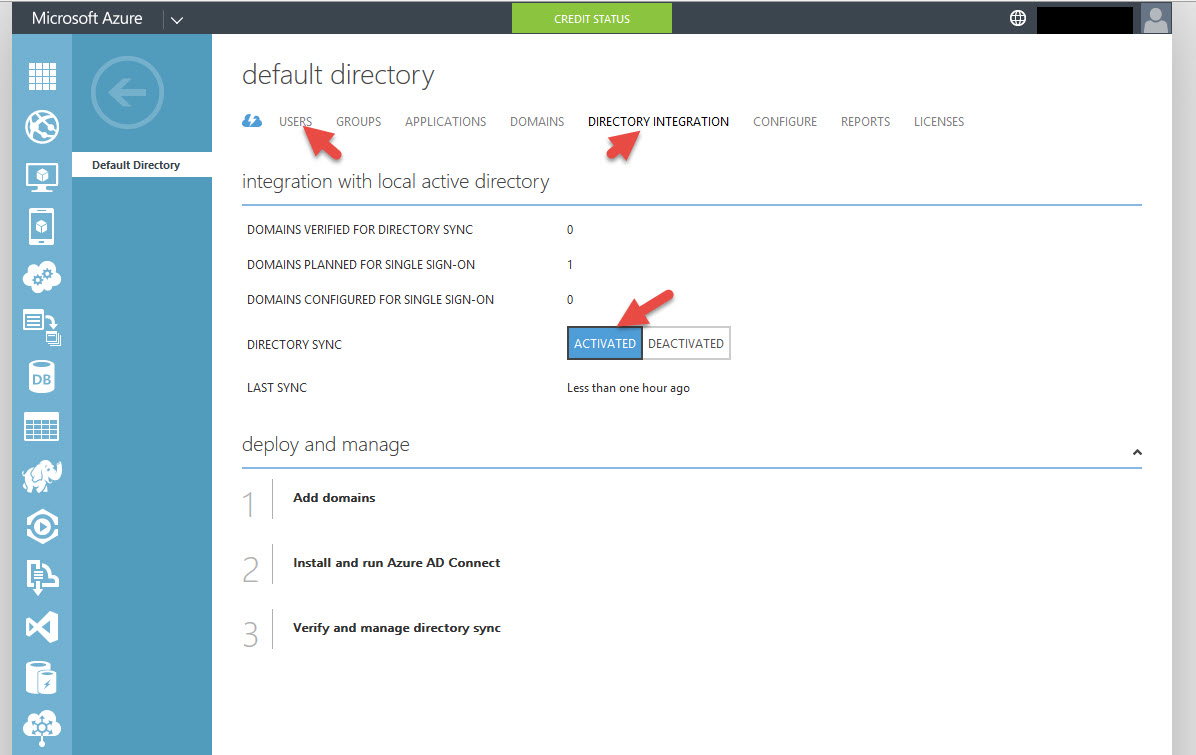
15. You’ll notice all the Users are in the Users section and now under Directory Integration you are now ACTIVATED:
SETTING UP AZURE AD PREMIUM
Did you know there are presently 3 different version of Azure MFA? Microsoft allows you to set it up for Office 365 only, Azure Administrators only (comes with your Azure subscription), or what you probably came here for, any and all of your Active Directory users both for on prem and cloud authentication. You must be using that 3rd flavor to work with NetScaler Gateway. In order to get it, you must be using Azure AD Premium or the Enterprise Mobility Suite. Bill Mathers has a great article explaining the flavors here:
https://azure.microsoft.com/en-us/documentation/articles/multi-factor-authentication/
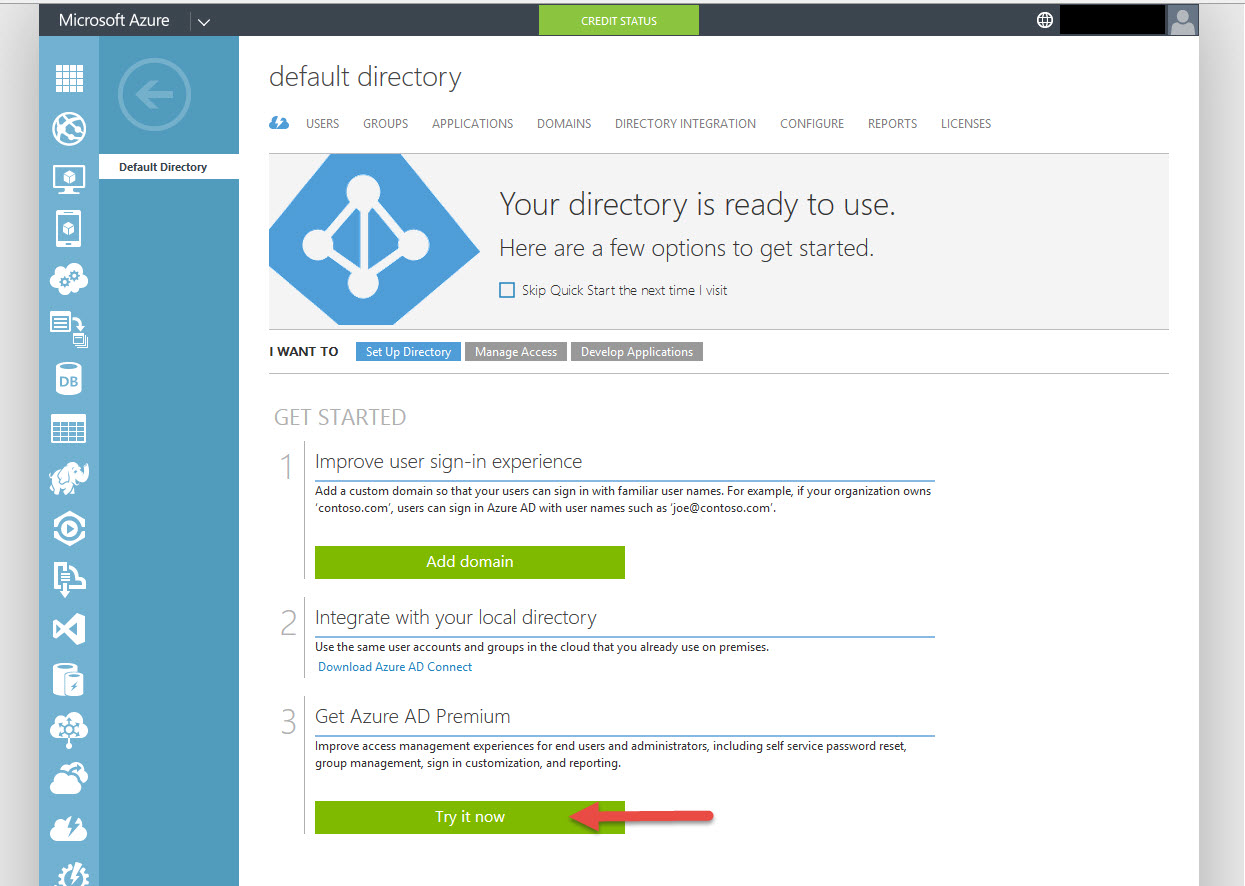
16. So go back to the Quick Start page and hit Try It Now under Azure AD Premium
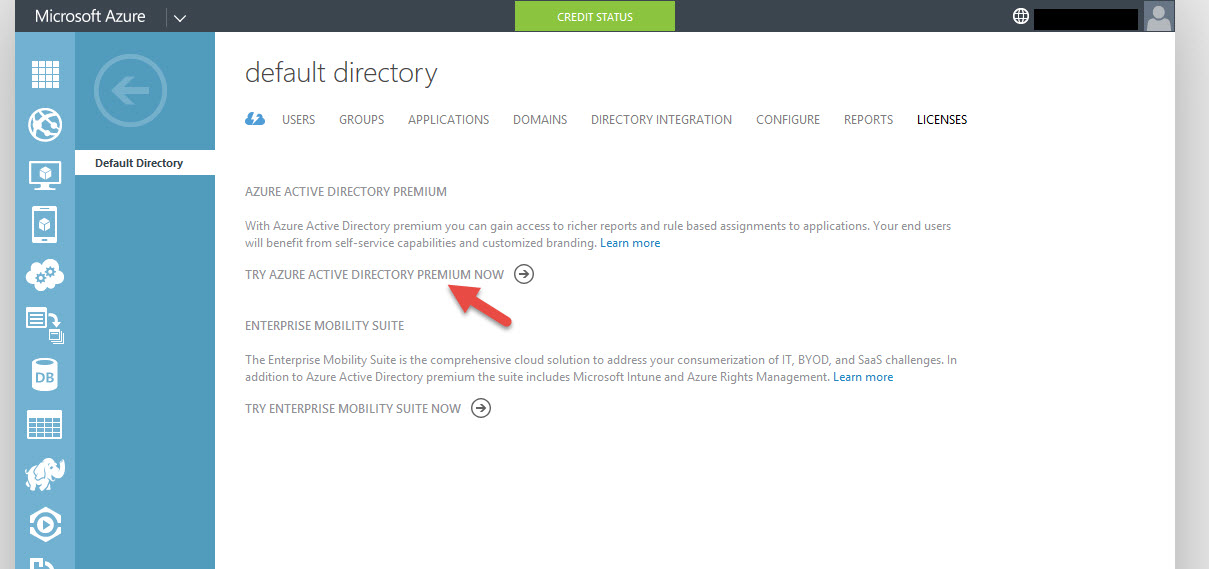
17. Now click “Try Azure Active Directory Premium Now”
18. Then I get the message about the 30 day trial. My MSDN account comes with AD Basic which is part of every Azure subscription. AD Premium is an additional cost. Grrr… Go ahead and hit the check box and wait 2-3 min for it to finish upgrading you to Premium. You might want to manually hit the refresh link it shows you after this page, I’ve seen it hang up sometimes.

19. Now you’ll see your are using Azure Active Directory Premium. Go ahead and click on it:
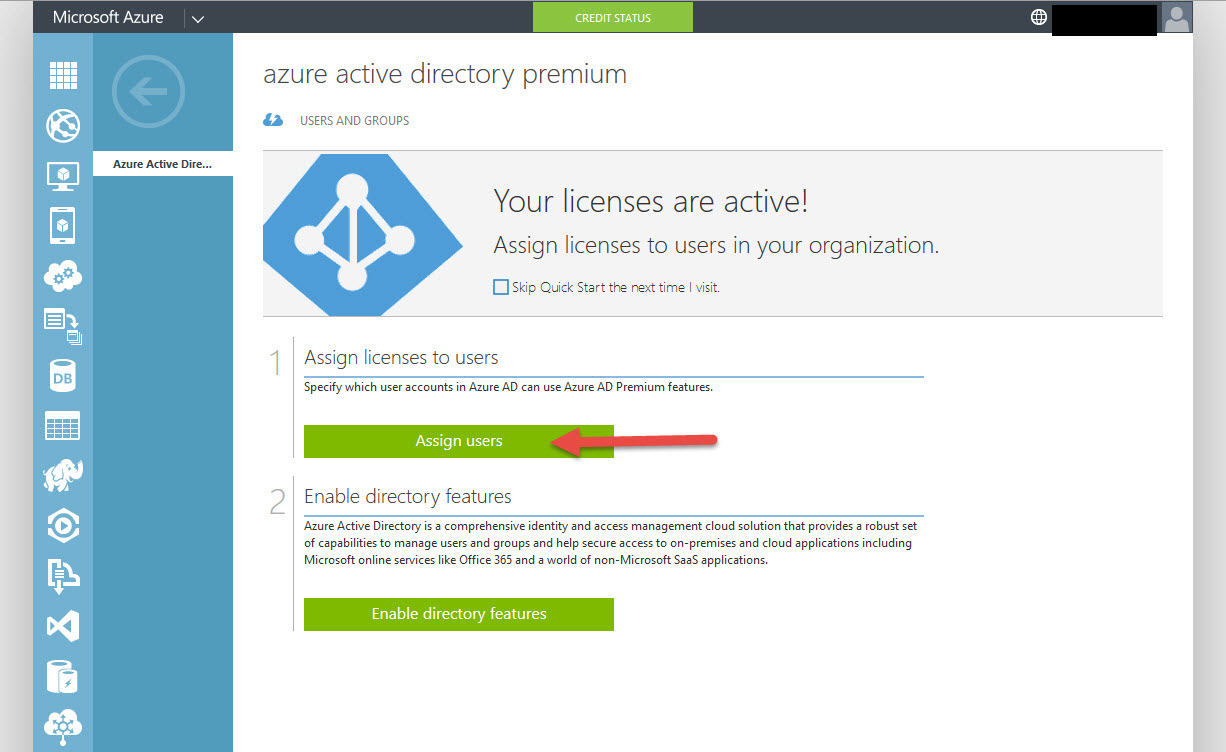
20. Now you have the options to Assign Users or Enable Directory Features. Go ahead and click Assign Users
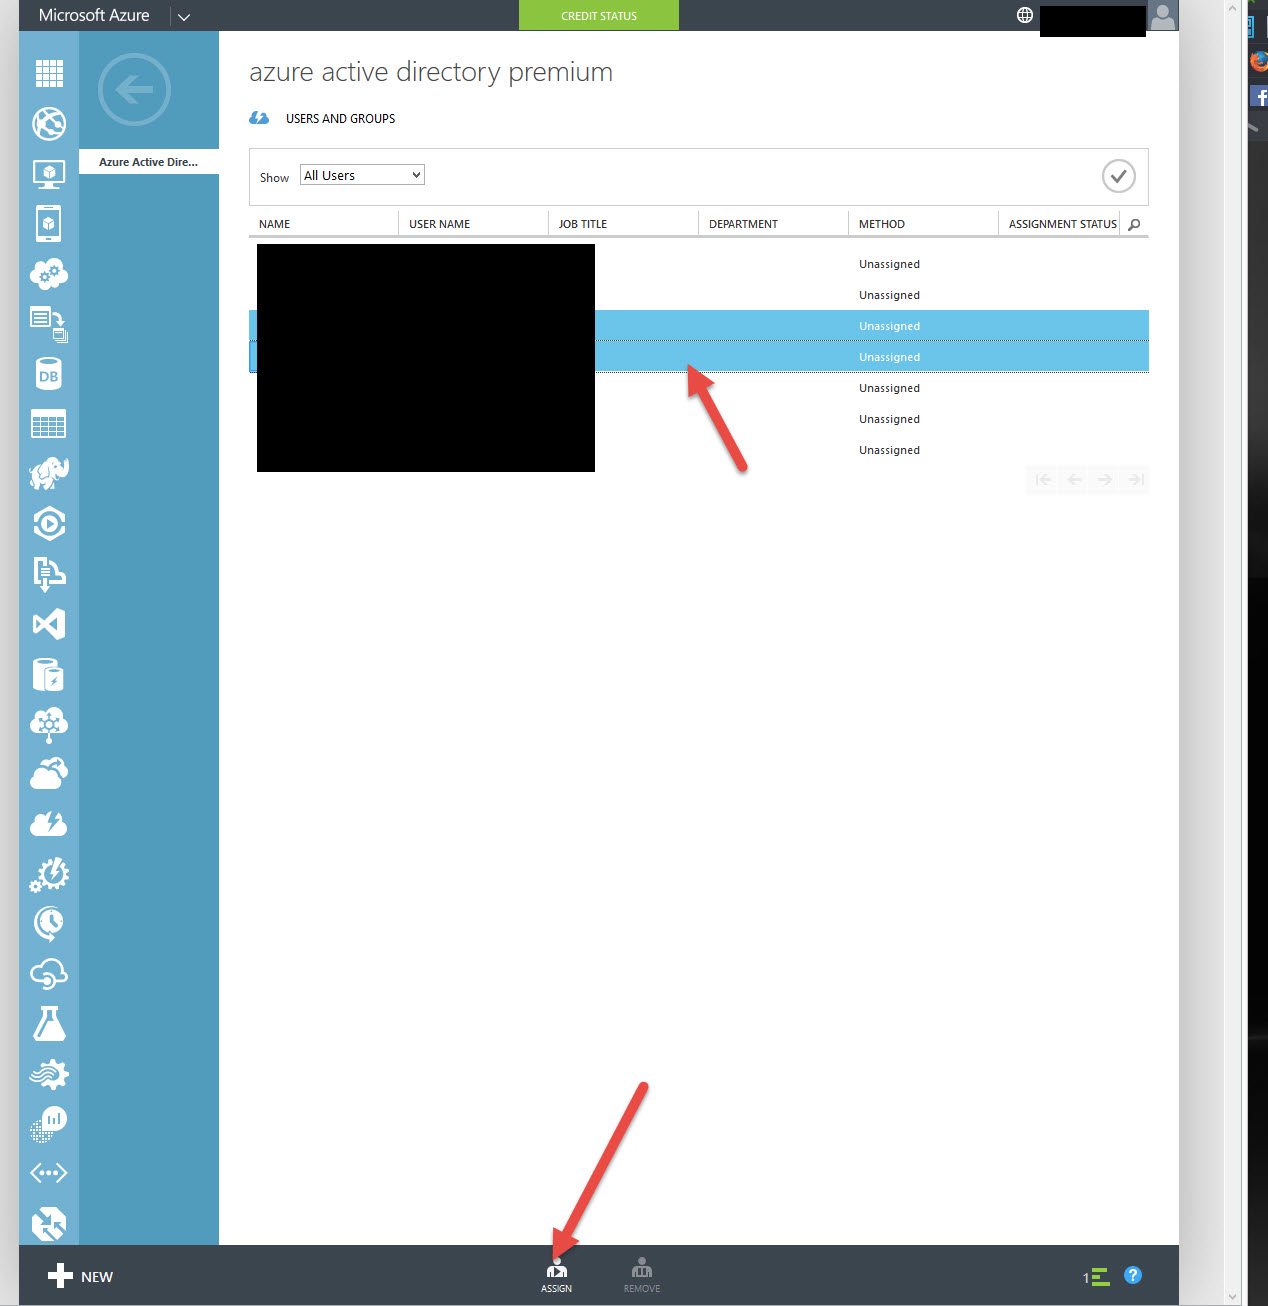
21. By default you’re going to see Assigned Users and it will be blank. You have to click on the drop down and select All Users then hit the Check button to actually see the users:

22. Select the user accounts you want to Assign (Ctrl+click) then click Assign at the bottom:
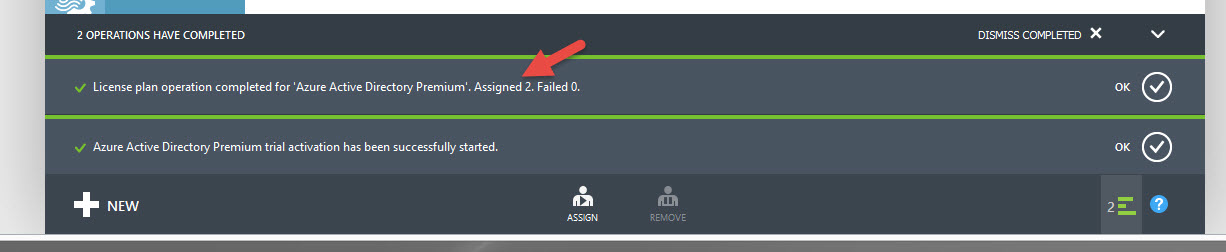
23. It will tell you at the bottom once it has completed
24. Now go back to the Azure AD Premium Quick Start screen and hit Enable directory features
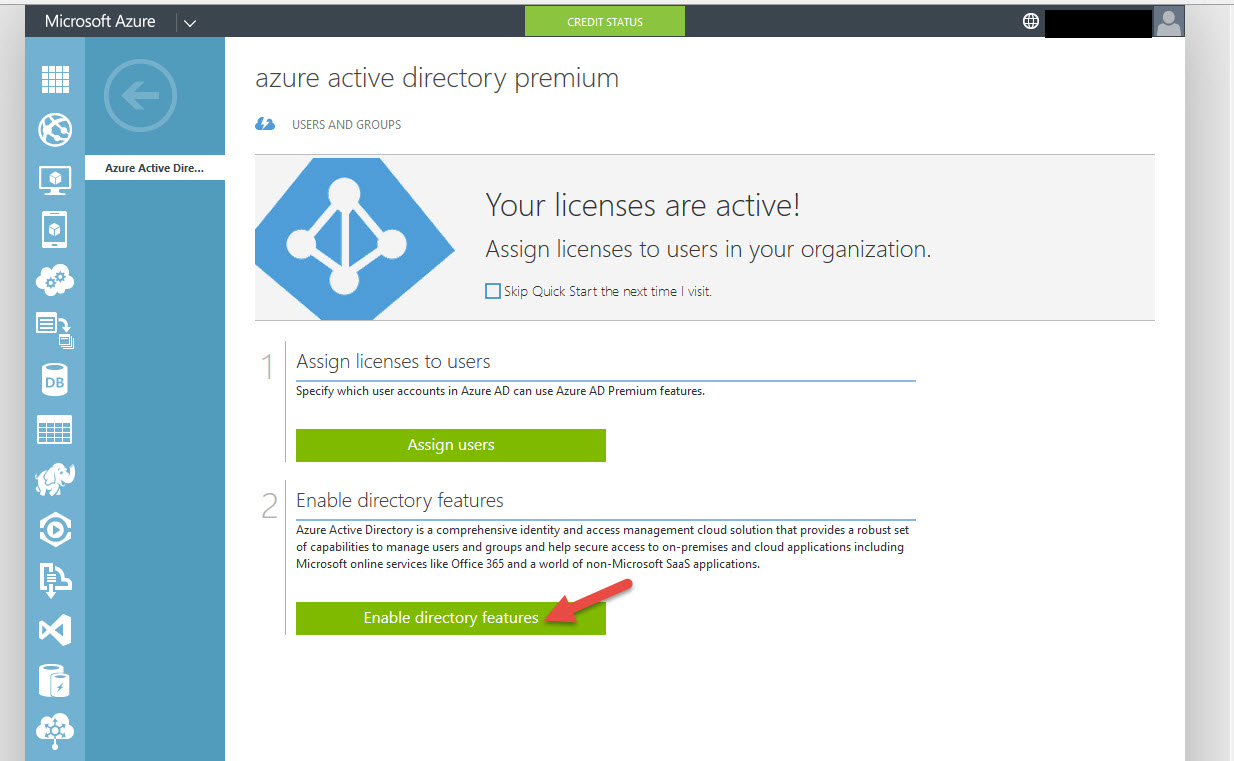
25. Now you’ll see a bunch of Directory Properties. Some really cool stuff in here I’ll have to show you in a different article like the custom branding. Scroll down to “multi-factor authentication” and click Manage service settings.
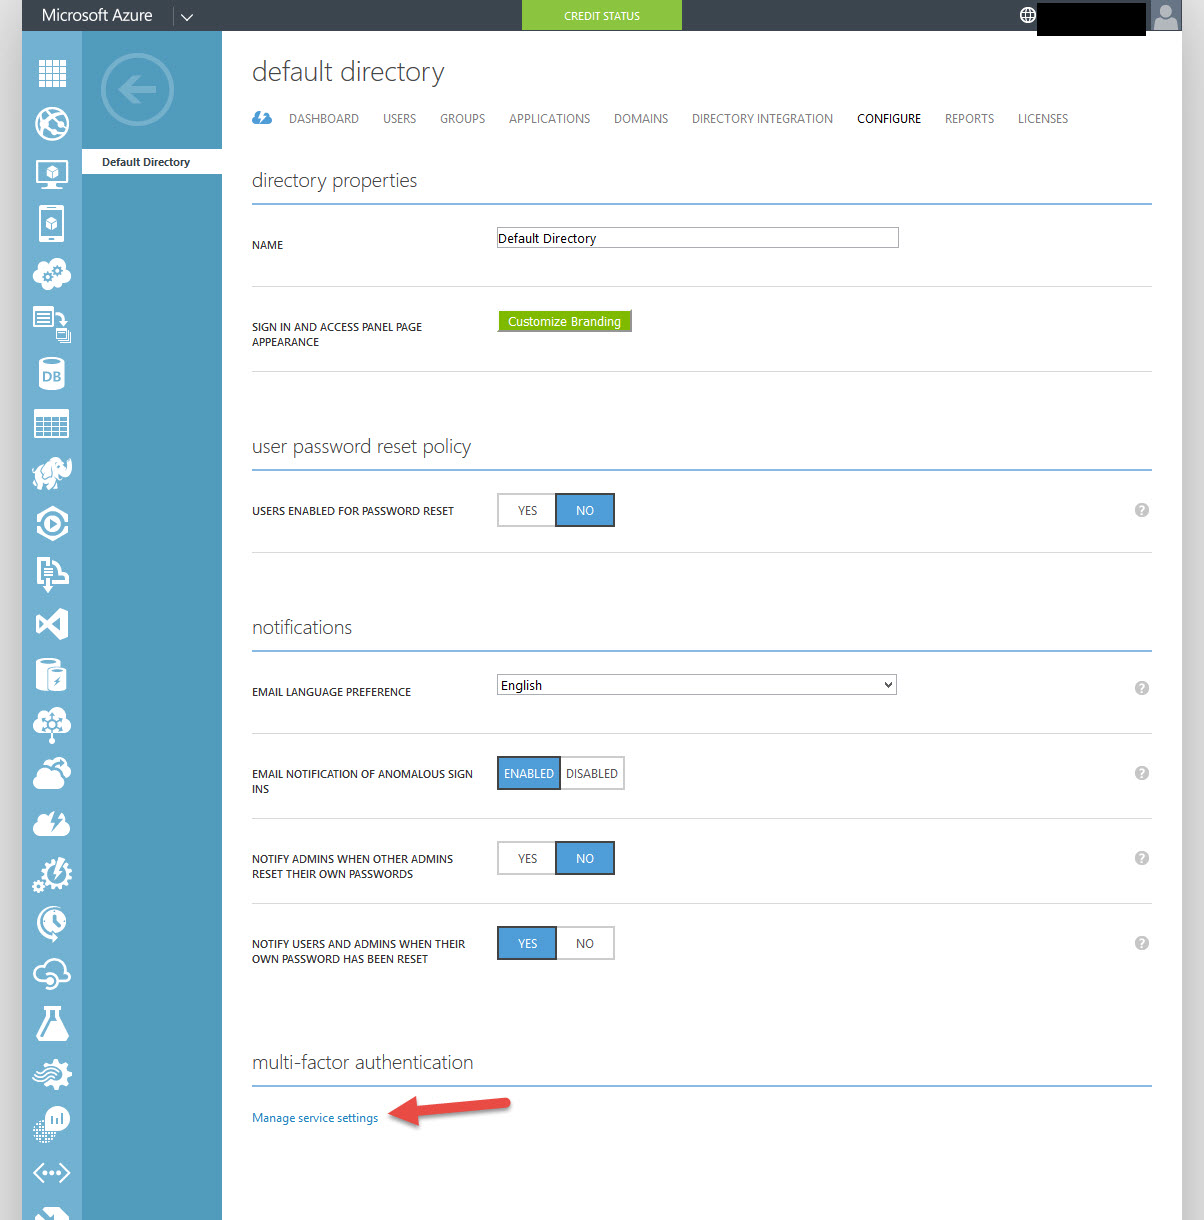
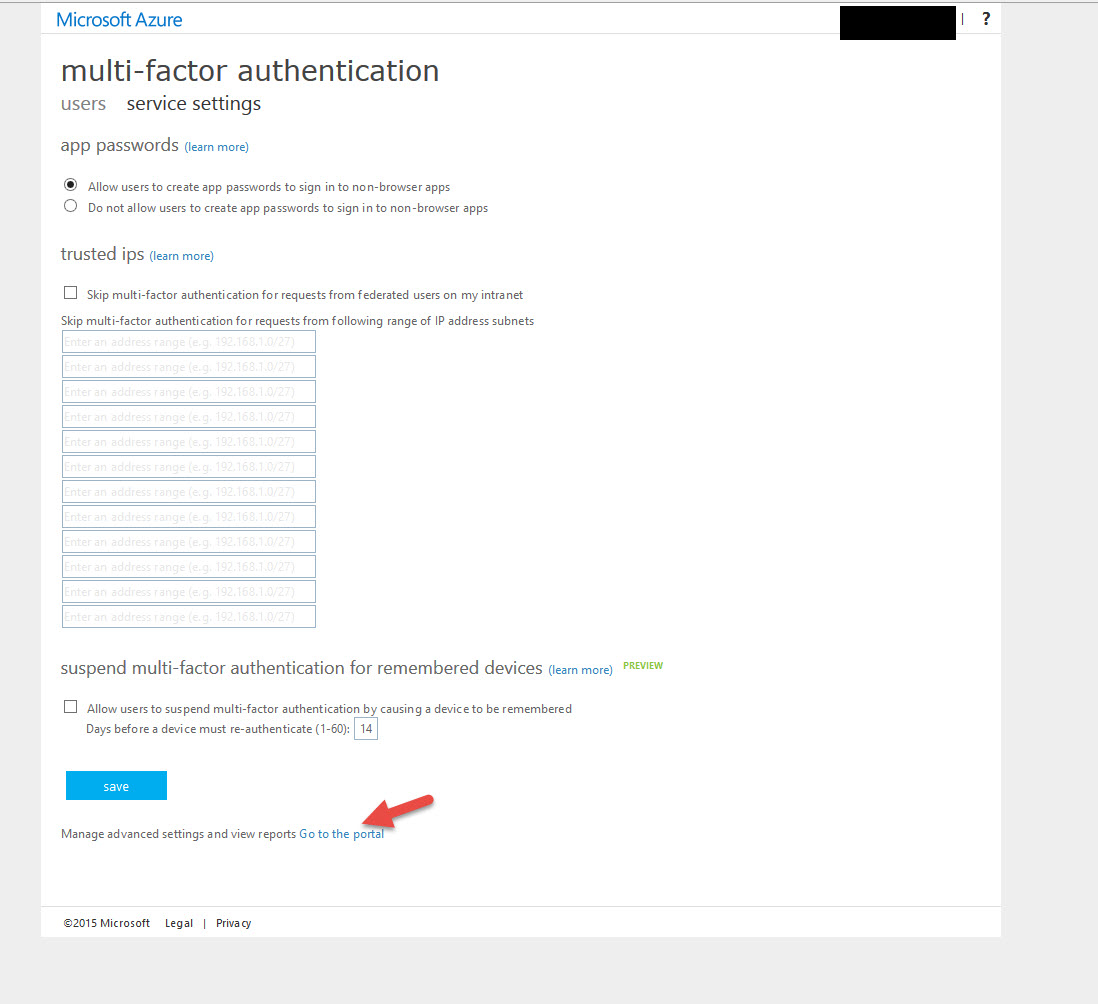
26. You’ll get redirected to a different portal, don’t worry about this stuff now. Just click Go to the portal near the bottom:
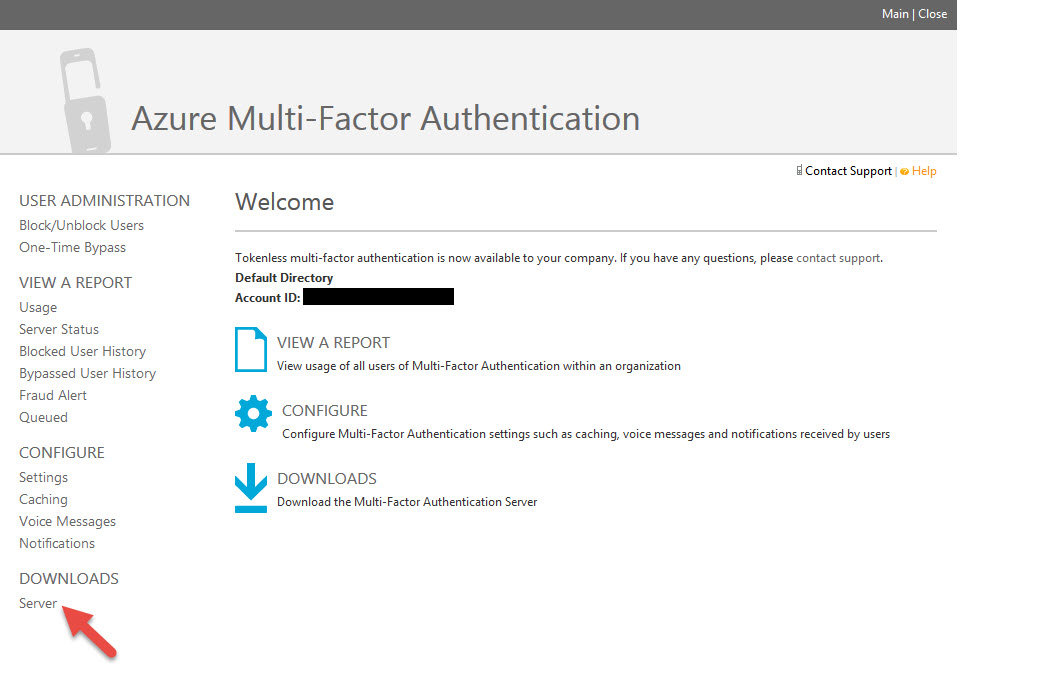
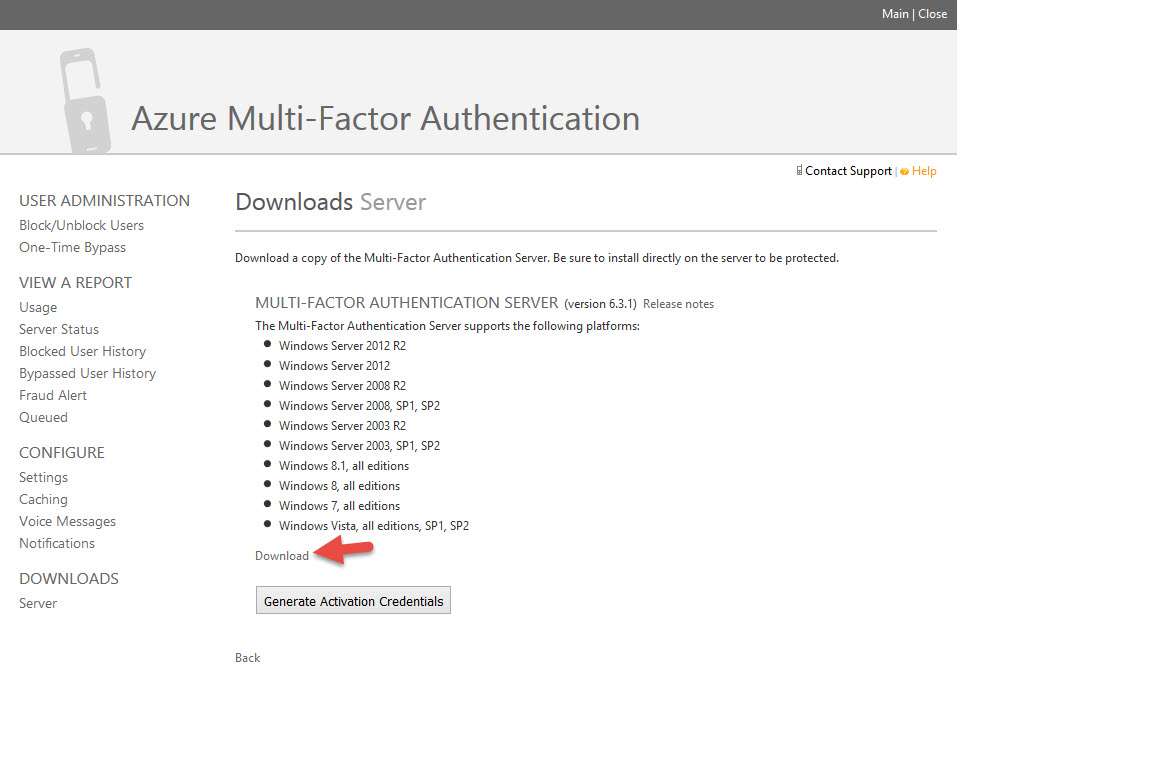
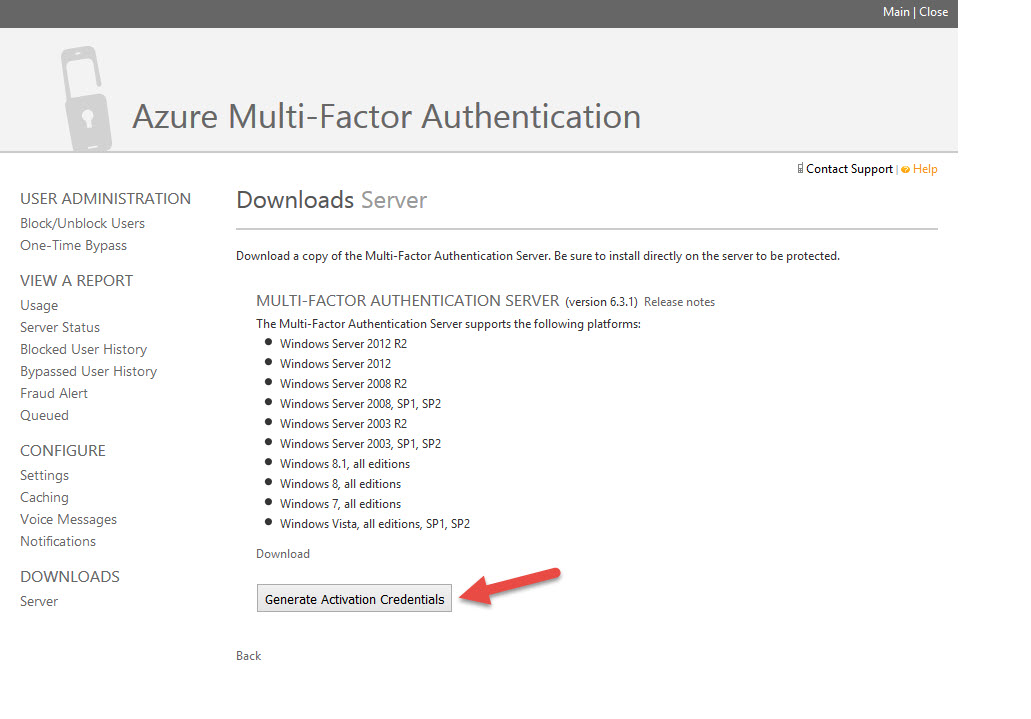
27. Now the 3rd portal opens up. This is the Azure Multi-Factor Authentication Admin portal. Finally! Looks like the old PhoneFactor portal doesn’t it? You can verify on the home page that your Directory has it enabled. Go ahead and click “Server” in the left hand Downloads section.
SETTING UP AZURE MULTI-FACTOR AUTHENTICATION SERVER ON PREMISE
Though Azure MFA is a cloud based service, an on premise component called “Azure MFA Server” is necessary. This is what allows 3rd party systems like NetScaler Gateway to use the solution. If you don’t use the on premise server then you are limited to only being able to use MFA for Microsoft’s cloud and SaaS services like Office 365 only. In a production environment, you’ll want to have at least 2 of these servers and a high availability configuration plus consider your DR sites. These servers will become critical to your organization. Bill Mathers has an excellent guide available here:
https://azure.microsoft.com/en-us/documentation/articles/multi-factor-authentication/
NOTE: DO NOT install MFA Server on a Domain Controller. It is meant to be a standalone component. It will take over ports 389, 636, etc. for LDAP/LDAPS traffic so don’t potentially screw up your DCs which will compete for those ports with MFA server. I have not found any documentation from Microsoft on this but this is just from my personal experience watching network traffic on MFA Server. I wouldn’t risk it.
28. Go ahead and click the “Download” link for MFA Server. It’s pretty small file at 122 MB called MultiFactorAuthenticationServerSetup.exe
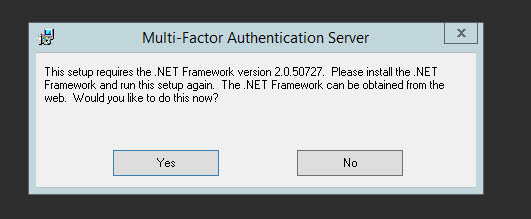
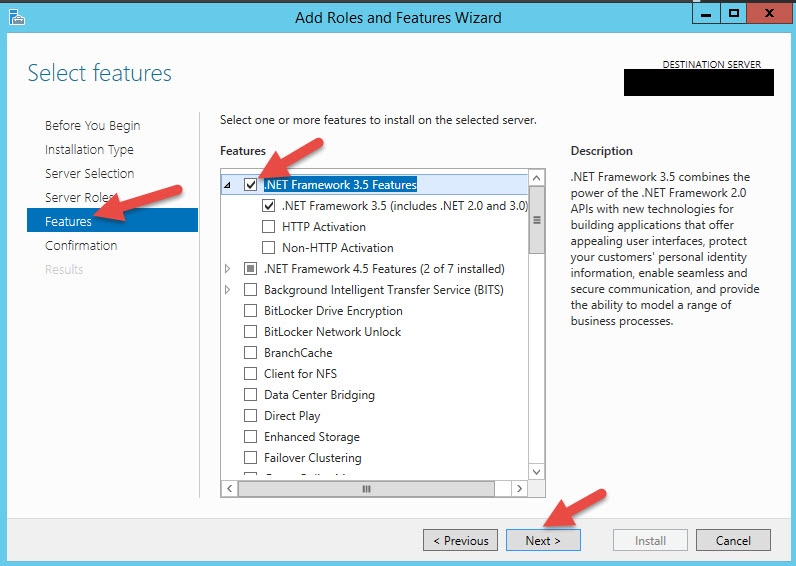
29. Run it and it will want to install .NET Framework 2.0.50727 from 2007. Yeah, I’m not kidding. I think that’s some kind of oversight by Microsoft from the legacy PhoneFactor days most likely. If you hit Yes it will open IE and you have to download and install it but the website won’t have it since it’s so old. Easier thing is just to install the .NET Framework 3.5 Features on the server which will include 2.0. Wish the installer would just do it for you.
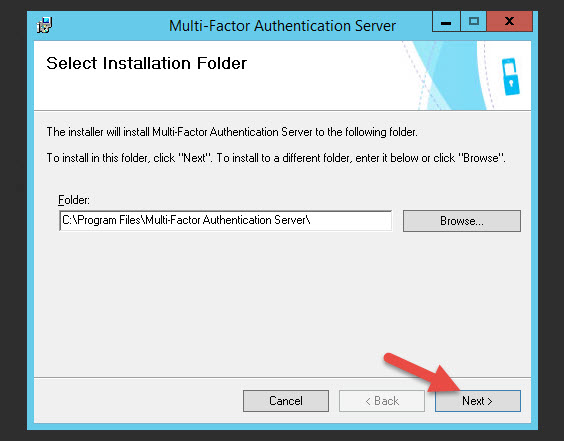
30. Now we can restart the install. Hit Next. The install will take a bit of time.
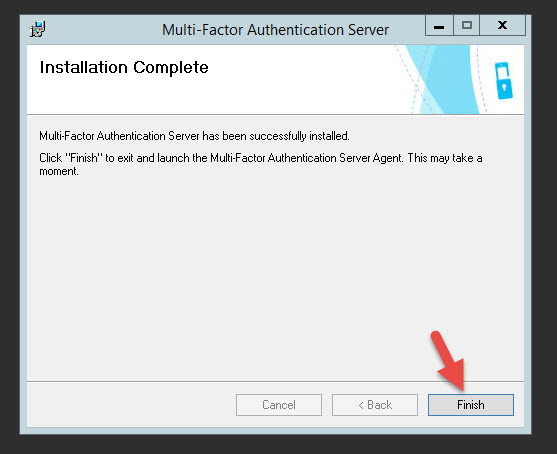
31. Hit Finish and the wizard will start
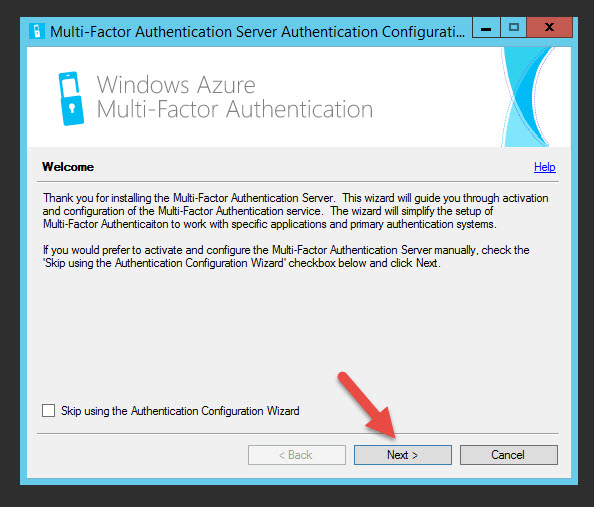
32. Hit Next on the Wizard
33. You’ll get this screen asking for credentials

34. Go back to the Azure MFA Admin portal and click Generate Activation Credentials. Take those credentials and put it into the wizard.
35. You can leave the default MFA group

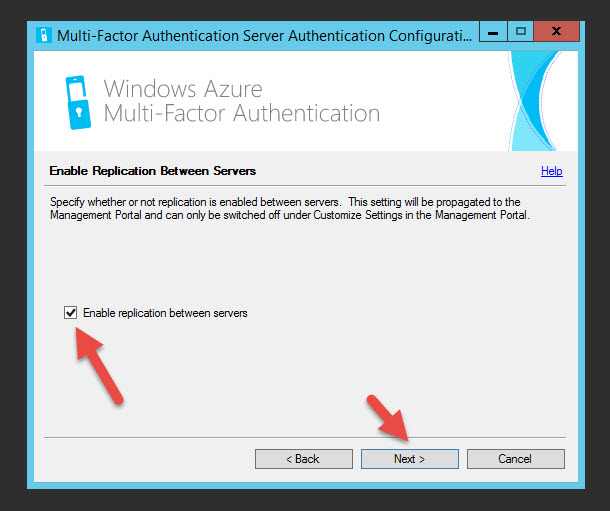
36. Go head and enable replication between servers for later
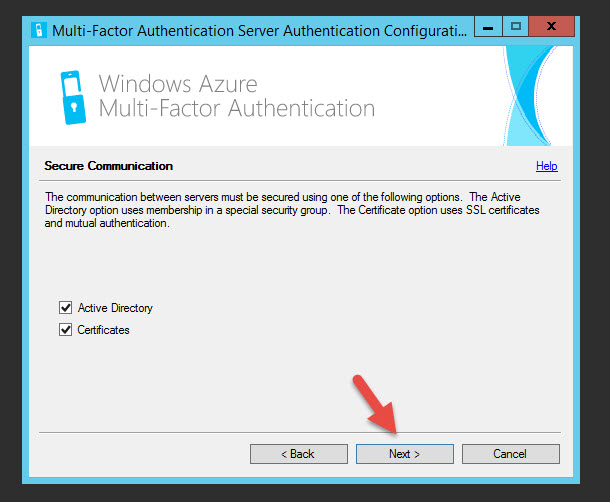
37. Hit next under Secure Communication
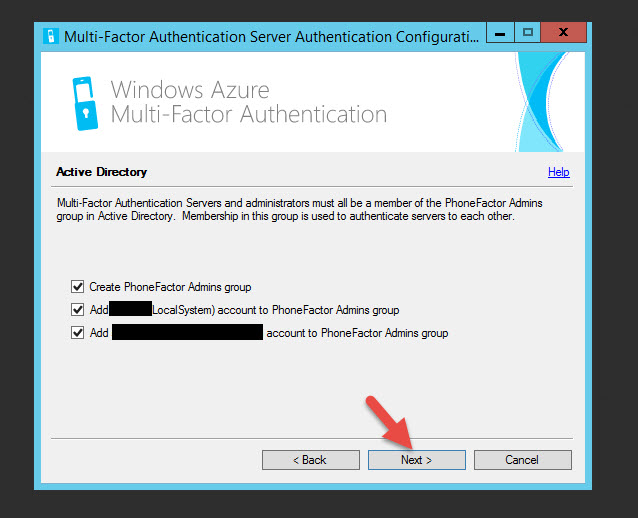
38. Next it talks about creating a PhoneFactor Admins group
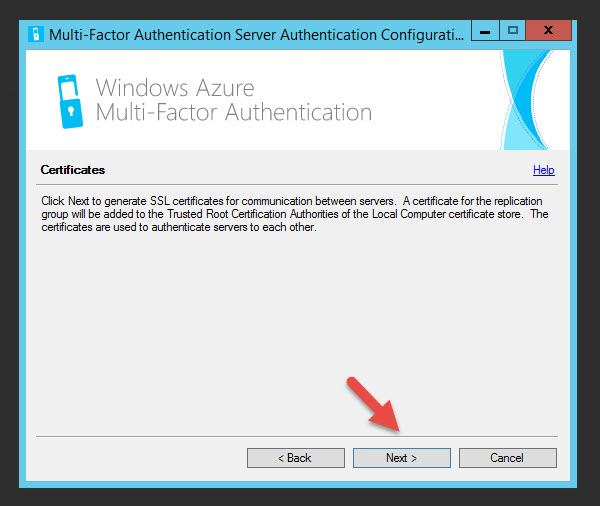
39. Hit Next to generate SSL certs
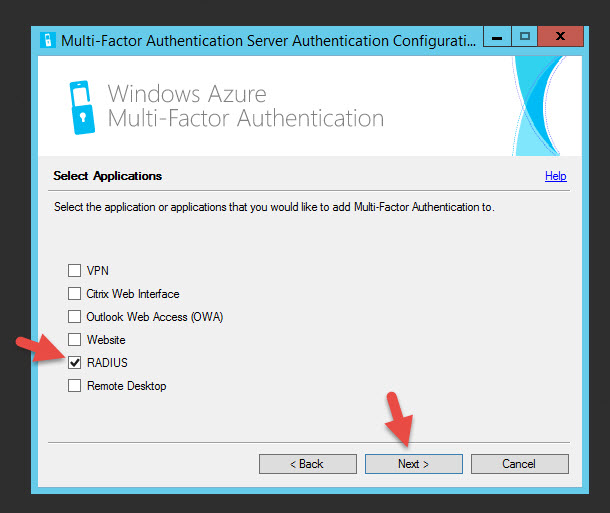
40. Select what we’re going to be using MFA for. In our case since we’re using NetScaler Gateway which isn’t on the list. They don’t list LDAP/LDAPS as one of the options. Just select RADIUS. Even if you don’t use it, you have to configure something from the list to move on. Don’t worry, you can still use LDAP or LDAPS later.
41. Type in your NetScaler NSIP for the RADIUS client IP, make up a shared secret, and you can use the default 1645 and 1812 RADIUS ports.

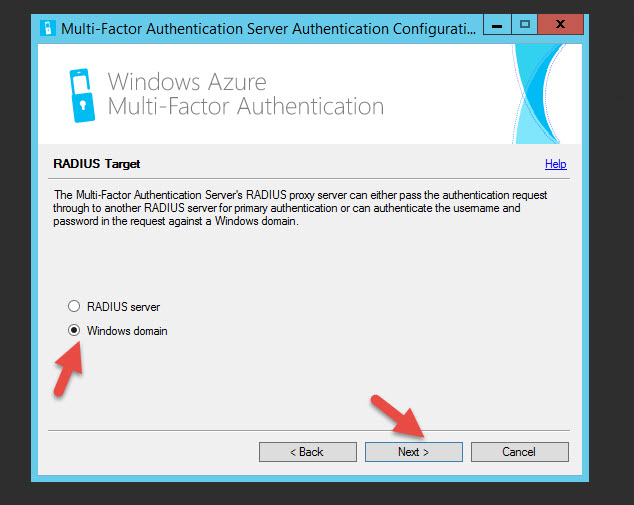
42. The MFA Server can proxy the authentication request to another RADIUS server or against your Windows domain. In most cases you would use Windows domain.
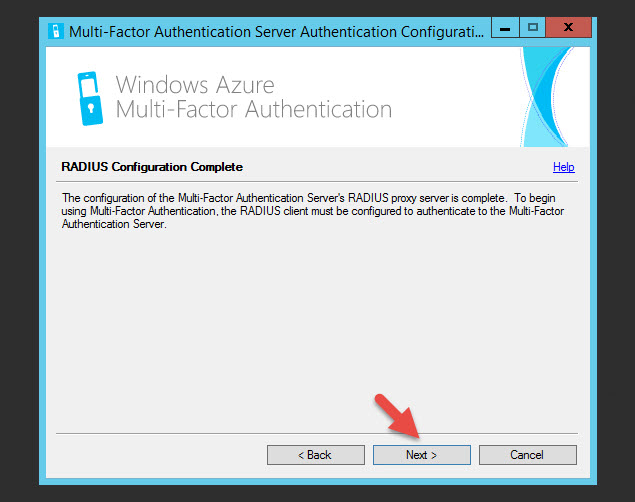
43. Hit Next on the completion page
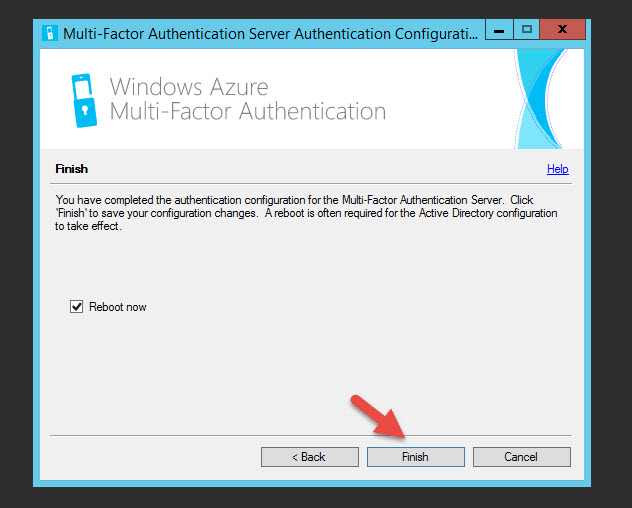
44. Hit Finish and let the server reboot
CONFIGURING AZURE MFA SERVER FOR NETSCALER GATEWAY
Now we can finally begin setting up the MFA Server for your NetScaler Gateway. In this example I’m going to use plain old unencrypted LDAP on port 389 for example purposes. Please use LDAPS or RADIUS in a production environment.
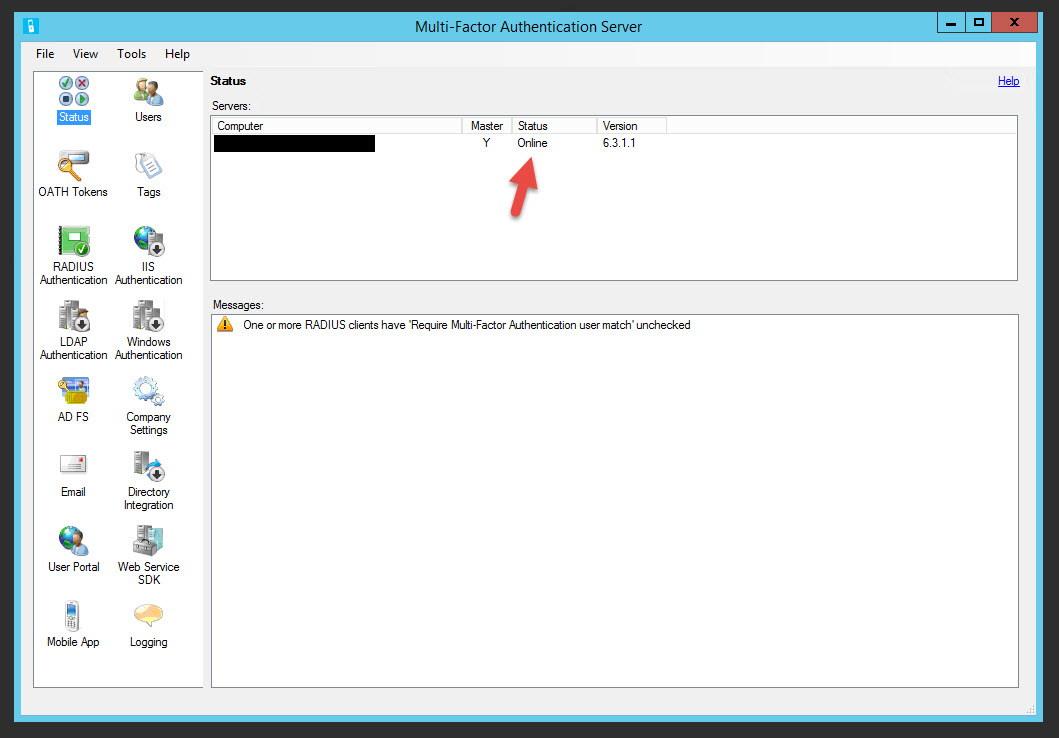
45. Open the MFA Server Console after the server comes back up and you should see the Status as Online. This means it’s talking to the PhoneFactor servers in the cloud.
46. Go to the LDAP Authentication section and click the check box to enable it
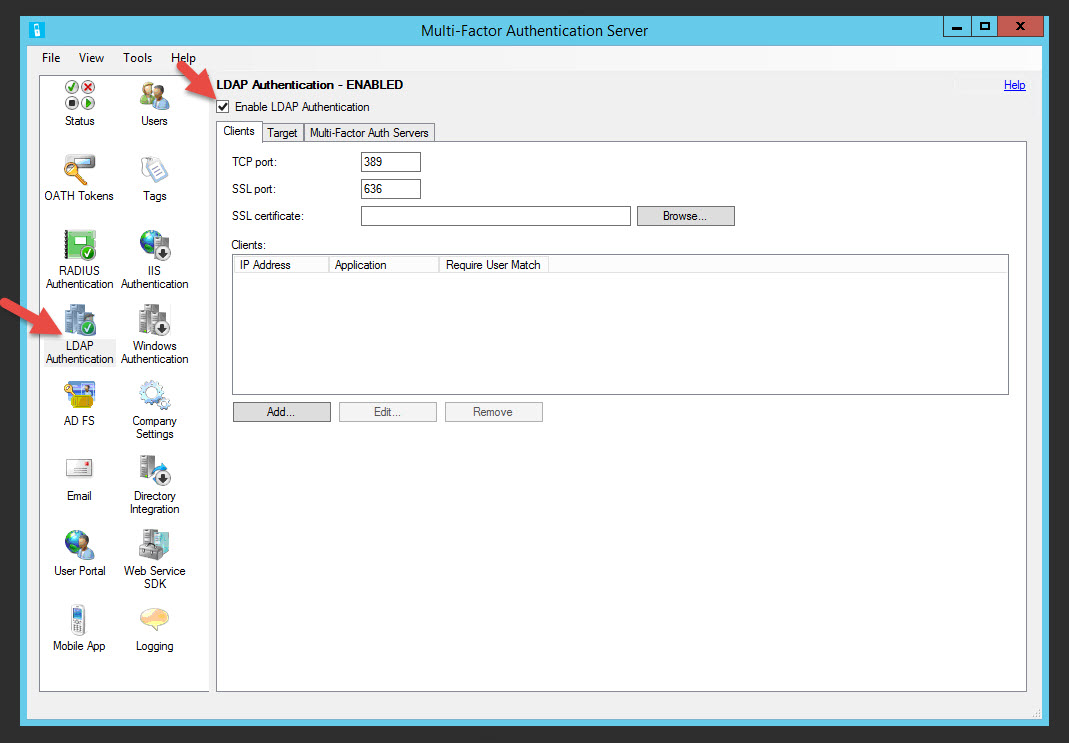
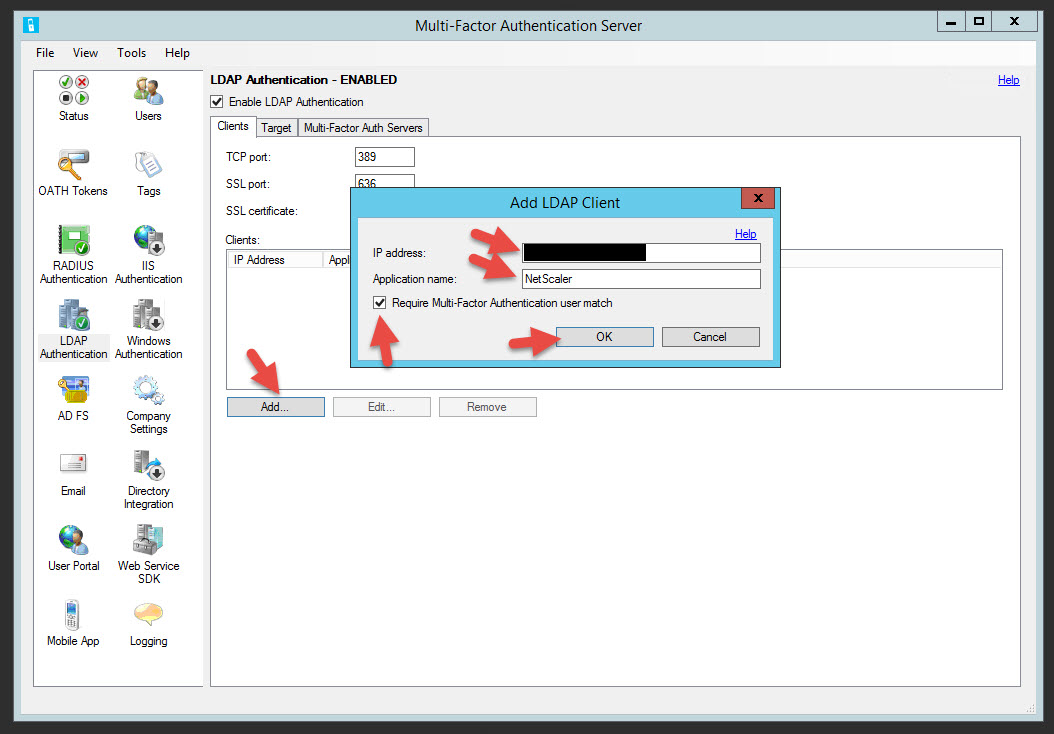
47. Click Add, enter your NetScaler NSIP, application name as “NetScaler” or whatever you like, and check the box that says “Require Multi-Factor Authentication user match”. Remember LDAP traffic on a NetScaler is over the NSIP, not the SNIP. If you have an HA pair you’ll want to add both NSIPs as clients in here. But if you load balance LDAP vservers on the NetScaler, then you will want to use the SNIP. This in effect forces LDAP authentication traffic to go over the SNIP instead of the NSIP. I have used both in production environments depending on the environment so this will be up to you to decide.
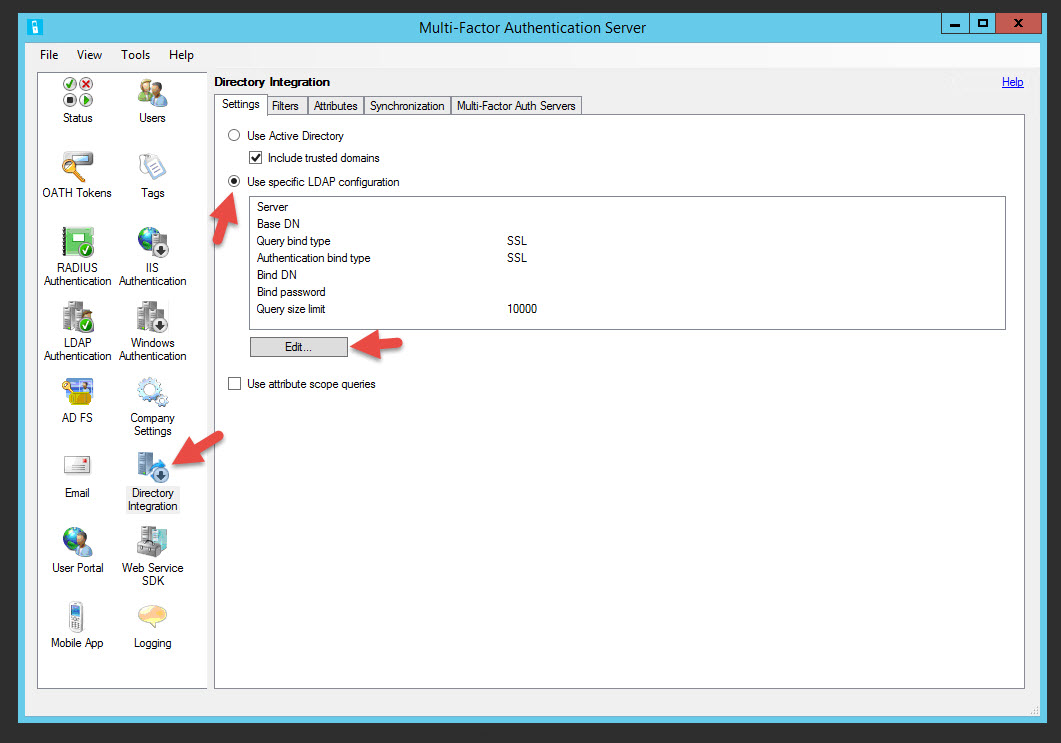
48. Now click Directory Integration, you’ll notice a black down arrow on the icon. You can use Active Directory but I like to do LDAP binds so I know exactly how lookups are happening and I’m so used to doing it with NetScalers. Click the “Use specific LDAP configuration” and hit Edit
49. Type in a Server name, Base DN, Bind username, and Bind password. This is the exact same info you would normally use when creating an LDAP policy on your NetScaler except you type in the Bind username, not the Bind DN. Make sure the Queries and Authentications are both set to “Windows”.
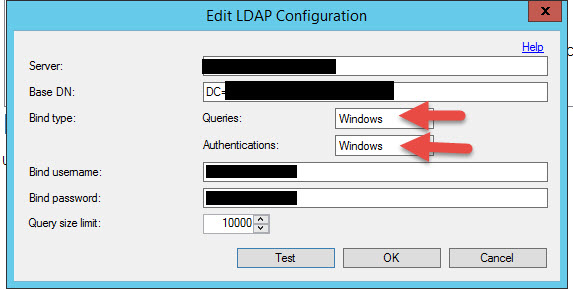
50. When you hit Test hopefully you’ll get a message like this

51. Go to Company Settings > Username Resolution and click “Use LDAP unique identifiers attribute for matching usernames”

52. Now it’s time to add a User. Go to the Users section and hit Import from LDAP:
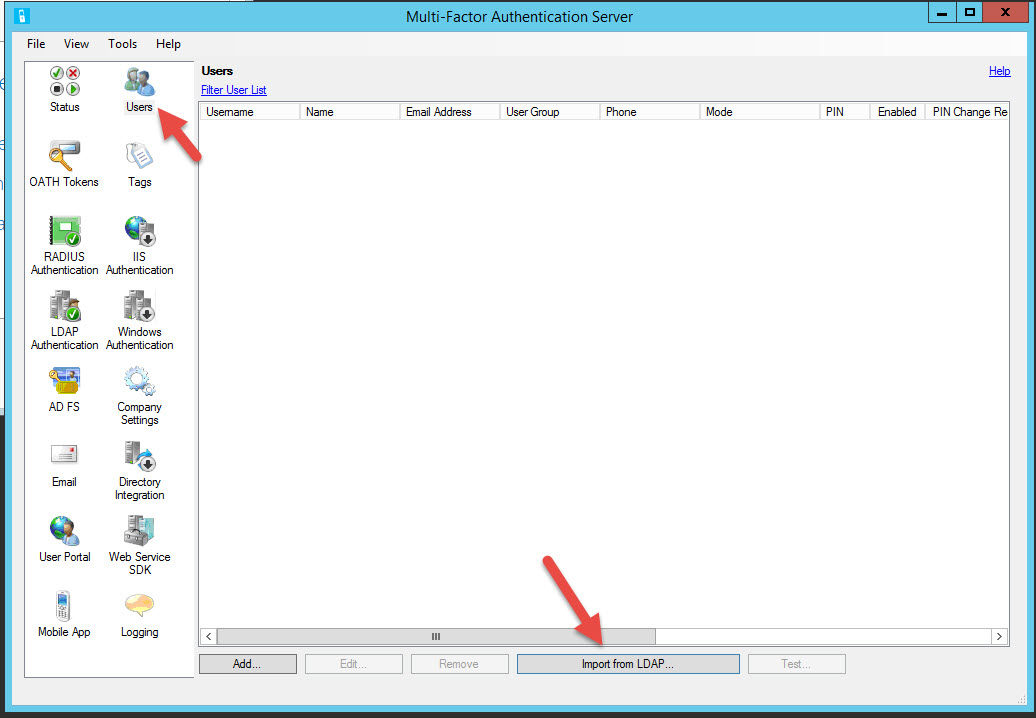
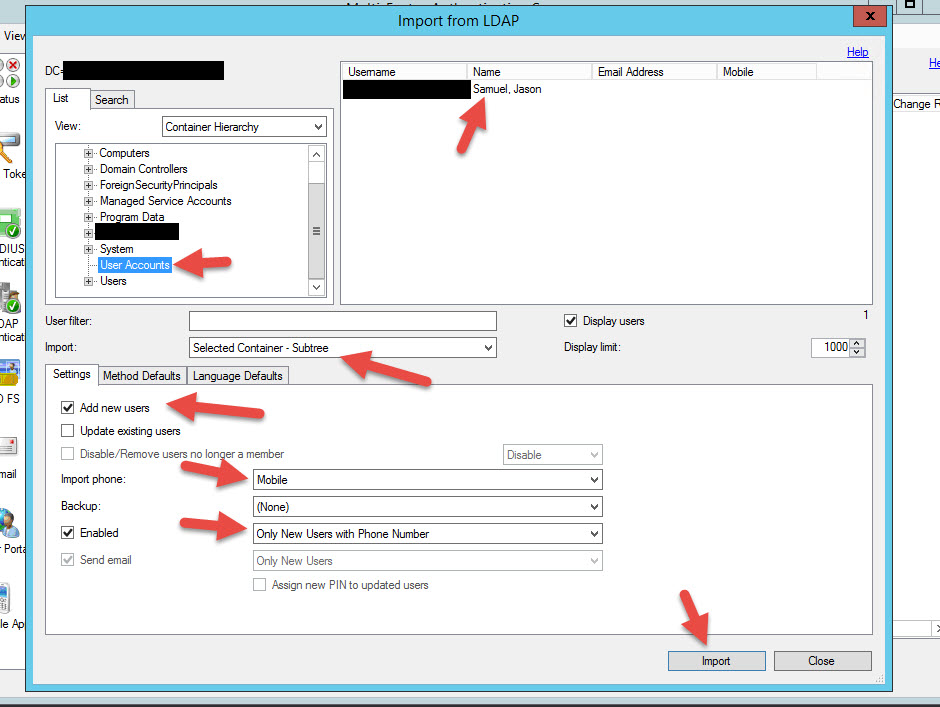
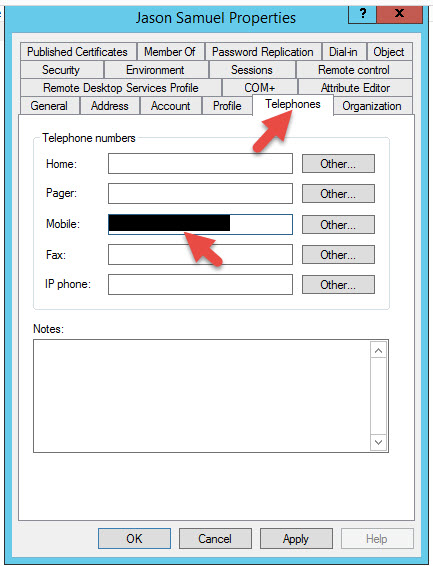
53. Look how versatile it is. You can select an OU where you keep all your User Accounts or you can run LDAP filters to find your users. By default it’s going to import all users with a Mobile specified in AD so make sure all your users have their numbers specified. If you import users without numbers, the MFA server will import them but their account will be set to disabled by default. You can see below my AD account has a mobile number in it.
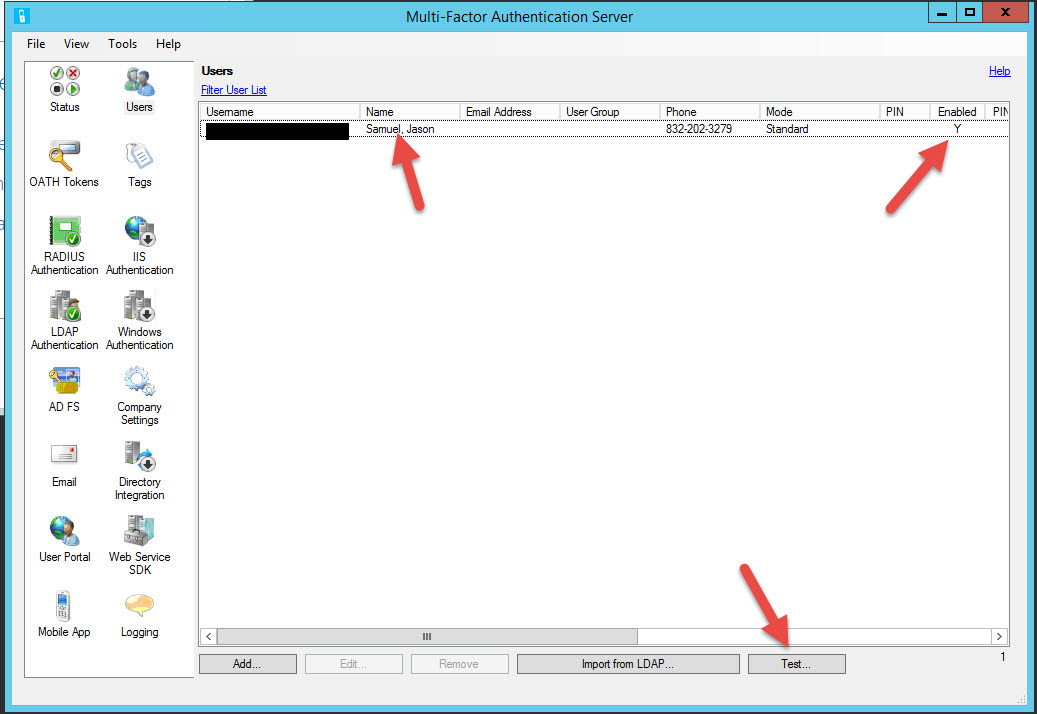
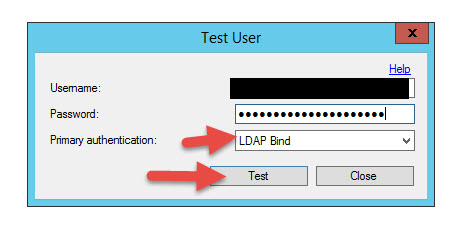
54. Woohoo! I’m imported and Enabled. Hit Test at the bottom.
55. You can use Windows Domain or the LDAP Bind you did in the drop-down for testing purposes. Enter your credentials and hit OK.
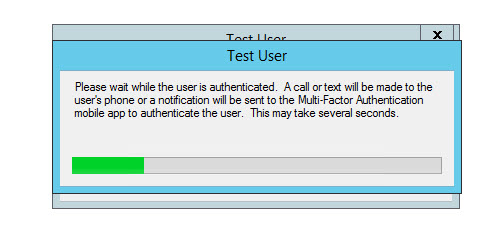
56. You will see this message saying Azure MFA is calling you. One thing to note, make sure you can communicate outbound on port 443 to the following PhoneFactor servers in the cloud. If they are blocked by your organization by a web filter, authentication will not work:
https://pfd.phonefactor.net
https://pfd2.phonefactor.net
https://css.phonefactor.net
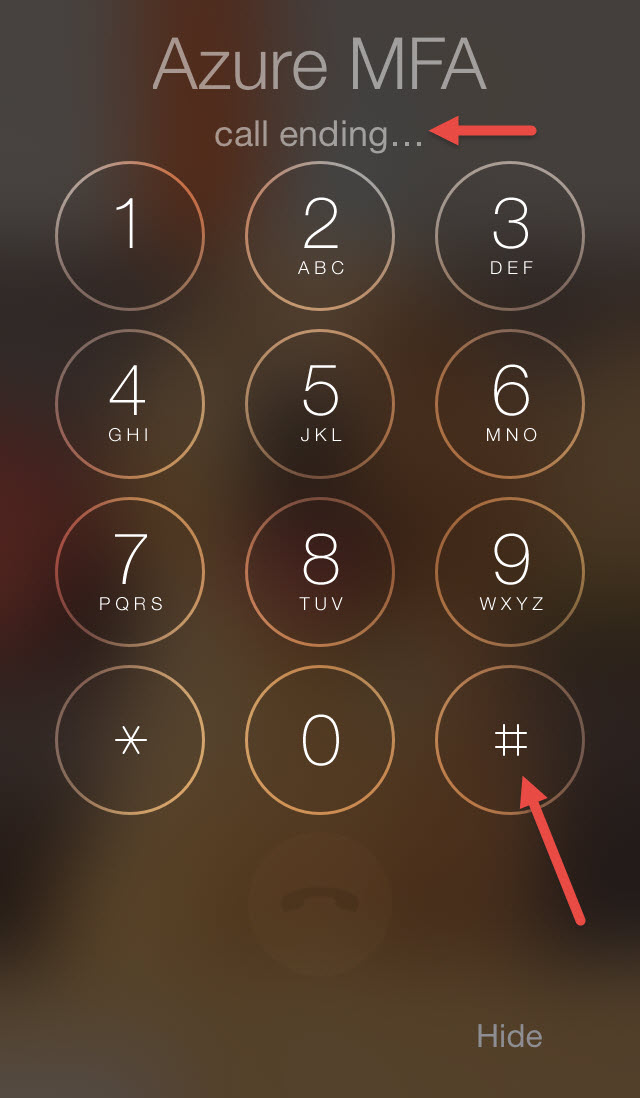
57. You should start getting a phone call from Azure MFA like this:
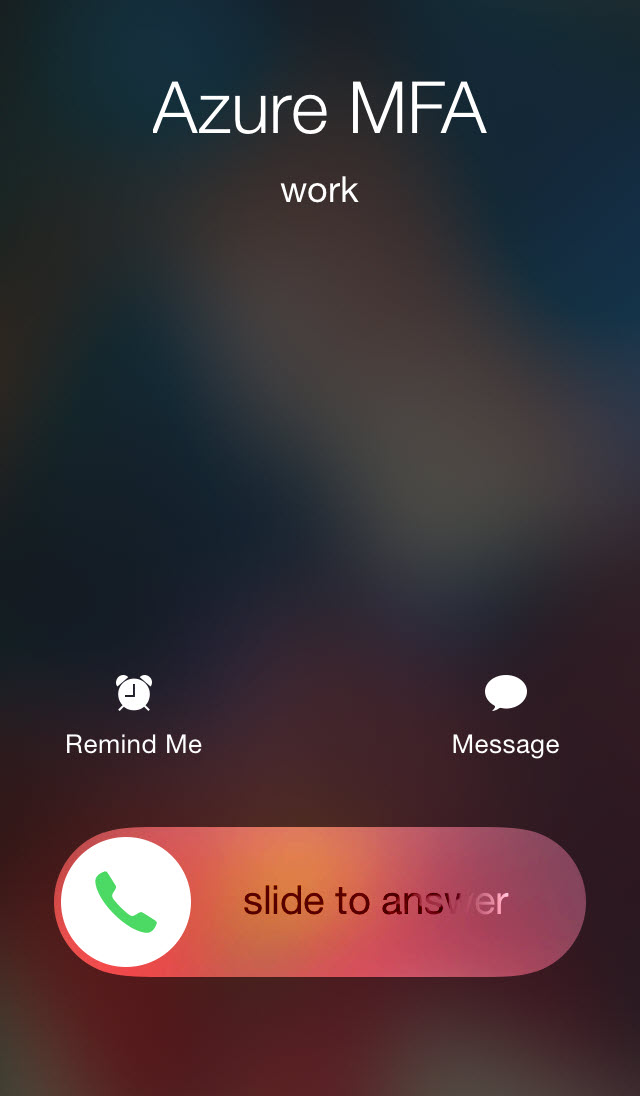
58. Answer it and hit the # sign, it will immediately end the call
59. And your login test will show it’s successful

60. Now you need to import your service account that will talk to the MFA server and do LDAP lookups. It won’t have a mobile number associated with it so it will import as Disabled. That is fine. Don’t give this service account a mobile number or it will call that number everytime any user attempts to authenticate on your NetScaler Gateway. Should look like this:
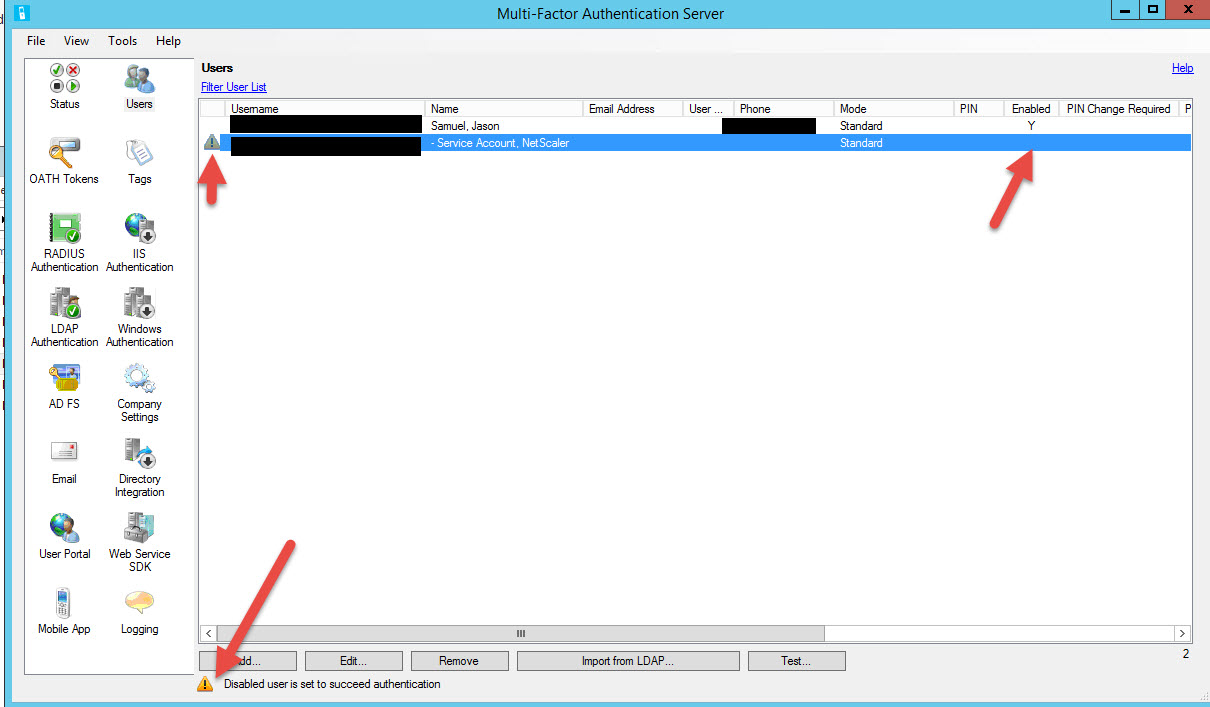
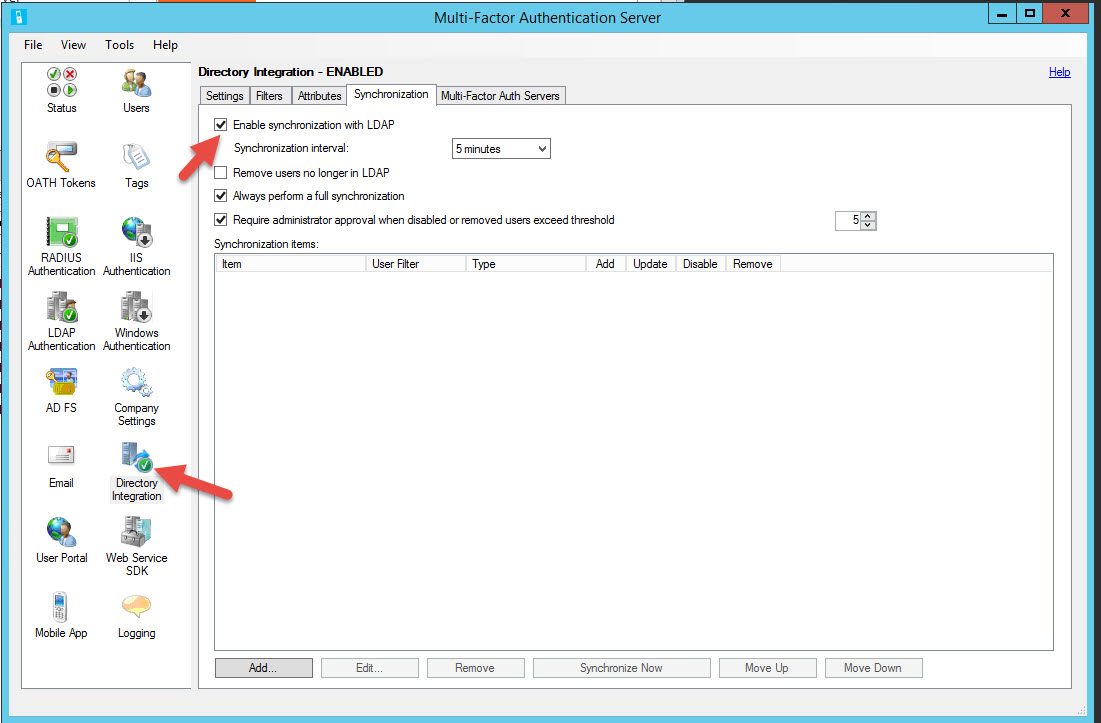
61. Remember the black arrow under Directory Integration? See what happens when you enable LDAP sync under the synchronization tab? It goes green. You don’t need to enable it for this example but I just wanted to make you aware that’s why the black arrow shows down. You should go ahead and enable it and add your domain to sync every 5 minutes if you wish to use this feature.
CONFIGURING NETSCALER GATEWAY TO USE MFA
Now finally we can get to the NetScaler config. It’s pretty simple. Let’s create an LDAP authentication policy for MFA. Again I’m using LDAP on port 389 for this example but in a production environment you need to use LDAPS on port 636 or RADIUS. I’m going to assume you already have a working NetScaler Gateway vserver. We’re going to swap out your regular LDAP authentication policy with a new MFA authentication policy.
62. Navigate to NetScaler Gateway > Policies > Authentication > LDAP then clicks the Servers tab and hit Add
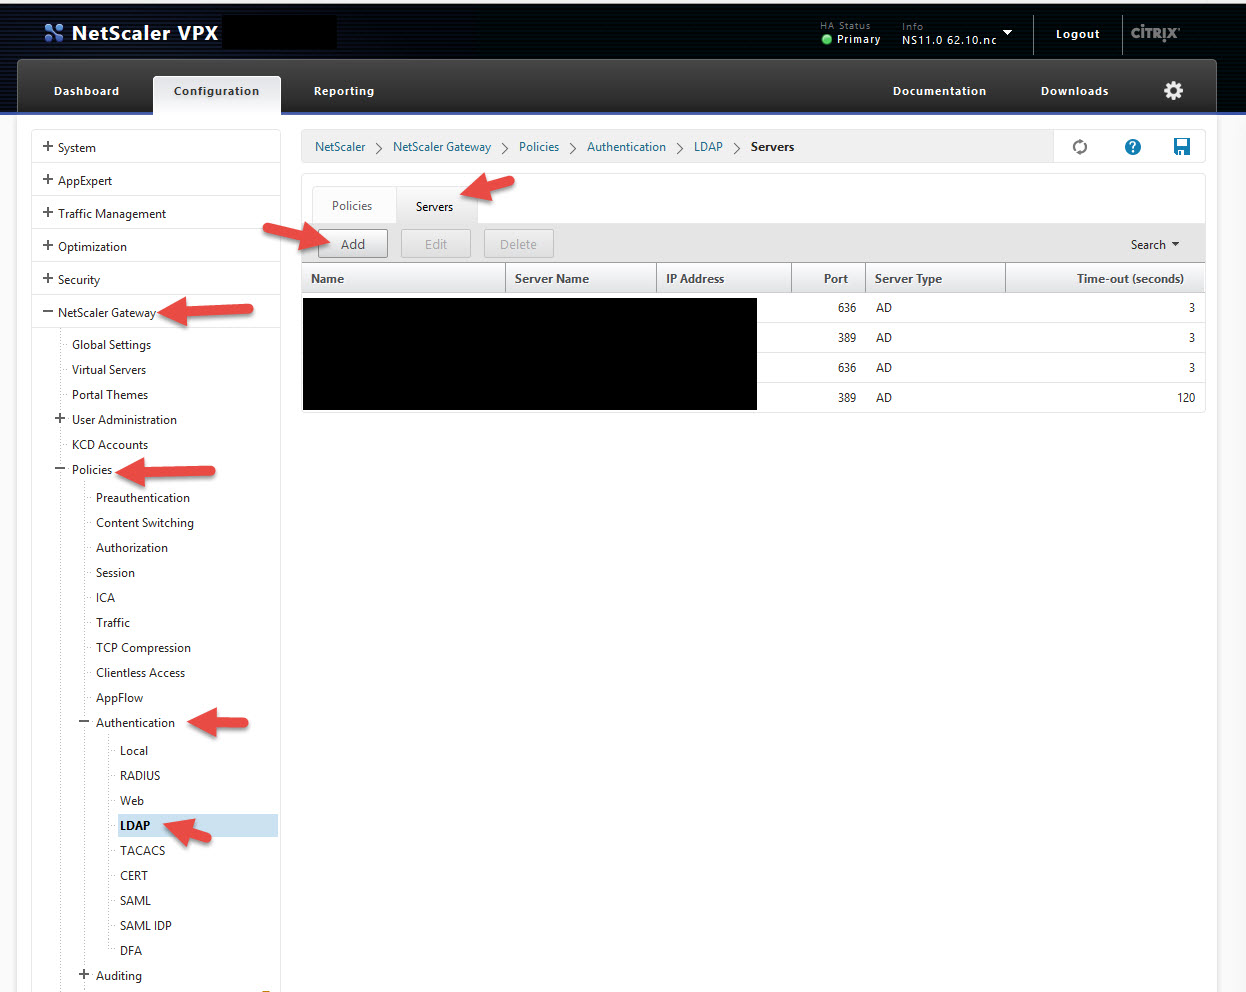
63. Now give it a name and configure it just like you would any other LDAP policy. The only difference is the server IP is going to be the IP of the MFA server. You also need to increase the default timeout value of 3 seconds to something like 120 seconds. This is because the NetScaler Gateway has to wait while the PhoneFactor/MFA call is made and you hit the # sign on your phone. In this example my policy name is ldap_vsrv_js_MFA_389.
64. Create a policy with ns_true, in this example mine is called ldap_pol_js_MFA_389

65. Now bind your new LDAP policy to your NetScaler Gateway vserver.

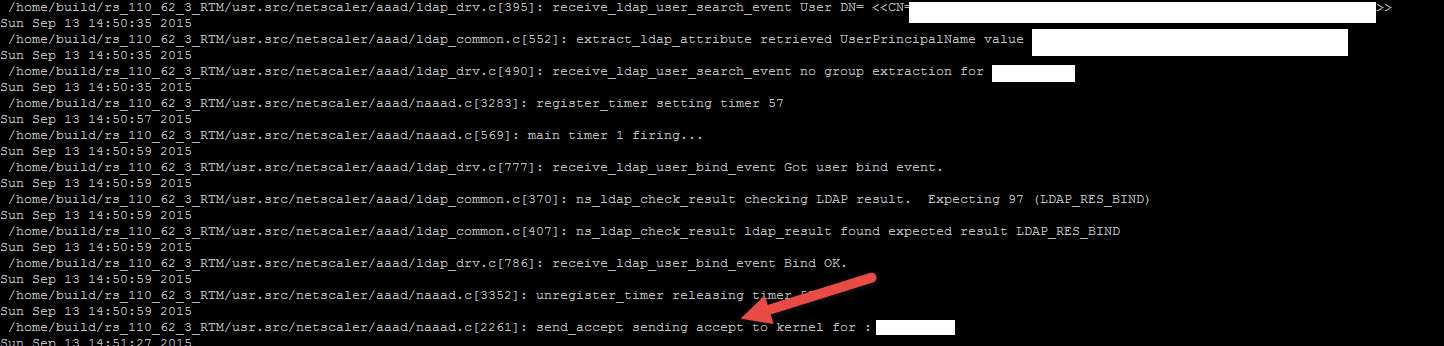
66. Now open up Putty and SSH into your NetScaler. Let’s do:
shell

cat /tmp/aaad.debug
67. Now go to your NetScaler Gateway login page and attempt a login. You should see it do the LDAP bind in your AAA log and then wait. You will get a phone call and once you hit the # sign, you will see an accept like this for your user ID:
Congrats! You just setup your NetScaler Gateway with Azure MFA!
68. Ok so what about accounts you want to allow login to your NetScaler Gateawy but they don’t have mobile numbers specified in LDAP yet so can’t use PhoneFactor? Just import them all into MFA but leave them disabled like your NetScaler service account. They’ll be able to login just fine like they always have been able to. This effectively bypasses the phone call and authenticates straight against your AD only. When you’re ready to give them MFA/PhoneFactor, just populate their mobile number in LDAP and verify their account gets updated and is Enabled on the MFA server during the next sync. Bam, now they’re an MFA user!
MODIFYING NETSCALER GATEWAY LOGON PAGE FOR MFA
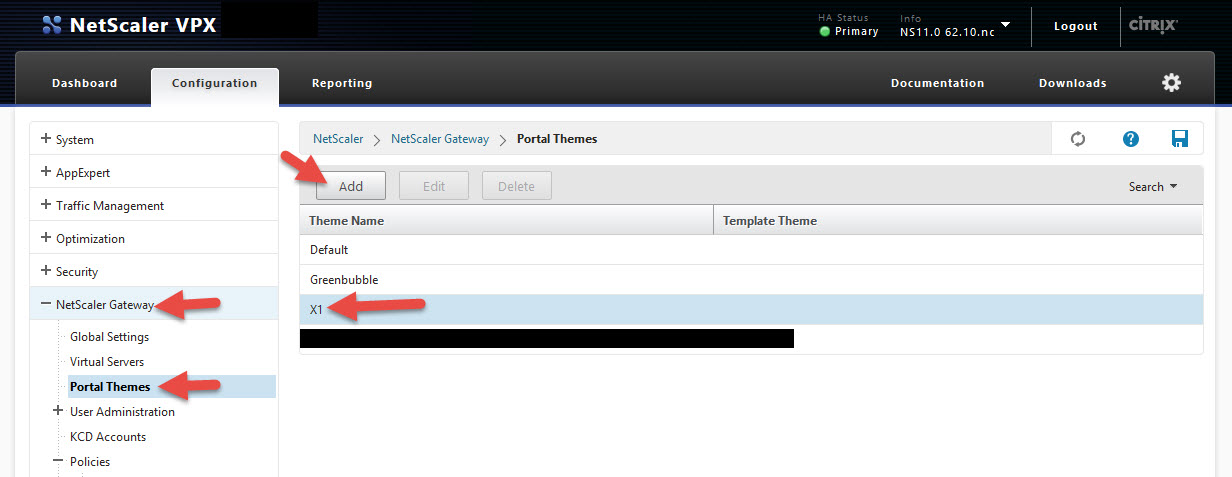
With NetScaler 11 you have the wonder Portal Themes feature now (Internet High Five to the NetScaler Team!). With NetScaler 11.0 build 62.10 they included the X1 theme we’ve all been waiting for. When you are using MFA, there is no notification to the user that the NetScaler is waiting on them to pick up and hit # before logging in. So you have to let them know somehow to expect that. The Portal Themes does not have the ability to add custom text below the login boxes right now so instead you can modify the top area.
69. Navigate to NetScaler Gateway > Portal Themes > click the X1 theme and hit Add
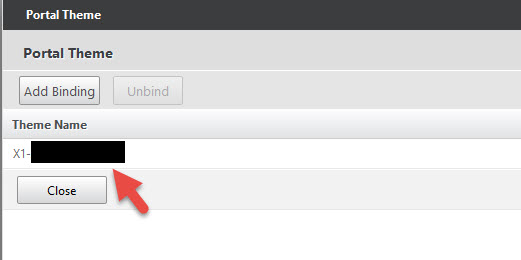
70. Give it a name and follow the prompts. The thing you want to change is the “Form Title” in the “Login Page” section. Change it from “Please log on” to “Please logon and wait for the phone call” or something along those lines.

71. Bind this new Portal Theme to your NetScaler Gateway vserver
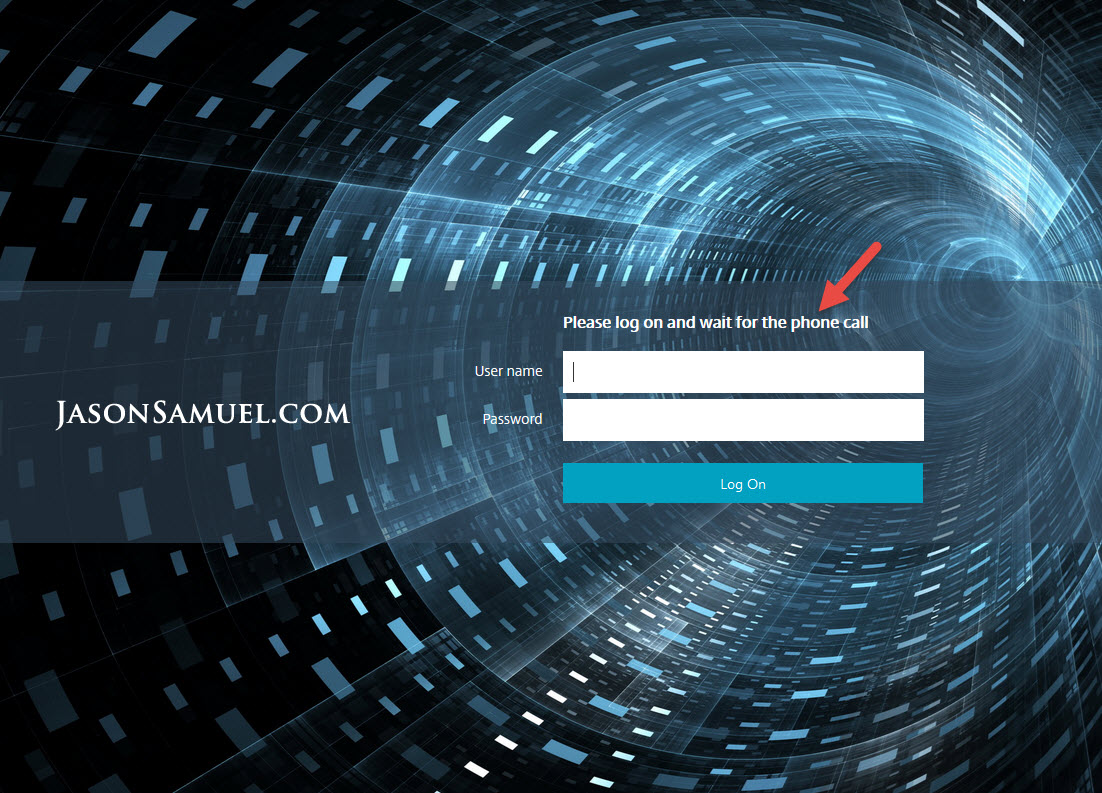
72. Open a browser in private/incognito mode so you aren’t pulling from your local web cache and navigate to your NetScaler Gateway logon page. It should look something like this now.
TROUBLESHOOTING MFA AUTHENTICATION ISSUES
I’ve covered how to troubleshoot NetScaler authentication issues in previous articles:
and now you’ve got this man in the middle called MFA. I showed you above how AAA debug still works but you can’t really see what’s going on once the MFA server and Azure cloud/PhoneFactor servers start talking. Here’s how you can troubleshoot this.
73. On your MFA Server navigate to C:\Program Files\Multi-Factor Authentication Server\Logs and check out the logs. The one that’s going to tell you exactly what’s happening with each user is the “MultiFactorAuthSvc.log”:
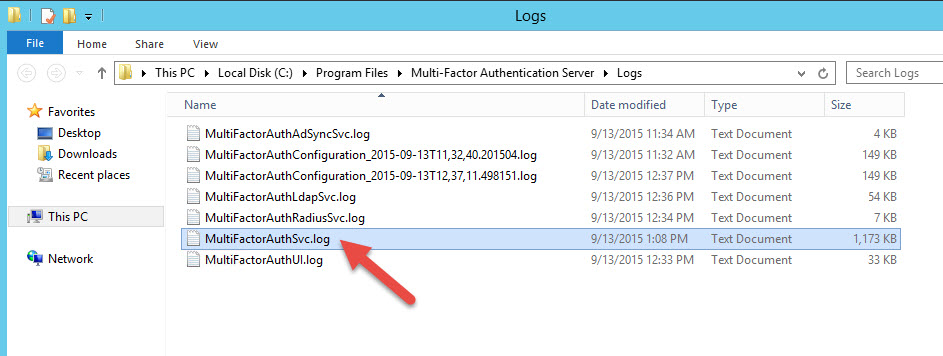
74. Open it up and scroll straight to the bottom for the latest entries. You’ll see everything going on between the MFA Server and the PhoneFactor servers for that user. Hopefully you’ll see a sucess like this:
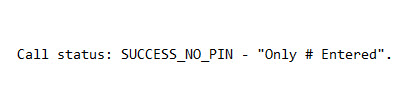
pfsvc|Pfauth succeeded for user 'CN=xxxxxxxxxxxxxx' (distinguishedName format) from xxx.xxx.xxx.xxx. Call status: SUCCESS_NO_PIN - "Only # Entered".
75. If the user hangs up the phone or doesn’t answer, you’ll see messages like this:
pfsvc|Pfauth failed for user 'xxxxxxxxxxxxxxxxxx'. (distinguishedName format) from xxx.xxx.xxx.xxx. Call status: FAILED_USER_HUNGUP_ON_US - "User Hung Up the Phone".
or
pfsvc|Pfauth failed for user 'xxxxxxxxxxxxxxxxxx' (distinguishedName format) from xxx.xxx.xxx.xxx. Call status: SUCCESS_NO_PIN_BUT_TIMEOUT - "No Phone Input - Timed Out".
or
pfsvc|Pfauth failed for user 'xxxxxxxxxxxxxxxxxx' (distinguishedName format) from xxx.xxx.xxx.xxx. Call status: SUCCESS_WITH_PIN_BUT_TIMEOUT - "# Not Pressed After Entry".
etc.
AUDITING & REPORTING MFA LOGINS
I’ve talked about the importance of syslog and NetScaler in the past in my previous article:
http://www.jasonsamuel.com/2014/05/28/best-practices-for-citrix-netscaler-aaa-logging-and-retention/
MFA logs in the cloud and on the MFA server but you also want to consider setting up a dedicated syslog server like Splunk, Kiwi, etc. where all this data goes. This is how you do it:
76. Go to the MFA Server > Logging > Syslog tab and check all the boxes and specify your syslog server (separate multiple syslogs servers them with semi-colons). Leave the facility as 16.

Note, the severity is as follows and cannot be changed:
3 for errors
4 for warnings
6 for all other information messages
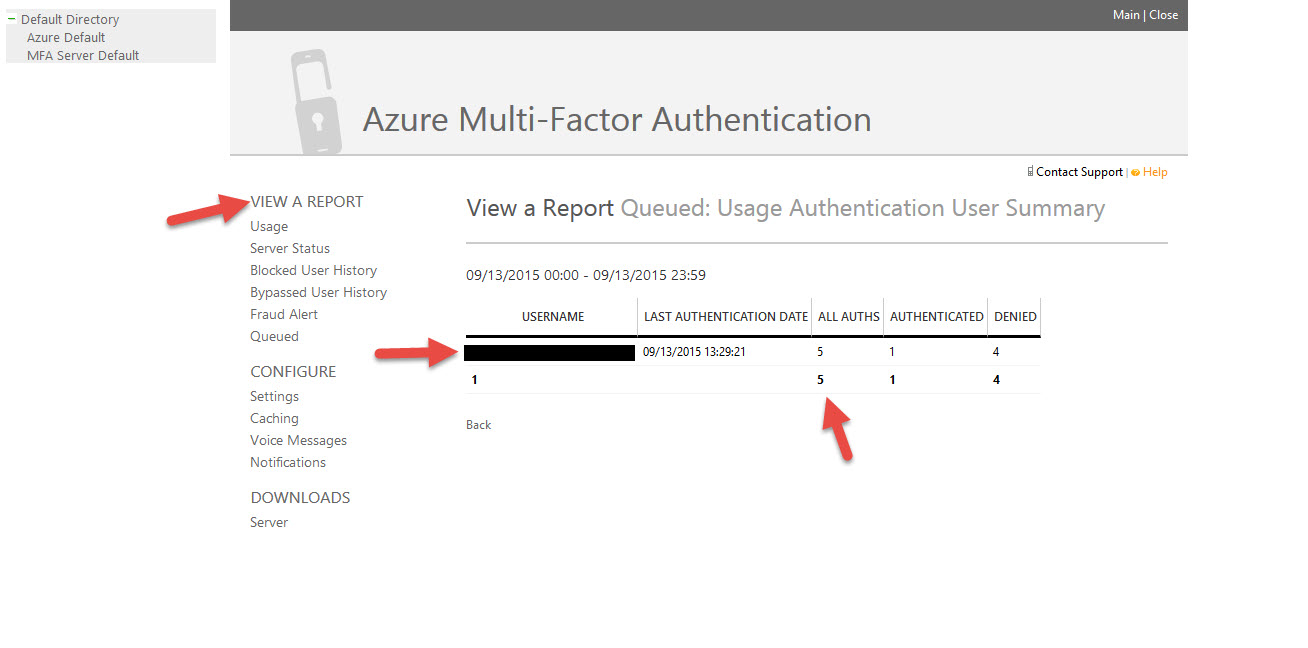
77. Additionally on the MFA Admin portal you can run all sorts of reports just like back when it was PhoneFactor.
AZURE MFA HACKING ATTEMPT NOTIFICATIONS
Let’s say you’re at dinner and you get an MFA phone call asking you to authenticate. That means someone has stolen your domain credentials and is attempting to login to the NetScaler Gateway. Instead of hitting the # sign, you can hit 0# (or other keys you define on the MFA server) and submit a FRAUD ALERT to MFA. This immediately blocks your account in Azure AD from any further authentication attempts. It does not lock out the user’s AD credentials themselves so lockout attacks are rendered pretty useless. You can even specify your security team get an email when a FRAUD ALERT is submitted by a user. This is how you do it.
78. Login to the MFA Admin Portal and click Fraud Alert. Add your email distribution groups for Fraud Alert Notifications, Account Lockouts, and One-Time Bypasses.

CONSIDER DEPLOYING THE AZURE MFA USER PORTAL FOR SELF SERVICE
If you want to take your environment a step further, you can deploy the Azure User Portal which is a separate set of IIS servers you will need to deploy. Doesn’t have to be but I would highly recommend keeping those web servers separate and in a DMZ. The UI does look a little dated unfortunately. The User Portal will allow your users a level of self service so they’re not always calling your Help Desk for issues, bypasses, changing security questions, changing their phone number, etc. You can pick what options you want to allow. In this example I’ve taken away a few menu items like One-Time Bypass, Change Language, & OATH Tokens as a test but allowed other features to remain:
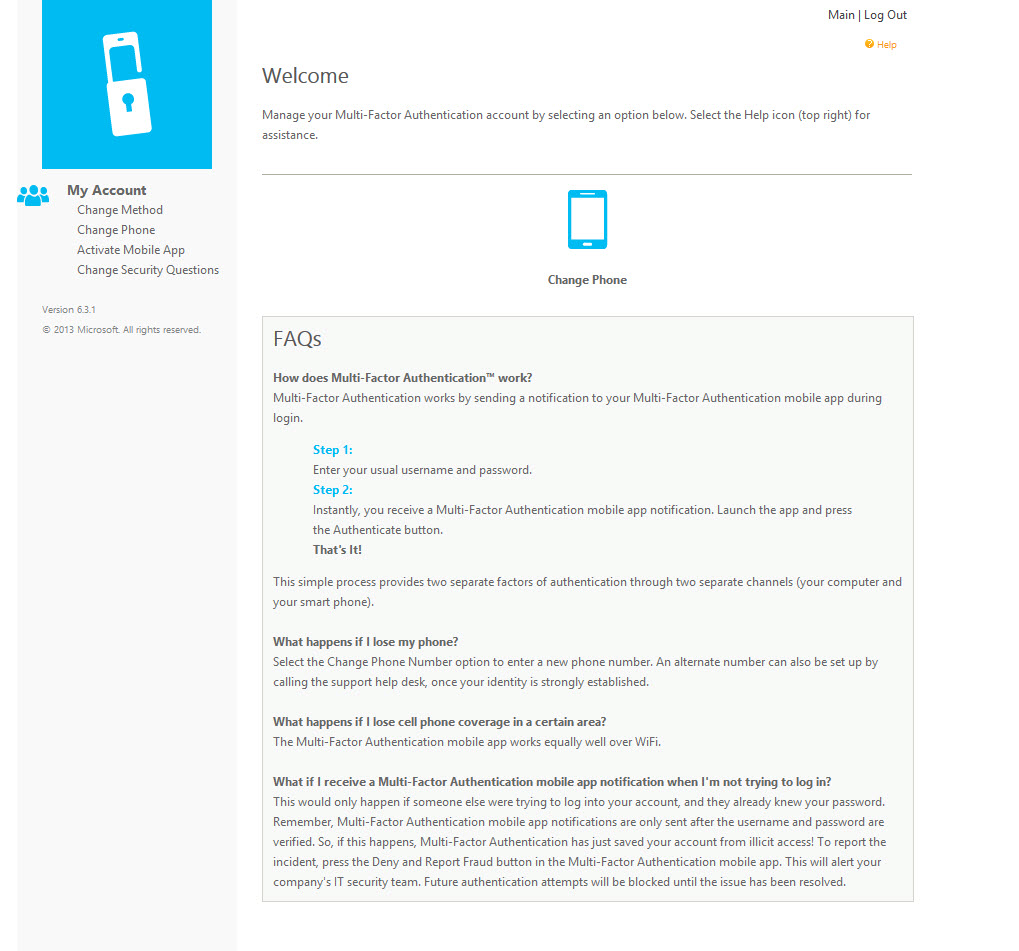
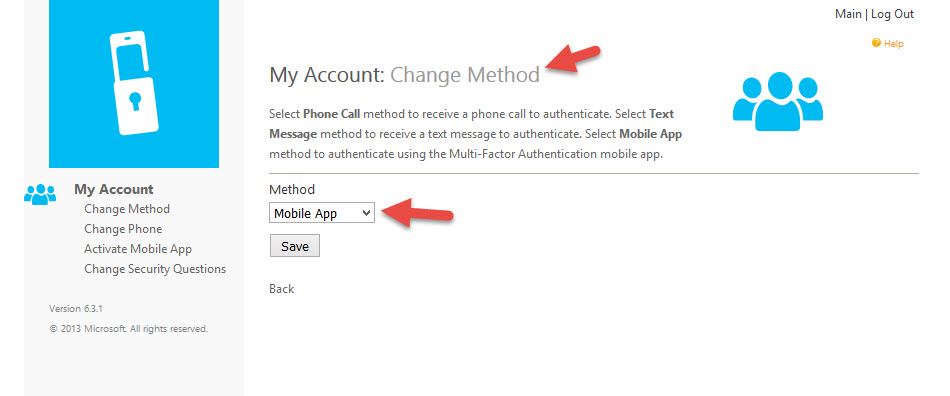
You can also allow the users to change their MFA preferences, for example switching from using a phone call to using the Azure MFA Authenticator mobile app. I actually find the mobile app to be even a quicker process to login so users will appreciate the ability to choose:

FINAL THOUGHTS
I hope this article has helped you setup Azure AD Connect, AD Premium, and Azure MFA with NetScaler Gateway. 2 factor or multi-factor authentication is an important part of your business no matter what size company you have. It is absolutely necessary for everyone in my opinion. There’s a lot of steps involved in setting up MFA (78 by my count 🙂 ) but once it is in place you have a really powerful system to authenticate your employees.
As always please leave a comment below if this guide has helped you or if you have any questions.
Jason Samuel is a visionary product leader and trusted advisor with a proven track record of shaping strategy and driving technology innovation. With extensive expertise in enterprise end-user computing, security, cloud, automation, and virtualization technologies, Jason has become a globally recognized authority in the IT industry. His career spans consulting for hundreds of Fortune 500 enterprises across diverse business sectors worldwide, delivering cutting-edge digital solutions from Citrix, Microsoft, VMware, Amazon, Google, and NVIDIA that seamlessly balance security with exceptional user experiences.
Jason’s leadership is amplified by his dedication to knowledge-sharing as an author, speaker, podcaster, and mentor within the global IT and technology community. Recognized with numerous prestigious awards, Jason’s contributions underscore his commitment to advancing technology and empowering organizations to achieve transformative results. Follow him on LinkedIn.
Disclaimer: Views expressed here are his own and do not reflect the views of his employer, past or present, or any organizations he is affiliated with. Content is for informational or personal purposes only.


Saadallah
September 18, 2015 at 4:14 AM
That must have took some time ! Great work Jason , a real treat to read your blogs.
Carl Stalhood
September 18, 2015 at 7:00 AM
With LDAP Bind, does it support multiple domains? It does with integrated auth but I don’t think it supports multiple LDAP domains.
Jason Samuel
September 21, 2015 at 7:32 PM
Thanks Saadallah! Yes it did take a while. Glad to know you liked it!
Carl, you are correct. If you have a multiple domain environment then LDAP bind will only work with the single domain you have specified on the MFA server. There are no options for multiple LDAP binds and cascading authentication policies on the MFA server like we can do on a NetScaler. You would have to setup an MFA server per domain to make LDAP work.
The easiest alternative I would use in this case is RADIUS authentication with Target set to “Windows domain”. Then set Directory Integration to “Use Active Directory” with the “Include trusted domains” option checked. As long as there is a trust in place the MFA server should be able to see all the domains in the Users > Import from LDAP section and you should be able to import the accounts. Since the NetScaler is a domain agnostic appliance I don’t believe there is a way to use the Windows Authentication option on the MFA server with NetScaler directly.
The only things to consider with RADIUS are:
1. AAA.debug won’t be as verbose as when using LDAP/LDAPS. It will be a very simple accept or deny message. For example, it will show this for accepts:
process_radius radius accepts : youruserIDprocess_radius extracted group string :(null)
send_accept sending accept to kernel for : youruserID
or something like this for denys:
process_radius Received RAD_ACCESS_REJECT for: youruserIDprocess_radius Sending reject.
send_reject_with_code Rejecting with error code 4001
You will have to heavily rely on the RADIUS logs on the MFA server when troubleshooting user authentication issues to find out what’s really going on in plain English.
2. If your current LDAP bind service accounts have denys in Active Directory on certain OUs that contain users and you never want to let these users login via NetScaler Gateawy/AAA-TM you will have to translate these access control settings to the MFA server. You’d have to set a Filter or modify the directory Synchronization under “Directory Integration” on the MFA server to make sure these users are omitted.
3. If your current LDAP auth policies have any special Search Filters or look at any custom attributes, this is not possible with RADIUS auth policies. You would have to accomplish this on the MFA server itself as well.
Gaurav
November 17, 2015 at 3:47 PM
Great article jason, i want to ask can we do Microsoft Azure Multi factor authentication with SAML on netscaler , is their any aricle for that.
Pete Runyan
December 24, 2015 at 12:14 PM
I’m trying to get Azure MFA working with an old Web Interface 5.4 PNAGENT (xenapp services) site. It worked fine with PhoneFactor under ISAPI, but the new server with Azure MFA is IIS 7 instead of IIS6. This seems to be the rub. Using the Native Module with IIS7 causes Receiver to throw an error saying the applications are available, and you never get a phone call or text from Azure MFA either. (This is using the exact same config that worked fine under Windows 2003 with IIS 6. We are planning a move to Netscaler and Storefront, but haven’t gotten their yet. Also, the regular XenApp website with Web Interface 5.4 and the old CSG works flawlessly with Azure MFA. Thoughts?? I can’t find anything about this issue anywhere on the web.
Steve Parlee
January 15, 2016 at 6:51 PM
Has anyone successfully gotten this configuration to work with LDAPS? I have my local domain CA certs on my MFA servers (computer/personal store) and the root cert in the correct trusted root store. In the MFA LDAP config section I’ve added the machine cert for that corresponding server which it should use to authenticate against the AD domain and it fails.
The Netscaler itself when doing a LDAPS connection, using the same certs (domain root is installed), against the same AD, works just fine.
Standard LDAP port 389 works just fine.
Geoge Duane
June 9, 2016 at 4:54 PM
Jason, Another awesome Blog!!! Keep up the great work. You insight is much appreciated.
Ram
September 2, 2016 at 11:18 AM
Great Article On MFA Jason.
cvanaxel
September 14, 2016 at 5:52 AM
63. Now give it a name and configure it just like you would any other LDAP policy. The only difference is the server IP is going to be the IP of the MFA server. You also need to increase the default timeout value of 3 seconds to something like 120 seconds. This is because the NetScaler Gateway has to wait while the PhoneFactor/MFA call is made and you hit the # sign on your phone. In this example my policy name is ldap_vsrv_js_MFA_389.
This part something is missing because the netscaler can’t retrieve anything. The windows machine(MFA) ldap port is open but can’t bind. My windows 2012 r2 server is not a DC.
Aditya kumar pagadala
May 19, 2017 at 9:55 AM
Great Article Jason…thank you so much
Ronald
July 3, 2017 at 1:37 PM
Hi Jason, gr8 article, but the last steps are failing on me. I can successfully test LDAP connection and test an individual user, that’s fine. However, when I try to put the NS in the mix, things don’t work. I use nested groups and the userPrincipalName attribute for signing on in NS. The error I get in NS is below (debug log, 2nd entry). It says invalid credentials. No call from Azure. I made a copy of a working LDAP server and Policy in NS and made sure it works, before changing the IP to the MFA instance. Any ideas what might cause this?
BR,
Ronald
Mon Jul 3 16:32:07 2017
/home/build/rs_110_64_24_RTM/usr.src/netscaler/aaad/ldap_common.c[408]: ns_ldap_check_result ldap_result found expected result LDAP_RES_BIND
Mon Jul 3 16:32:07 2017
/home/build/rs_110_64_24_RTM/usr.src/netscaler/aaad/ldap_common.c[233]: ns_show_ldap_err_string LDAP error string: <>
Mon Jul 3 16:32:07 2017
/home/build/rs_110_64_24_RTM/usr.src/netscaler/aaad/ldap_common.c[418]: ns_ldap_check_result LDAP action failed (error 49): Invalid credentials
Mon Jul 3 16:32:07 2017
/home/build/rs_110_64_24_RTM/usr.src/netscaler/aaad/ldap_drv.c[213]: receive_ldap_bind_event Got LDAP error.
Mon Jul 3 16:32:07 2017
/home/build/rs_110_64_24_RTM/usr.src/netscaler/aaad/naaad.c[3399]: unregister_timer releasing timer 106
Mon Jul 3 16:32:07 2017
/home/build/rs_110_64_24_RTM/usr.src/netscaler/aaad/naaad.c[2583]: send_reject_with_code Rejecting with error code 4001
Mon Jul 3 16:32:07 2017
/home/build/rs_110_64_24_RTM/usr.src/netscaler/aaad/naaad.c[2616]: send_reject_with_code Not trying cascade again
Mon Jul 3 16:32:07 2017
/home/build/rs_110_64_24_RTM/usr.src/netscaler/aaad/naaad.c[2618]: send_reject_with_code sending reject to kernel for : [email protected]
SalvatoreScandurra
July 12, 2017 at 3:54 AM
Hi Jason Samuel
great post, really helpful.
I just have a small question, did you ever noted that the auth. work only over WEB but not over the Citrix Receiver?
At the moment i have an issue, that i setup the account the receiver, im able to login, and a soon i approove the Token over my Phone, receiver try to connect to storfront, but at certain point i get the 3 Field auth and the Auth faild.
User
Passcode 1
Passcode 2
did you or some one have any idea/help?
Jig
July 13, 2017 at 8:30 AM
Hi Jason, I have MFA sending code via text message working fine via web browser, but do you know how can i make this work with the Citrix Receiver?
Leon Ngo
July 17, 2017 at 2:21 AM
Anyone able to get password expiration to work through NSG while having the On-prem MFA server as the ldap intermediary? I don’t think the MFA servers can process pw change.
Will A.
August 8, 2017 at 9:42 AM
Do you have Azura MFA working with LDAPS and supporting password changing on the netscaler? I did find an article that talks about doing this but it requires changing the Directory Integration from AD to LDAP and then the MFA software will act as a LDAP proxy. I haven’t made this change yet as I am worried about affecting our existing Office 365 users. https://docs.microsoft.com/en-us/azure/multi-factor-authentication/multi-factor-authentication-get-started-server-ldap
Shaun Rockett
August 23, 2017 at 1:52 PM
I have the same issue with password change not working. I’ve opened a ticket with Microsoft support. Hopefully I get an answer as this is a show stopper for our deployment.
I work at Microsoft boii
August 28, 2017 at 1:03 PM
Password expiration works: https://docs.microsoft.com/en-us/azure/multi-factor-authentication/multi-factor-authentication-advanced-vpn-configurations
You have to use LDAPS (SSL) not Windows on the LDAP configuration for the password change to work. The above article has documentation on setting up the LDAP with NetScaler screenshots too.
[email protected] Michael Hall
Will A.
August 28, 2017 at 1:23 PM
Michael,
I have a question about switching to LDAPS, since we are using the servers now for our Office 365 integration and it is production. Do we have any risk in changing the Directory Integration from Active Directory to LDAPS? Should we anticipate an outage or any changes in how things work now? Could we have one server remain with a Active Directory configuration and switch another to LDAPS in the cluster of servers? It was explained to me that this is not possible since they act in an active/passive type of failover.
Mansoor Padipura
November 27, 2017 at 12:29 AM
Great Article.. Really appreciate
Rob
March 6, 2018 at 10:09 AM
Does this method work with text messages? I have got it all up and running the phone calls and the Authenticator app but would like to get it working for all three methods. I cant find away to enter the text code.
Sri
November 14, 2018 at 8:29 AM
Hi Jason,
If users are in Azure Active directory, can we integrate netscaler as Enterprise application in Azure portal and configure MFA, without FAS? also are there any limitations in netscaler?
Thanks,
Srinivas
Adam Ridley
February 19, 2019 at 4:56 AM
Hi Jason,
I have a NetScaler (one-arm mode) in our DMZ and the MFA in the Internal Network.
On the MFA I can perform a user authentication test OK.
When I bind the LDAPS policy to my VIP authentication simply fails and users cannot log on.
Do you have a list of the required Firewall Rules that are needed (Inbound and Outbound) for MFA functionality?
I already have the following configured:
NS to MFA [TCP:389 (ldap); TCP:636 (ldaps); TCP:1645-1646 & 1812-1813 (radius)]
jai
July 29, 2019 at 4:16 PM
Hi Jason.
Its very useful detailed configurations, Thanks and appreciated. I just want to know couple of things. Appreciate if you can get me that information.
User can change the option in MFA portal to use either App or Call or SMS for authorization. App and call will work fine. But when user opted to use sms, how to get second page to enter password option? During my test after initial authentication with username and password, I receive SMS, but I dont have option to enter password received by sms.
App or call approval doesn’t required second page. But SMS password required second page. Will these work together? or either App/Call or SMS
Thanks in advance.
William Turgeon
August 31, 2021 at 2:53 PM
Unfortunately, the Azure portal has changed drastically and the instructions here no longer apply.