SAML is a type of authentication mechanism you can use to allow for single sign-on (SSO) between Active Directory user accounts and Citrix ShareFile. ShareFile presently supports 3 methods to authenticate your Active Directory accounts with ShareFile and SAML is the easiest of the 3 to configure if you have a NetScaler. If you don’t use a single-sign on method that means the users will have to remember a cloud based account within the ShareFile environment and that’s probably not something you want in a large enterprise. No user should have to remember multiple credentials to access enterprise apps and data. The focus of this article will be setting up SAML IdP on your NetScaler so you can use Active Directory credentials for single sign-on with ShareFile.
WHAT IS SAML IDP?
SAML stands for Security Assertion Markup Language. IdP stands for Identity Provider. SAML is an XML based open standard used to exchange authentication and authorization information between systems. So in this case, your on-premise Active Directory talking to the ShareFile control plane in Amazon Web Services (AWS). The current version is SAML 2.0 and you can read more about it here:
https://en.wikipedia.org/wiki/Security_Assertion_Markup_Language
SAML is composed of two kinds of providers, the IdP (Identity Provider) and SP (Service Provider). In our ShareFile example, the SP will be in AWS and the IdP is something in your datacenter. The Service Provider talks to the Identity Provider to verify and allow the user to use the service in question.
HOW CAN NETSCALER HELP?
NetScaler can act as a SAML Identity Provider. You don’t need to stand up any servers like you do when configuring ADFS or other SSO methods, it’s simply a AAA vserver VIP hosted on the NetScaler not too different from a load balanced vserver or NetScaler Gateway vserver you may have setup before. It talks to your Active Directory and verifies and allows authentication requests coming from the ShareFile control plane in AWS.
SAML IdP is still a fairly new feature on the NetScaler. It was first added in NetScaler 10.5 a little over a year ago. To be honest, it’s had some bugs along the way. But now in NetScaler 11.0 with build 55.20 onward, I have not come across any bugs with it and can 100% recommend using it in a production environment. You’ll even note in my test lab I’m using the latest 62.10 build and it continues to work great!
HOW WILL SSO WORK WITH SHAREFILE?
I’ll try and be simple with the explanation. This is how single sign-on (SSO) will work with ShareFile and the NetScaler:
1. You have to setup a trust between ShareFile and the NetScaler. When a user connects to the ShareFile control plane in AWS to authenticate, they will get redirected to the NetScaler AAA SAML IdP logon page.
2. Transparent to the user, this redirect will include a SAML Request that is signed by ShareFile. The user logs in and authenticates against the IdP and Active Directory.
3. The IdP on the NetScaler then redirects the user back to ShareFile and again, transparent to the user sends a SAML token which ShareFile validates, then allows the now fully authenticated user in and they can begin using the ShareFile system.
That’s it in a nutshell. Pretty simple right?
HOW TO CONFIGURE THE SHAREFILE CONTROL PLANE FOR SSO/SAML SP
The ShareFile Team will set you up with a subdomain on sharefile.com with your company name like this:
https://companyname.sharefile.com
Initially you will be given a cloud based admin account for setup functions. Go ahead and login with your admin account and do the following to setup SSO:
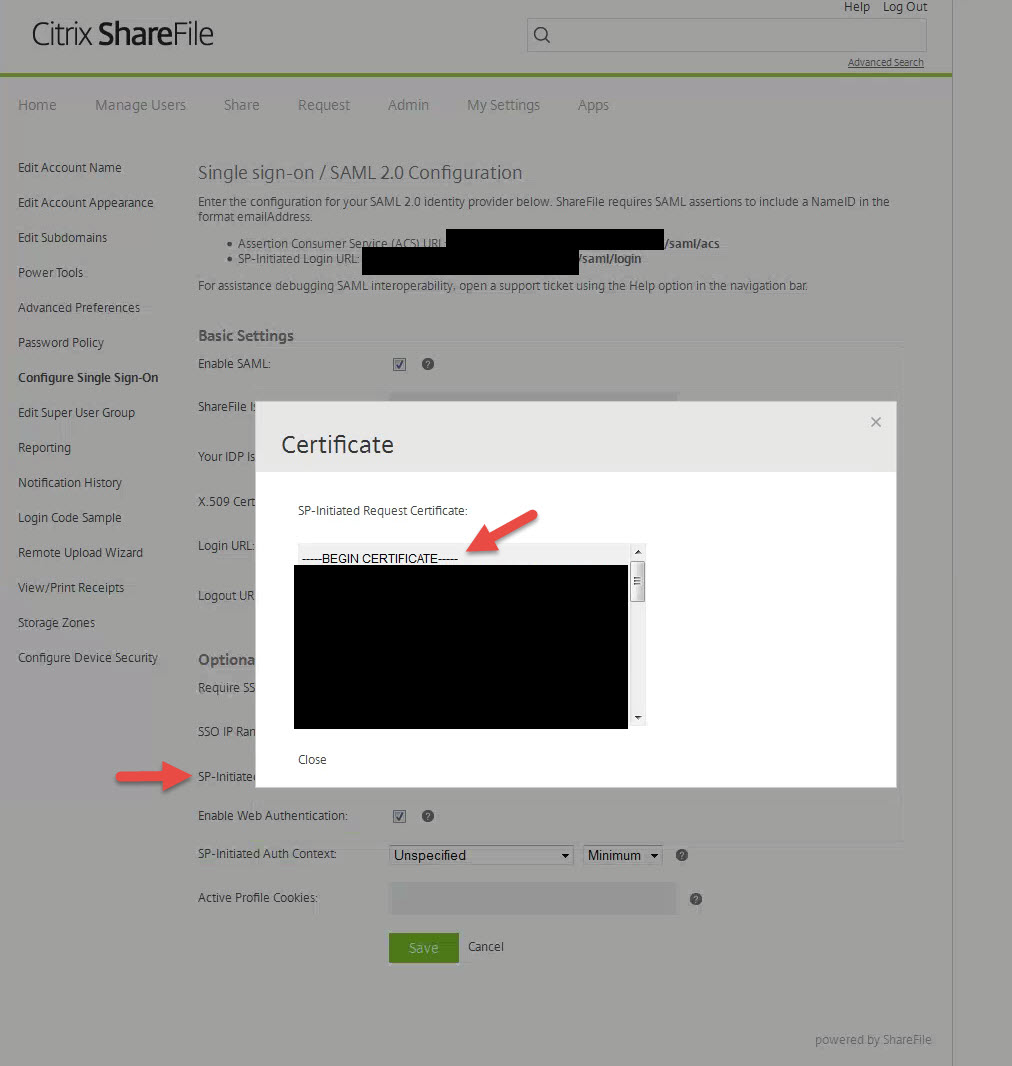
1. Go to the Admin tab and click on “Configure Single Sign-On” in the left side navigation. This screenshot is lit up like a Christmas tree so let me try and explain from the top:
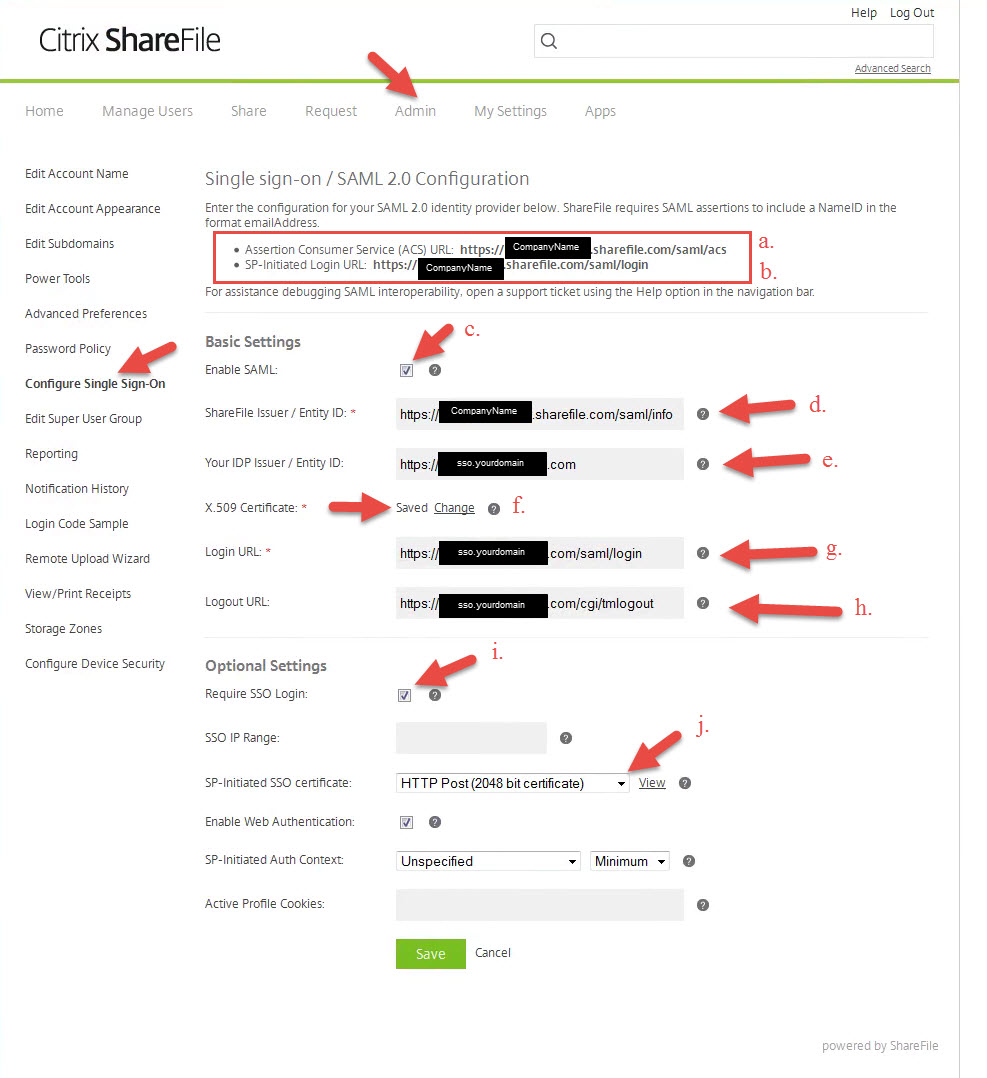
Top part:
- a. In the red box I’ve outlined is the Assertion Consumer Service (ACS) URL. Copy this to Notepad, we’ll need it later for the NetScaler config.
- b. Also in the red box is the SP-Initiated Login URL. Again, needed later so copy to Notepad as well.
Basic Settings part:
- c. Check this box to actually allow SAML.
- d. ShareFile Issuer, enter in https://companyname.sharefile.com/saml/info
- e. Your IDP Issuer, finally something related to a URL your control. This is the URL you will be setting up SAML IdP on later during the NetScaler config. In this example let’s use https://sso.yourdomain.com
- f. X.509 Certificate, this is the SSL cert you will bind on https://sso.yourdomain.com later. I’ll show you how to copy it over from the NetScaler later in step 3.
- g. Login URL, this is the NetScaler SAML IdP URL users will be redirected to, https://sso.yourdomain.com/saml/login. Some of you NetScaler gurus may be thinking where tmindex.html is, don’t worry I’ll cover that later.
- h. Logout URL, this is the logout URL for the above, again pretty standard. Users will hit this logout link when they logout of the ShareFile environment: https://sso.yourdomain.com/cgi/tmlogout
Optional Settings part:
- i. Require SSO Login, if you check this all employees will be required to use SAML IdP. No skirting around using a cloud account if they have one. Remember, this is licensed employees only. Clients, external vendors, and other unlicensed people will continue to use the cloud based login within ShareFile if they are setup for that.
- j. SP-Initiated SSO certificate, make sure it is set to “HTTP Post (2048 bit certificate)”. This is the SSL cert for https://companyname.sharefile.com and you’ll need this later.
HOW TO CONFIGURE NETSCALER FOR SAML IDP
2. How let’s begin the NetScaler config. First you need to create and install an SSL certificate for https://sso.yourdomain.com. I’ve covered SSL in depth in previous articles if you don’t know how to do this.
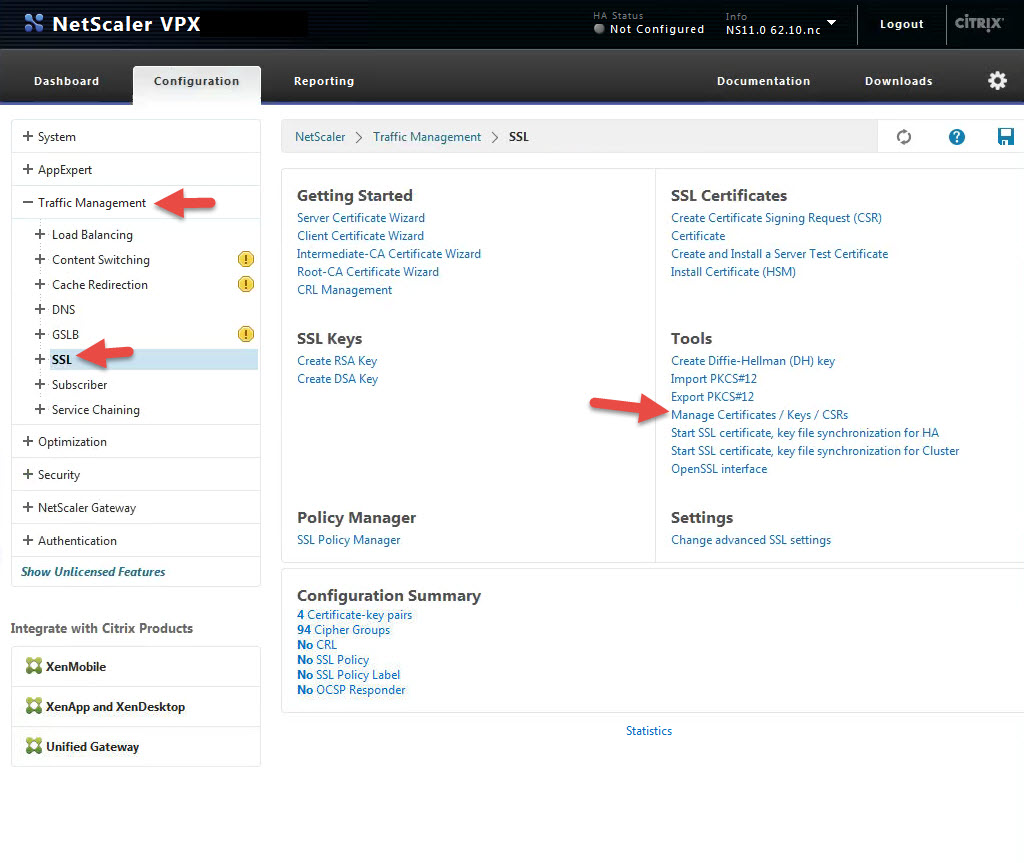
3. So remember that that X.509 certificate in step 1, section e. above? We need to copy this cert to ShareFile so it knows about it. Go to Traffic Management > SSL > and click Manage Certificates / Keys / CSRs
4. Click on your cert and hit View
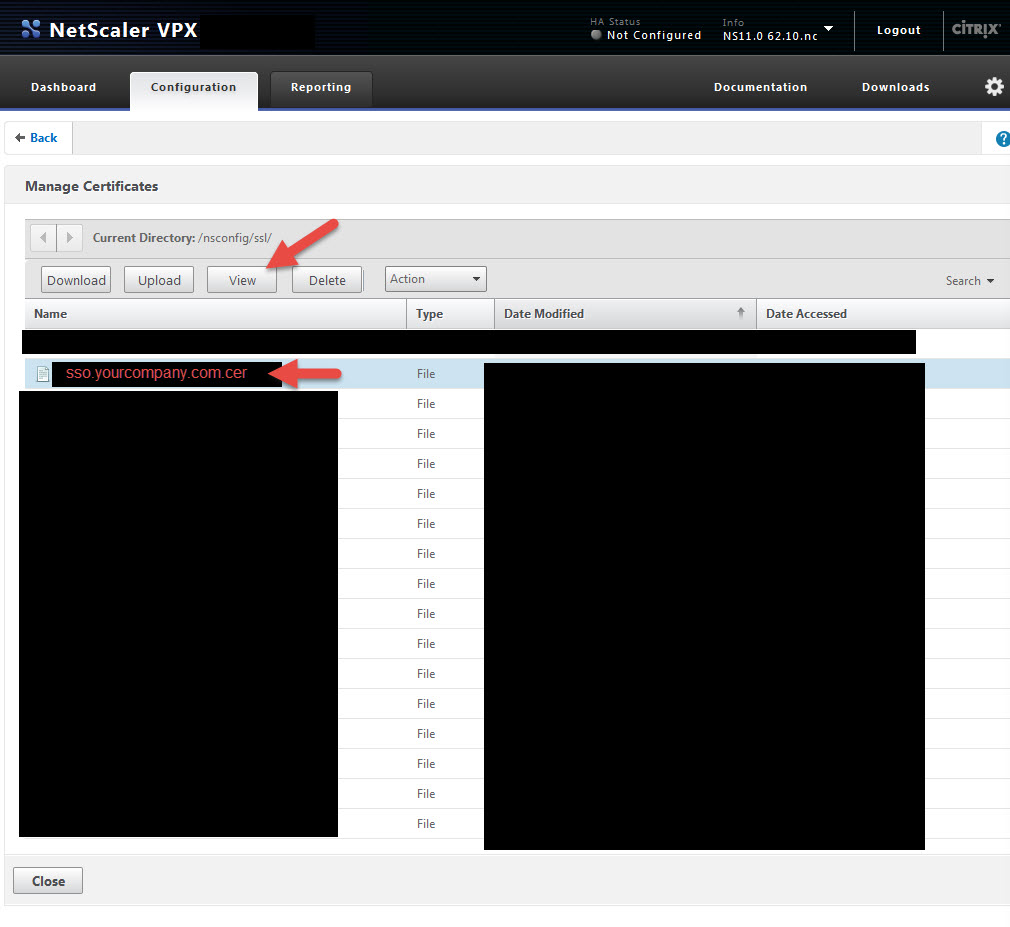
5. Copy all of it into Notepad. Yes including the Begin and End comments. Verify there are no extra spaces or characters at the end of what you copied into Notepad. Now copy what you pasted and drop it into the ShareFile X.509 Certificate area I talked about above in step 1, section e. You have now installed the cert in the ShareFile control plane. If you ever want to verify your control plane has the right cert just compare the last few characters of the cert vs. what pops up in ShareFile when you click the Change link. It should always match up.

6. Ok so now ShareFile knows about the NetScaler SSL cert but we need to make sure the NetScaler knows about ShareFile. Click on that View button next to SP-Initiated SSO certificate – HTTP Post (2048 bit certificate) that I pointed out in section j. above and copy everything into Notepad. Verify there are no spaces or characters just like before. Now save the the file with a .cer extension. I will call mine “ShareFile_ SP_Initiated.cer” in this example.
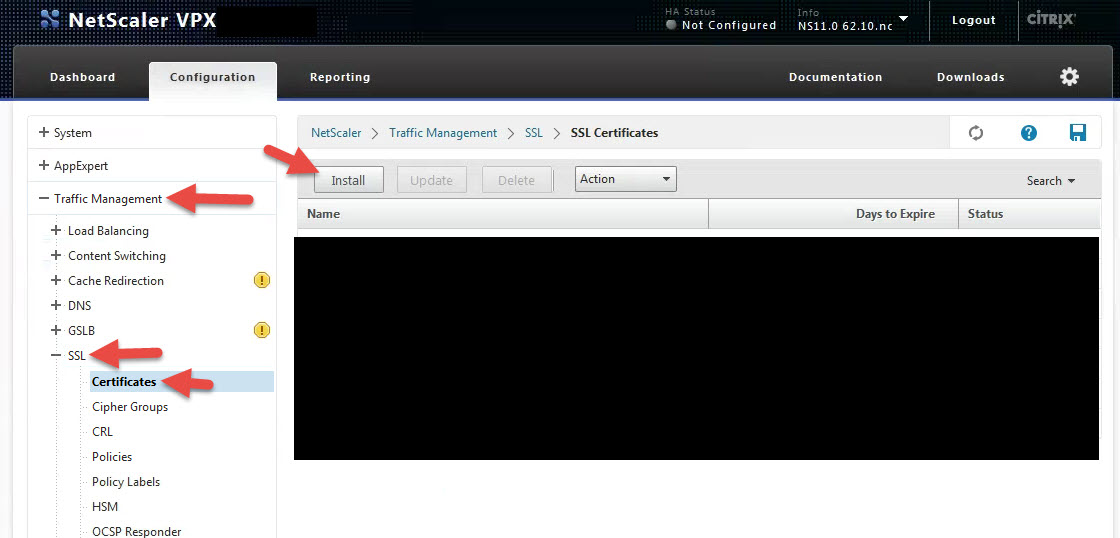
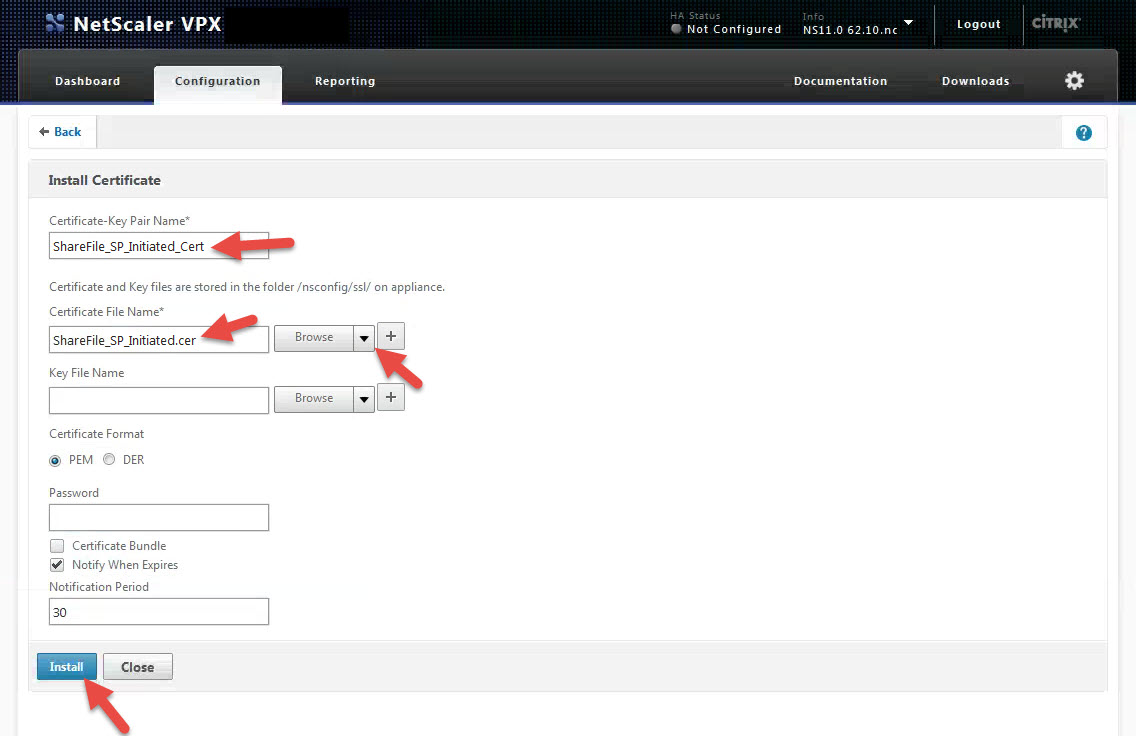
7. Now go to your NetScaler under Traffic Management > SSL > Certificates and click Install
8. Give it a name like “ShareFile_ SP_Initiated_Cert” in this example. In the Certificate File Name section, hit the drop down to Browse your Local machine and click on the “ShareFile_ SP_Initiated.cer” file you created. Then hit Install. We’ll bind it later.
**NOTE: SAML relies heavily on these SSL certs to create the trust between the SP and IdP (ShareFile and NetScaler). Please make sure the time on your NetScaler is correct and synced with an NTP server. I’ve covered FreeBSD NTP on MPX devices vs. VPX and the underlying hypervisor host’s time and some gotchas you can easily overlook before. Make sure you check the time is correct or SAML auth will fail every-time because the SAML token is invalidated and you’ll be pulling your hair out troubleshooting it. Also please make sure your SSL chain is valid and all certs are linked on https://sso.yourdomain.com. You can check this easily using SSL Checker.
9. Now setup a LDAP, LDAPS, or RADIUS authentication policy. As always in production environments, please make sure you are using LDAPS or RADIUS so the traffic is encrypted. You can use the same authentication policy you use on a NetScaler Gateway vserver if you like but you will need to make a copy of it and make some changes depending on how it’s configured. There is one little setting that has to change in order to pull the email address.
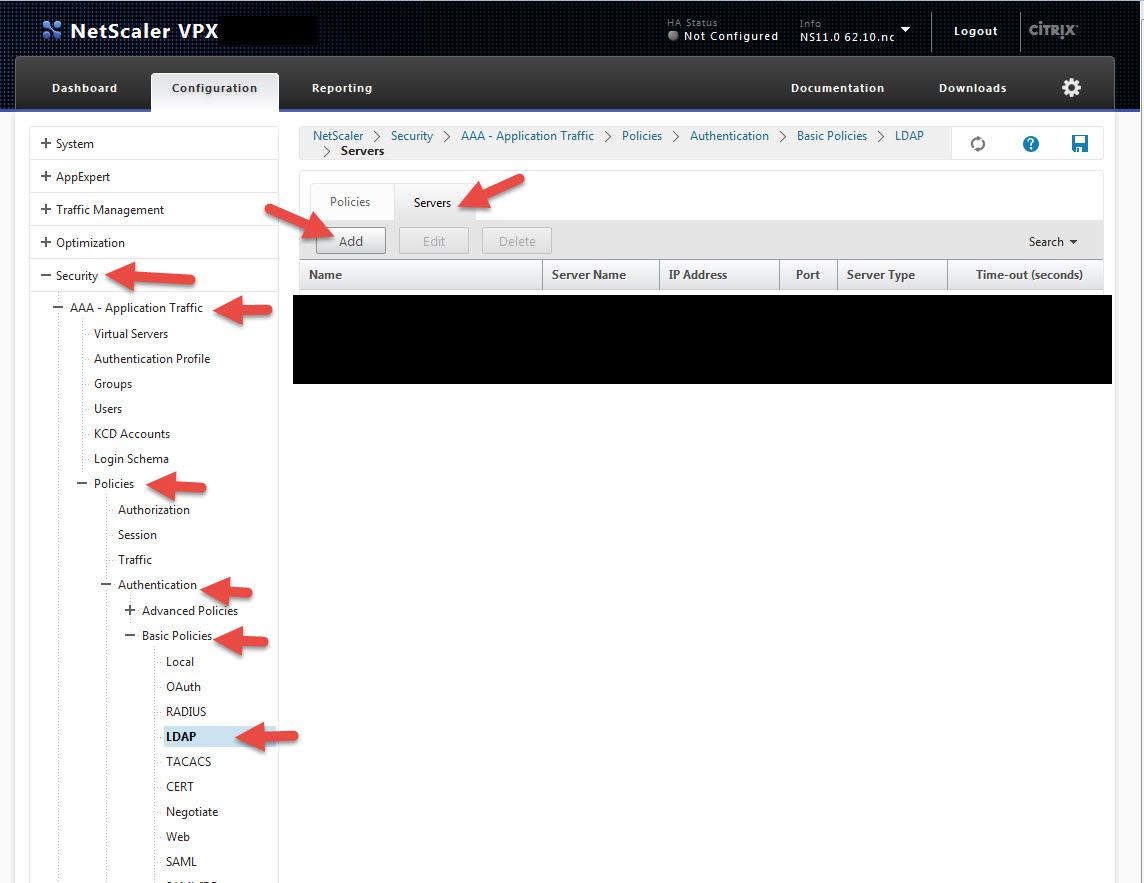
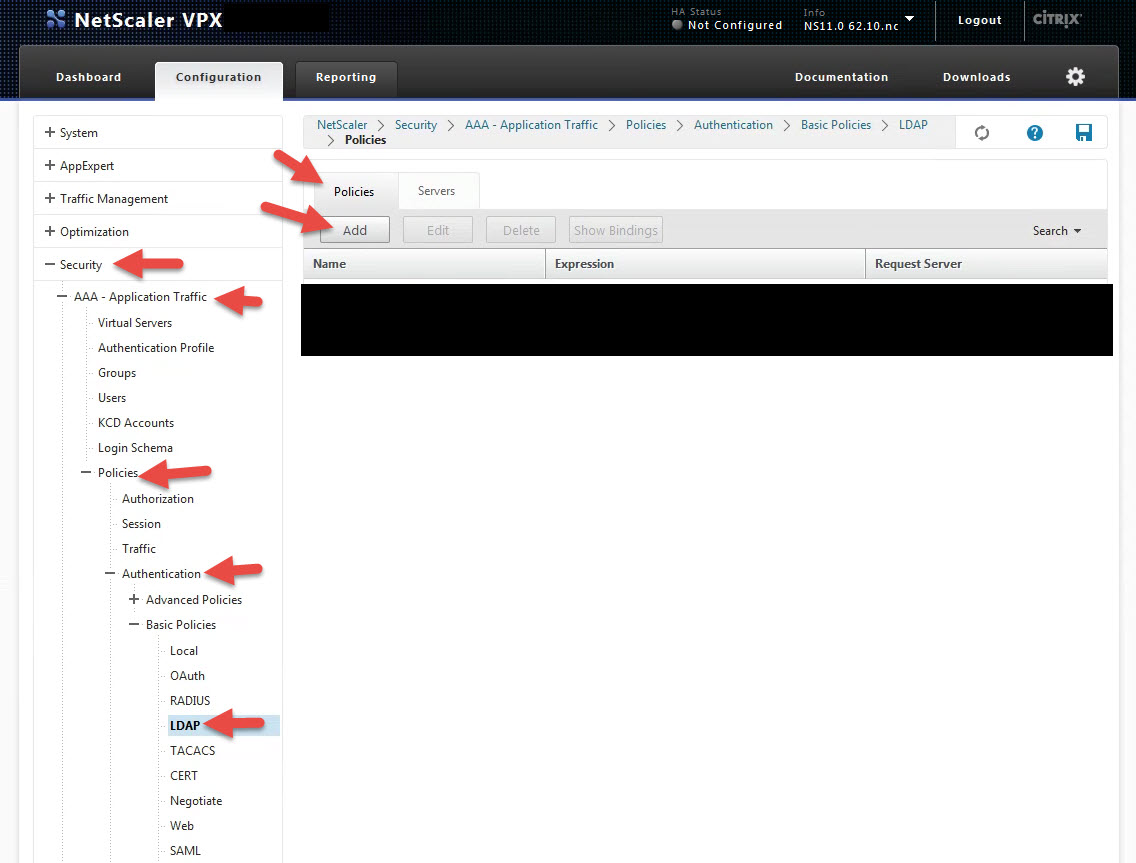
I’m going to show you LDAPS in this test lab example. Go to Security > AAA – Application Traffic > Polices > Authentication > Basic Policies > LDAP and then click on the Servers tab and hit Add. Or if you have an existing policy click it and hit Add to make a copy:
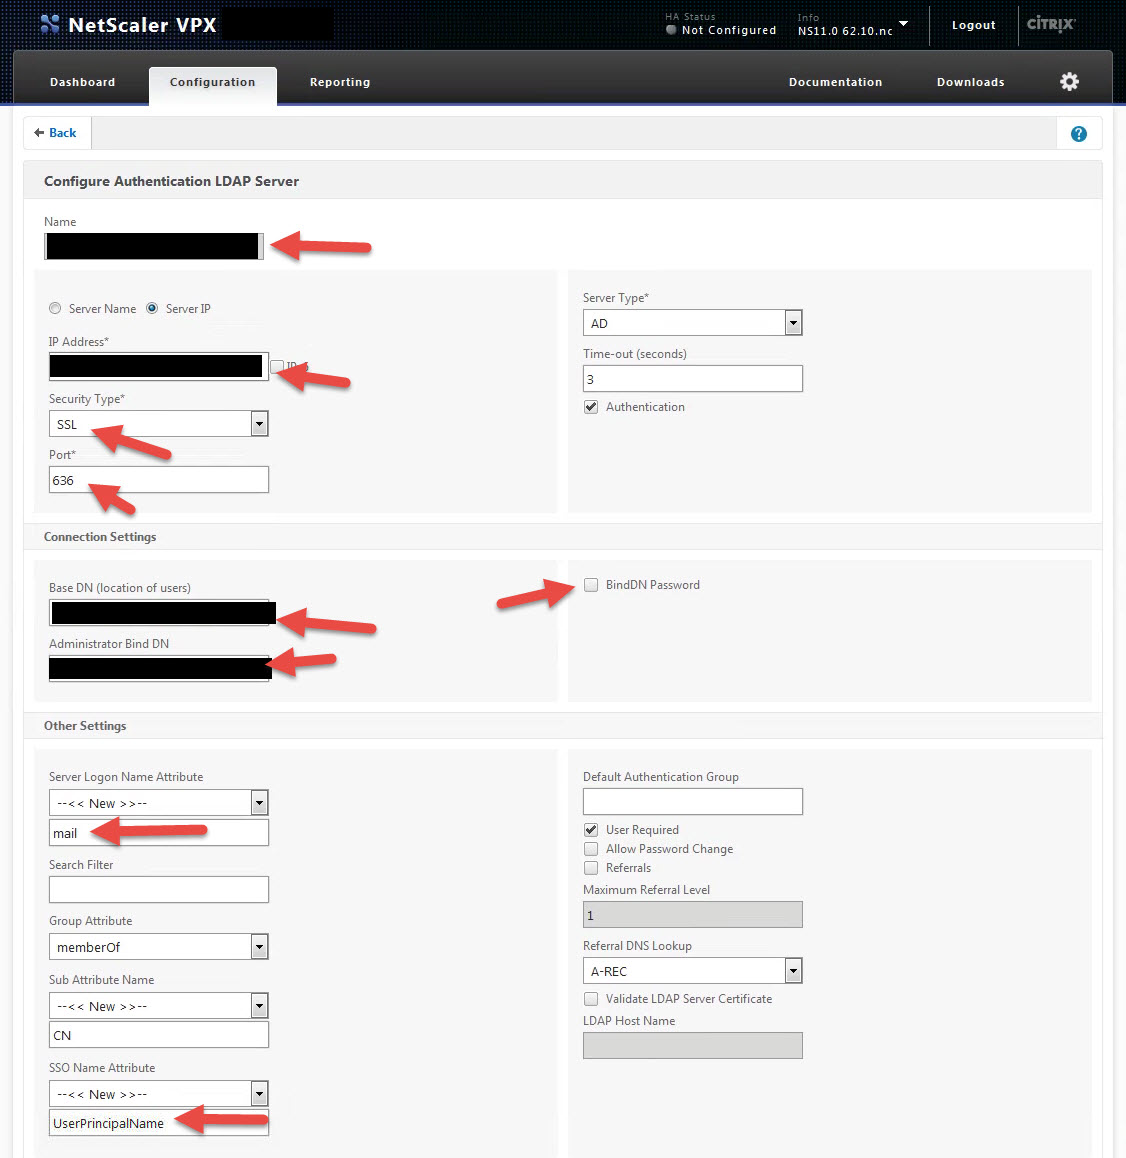
10. Give it a name, IP, switch to LDAPS (SSL) on port 636, add the Base DN, Administrator Bind DN, & Bind DN Password. Simple stuff just like any other auth server. The big change is the “Server Logon Name Attribute”. It must be set to mail. Usually you would do sAMAccountName or UserPrincipalName here but you need to hit New and type in “mail”. ShareFile uses the company email address to keep track of users in the control plane. SSO Name attribute can still be UserPrincipalName:
11. Now go to the Policies tab and hit Add to create a new policy.
12. Give the policy a name, bind it to the server you just created, and set the expression to ns_true so it’s always invoked:

Awesome, now your policy is ready to roll!
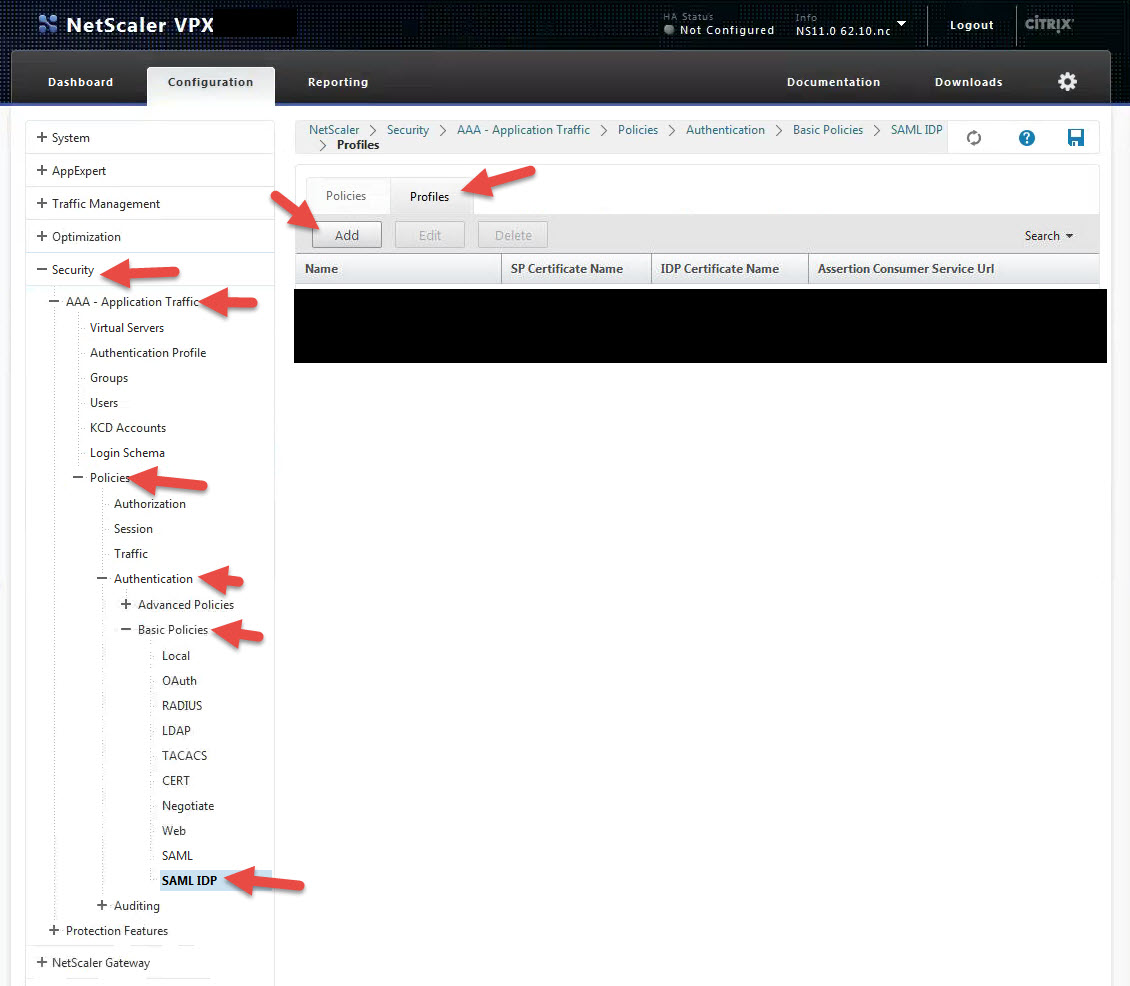
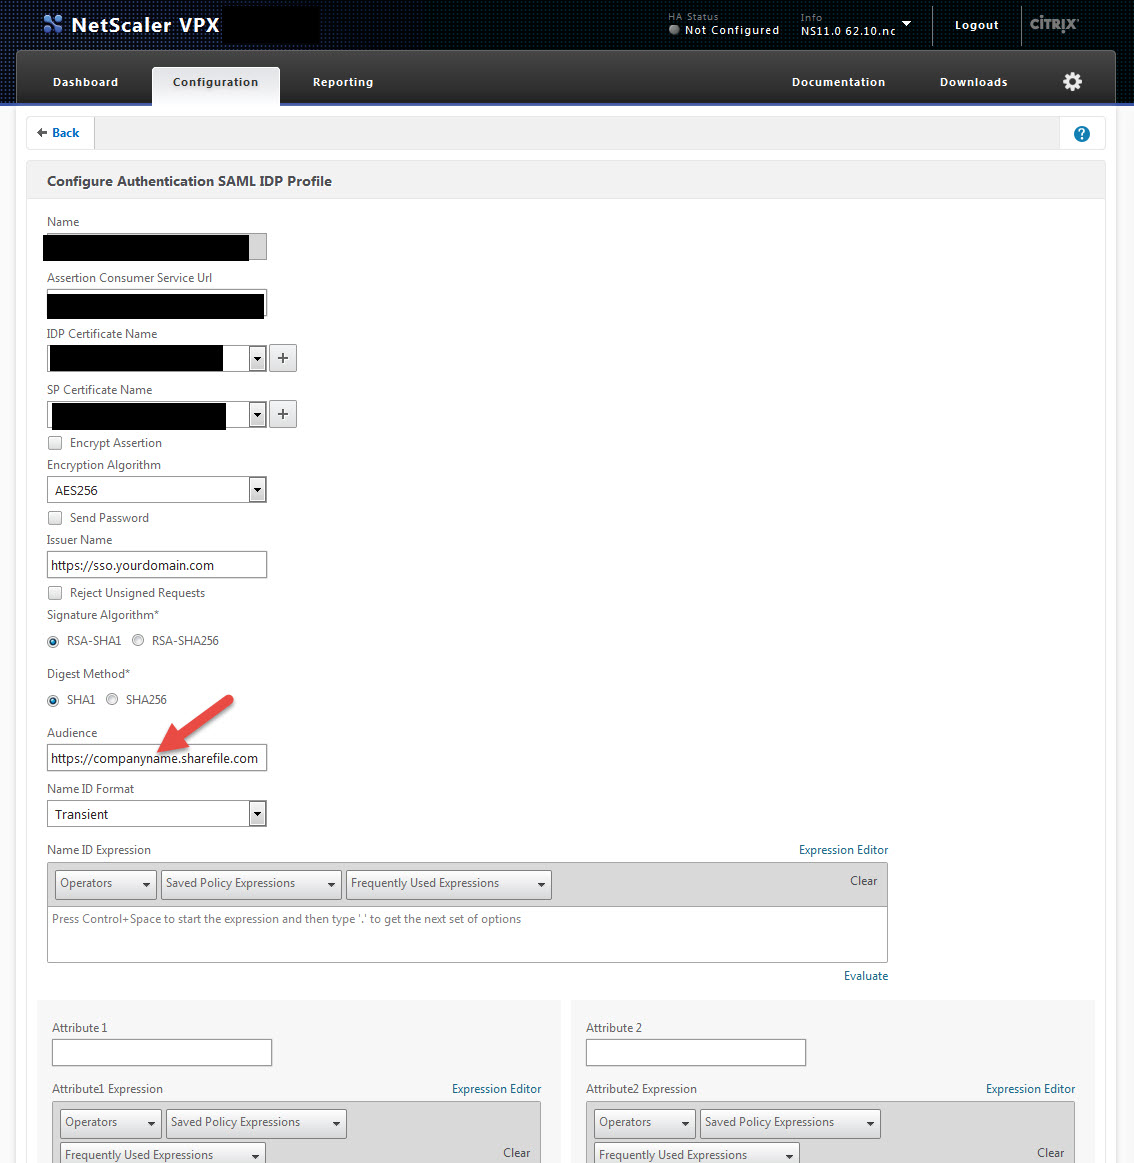
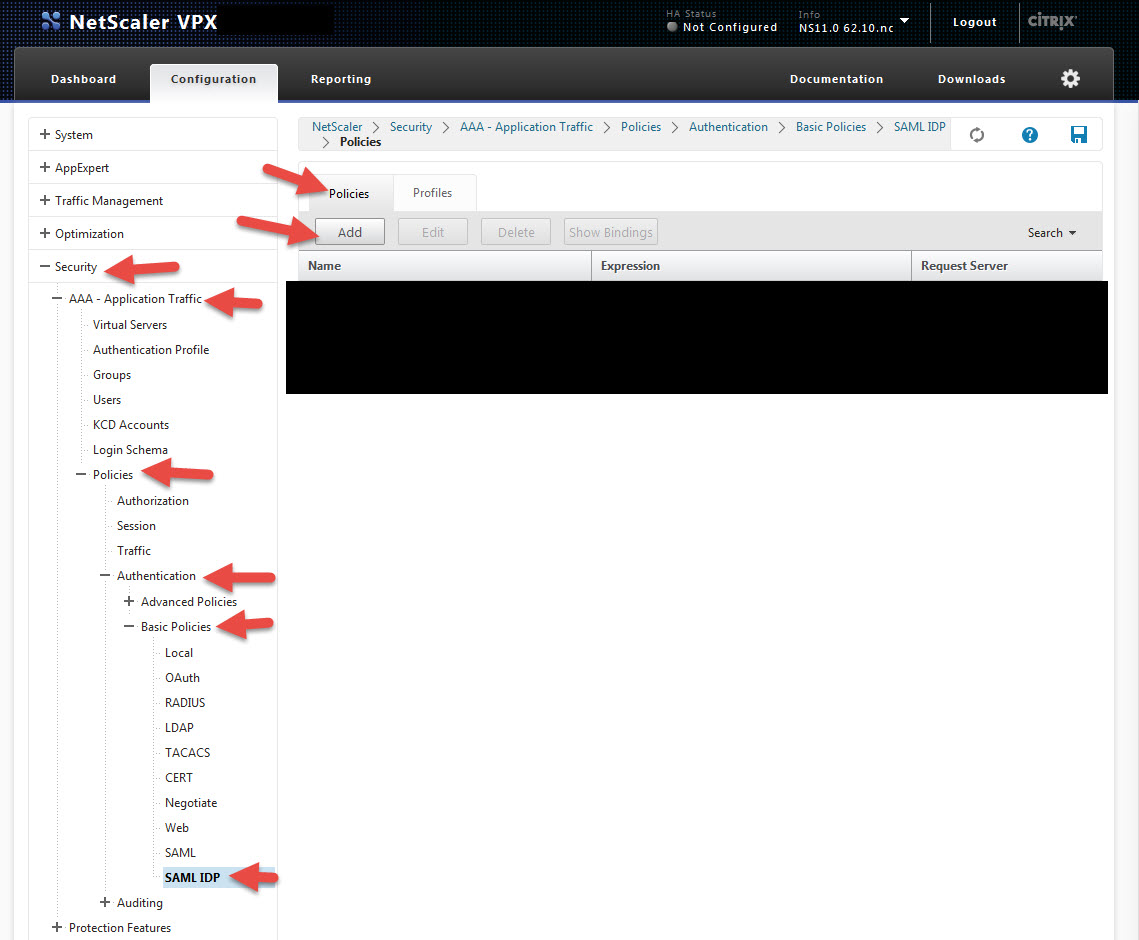
13. Now we need to create a SAML IdP profile. Go to Security > AAA – Application Traffic > Policies > Authentication > Basic Policies > SAML IDP and hit the Profiles tab. Then hit Add.
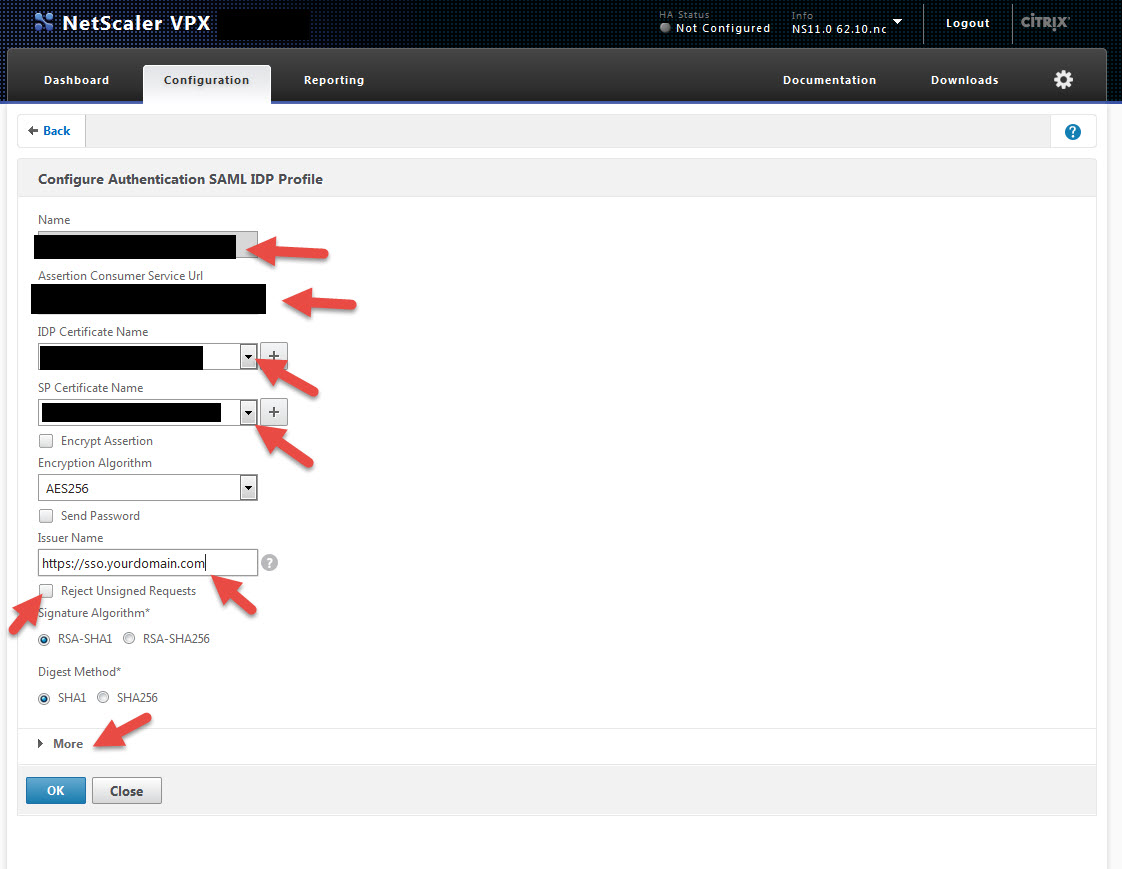
14. Give the profile a name and for the Assertion Consumer Service URL, copy and paste it from step 1, section a. It should be something like https://companyname.sharefile.com/saml/acs
For the IDP Certificate Name, this is your SSL cert for https://sso.yourdomain.com.
For the SP Certificate Name, this is the cert you just installed which in the example we had called “ShareFile_ SP_Initiated_Cert”.
For the Issuer Name, type in https://sso.yourdomain.com
Notice there is a check box to reject unsigned requests. You should check this in a production environment but for initial setup or testing purposes like in this lab, leave it unchecked so you can get the system working first.
Finally hit that little More section, we’re not done yet:
15. The More section is pretty freaking huge. But don’t be scared, all you need to type in is the Audience. This is just https://companyname.sharefile.com and once done save your profile.
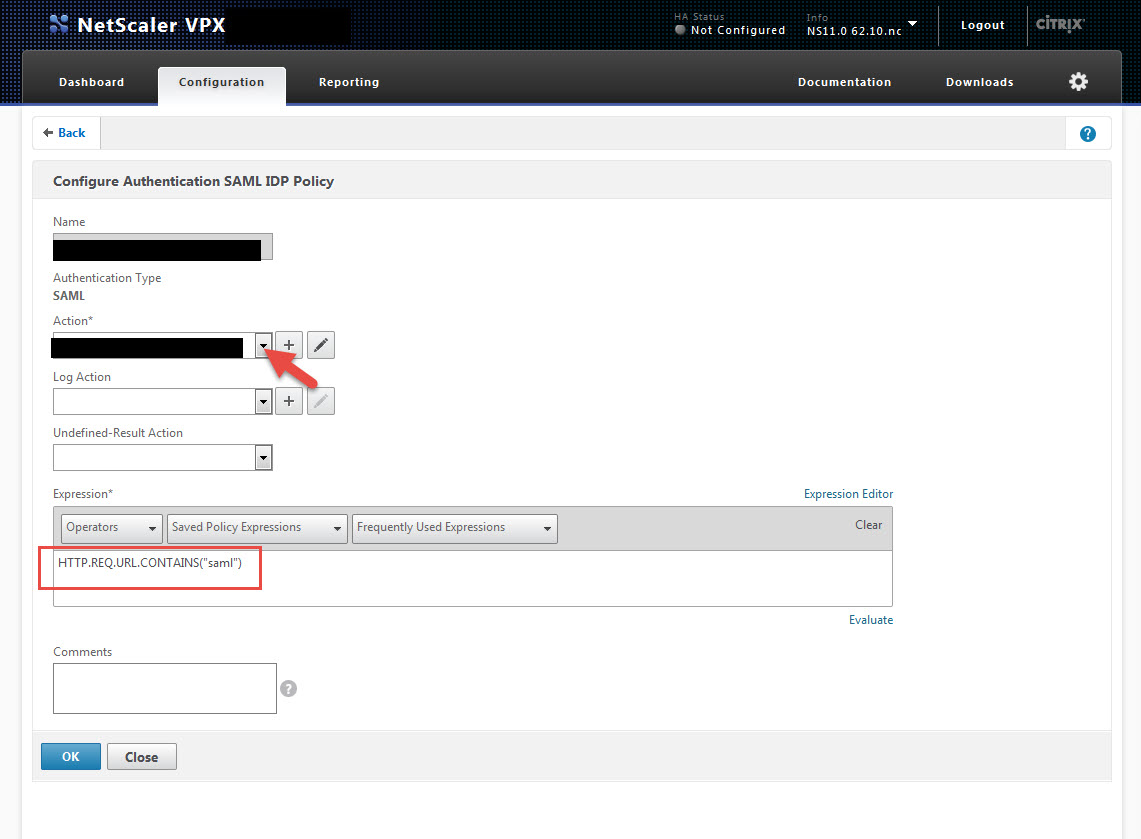
16. Now hit the Policies tab and click Add.
17. Give it a name, select the profile you just created as your Action, and for the Expression type:
HTTP.REQ.URL.CONTAINS("saml")
18. Aren’t you tired of drilling all the way down? Don’t worry, now it’s time to create your vserver and bind all the work you just did! Go to Security > AAA – Application Traffic > Virtual Servers and click Add:
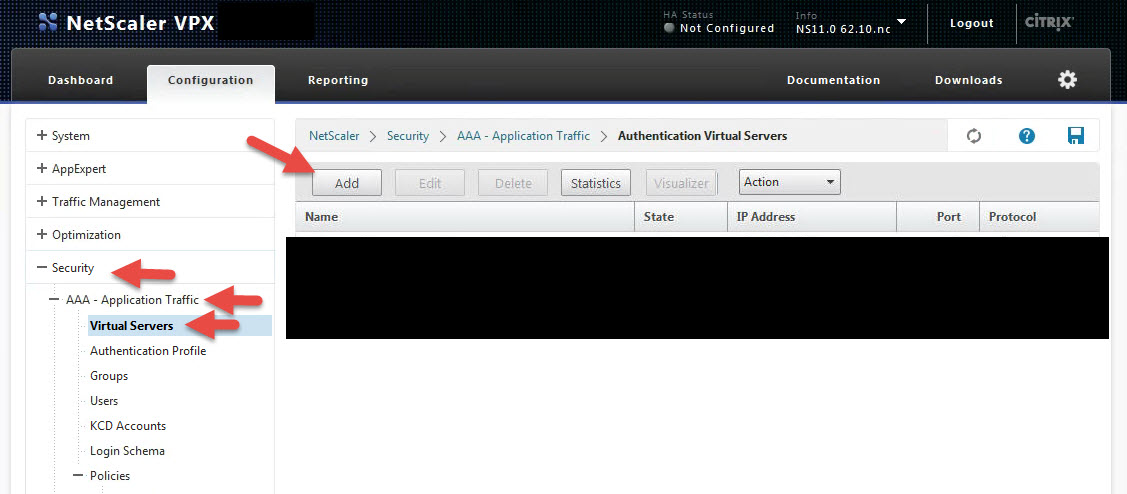
19. Give it a name, IP (make sure port 443 is open to it on your firewall), bind the SSL cert you created for https://sso.yourdomain.com, and bind the 2 authentication policies you created as Primary Authentication Policies. First is the LDAPS Policy you created in step 12 and second is the SAML IDP Policy in step 17 you just created. It should look like this when your policy is done:
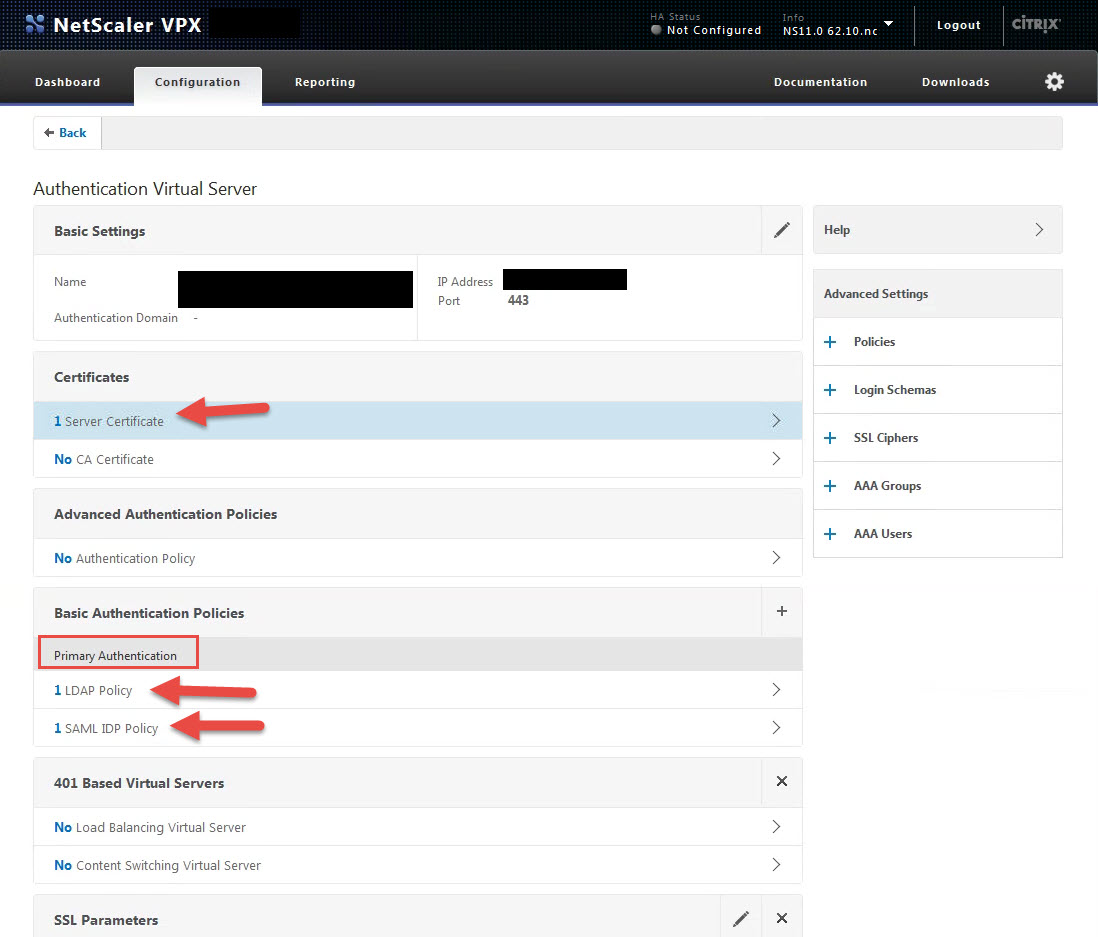
Bam! You just configured SAML IdP on your NetScaler. 🙂
READY TO TEST!
Now all that’s left to do is testing out the SSO login process. Let’s test it out in a web browser. Make sure you have enabled split logon within your ShareFile account. You will need to contact ShareFile Support to enable this on the backend.
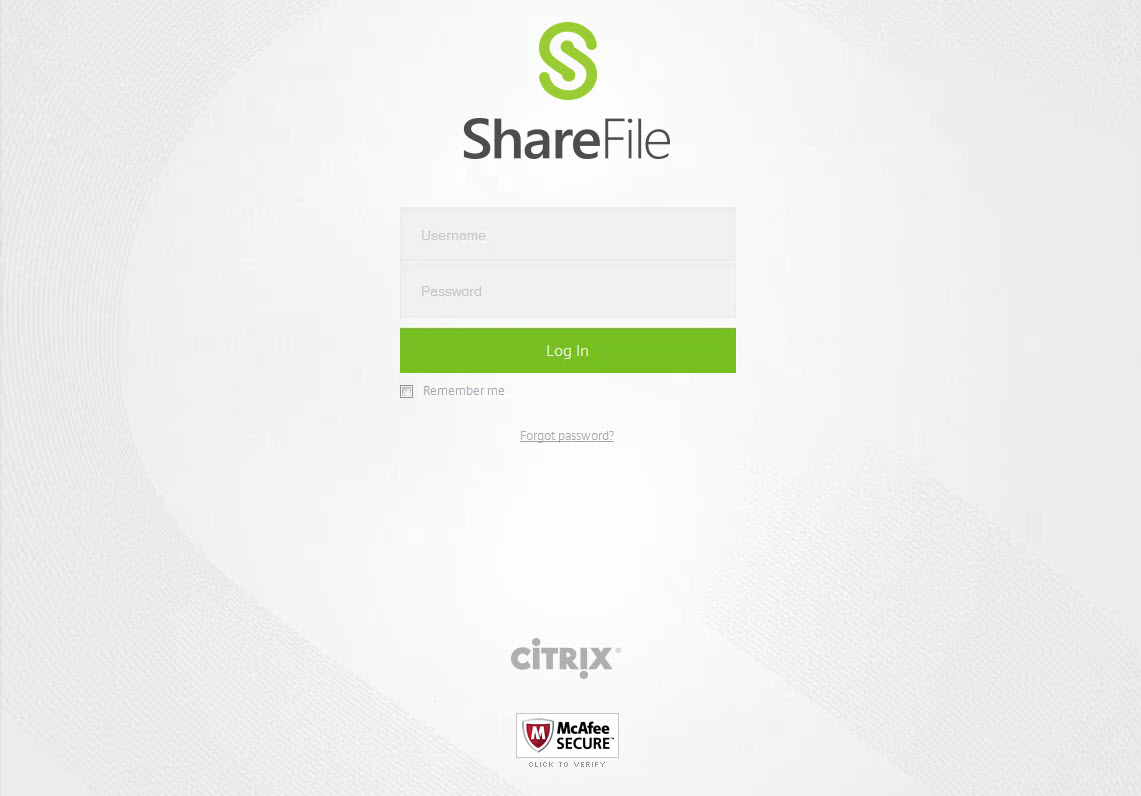
20. The default ShareFile login page will look like this for reference:
21. Support will give you the custom split login page you can use as a template and you can brand it accordingly for your company. It’s just very basic HTML/CSS and Support will guide you through customizing and branding it if needed. By default it will look like this when you navigate to https://companyname.sharefile.com without any additional customization done to it:
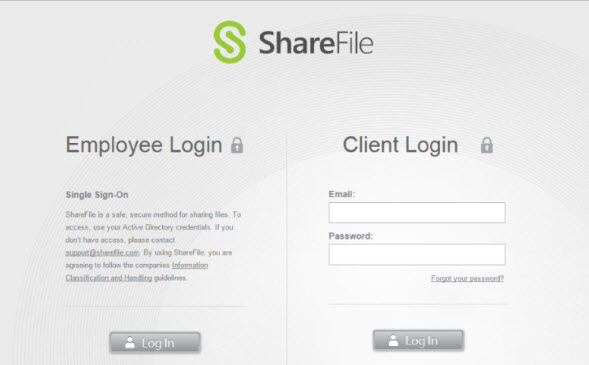
You can change all the verbiage you see, colors, background, and of course the logo at the top. Really, you can go nuts on it if you want, there’s no restrictions I’ve hit yet and I’ve done some pretty crazy stuff like inserting tracking code and live monitoring code into the page to keep tabs on it. Go ahead and click on the Employee Login.
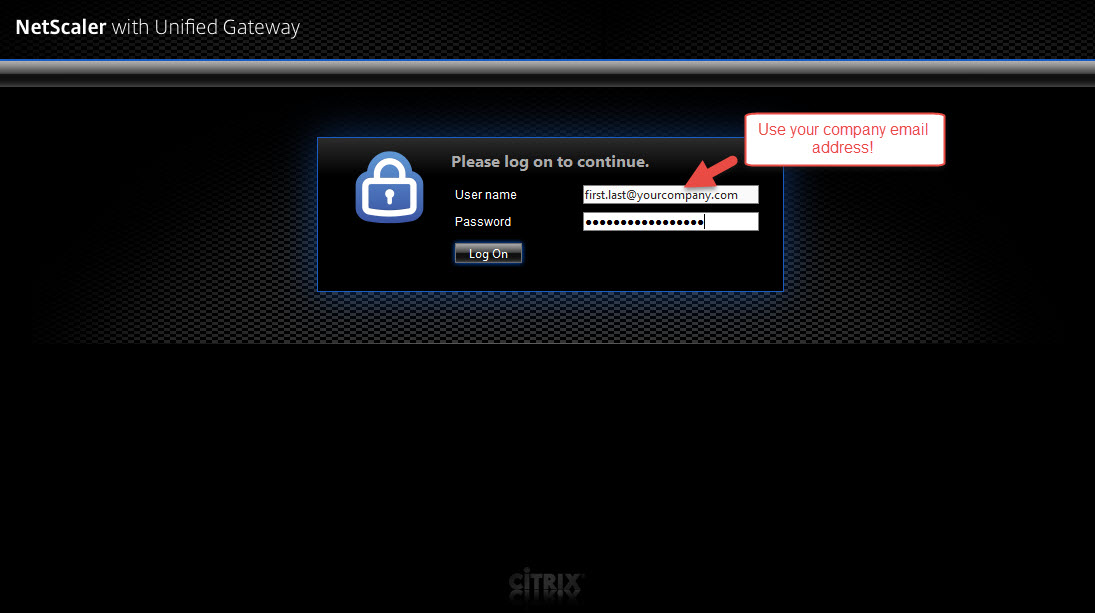
22. You should have been redirected to the URL you specified in step 1, section g. which was https://sso.yourdomain.com/saml/login. When you hit that page it then redirects you to https://sso.yourdomain.com/vpn/tmindex.html and you’ll be allowed to login to the AAA vserver.
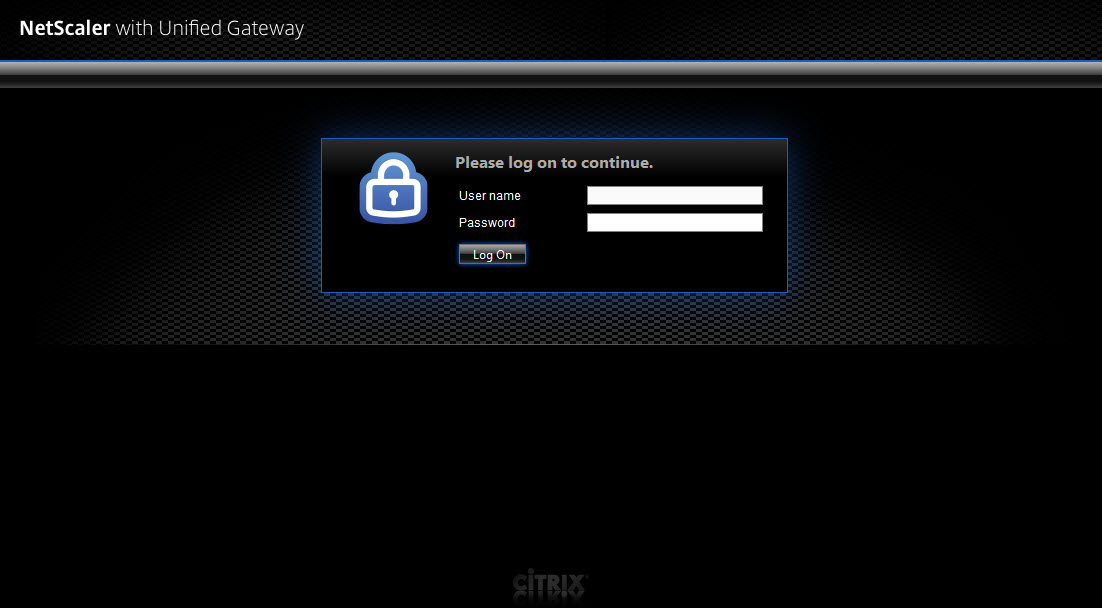
Yes, it’s black…
Yes, it says NetScaler with Unified Gateway for the logo….
Yes, it says “User name” instead of saying “Email Address” since that’s what users are going to be logging into ShareFile with….
I know. It needs work and should look more like the custom login page you just came from at the very least.
This is unfortunately the one big negative of using a AAA vserver on the NetScaler. At this time even with the latest 11.0 build 62.10, Portal Themes do not work with AAA vservers yet. Portal Themes is a feature that came out with 11.0 a few months ago and it only works with NetScaler Gateway vservers at this time. Sure you can hack a AAA vserver and switch up the look manually just like you could with an Access Gateway vserver but it’s an unsupported configuration and I hesitate to show you how to do it in this article. If you really want to know, Google it and you’ll find some info on how to do it.
Years ago I wrote articles on branding stuff (with a disclaimer of course since it technically wasn’t supported) because branding functionality was not even on the roadmap for the NetScaler Team at that time. I have some level of confidence that Portal Themes may expand beyond the NetScaler Gateway module in upcoming builds. I don’t want you to do something unsupported and then have a hard time going back to the supported way when it comes out so my best advice to you is just wait if you really need to customize your AAA vserver logon page. Please contact Citrix Support and let them know you want it though or it won’t happen. Ask for a feature enhancement form, fill it out, and send it in so it gets an enhancement ID attached to it. The NetScaler Project Managers and Developers can see your request and prioritize it. The more people that need a feature, the higher the priority becomes to the team so make sure your voice is heard.
This is just my opinion, but if you’re going to do an X1 based StoreFront 3.0 theme and X1 based NetScaler Gateway theme, then the ShareFile split logon page and the AAA vserver page for SAML IdP should also be based on that X1 theme. This will help your users have some level of familiarity when using your Citrix services. The NetScaler Unified Gateway is a great case in point. Everything including ShareFile, XenMobile, etc. should all be able to use the same theme to give users a truly unified Citrix Workspace experience. User Experience is the most important thing with any Citrix Workspace service you offer to your users. Since NetScaler is the core product tieing all these Citrix Workspace services together, it makes sense to me to control this experience on the NetScaler itself. A true Unified Experience via NetScaler Unified Gateway with X1 (or whatever theme you can dream up) tieing it all together.
Yes, I actually spent a few minutes to cobble that together to illustrate my point (excuse the quality, no trusty Photoshop on this laptop). But that’s literally the image I see in my head when I think Unified Gateway. A TRUE Unified Citrix Workspace NetScaler Gateway. Really, just sit there and think where it would make sense to truly unify the Citrix Workspace experience and tell me if I’m wrong.
23. Alright, off the soapbox. Let’s continue our testing. Go ahead and login but make sure instead of your domain user name, you type in your company email address. If you try your user ID you won’t be able to authenticate since we’ve told the NetScaler to look for the mail attribute:
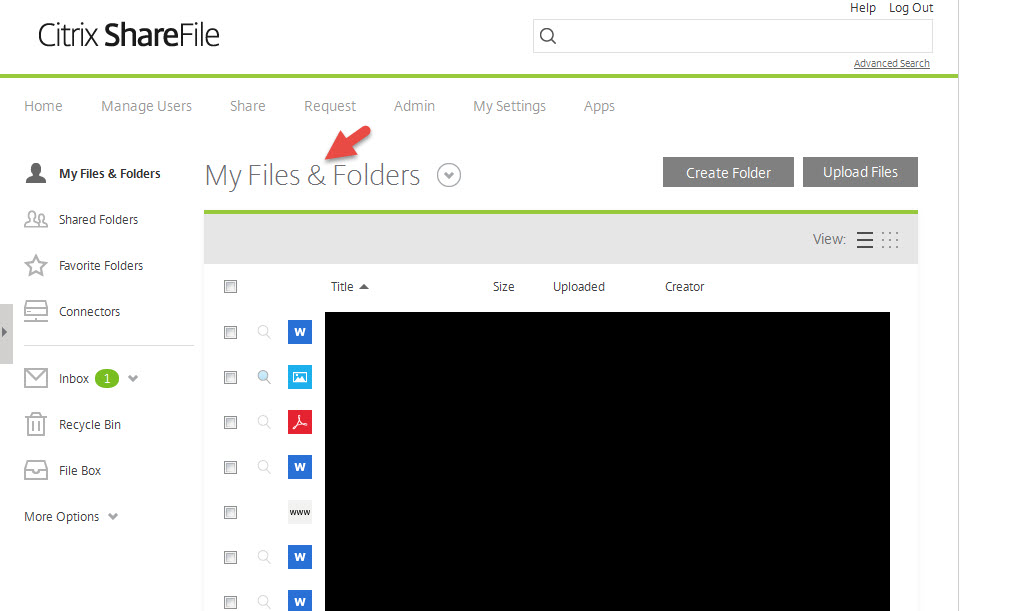
24. When you hit Log On should should be greeted with the ShareFile home page and see all your “My Files & Folders”. You can get a ShareFile trial account by the way if you want to play with it. This is my demo account that has Admin privileges and I’ve thrown a few files into it to demo for you. A normal end user won’t see all of this and the interface will look much more clean and simple for them:
FINAL THOUGHTS
I hope this article helps you setup Citrix ShareFile using SAML IdP on your NetScaler. I think it works very well and encourage you to test it out. You can use the other methods for SSO, the most common method is actually ADFS 3.0. But this has dependencies on your Active Directory and the Active Directory Federation Services role. Using SAML IdP keeps it all in-house right on the NetScaler with no additional dependencies.
Yes, branding on the AAA vserver is kind of a bummer but again, reach out to Citrix Support and let them know you want Portal Themes ability on it.
If this guide has helped you or if you have any questions please leave me a comment below.
—
UPDATES:
It’s been 8 months since I originally wrote this article and there are some updates you need to be aware of. The ShareFile team has released this great 20 page guide on setting up ShareFile SSO/IWA with SAML IdP using Kerberos KCD and NTLM Fallback here:
And as of NetScaler 11.0 build 66.11, you can now do Portal Themes on AAA vservers though it’s not in the release notes yet:
https://www.citrix.com/content/dam/citrix/en_us/documents/downloads/netscaler-adc/NS_11_0_66_11.html
Jason Samuel is a visionary product leader and trusted advisor with a proven track record of shaping strategy and driving technology innovation. With extensive expertise in enterprise end-user computing, security, cloud, automation, and virtualization technologies, Jason has become a globally recognized authority in the IT industry. His career spans consulting for hundreds of Fortune 500 enterprises across diverse business sectors worldwide, delivering cutting-edge digital solutions from Citrix, Microsoft, VMware, Amazon, Google, and NVIDIA that seamlessly balance security with exceptional user experiences.
Jason’s leadership is amplified by his dedication to knowledge-sharing as an author, speaker, podcaster, and mentor within the global IT and technology community. Recognized with numerous prestigious awards, Jason’s contributions underscore his commitment to advancing technology and empowering organizations to achieve transformative results. Follow him on LinkedIn.
Disclaimer: Views expressed here are his own and do not reflect the views of his employer, past or present, or any organizations he is affiliated with. Content is for informational or personal purposes only.


Tomy
February 8, 2016 at 11:38 AM
Fantastic guide! You helped me a lot. After whole bunch of Citrix guides which do not work your worked like a charm. Thanks!
Jason Samuel
February 8, 2016 at 6:02 PM
Thanks, glad to help Tomy!
Goran
February 16, 2016 at 5:15 AM
Such a life saver, thanks for this tutorial and congrats on getting the CTP award 😉
Jason Samuel
February 16, 2016 at 8:40 AM
Glad to help Goran! Thank you!
Jason B
February 26, 2016 at 5:15 AM
Hi Jason, thanks for taking the time to write this article, it’s helped immensely! We have the split login page configured but when attempting to login using SSO, it redirects to the split login page. Checking the aaad.debug log at the NetScaler, I can see the following which suggests the login is sanitized:
/home/build/rs_110_63_9_RTM/usr.src/netscaler/aaad/naaad.c[2261]: send_accept sending accept to kernel for : test@############.###.##
Any suggestion would be appreciated Jason.
Miki Rockey
April 11, 2016 at 3:34 AM
Hi Jason, great article.
Is there a way to use the “sAMAccountName” authentication on the Netscaler instead of “Mail” so internal domain users will connect the ShareFile seamlessly (pass-through)?
Carsten
May 17, 2016 at 1:00 AM
Hi Miki,
I have found an article, that helped me a lot. The users are able to use the samAccountName. And even if they are already authenticated with there mailaddress, the auth is still valid, they do not need to re-authenticate.
Here is the article, it is still the same To-Do as Jason has already wrote, but the difference is in the LDAP profile (search for “Attribute 1 field”) and then the SAML profile (search for “Name ID Expression”).
http://www.ingmarverheij.com/sso-to-sharefile-with-unified-gateway/
Best Regards,
Carsten
Matt
May 19, 2016 at 3:02 PM
Hi Jason, do I need to have enterprise level licensing to setup this Netscaler SSO solution?
Kent Soderlund
January 22, 2017 at 7:04 AM
Hello!
Love your blog posts. Nice work
I get an problem with this. Point 8 I get that I have to have a KeyFile Name?
Where do I get that?
Patrick D
July 19, 2017 at 2:52 PM
I think I’m also at a similar point as Kent. I don’t have a private key to match the cer that I’ve downloaded from the Sharefile site. My Netscaler version is NS11.1 52.13.nc, and it looks like the version in your guide is 11.0, so it seems a change in code has changed the behavior. How do I import the certificate without a private key to match?
Roberto
August 3, 2020 at 1:47 AM
Hello Jason. Nice post. I was able to configure everything so far. Logging in with ADFS works wonderfully in the browser (Netscaler is ADFS Proxy). However, when I install the Secure Citrix Files app via Endpoint Management, it always requires the subdomain and then the classic login window from Sharefile appears. Do you know how to get Secure Citrix Files to do SSO with ADFS? Thanks and regards, Roberto
Osman
October 1, 2020 at 4:17 AM
I have done this configuration successfully. Is there any way i can replace ldap with radius on this AAA V server. For Radius we have gemalto which does AD authentication with OTP sms.