Setting up Citrix ShareFile with AD FS 3.0 (Active Directory Federation Services) is probably one of the most common deployments for single sign-on (SSO) in an Enterprise environment. To my knowledge it is the only solution that currently supports Integrated Windows Authentication (IWA) where whatever credentials the user is logged into their PC with get passed to ShareFile and automatically logs them in. No login prompts, a super smooth single sign-on experience for both the ShareFile website as well as the numerous plugins like the ShareFile Outlook Plugin and ShareFile Sync for Windows client. I spoke about using a NetScaler as a SAML IdP provider a few months back here:
and there are some pros and cons I touched on when using it. For most production environments, I recommend using AD FS if you can. Now let me go over how AD FS 3.0 works with ShareFile.
WHAT IS AD FS 3.0?
AD FS (also spelled ADFS by many), stands for Active Directory Federation Services. It started out as a download you would have to install on Windows Server 2003 R2 and later became a full blown server role. AD FS allows an organization to extend it’s enterprise beyond it’s own network. Over the years it has become a core service in many enterprises to provide SaaS and cloud services to the organization. It allows you to use single sign-on to apps both inside and outside the company. So an Active Directory user id “federated” with another external party providing a single identity to the user that can access anything they are permitted to access.
The current version is AD FS 3.0 which ships with Server 2012 R2. Now in the year 2016, it’s such a fundamental services for Enterprises to allow an easy seamless single sign-on user experience to external services like Office 365, SharePoint Online, Salesforce.com, and of course ShareFile. Internet and cloud based software services are growing at an exponential rate. Your business apps are not just about authentication within the datacenter anymore.
HOW DOES IT WORK?
AD FS is a claims-based authentication method so that means there is a token being passed between your organization and the external organization’s service, in this case the ShareFile control plane in the Amazon Web Services (AWS) cloud. In a nutshell you build a trust between Active Directory and the external service via AD FS. AD FS acts as a intermediary. When an authentication request is made to ShareFile it talks to AD FS, verifies you, then passes a token back up to ShareFile which logs you in. Simple right?
HOW TO CONFIGURE YOUR AD FS 3.0 SERVERS FOR SHAREFILE
As I said AD FS is a server role, so let’s start there:
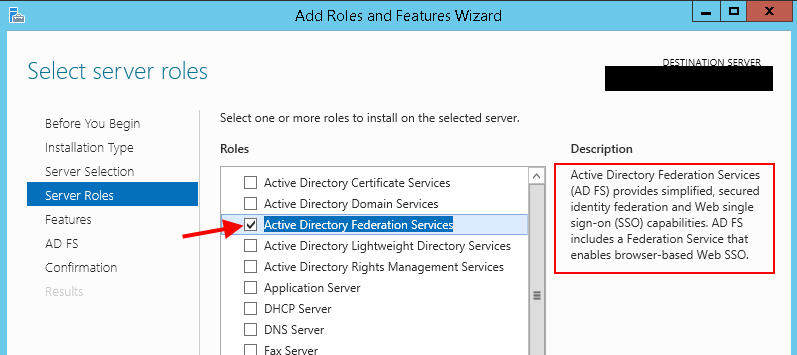
1. On your Windows Server 2012 R2 box, go to Server Manager and install the role and just hit Next all the way through:
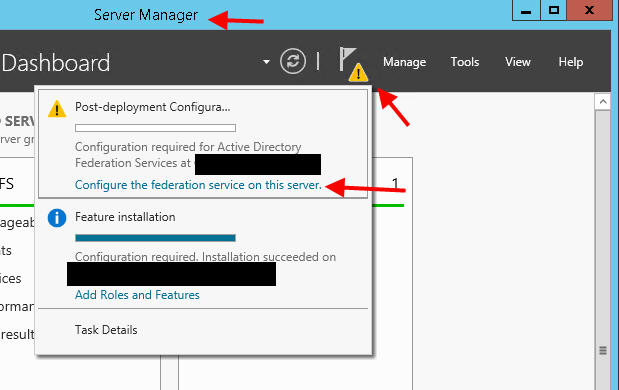
2. Once done click the little flag in Server Manager and click “Configure the federation service on this server.”:
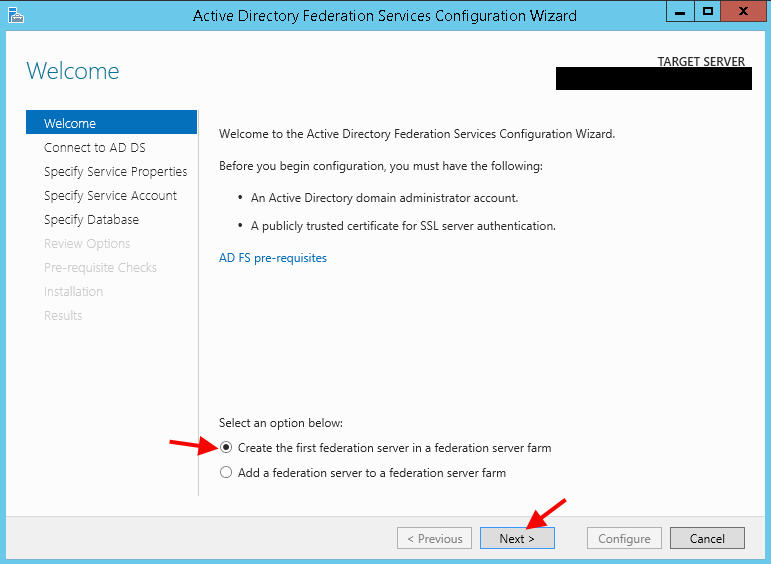
3. Since it’s the first server in the federation server farm go ahead and hit Next:
4. Provide domain administrator account credentials:

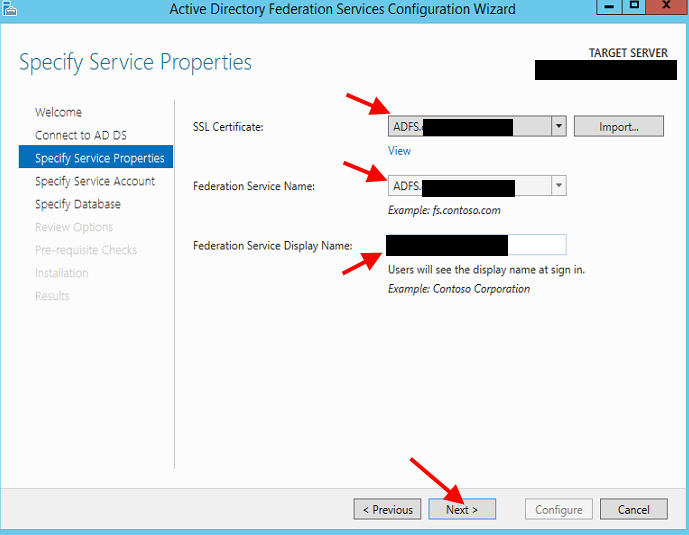
5. Create Federation Service name and display name. You will need an SSL cert. In this example I’ll use adfs.yourdomain.com:
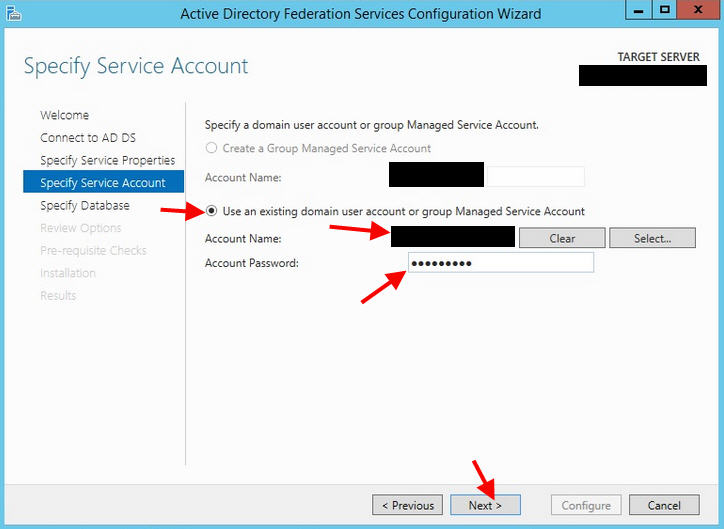
6. Give it a service account:
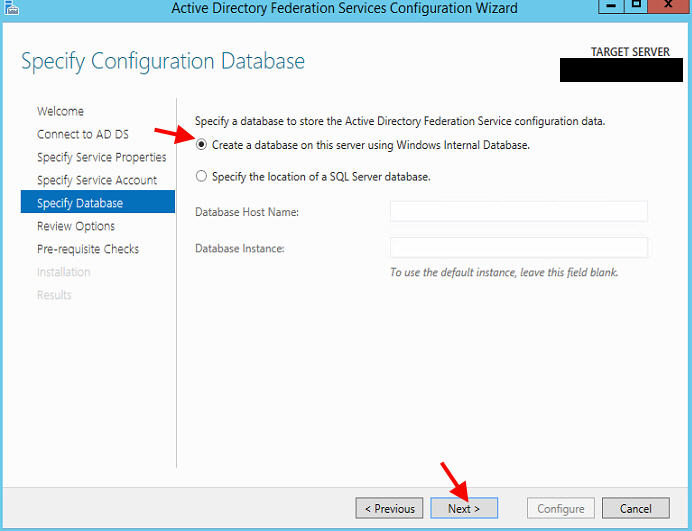
7. Now create a database, you can use SQL if you trust it. But if you don’t want to rely on an external point of failure and believe your sizing falls in line with local, go for a local Windows Internal Database. Hit Next to Review and finish the install.
8. Now the actual config. Open up the AD FS console and click on Authentication Policies. You’ll want to select Forms Authentication for Extranet and Window Authentication for Intranet:

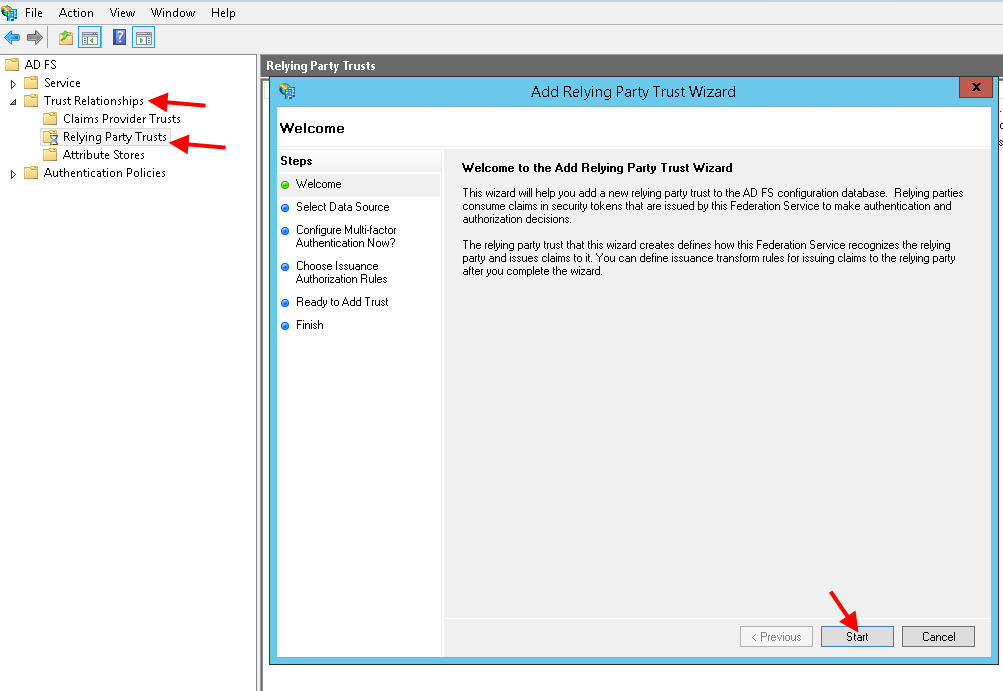
9. Now go to Trust Relationships and click “Add Relying Party Trust” on the right hand size. In this example we’ll use yourcompany.sharefile.com as your ShareFile domain. We need to create the trust relationship with this domain:
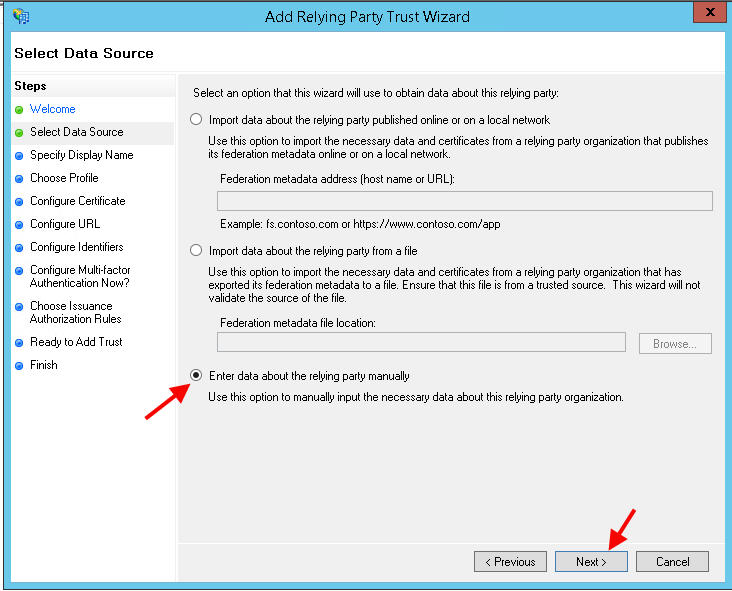
10. Select the manual option and hit Next:
11. Now you can type in yourcompany.sharefile.com and notes if you like:

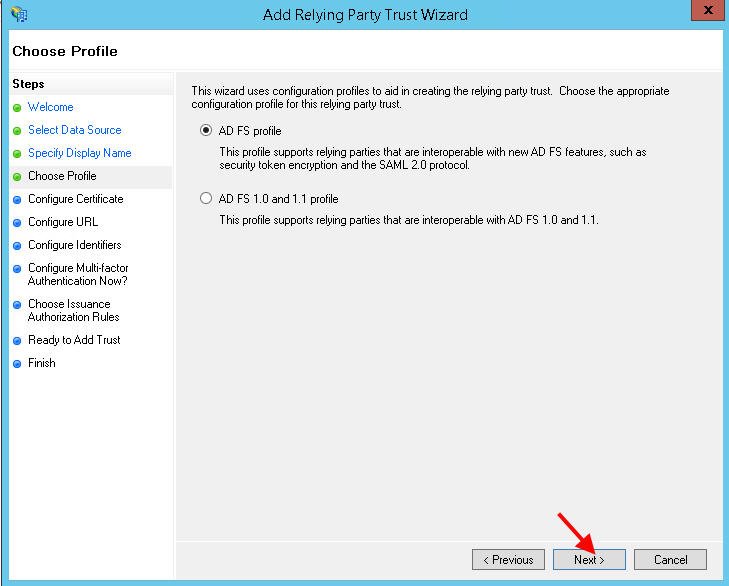
12. Leave the default AD FS profile
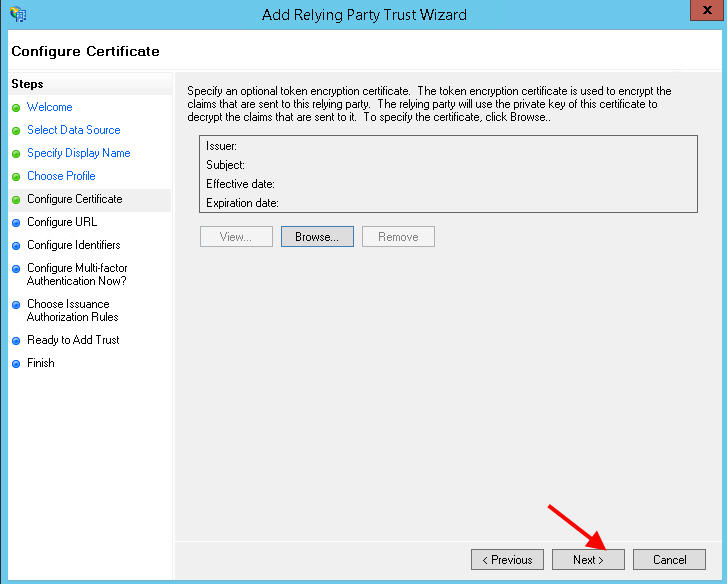
13. Ignore the cert, just hit Next.
14. Now type in your ACS URL. This is the Assertion Consumer Service that is the same no matter what kind of SSO authentication you are trying to setup with ShareFile. It’s basically what you’re going to talk to in AWS. You get this from the SSO section within the ShareFile console but it’s pretty much the same for everyone:
https://yourcompany.sharefile.com/saml/acs

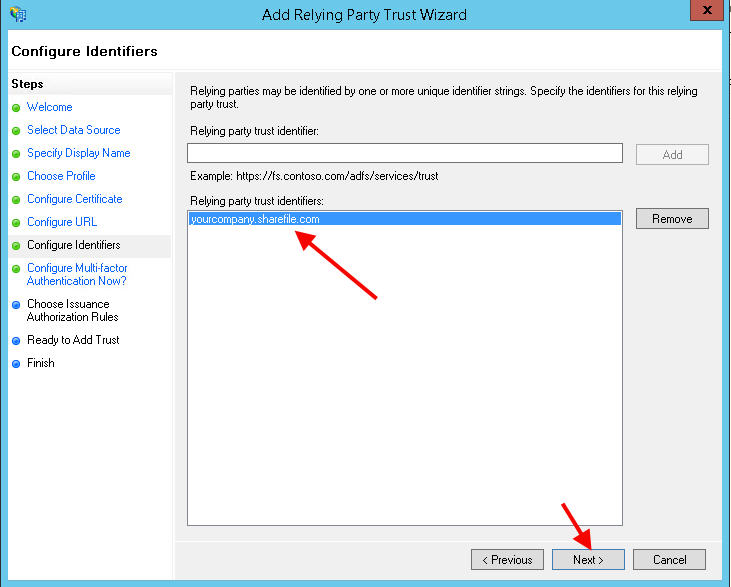
15. Now add your ShareFile domain as an identifier:
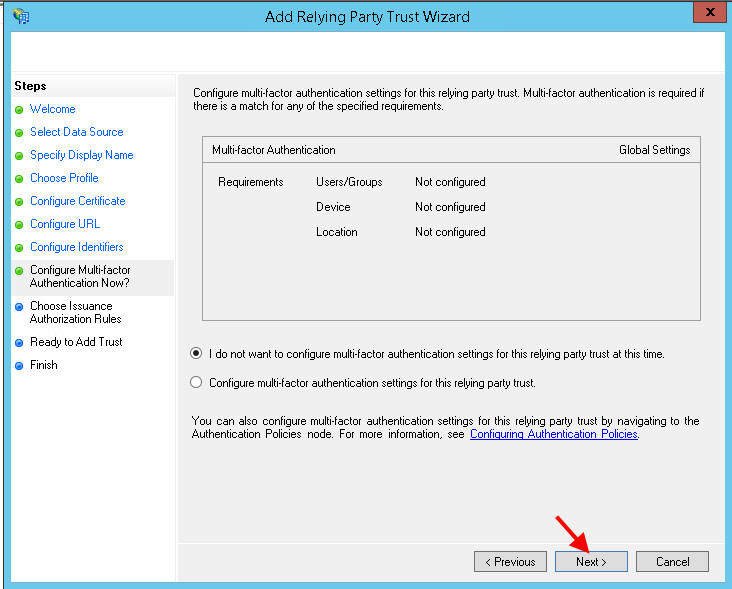
16. We don’t care about MFA so hit Next:
17. Permit all users to access the relying party:

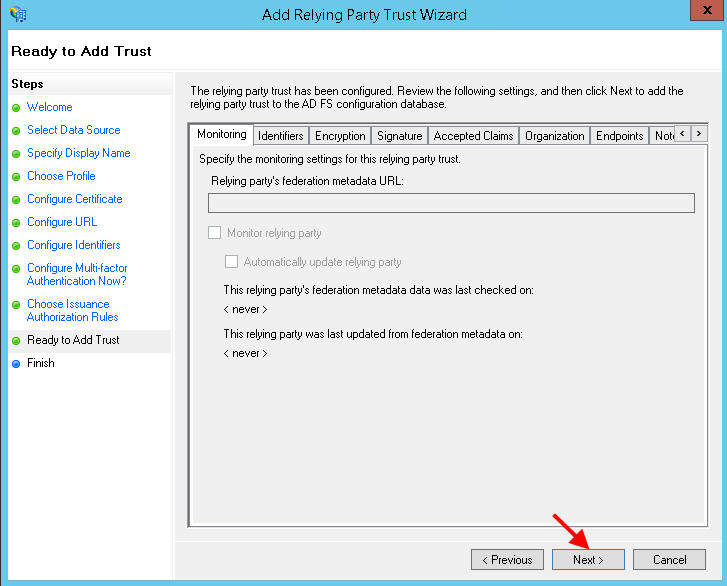
18. Hit Next to add the Trust:
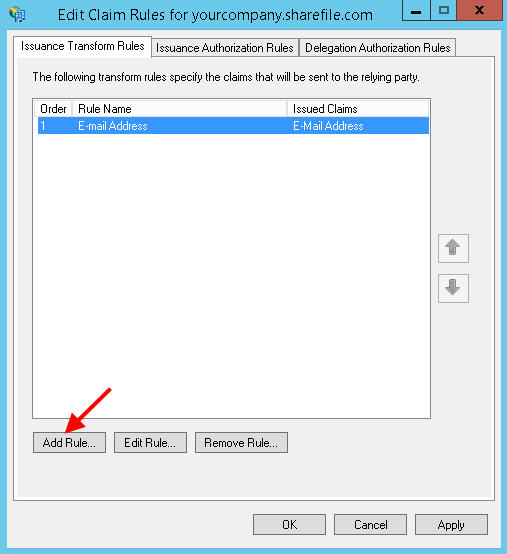
19. It should open up the Edit Claim Rules once you are done. Hit Add Rule:

20. Hit Next, we’re going to send LDAP attributes as Claims:

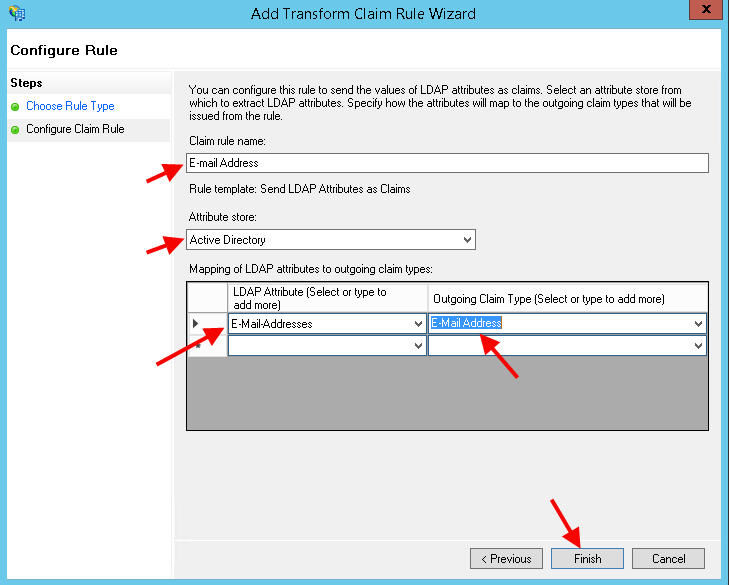
21. Call the Claim rule name anything you like, in this example “E-mail Address” since that’s what users are going to log into ShareFile with. Select Active Directory as the attribute store. Then choose “E-Mail Addresses” in the first column and “E-Mail Address” in the second column:
22. Now add another rule:
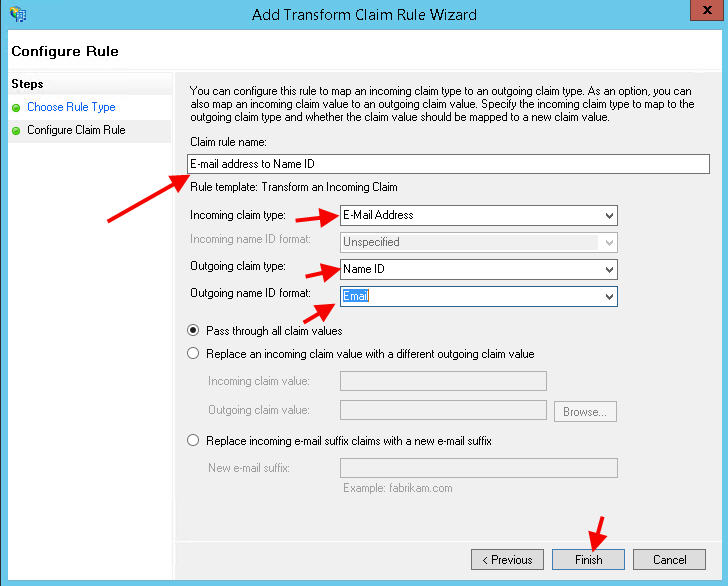
23. Select Transform an Incoming Claim:

24. Call the rule anything you like, in this example “E-mail address to Name ID”. For the incoming claim choose E-mail Address, outgoing claim as Name ID, and the outgoing name ID format as Email. This is what maps the email address to the Name ID:
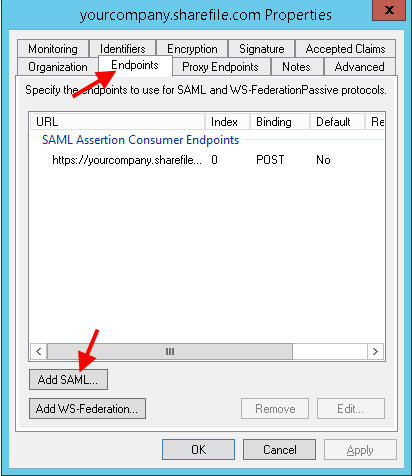
25. Now double click the relaying part trust you just created (yourcompany.sharefile.com) to edit it’s properties. Click on the Endpoints tab and hit “Add SAML”
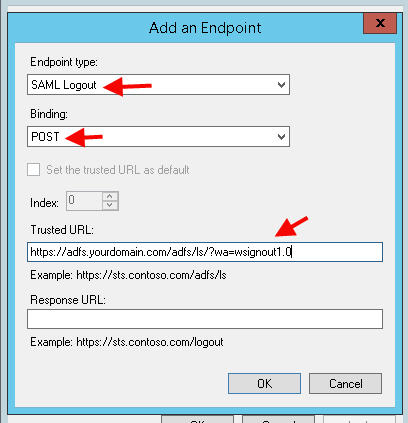
26. You’re adding a logout link for users are properly logged out of ShareFile when they are done. Choose SAML Logout, binding should be POST, and the Trusted URL should be the adfs signout link so:
https://adfs.yourdomain.com/adfs/ls/?wa=wsignout1.0
27. Now go to Certificates in the AD FS console under Service. Under Token-signing, double click your cert and hit Copy to File:
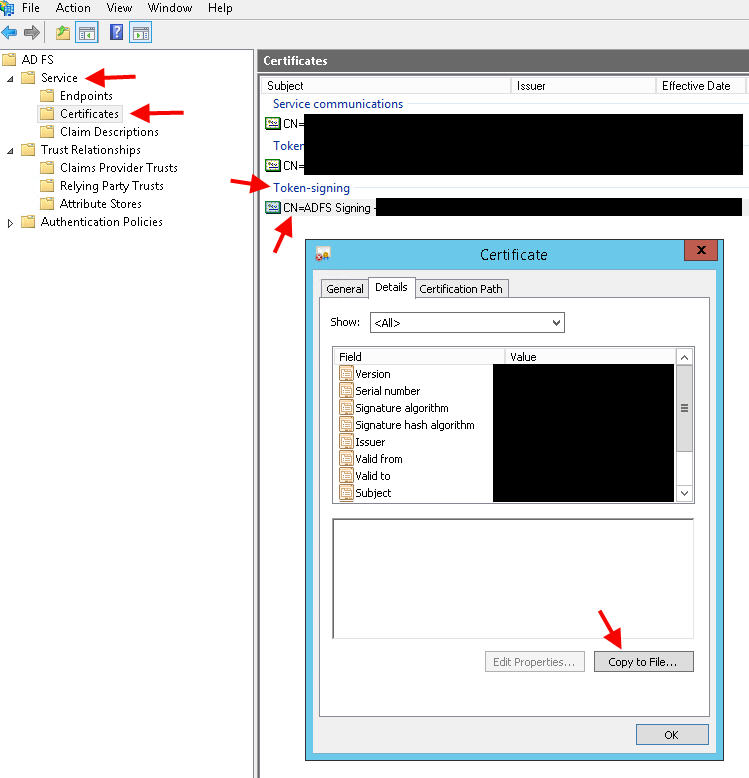
28. Choose Base-64 for the export. Give it a file name and export the .cert to your local hard drive.
HOW TO CONFIGURE THE SHAREFILE CONTROL PLANE FOR USE WITH AD FS 3.0
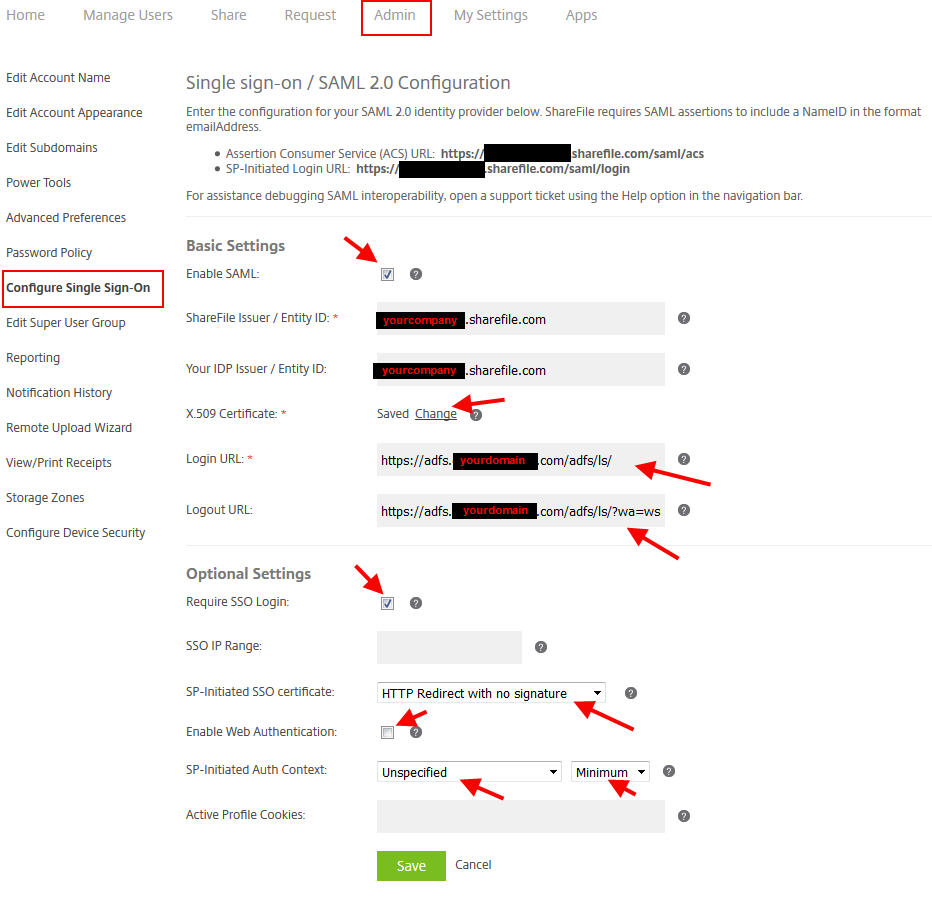
29. Open up the .cer in Notepad and copy and hit Ctrl+A > Ctrl+C and paste that into the ShareFile control plane. Log into ShareFile with admin credentials and go to Admin, then “Configure Single Sign-On”. You’ll want to paste it exactly as is into the X.509 Certificate section. The other settings you will need are below:
Basic Settings
- Check the box to allow SAML.
- ShareFile Issuer, enter in yourcompany.sharefile.com
- Your IDP Issuer, enter in yourcompany.sharefile.com again
- X.509 Certificate, once you paste it it should say Saved
- Login URL, this will be https://adfs.yourdomain.com/adfs/ls/
- Logout URL, this will be https://adfs.yourdomain.com/adfs/ls/?wa=wsignout1.0
Optional Settings
- Require SSO Login so all users will need to use AD FS to login (except admins)
- Set the SP-Initiated SSO certificate to HTTP Redirect with no signature, but you can specify a cert here if needed
- You can choose to check or uncheck the Enable Web Authentication. Since the purpose of this article is to use Integrated Windows Authentication, I left this unchecked.
- Set SP-Initiated Auth Context to Unspecified and Minimum. This will make sure both Integrated Windows Authentication and any others you decide to use in the future will all work.
TESTING LOGINS!
Now if you have already set the split logon page as I showed you here:
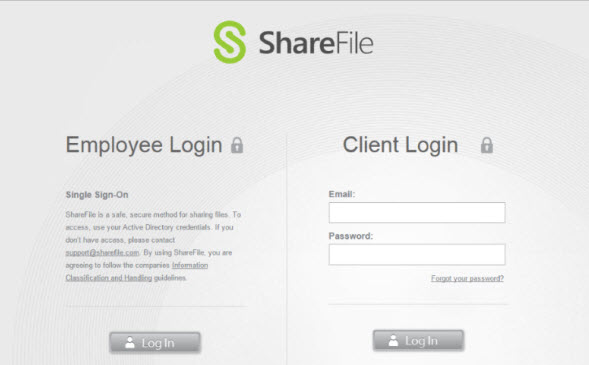
then go ahead and try your Employee login on the left side. You should see your web browser for a split second hit the adfs.yourdomain.com page as NTLM passthrough kicks in and then immediately log you in. Bam you’re in! With Internet Explorer make sure you set a GPO to add the AD FS url to your Trusted Sites if it doesn’t work for you. Now logout and verify it successfully logs you out.
If you’re using Firefox or Chrome, NTLM passthrough is disabled by default. There are tricks with either to add it. Like using about:config for Firefox and setting network.negotiate-auth.trusted-uris and network.automatic-ntlm-auth.trusted-uris. It’s easier to control Integrated Windows Authentication at the AD FS server level. Plus the added benefit is Integrated Windows Authentication will work with all other SaaS services you might use AD FS for such as Office 365, SalesForce, etc.
With older versions of AD FS there were some IIS tricks you can do. Since IIS is no longer used for AD FS it’s all up to PowerShell to achieve the same affect. On your AD FS server:
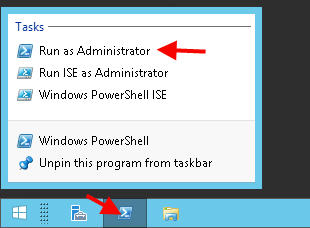
1. Open up a an administrative PowerShell prompt (by right clicking the PowerShell icon and hitting Run as Administrator):
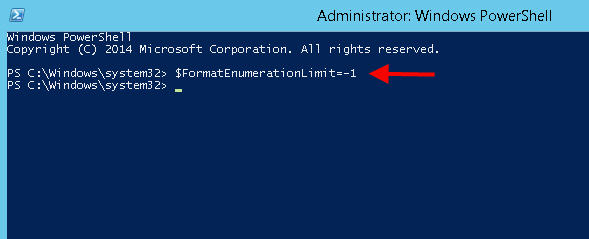
2. Type in:
$FormatEnumerationLimit=-1
3. Then type in:
Get-ADFSProperties
you should see a setting called:
ExtendedProtectionTokenCheck : Allow
You’ll also notice the “WIA” Windows Integrated Authentication Supported User Agents is looking pretty slim:

4. We need to change Extended Protection Authentication (EPA) to none. You do that by typing in this:
Set-ADFSProperties –ExtendedProtectionTokenCheck None
5. Then you have to add your browser user agents. Let’s do them all:
|
1 |
Set-AdfsProperties -WIASupportedUserAgents @("MSIE 6.0", "MSIE 7.0; Windows NT", "MSIE 8.0", "MSIE 9.0", "MSIE 10.0; Windows NT 6", "Windows NT 6.3; Trident/7.0", "Windows NT 6.3; Win64; x64; Trident/7.0", "Windows NT 6.3; WOW64; Trident/7.0", "Windows NT 6.2; Trident/7.0", "Windows NT 6.2; Win64; x64; Trident/7.0", "Windows NT 6.2; WOW64; Trident/7.0", "Windows NT 6.1; Trident/7.0", "Windows NT 6.1; Win64; x64; Trident/7.0", "Windows NT 6.1; WOW64; Trident/7.0", "MSIPC", "Windows Rights Management Client", "Windows NT 10.0; WOW64; Trident/7.0", "Edge/1", "Mozilla/5.0 (Windows NT") |
6. Now restart the “Active Directory Federation Services” Windows service and try your browser of choice. It should pass you right through.
FINAL THOUGHTS
I’ve showed you how to setup AD FS 3.0 from scratch and how to integrate it with ShareFile. Other services besides ShareFile you might integrate in the future all work pretty much the exact same way. I hope this guide helps you out, please leave a comment below if you have any questions. 🙂
Jason Samuel is a visionary product leader and trusted advisor with a proven track record of shaping strategy and driving technology innovation. With extensive expertise in enterprise end-user computing, security, cloud, automation, and virtualization technologies, Jason has become a globally recognized authority in the IT industry. His career spans consulting for hundreds of Fortune 500 enterprises across diverse business sectors worldwide, delivering cutting-edge digital solutions from Citrix, Microsoft, VMware, Amazon, Google, and NVIDIA that seamlessly balance security with exceptional user experiences.
Jason’s leadership is amplified by his dedication to knowledge-sharing as an author, speaker, podcaster, and mentor within the global IT and technology community. Recognized with numerous prestigious awards, Jason’s contributions underscore his commitment to advancing technology and empowering organizations to achieve transformative results. Follow him on LinkedIn.
Disclaimer: Views expressed here are his own and do not reflect the views of his employer, past or present, or any organizations he is affiliated with. Content is for informational or personal purposes only.


Kent Soderlund
December 25, 2016 at 5:29 AM
GREAT article! Thanks! Will try this during the weekends
One question – this setup requries a port opening from Internet to your adsf server? Or can you use Netscaler to protect that?
/Kent
Paulius Mantulovas
February 27, 2017 at 1:09 PM
Hi, really impressive article with extremely good explanations on each step. Your shared knowledge was good inspiration for our implementation, however we have one question.
We have configured ADFS as IDP for ShareFile everything works perfectly on workstation, however we identified problem for mobile MDX client – we are not using XenMobile as IDP obviously and looks like that causes problem.
ShareFile mobile MDX client cannot automatically identify controlpane (subdomain) for some reason. User needs to click Add account and type in subdomain, when it’s done SAML SSO works fine.
This problem persists only if we are using AD FS as IDP, if we are using XenMobile as IDP ShareFile mobile client identifies our subdomain automatically.
Question is how to provide subdomain configuration to ShareFile MDX app if we want to use ADFS instead of XenMobile as IDP? For some odd reason ShareFile MDX policies not allows to set subdomain from XenMobile.
Broom
March 9, 2017 at 11:51 AM
Very good article. If anyone is looking to take this one step further take a look at: https://www.dolejarz.com/true-sso-sharefile-sync-drive-mapper/
Michael
June 21, 2017 at 12:37 PM
Thank you for providing such wonderful article. We are in the process helping our customer doing POC. What is the best way to implement multi-domain login? That’s say each country has their own Active Directory. How can I let them login sharefile in HQ by using their own domain account? I am not quite sure if we want to reach real SSO for Domain joined computer. Do I have to use ADFS only? Can I use NetScaler as a SAML?