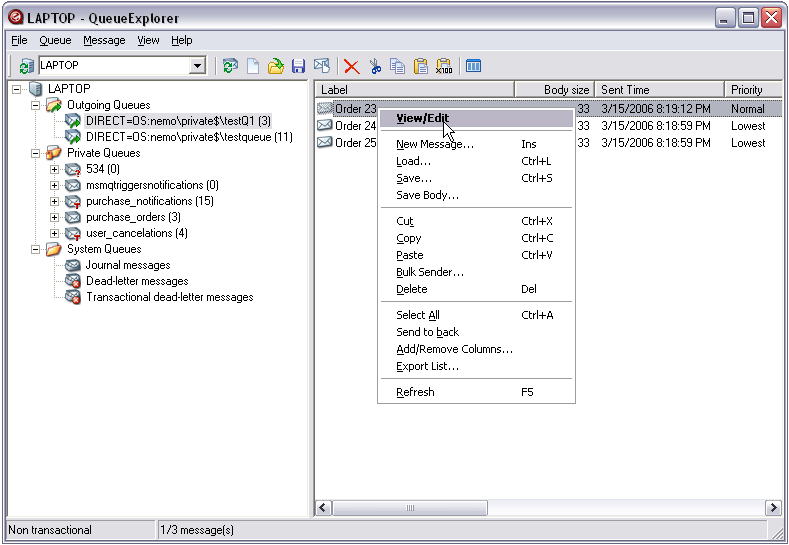
Archive

Archive for June, 2010

MSMQ messages stuck in the outgoing queue after cloning servers

June 30th, 2010 3 comments

Always remember to sysprep when cloning a node! MSMQ (Microsoft Message Queuing) uses a registry valued called QMId located at:

HKLM\Software\Microsoft\MSMQ\Parameters\Machine Cache

which has to be unique on all your servers or it will cause all sorts of issues. Sysprepping a server generates a new SID which also generates a new QMId in the process. If you don’t do this and have multiple servers out there with the same QMId, you will see strange things like messages remaining in the outgoing queue in limbo and sometimes just disappear completely with no trace in journaling anywhere. Bottom line, don’t confuse MSMQ! It’s fragile!

Thankfully John Breakwell (MSMQ guru at Microsoft) blogged about this exact issue which made me realize what was going on in the environment I was troubleshooting. Well done John!

http://blogs.msdn.com/b/johnbreakwell/archive/2007/02/06/msmq-prefers-to-be-unique.aspx

I simply ran sysprep and resealed the clone to fix it. It automatically generated a new QMId in the process so I didn’t have to follow the exact steps John had blogged about. It was a simple mistake which can be avoided in the future by using the Guest Customization Wizard in VC to automatically sysprep when creating the clone.

BTW, you can check if your SIDs are identical on a server by using getsid.exe. Download the Windows XP Service Pack 2 Support Tools:

http://www.microsoft.com/downloads/details.aspx?FamilyId=49AE8576-9BB9-4126-9761-BA8011FABF38&displaylang=en

and use the getsid.exe tool to compare SIDs on your Windows servers. Usage syntax is here:

http://technet.microsoft.com/en-us/library/cc784314%28WS.10%29.aspx

Since I’m blogging about MSMQ, let me take a moment to plug QueueExplorer (http://www.cogin.com/mq). This is hands down the best MSMQ management software I have ever used and the developer is very open to feature requests. Give them some business and tell them Jason sent ya! :) Check out a screenshot of it below:

How to REALLY set a Netscaler back to factory defaults (factory new condition)

June 29th, 2010 2 comments

This is my follow-up to my original article on setting a Netscaler back to factory defaults (http://www.jasonsamuel.com/2010/06/22/how-to-reset-a-citrix-netscaler-back-to-factory-defaults/). The instructions I provided wiped the config but what about if your actual Netscaler system is corrupted and you need to bring it back to factory new conditions? Well here is the procedure which is also outlined here on CTX116742 (http://support.citrix.com/article/CTX116742). ZebOS by the way if you are interested is what does the routing on the Netscaler (http://www.ipinfusion.com/products/products_home.html). This is a commercial version of GNU Zebra (http://www.zebra.org). Development on Zebra stopped back in 2005 and Quagga became the successor (http://www.quagga.net). A lot of network appliances out there are based on these two.

1. After completing the following steps, the NetScaler will have no configuration left and will be ready for the next installation or environment. Connect to the device using the serial console or with a Secure Shell client (SSH). Delete the system, routing, and SSL configuration:

> shell
# cd /etc
# for file in *; do
# rm /nsconfig/$file 2> /dev/null
# done
(Ignore warnings about files or directories missing. Not all files in /nsconfig are present in /etc)
# cd /nsconfig
# rm ns.conf* ZebOS.conf rc.conf
(Ignore warnings about files or directories missing)
# cd ssl
# GLOBIGNORE=”ns-*”
# rm *
# exit
> reboot

2. Perform an initial system configuration. Connect to the device using the serial console:

> set ns config –ipaddresss nsip -netmask netmask
> save config
> reboot

Categories: Citrix NetScaler Tags:

Setting the date, time, and time zone in FreeBSD on your Citrix Netscaler

June 28th, 2010 8 comments

I recently troubleshot an issue where cookie persistency was not working properly when failing over from the active node to the passive node in a Citrix Netscaler HA cluster (high availability cluster). I found the issue was that if the date and time on your appliances are not the same, the cookie will be invalid causing persistency to fail when failing over to the passive node. That’s a big issue because all your users will lose their sessions during a failover.

To quickly check your appliances:

1. SSH using Putty into your NSIPs of your Netscalers.

2. Type “shell” to enter the FreeBSD shell

3. Type “date” to see the current date, time, and time zone. Both your Netscalers should be identical.

4. If they are not identical, set the time by typing the current date and time in the following format:

date yymmddhhmm.ss

For example, to set the date to June 28, 2010 12:13 PM with 15 seconds left in the minute:

date 1006281213.45

You will get this result if you are successful:

Mon Jun 28 12:13:45 CST 2010

5. Now if your timezone says GMT or something instead of your correct time zone, then you need to navigate to timezone file directories by typing:

cd /usr/share/zoneinfo

6. Type this to list all the different zone folders:

ls -l

7. To set the timezone, copy your timezone file to the localtime folder. Below, I am setting the timezone to CST (Central Standard Time):

cp /usr/share/zoneinfo/America/Chicago /etc/localtime

8. Now just type “date” again and it should be the correct time, date, and timezone. That’s it, you’re done! Let me know if you run into any trouble. :)

How to reset a Citrix Netscaler back to factory defaults

June 22nd, 2010 2 comments

On older Netscaler appliances, the command to clear your Netscaler configuration and reset it to factory defaults used to be:

clear config –c y

But on newer devices, the command is:

clear ns config level

where level is one of the following:

1. basic – which clears everything except NSIP, MIPs, SNIPs, network settings, HA, features, and the nsroot account

2. extended – which clears everything except NSIP, MIPs, SNIPs, network settings, & HA

3. full – which clears everything except teh NSIP and default gateway

So typically, I type this to do a full wipe:

clear ns config full

You can also do this through the GUI by going to System > Diagnostics > Maintenance > Clear Configuration. Use the drop down box to select basic, extended, or full then click the Run button.

With that said, I have run across newer devices (even running NS 9.1 and newer) that just don’t clear all their config info. For those, I have just done the following to reset:

1. SSH using Putty into the Netscaler and login
2. Type “shell” to enter shell
3. cd /nsconfig
4. Rename the configuration by typing “mv ns.conf ns.conf.bak”
5. Type reboot

This should reset the device to the IP of 192.168.100.1 with the nsroot/nsroot account credentials. Your licenses and SSL certs will remain though since these are files and not part of the Netscaler config. You will have to delete them manually via WinSCP.

UPDATE 6/29/10: To completely reset your Netscaler to “factory new” conditions, it’s a little bit more work but I have outlined the procedure here:

http://www.jasonsamuel.com/2010/06/29/how-to-really-set-a-netscaler-back-to-factory-defaults-factory-new-condition/

Categories: Citrix NetScaler Tags: ,

How to update your Citrix Netscaler firmware

June 22nd, 2010 6 comments

I’m doing some firmware updates on Citrix Netscaler appliances today and thought I would give you guys a quick guide on how to do this. This applies to all legacy appliances, MPX appliances, and VPX appliances. You use the same procedure for both Classic and nCore firmware packages. It is very easy to do. :)

1. Login to MyCitrix at http://citrix.com/English/mycitrix/index.asp and download the firmware .tgz package. Make sure to check compatability with your appliance before downloading.

2. Use WinSCP to transfer the package to the /var/nsinstall directory on your appliance.

3. SSH into your appliance using Putty and type “shell” to enter the shell

4. Type cd /var/nsinstall

5. Type ls to list the contents of the directory and verify your newly uploaded firmware package is there

6. Now type “tar -zxvf build-xxxxxxxx.tgz” to unzip the package

7. Then type “installns” to begin the install. Should take about 30 seconds to copy to flash and install.

8. Reboot the appliance once prompted for it (just type Y).

9. Login via the web GUI and verify the firmware version in the top right corner is the same as the package you were trying to apply.

Categories: Citrix NetScaler Tags: ,

How to fix an IP address conflict on your network caused by a VM using PowerCLI

June 11th, 2010 No comments

IP Address conflict? Have you narrowed the MAC down to being a VM in one of your ESX/vSphere clusters? Well use vSphere PowerCLI to figure out what device and adapter is causing the conflict.

Example, if your MAC is 005056b60b13:

Get-vm | Select Name, @{N="Network";E={$_ | Get-networkAdapter | ? {$_.macaddress -eq "00:50:56:b6:0b:13"}}} |Where {$_.Network-ne ""}

And it will output the VM name and the Network Adapter causing the conflict. :)

How to install an SSL cert chain on a Cisco Wireless Lan Controller (WLC)

June 2nd, 2010 2 comments

Cisco WLC (Wireless LAN Controllers) require the entire SSL cert chain to be installed on the appliance. I like to do this via IIS since it is very quick and efficient and all my intermediate and root certs are already on there typically (double check your servers please).

1. Create a temporary site in IIS and generate a CSR. Make sure the domain matches whatever appliance you are trying to generate it for exmp: wireless.yourcompany.com.

If you are exporting a wildcard cert that might already be on your IIS server, just export it as a PFX and skip to step 5.

2. Send the CSR to your registrar and wait for them to validate.

3. Get the .crt and convert it to .cer (just open the .crt and save it as .cer). Do the same for the intermediate and root certs you received.

4. Install the .cert in IIS as well as all intermediate and root certs they send you.

5. “View” the cert in IIS (Site properties > Directory Security > View Certificate > Details Tab > Copy to File) and export it with the private key in pkcs12 (.pfx) format. Also make sure to check “Include all certificates in the certification path is possible”. Just set the password as “password” so it’s easy to remember.

6. Now you have a .pfx with your whole SSL cert chain but you need to convert it to .pem for the WLC.

7. Use this command with OpenSSL:

openssl pkcs12 -in yourcert.pfx -out yourcert.pem

8. Type the “password” when prompted

9. TFTP the new .pem containing the whole SSL cert chain and private key over to the WLC and reboot. You will have to specify the “password” when you type in your TFTP info and Save and Reboot the WLC after the download is successful. Test it out and it should work.