EUC and Security Engineers have always had the capability to add a EULA to Citrix StoreFront and/or Citrix NetScaler Gateway (aka Citrix Gateway) for legal and compliance requirements but now with cloud-based Citrix Workspace and modern identity providers (IdPs), you must rely on the IdP to control the authentication and authorization flow. The SP (service provider) is Citrix Workspace and it’s only responsibility is to provide you services post-authentication/authorization. Luckily Azure Active Directory and Conditional Access have a very powerful feature called Terms of Use to help with this. This will allow you to add a Term of Use disclaimer to native Microsoft services like Office 365 (Microsoft 365), Microsoft WVD, etc. as well as popular 3rd party enterprise SaaS apps like Citrix Cloud-based Citrix Workspace, SalesForce, Workday, ServiceNow, etc.
EULA, Terms of Use, Terms of Service…does it matter legally speaking?
In the Citrix world, we have used EULA (End User License Agreement) as our verbiage when describing disclaimers added to your gateways over the years. The reality is we offer a virtual app and virtual desktop delivery service so the proper verbiage should be Terms of Use or Terms of Service when describing this disclaimer that users must consent to. A definition of these terms:
- The Wikipedia definition of Terms of Service: “Terms of service (also known as terms of use and terms and conditions, commonly abbreviated as TOS or ToS, ToU or T&C) are the legal agreements between a service provider and a person who wants to use that service. The person must agree to abide by the terms of service in order to use the offered service. Terms of service can also be merely a disclaimer, especially regarding the use of websites.”
- The Wikipedia definition of EULA: “An end-user license agreement (EULA) is a legal contract entered into between a software developer or vendor and the user of the software, often where the software has been purchased by the user from an intermediary such as a retailer. A EULA specifies in detail the rights and restrictions which apply to the use of the software.”
How Authentication and Authorization work together to verify and audit the user
The Azure Active Directory Terms of Use feature is a way to break the authorization flow post-authentication and force the user to read over a disclaimer message as well as any other verbiage you wish. It is triggered by Conditional Access policy that you can set granularly per Enterprise application you have registered with AAD if you like as well.
Authentication is independent of authorization so you can use any form of Azure AD authentication you wish including strong authentication that doesn’t depend on user passwords, like FIDO2 hardware security keys and Authenticator paswordless phone sign-in. The authorization flow powered by the Conditional Access policy engine occurs afterward and that’s where the Terms of Use will show for users, immediately after they complete authentication successfully.
Some companies may want to trigger it for all Azure AD apps including Office 365 (Microsoft 365) just once per quarter or perhaps annually. This consent is logged and auditable for each user. Some companies may want to trigger it monthly or even daily as a reminder to users which is also possible. You can even have certain apps trigger a consent more often than your default time period for other apps.
Some of the Terms of Use settings must be fine-tuned in order to provide the best possible user experience to your users which I will cover below.
Configuring the Terms of Use Policy
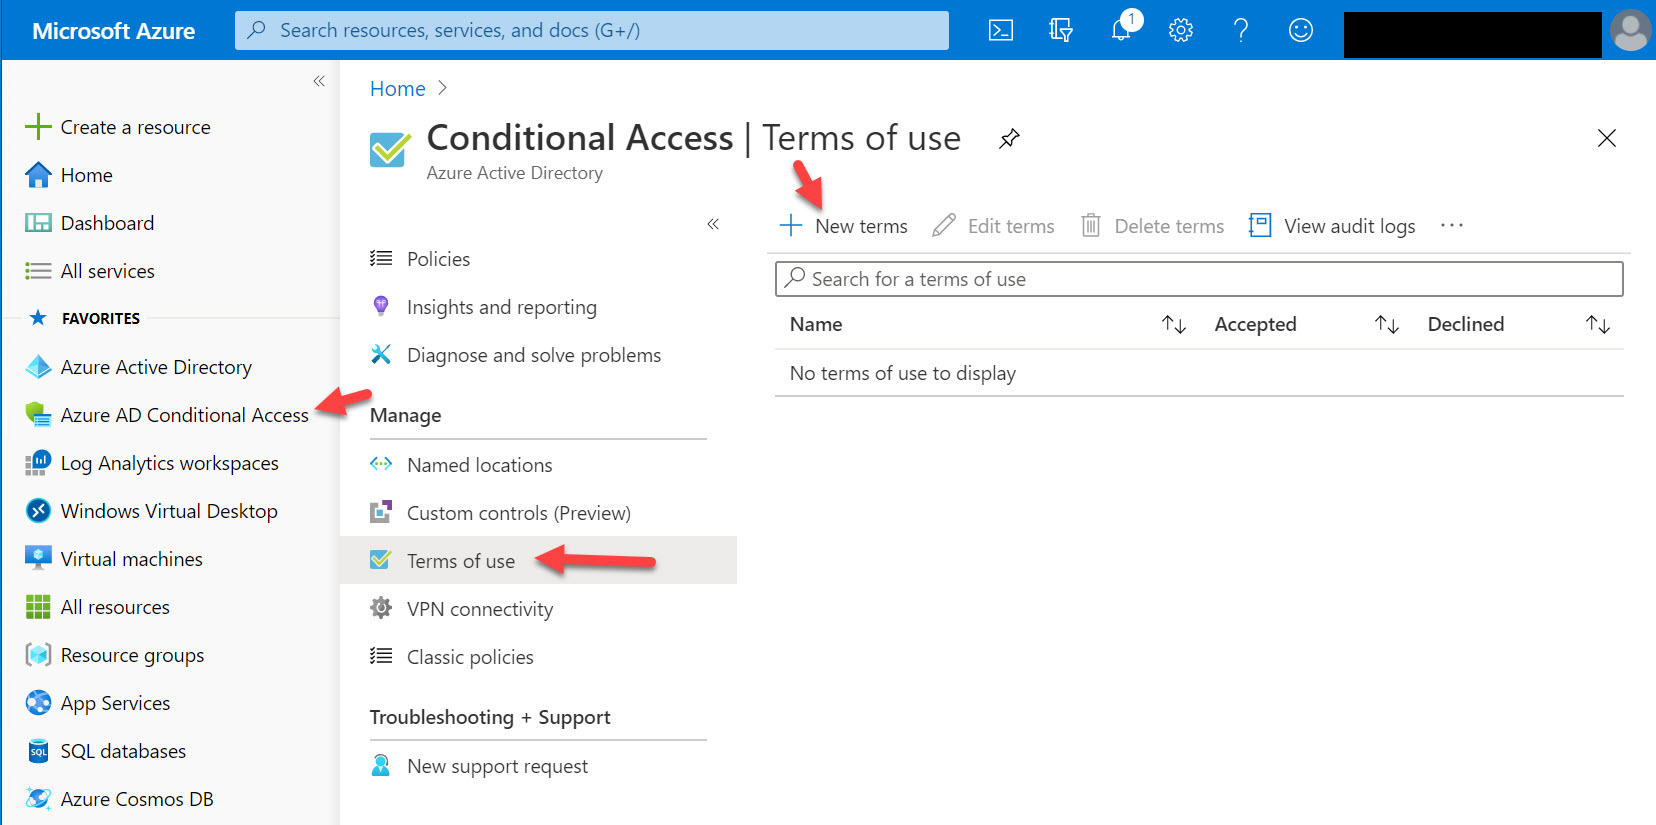
1. Go to the Azure Portal at https://portal.azure.com/ and go to Azure AD Conditional Access > Terms of Use > New terms
2. You will now see this “New terms of use” wizard.
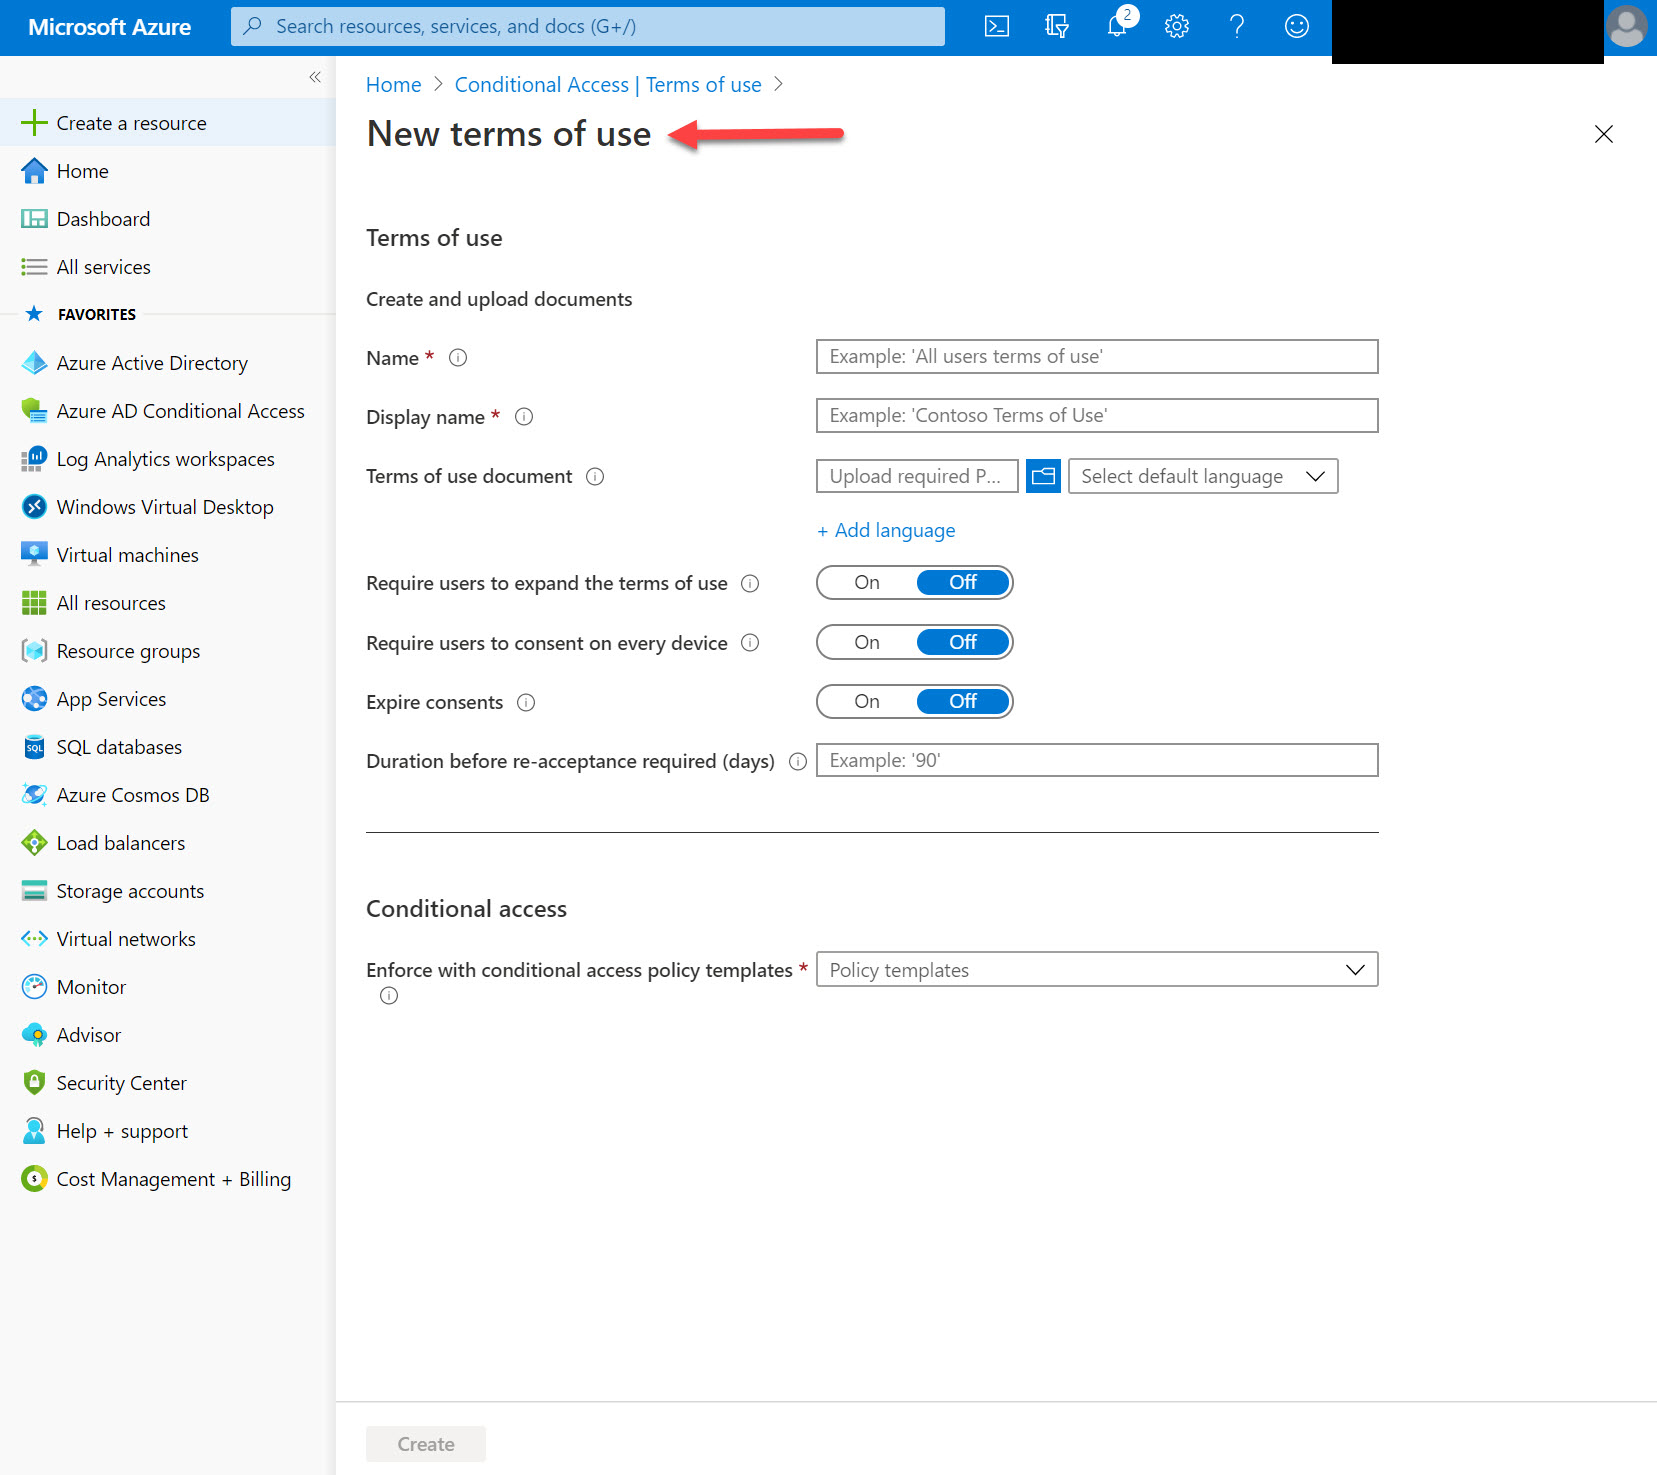
3. Enter the following bits of information. NOTE: Please read through this entire guide before proceeding, there are some modifications to this policy I suggest further below that will give your users a better user experience you may want to try. You will not be able to edit settings later without re-creating your policy so it’s best if you read through this guide fully before creating your policy.
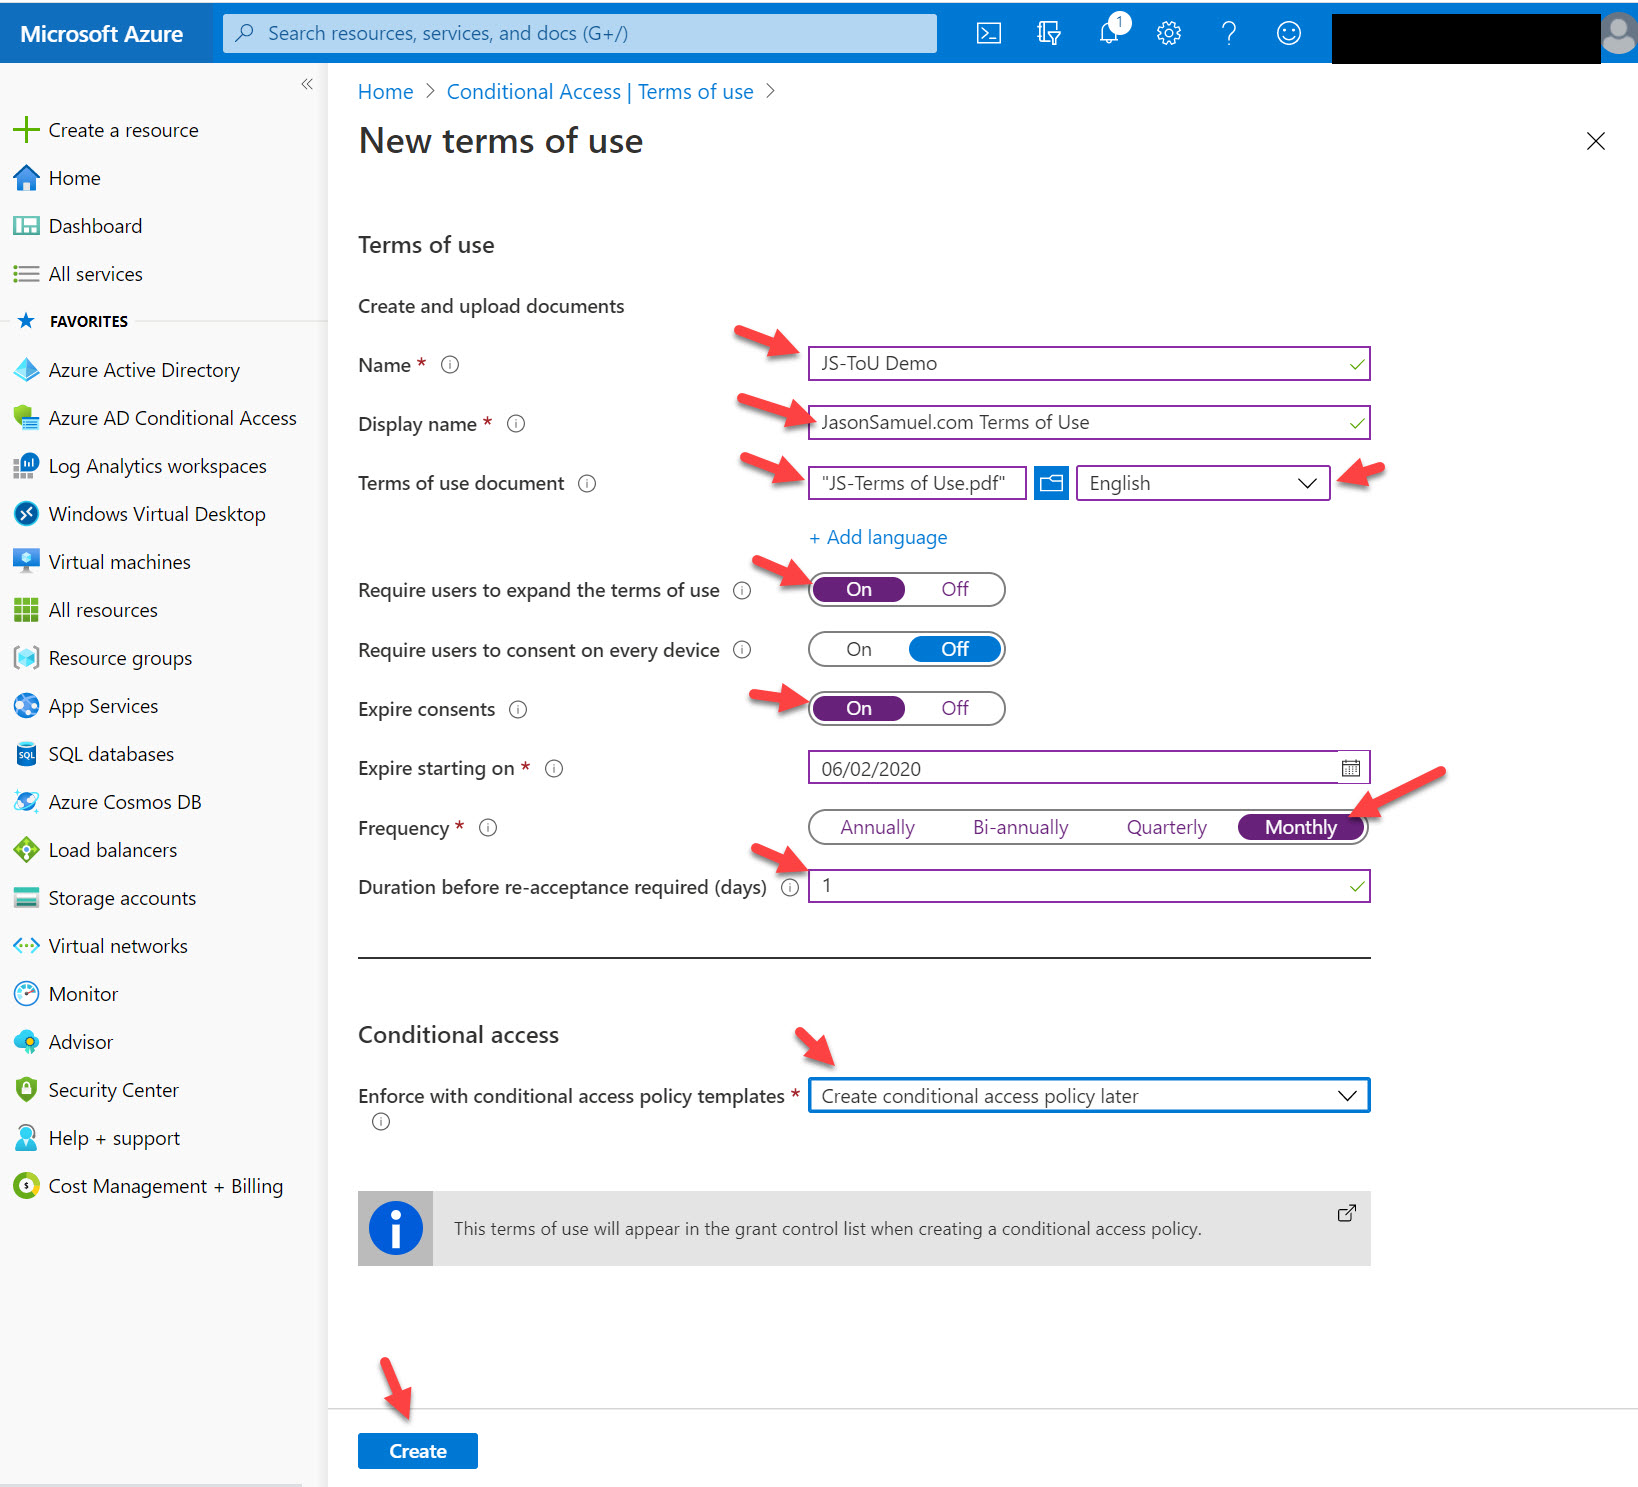
- a. A name for your Terms of Use policy that makes sense to you
- b. The display name for the policy which is end user-facing, you will want something like “YourCompanyName Terms of Use” here
- c. Upload a .PDF of your Terms of Use. You cannot just enter text right into the policy and must upload it in PDF format and set the language for it, in my case English. You can add other languages if you wish.
- d. You can enable the “Require users to expand terms of use” option so you have a better assurance that they actually read it
- e. You can require users to consent on every device they access your AAD protected services from but this can be annoying so I have left it off in my demo
- f. For an extreme Terms of Use that requires a consent once every 24 hours, set the expiration to the date you are creating the policy, set the frequency to Monthly, then set “Duration before re-acceptance required (days)” to 1.
- g. For the “Enforce with conditional access policy templates”, I usually set this to “Create conditional access policy later” just to get through the wizard
…and your finished policy should look something like the below. Hit Create.
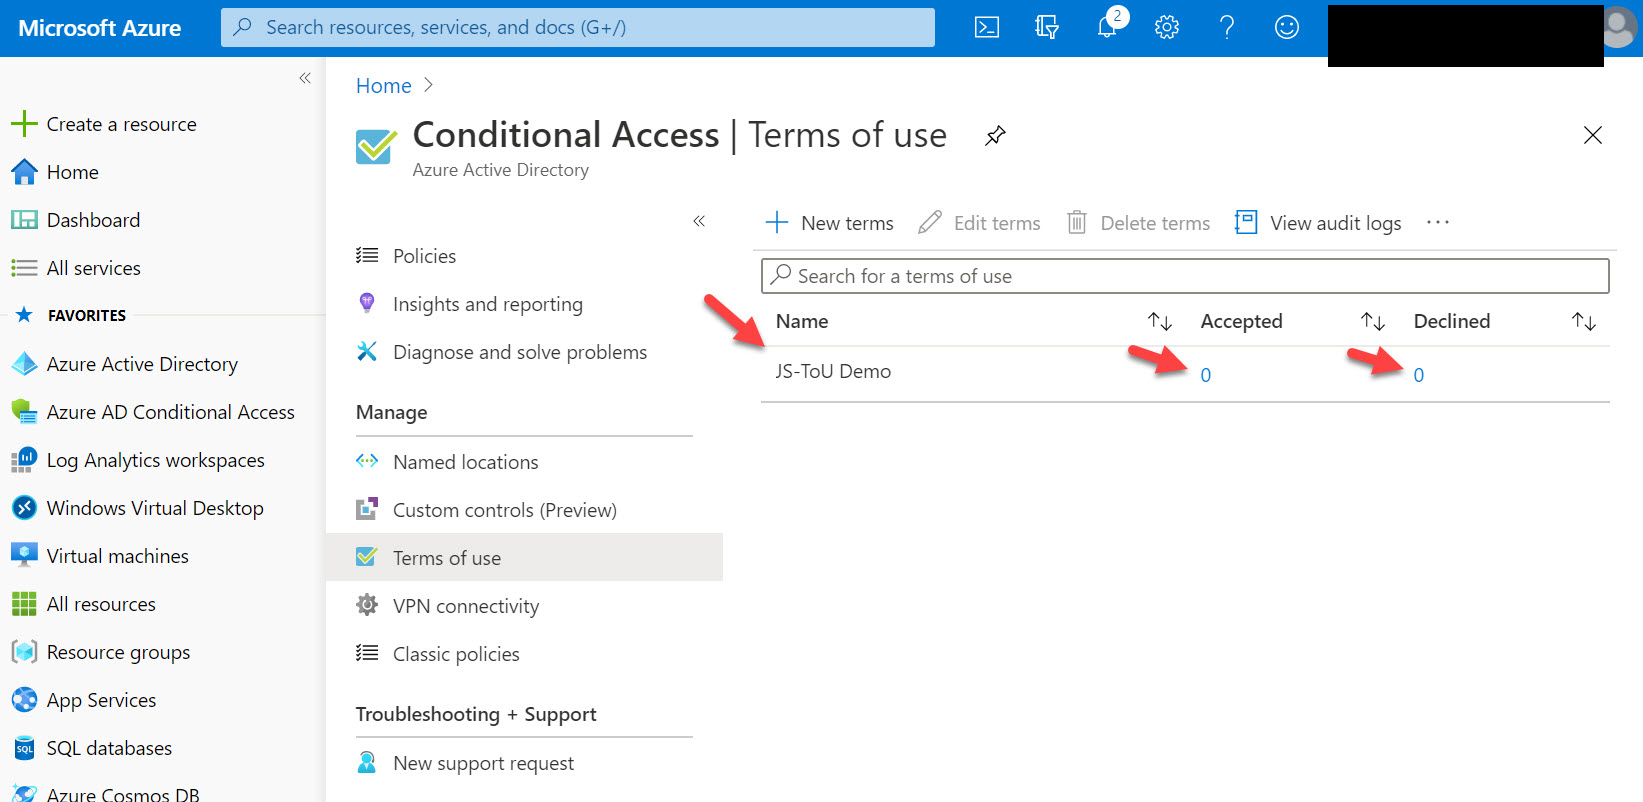
4. Now you will see your policy has been created. You will see the Accepted and Declined are at 0 because you haven’t enabled it via Conditional Access policy yet.
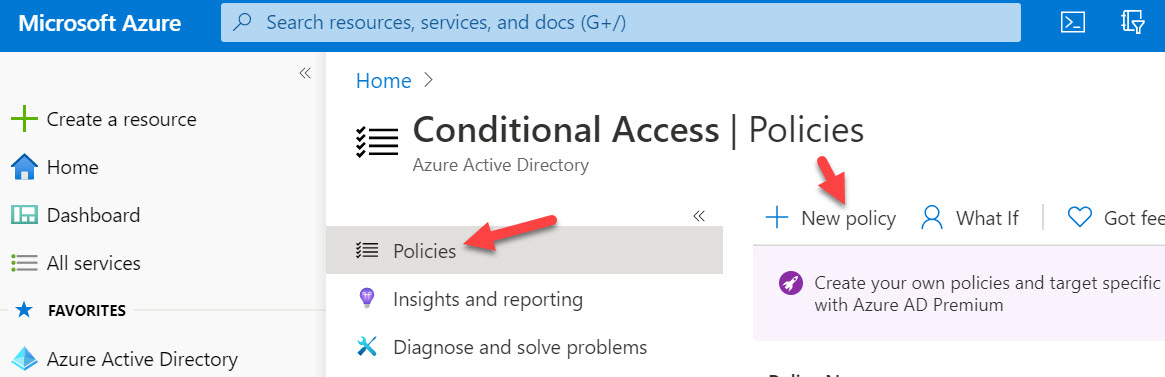
5. Click Policies and then “New Policy” to create a new Conditional Access policy
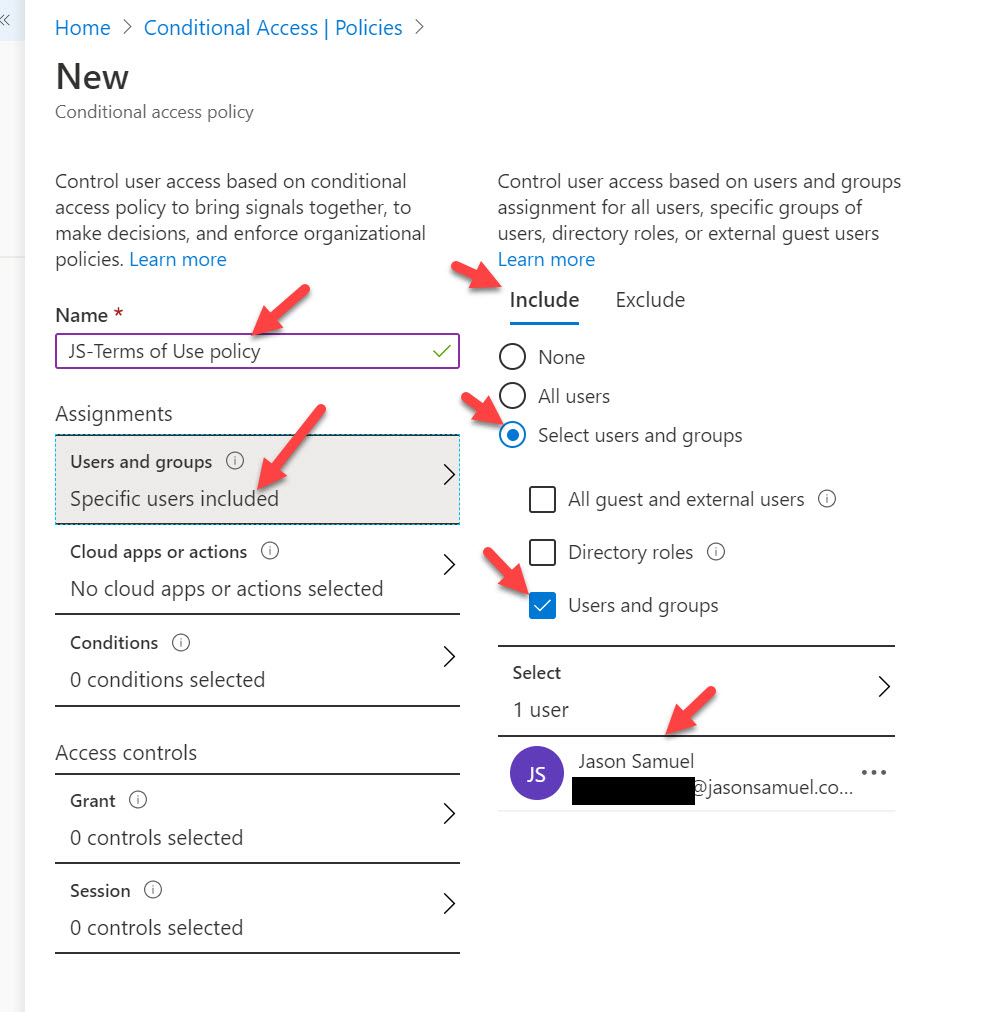
6. Give your Conditional Access policy a name, then under Assignments click Users and Groups and select just a test user account or security group
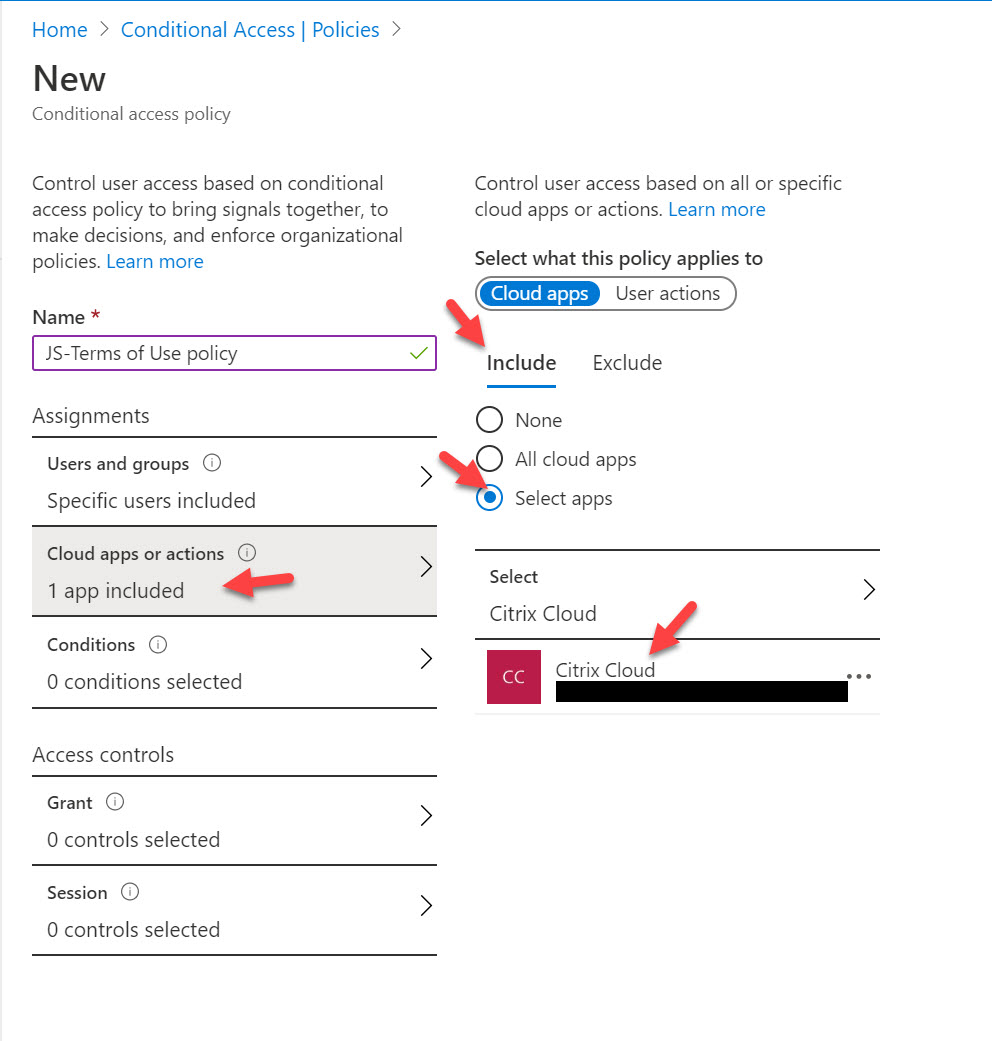
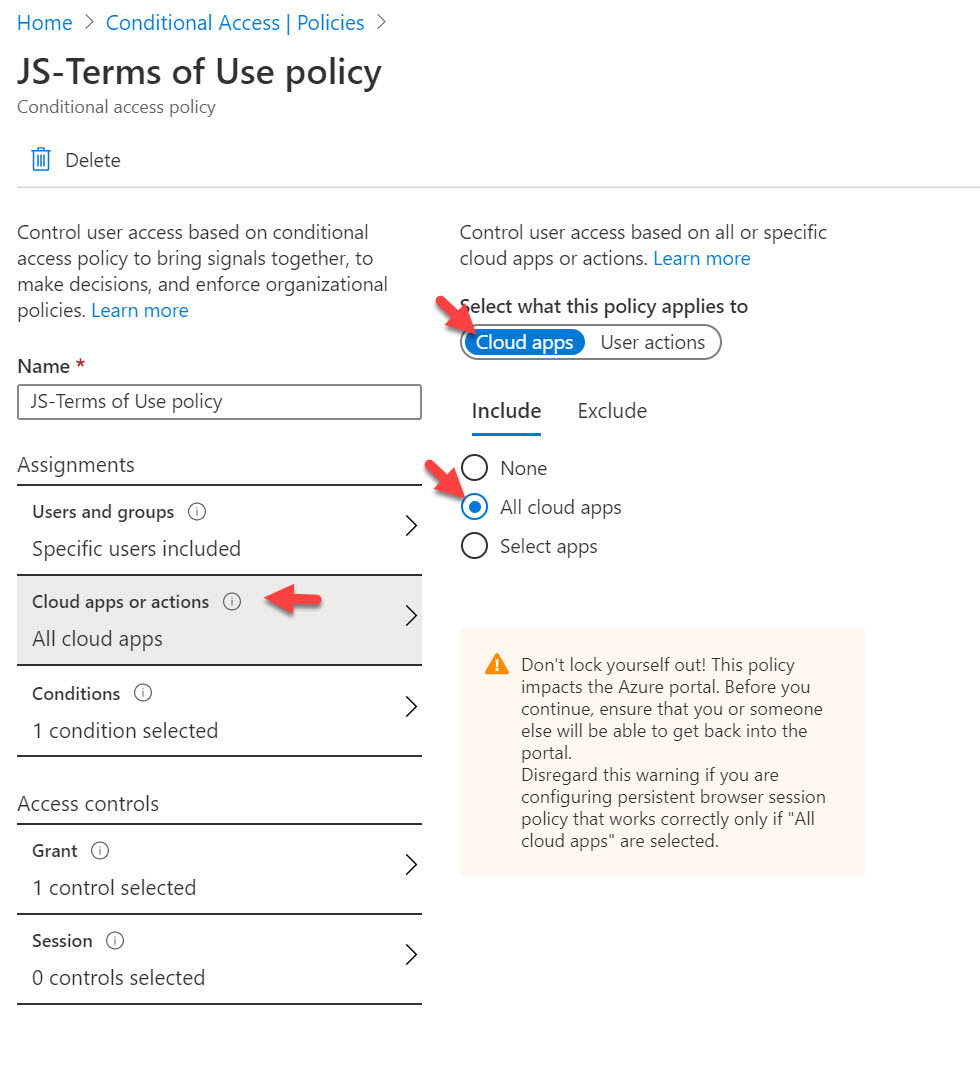
7. Under Cloud apps or actions, you can select All cloud apps but for the purposes of this demo, I am only going to select Citrix Cloud which is my Citrix Workspace/Gateway Service (yourcompanyname.cloud.com). Usually when Citrix Cloud is wired up to AAD you’ll see at least 3 enterprise apps in there named the same for other functions like the admin page logins so check your Sign-In logs for each of the Citrix Cloud apps and choose the one that has all the user sign-ins which means its the one being use for Workspace/Gateway Service. If you accidentally pick the wrong one and create the policy it will kill expire your Citrix Idenity Platform to Azure AD connection in your Citrix Cloud tenant and you will have to go through the steps of reconnecting that which means a user impact where they won’t be able to login to Workspace until you reconnect:
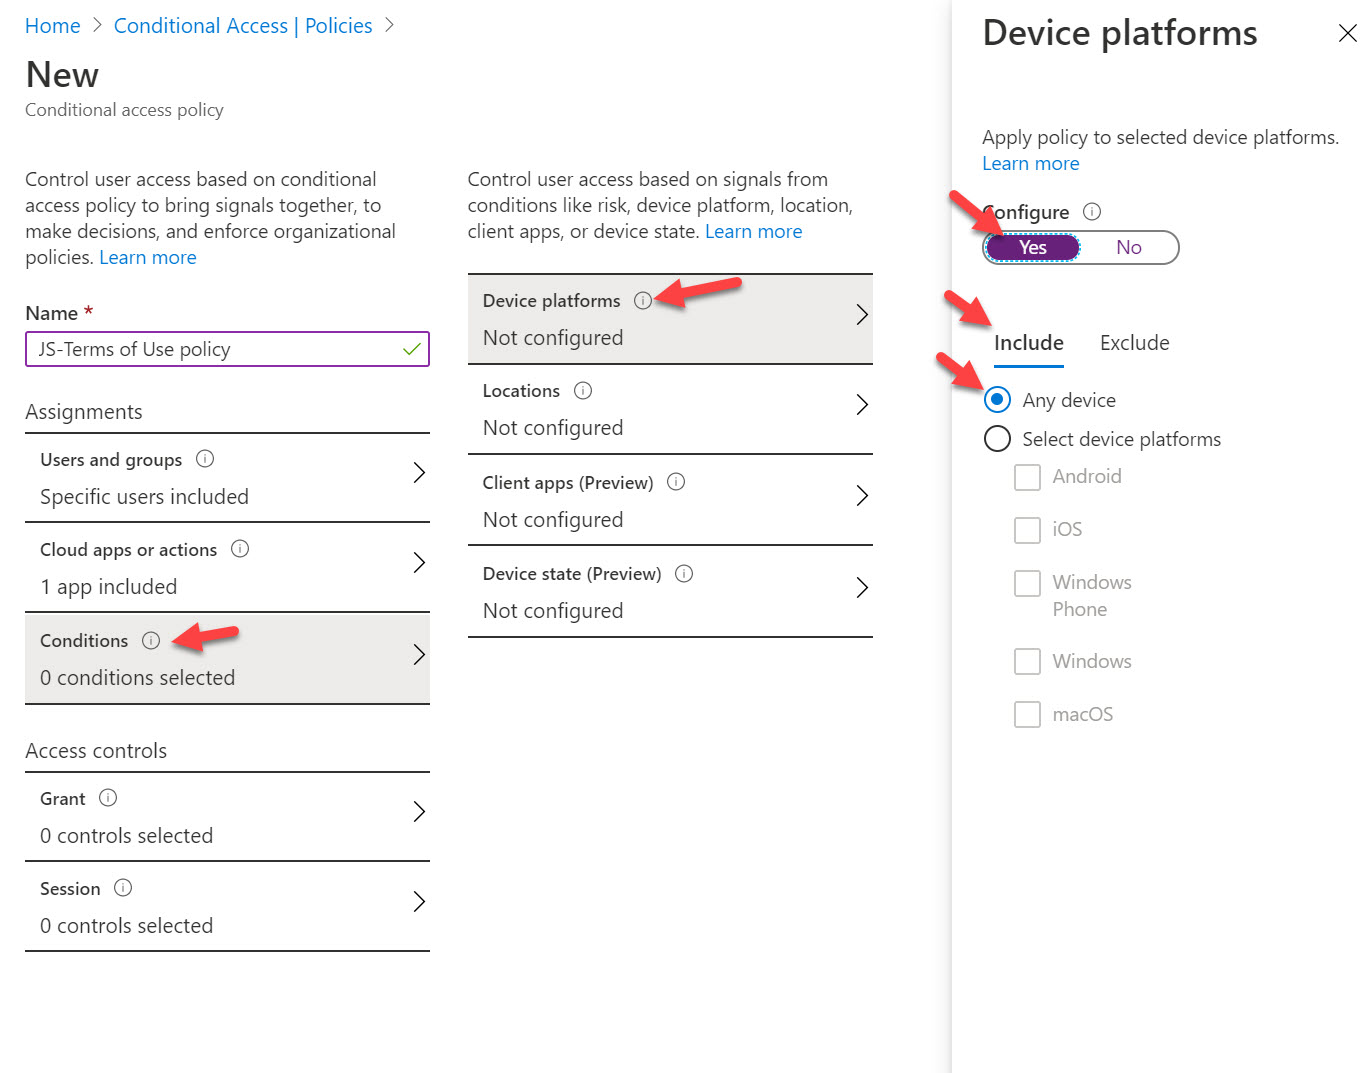
8. For the Conditions, I like to set Any device since Terms of Use works with any device since it’s displayed via a web view.
9. Under the Access Controls section, select Grant access and select the Terms of Use you had created in the earlier step and hit Select

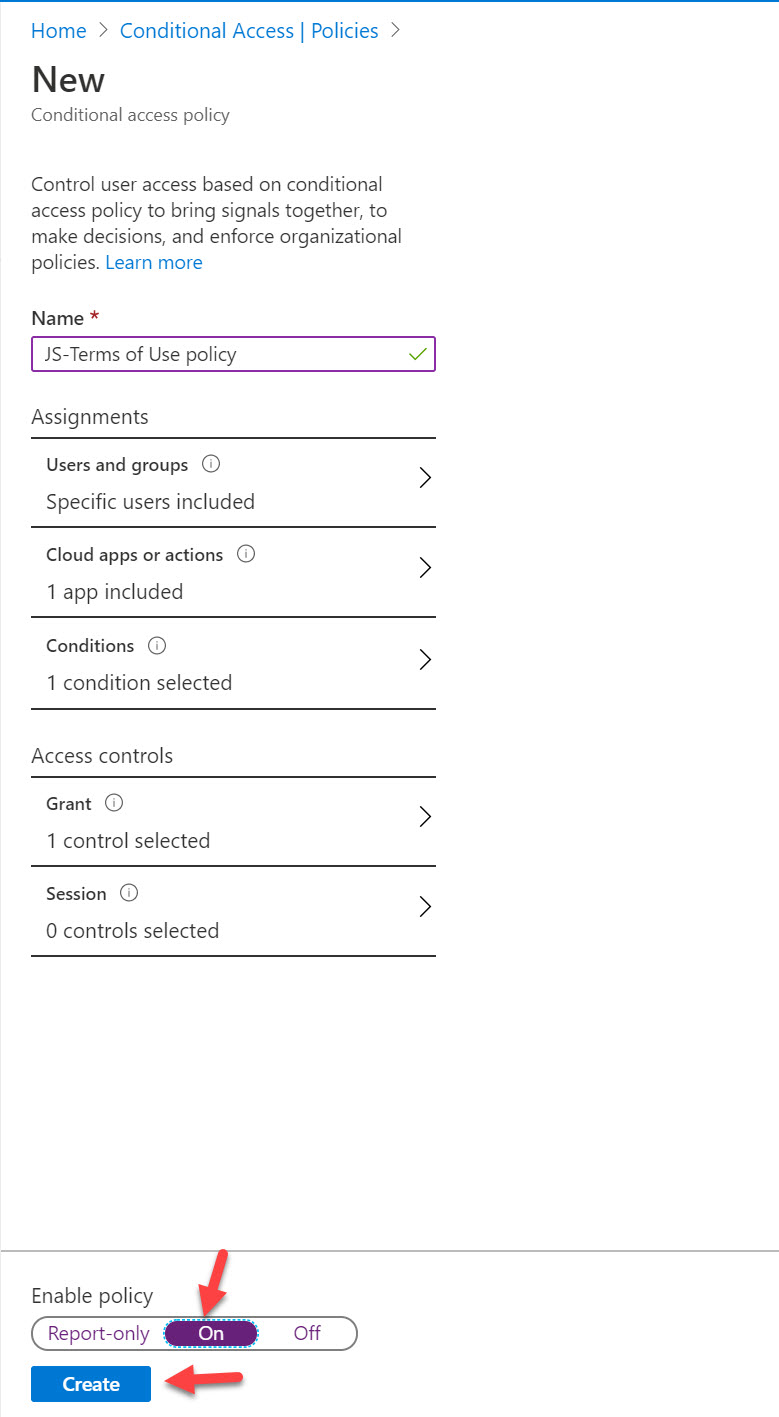
10. Under the Enable policy setting, flip it to “On” and then hit Create. It’s best practice to always use Report-only for testing policies with enterprise users so nothing unexpected happens to them if you configured something wrong but in this case, I am targetting just a test account so I’m skipping this and just enabling right away.
Testing the Terms of Use Policy
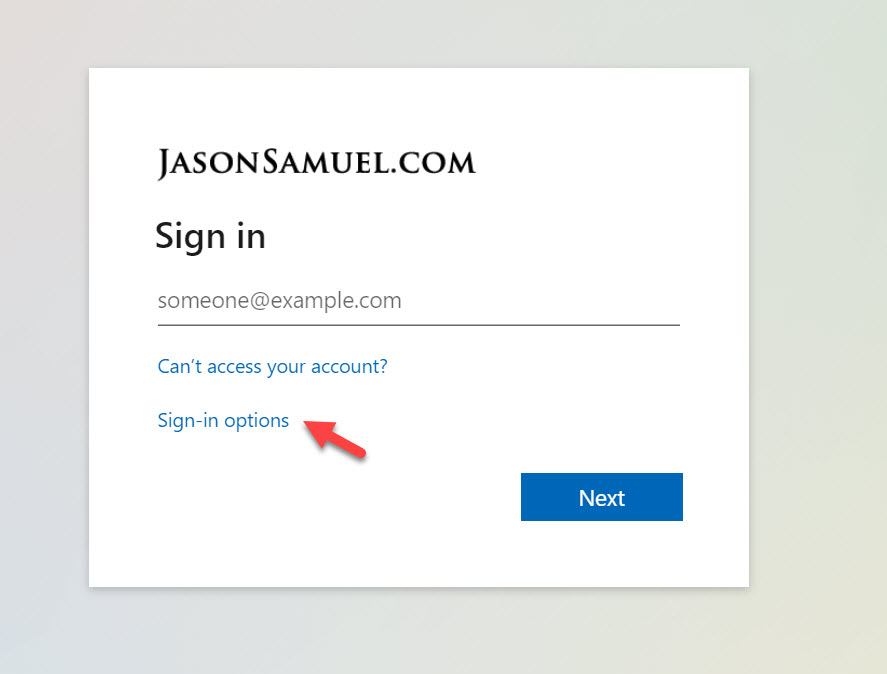
11. Now test your login with your test account in a private browser window. I am going to use my FIDO2 key to do a passwordless login with Azure AD and Citrix Workspace. I navigate to yourcompanyname.cloud.com and which redirects me to Azure AD. I will click Sign-in options:
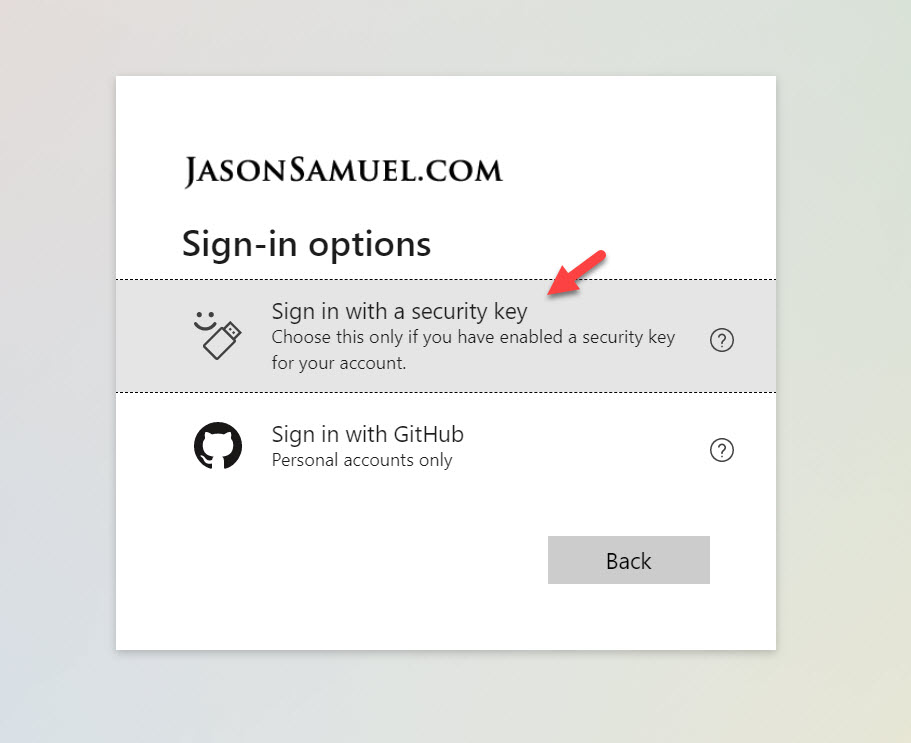
12. Click “Sign in with a security key”:
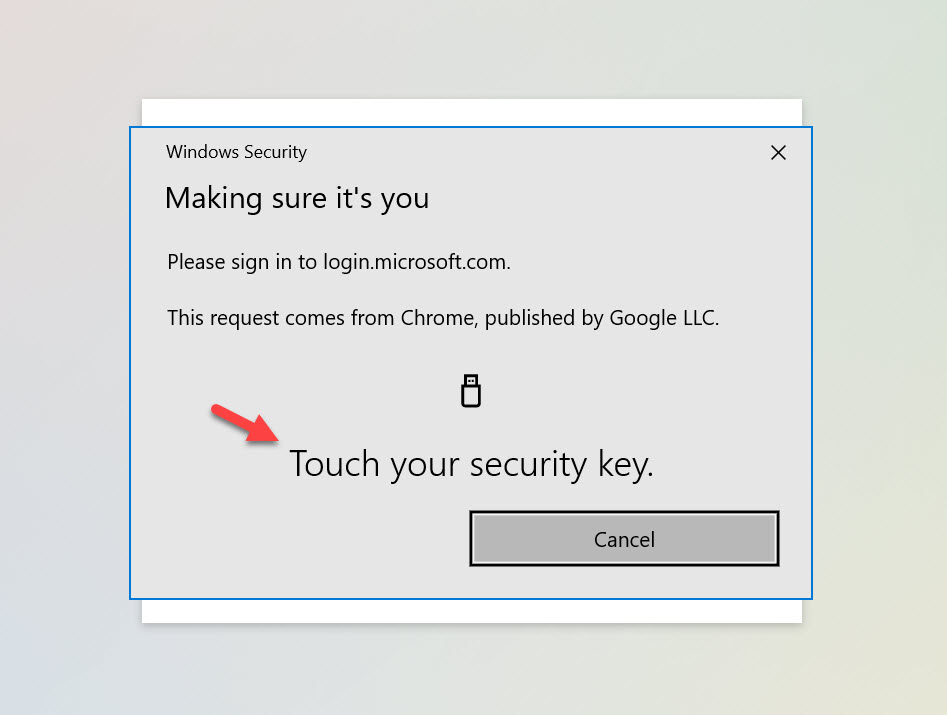
13. Touch your security key. In this case, I am use a TrustKey (eWBM) G310 biometric FIDO2 key with a built-in fingerprint reader so I will not be prompted for a PIN, the touch will actually scan my finger at the same time:
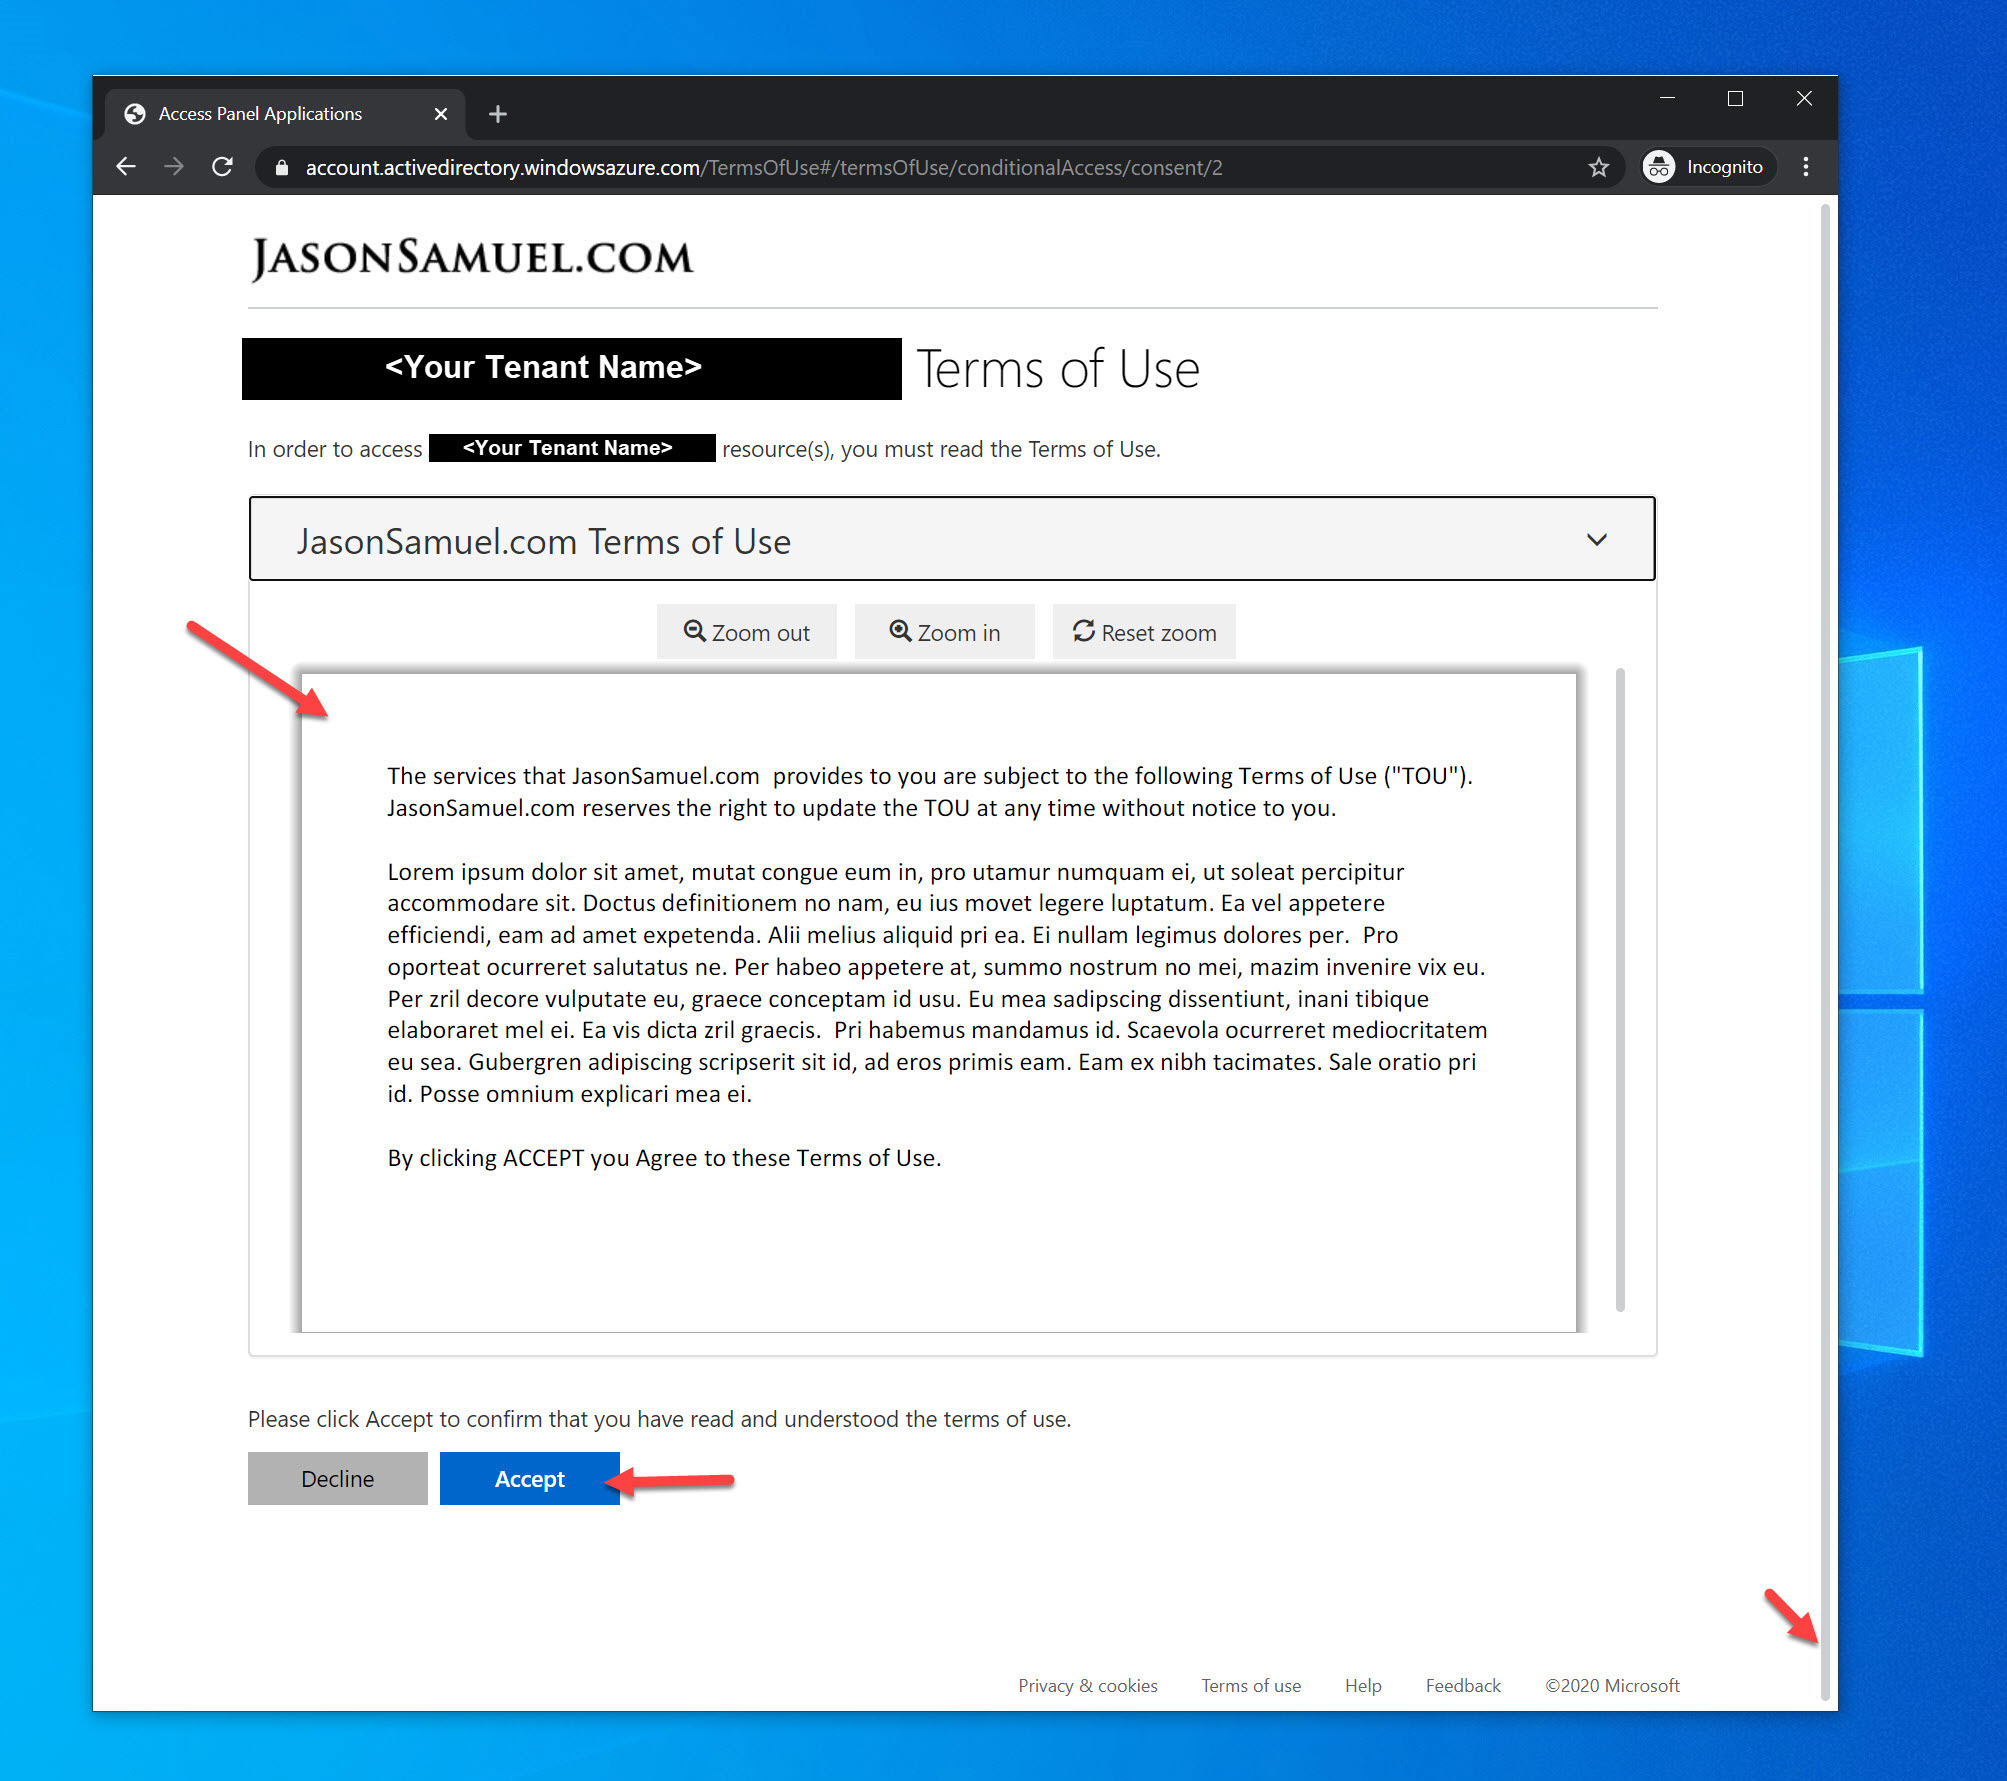
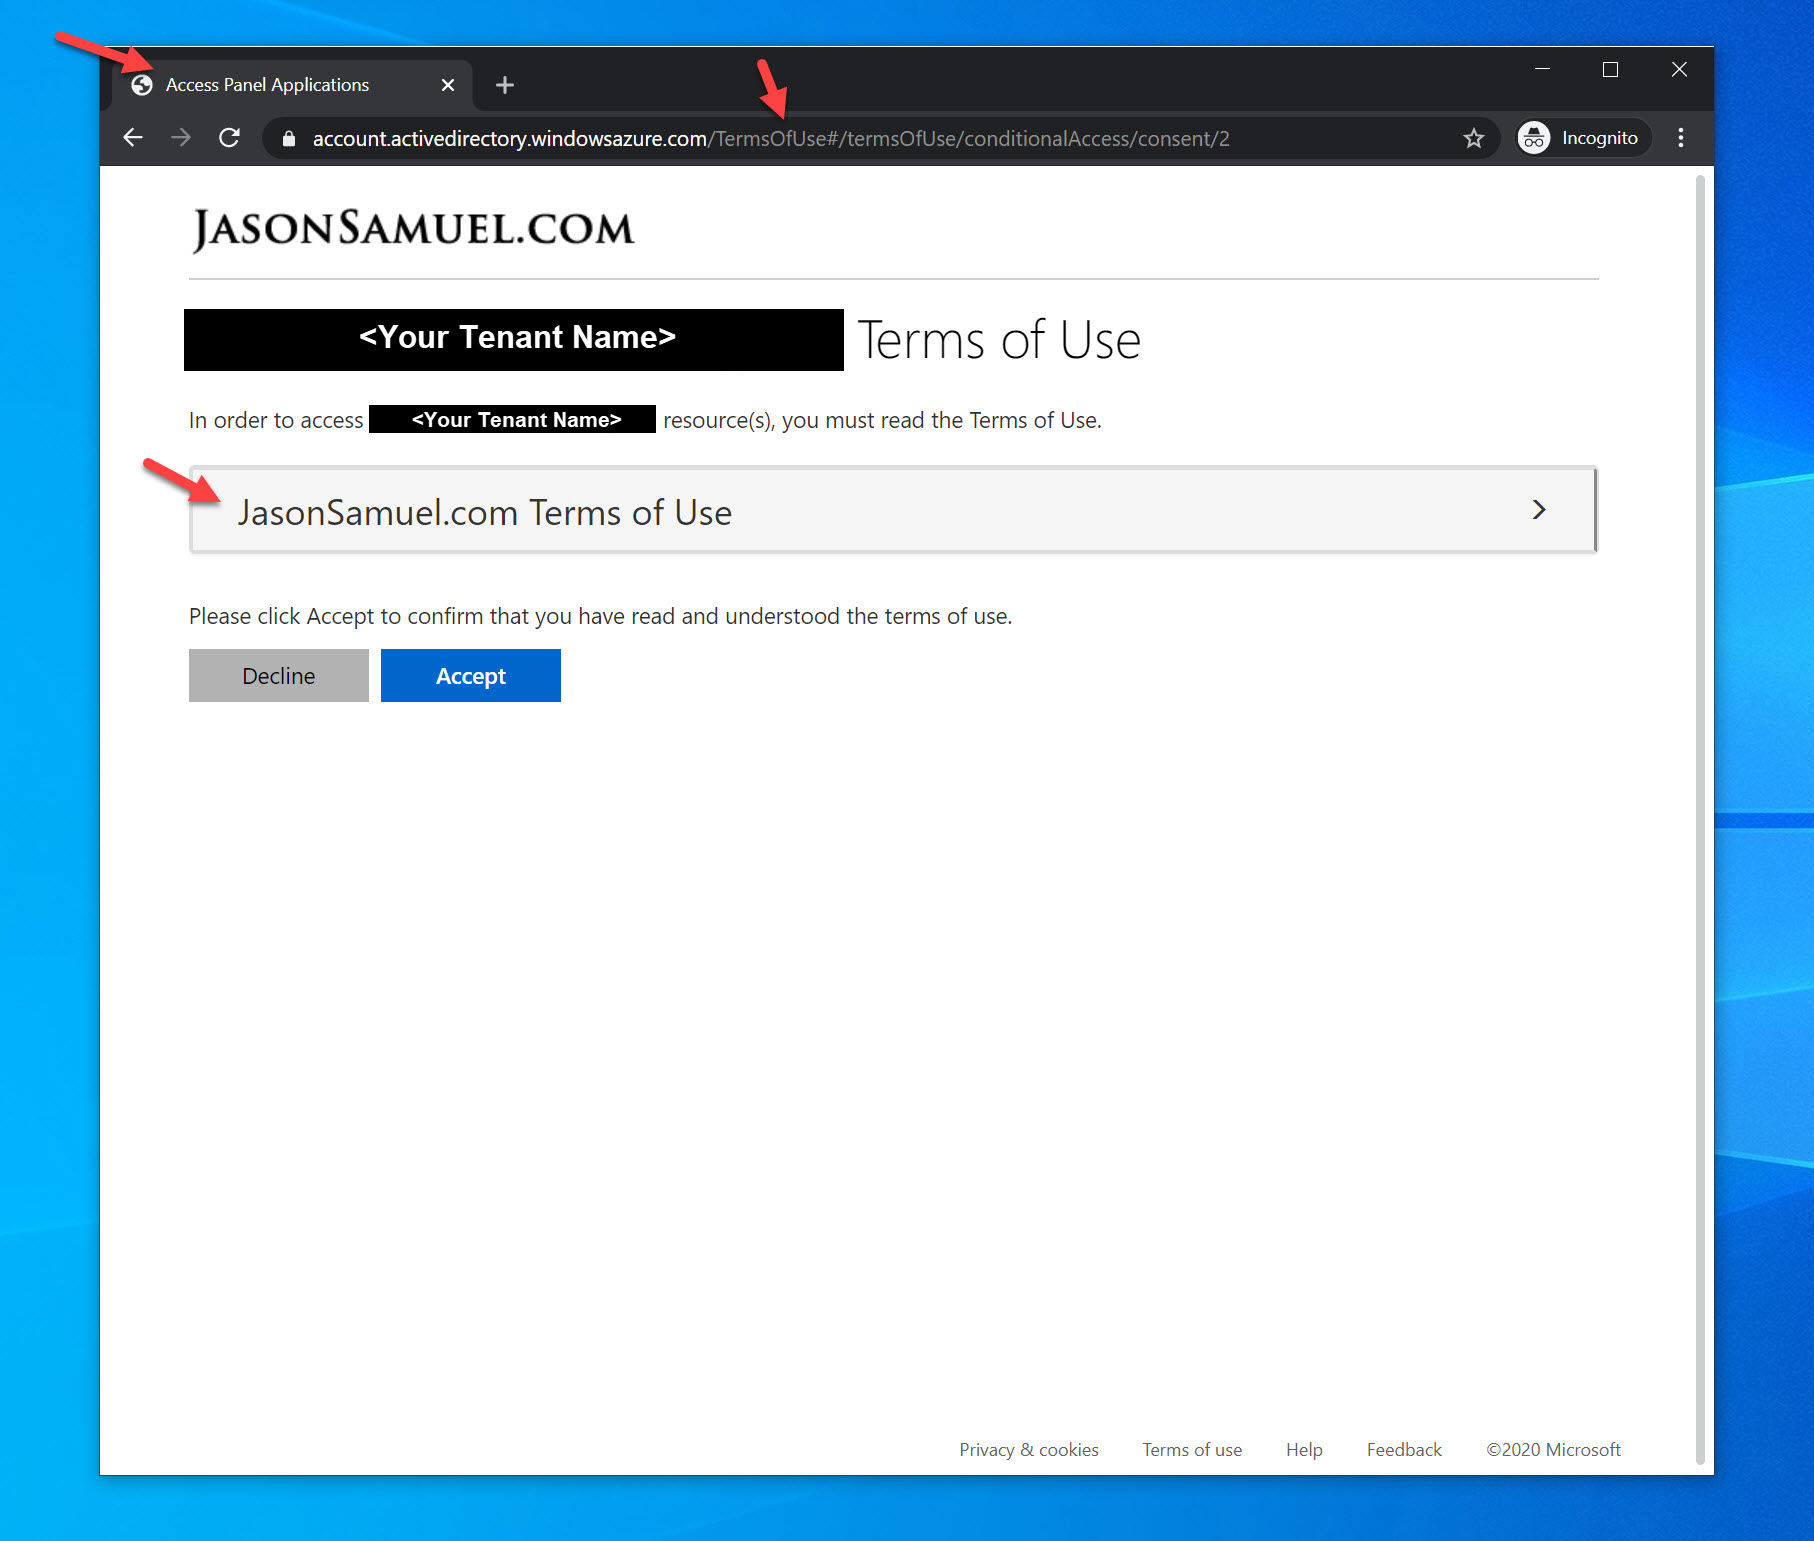
14. Now Conditional Access kicks in with the authorization flow and stops you from proceeding to Citrix Workspace to launch your virtual apps and virtual desktops as you normally would. Instead, you will see the Terms of Use. You’ll notice it’s Access Panel Applications in the title bar. This is not configurable at this time but hopefully can be more descriptive to your tenant in the future. You’ll notice the URL is from this Terms of Use feature. The logo is from your AAD branding and the first few lines of the Terms of Use pull straight from your company’s tenant name and cannot be changed. The display name you selected earlier only applies to the actual Terms of Use you can expand here:
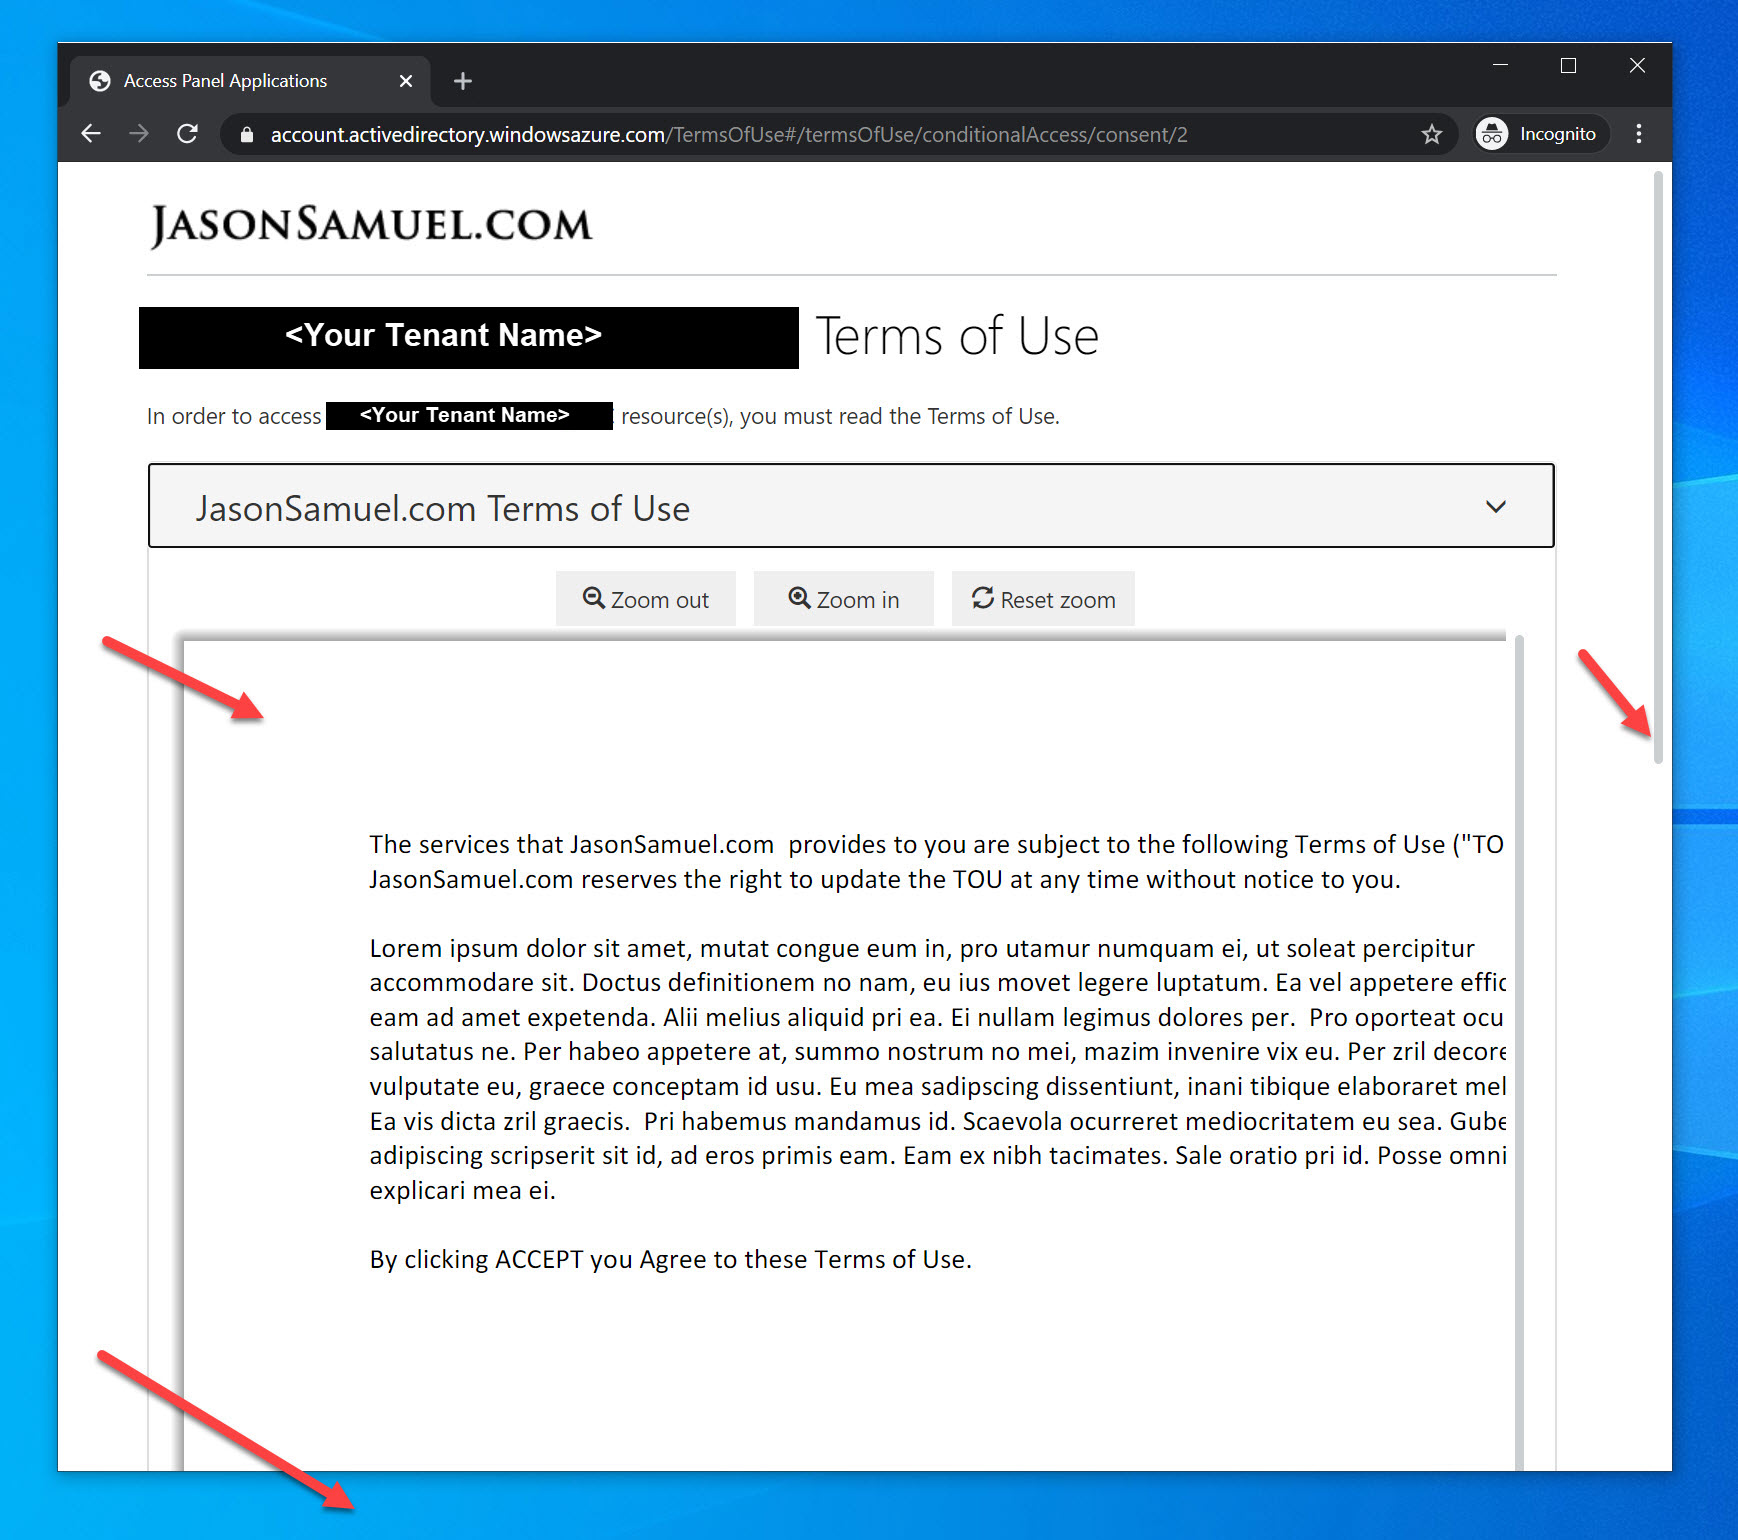
15. When you expand the Terms of Use, you’ll notice your PDF from earlier is embedded in the page with Zoom out and Zoom in controls. Unfortunately, it will run right off the page with a bunch of white space. You are forced to scroll down:
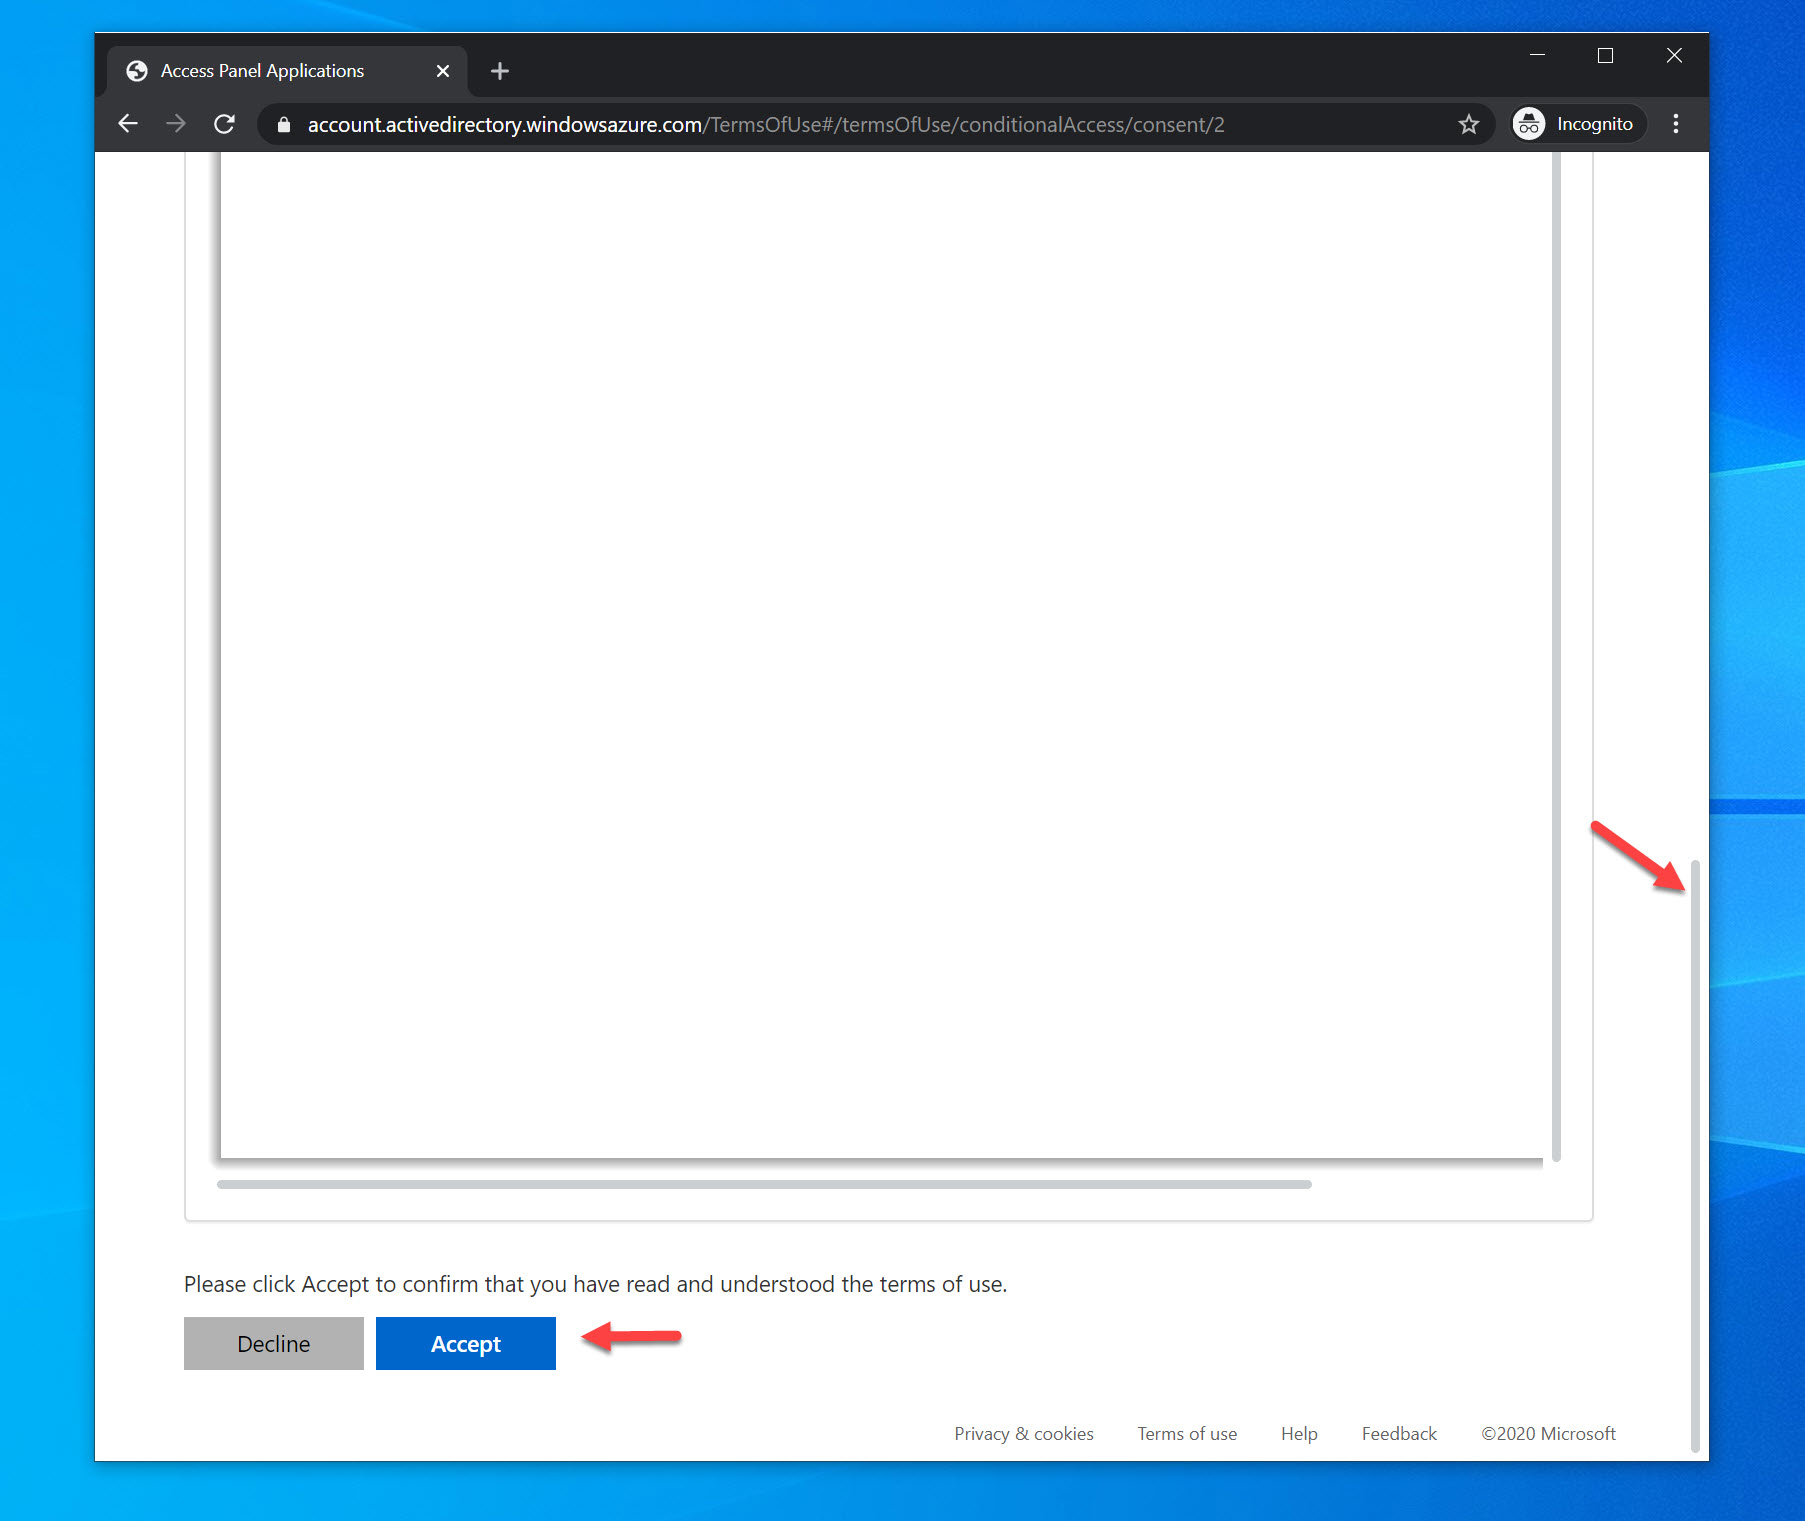
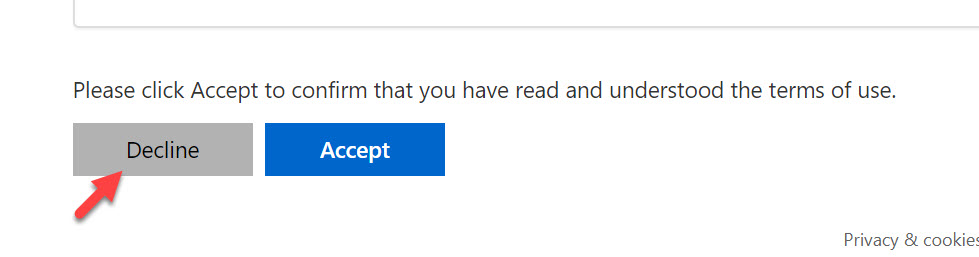
16. …and then finally you’ll be able to Accept. This is not an ideal user experience, especially in mobile devices, but the goods news is it can be fixed and I’ll show you how:
17. But first, lets hit Decline and see how that flow looks. Go ahead and press decline:
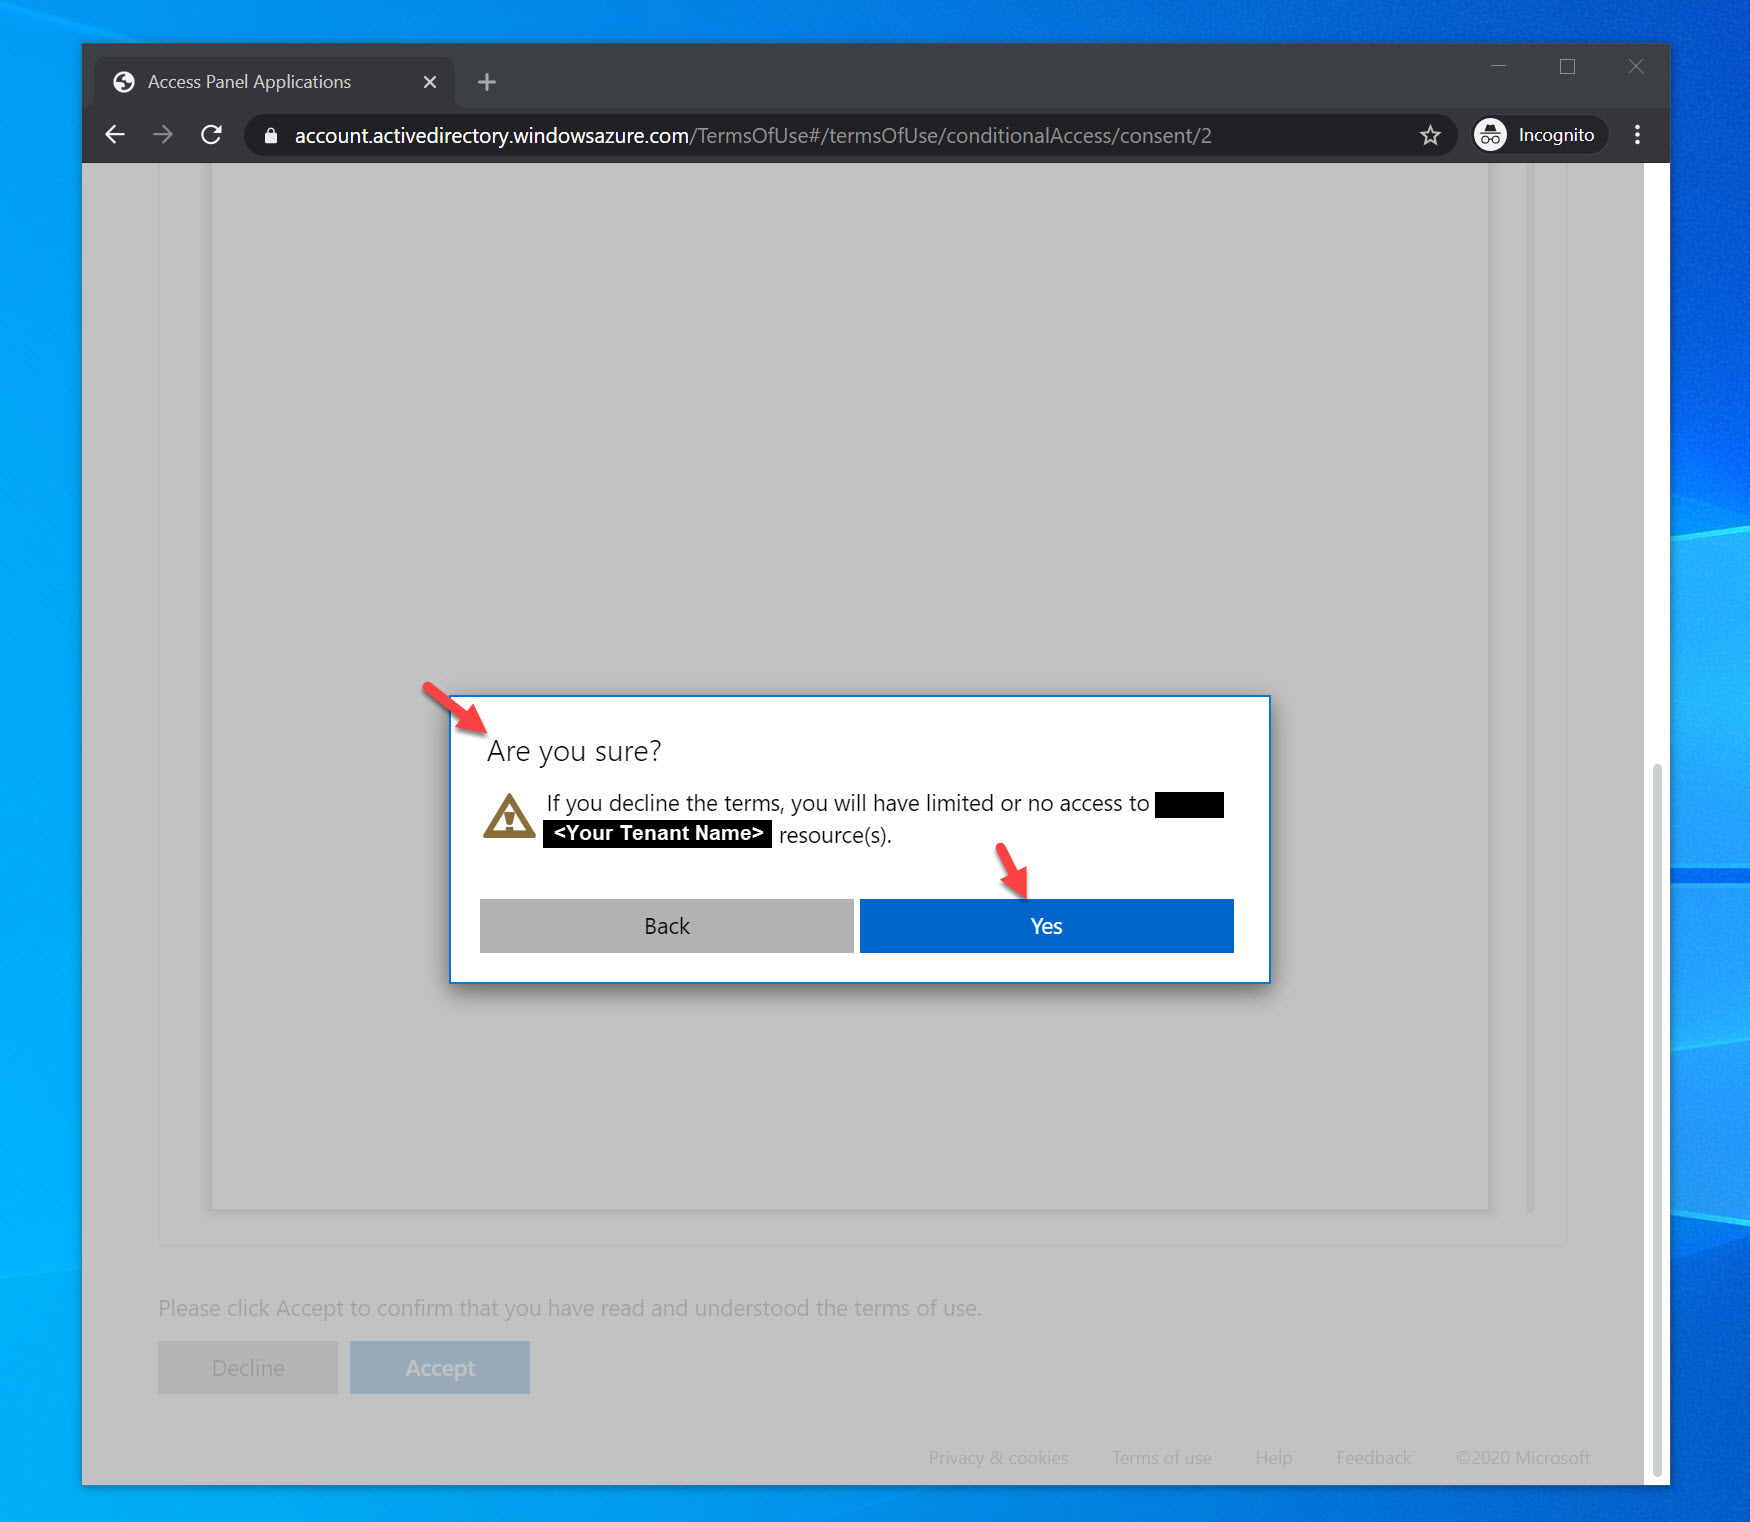
18. There will be an “Are you sure?” dialog to ensure you clicked Decline on purpose:
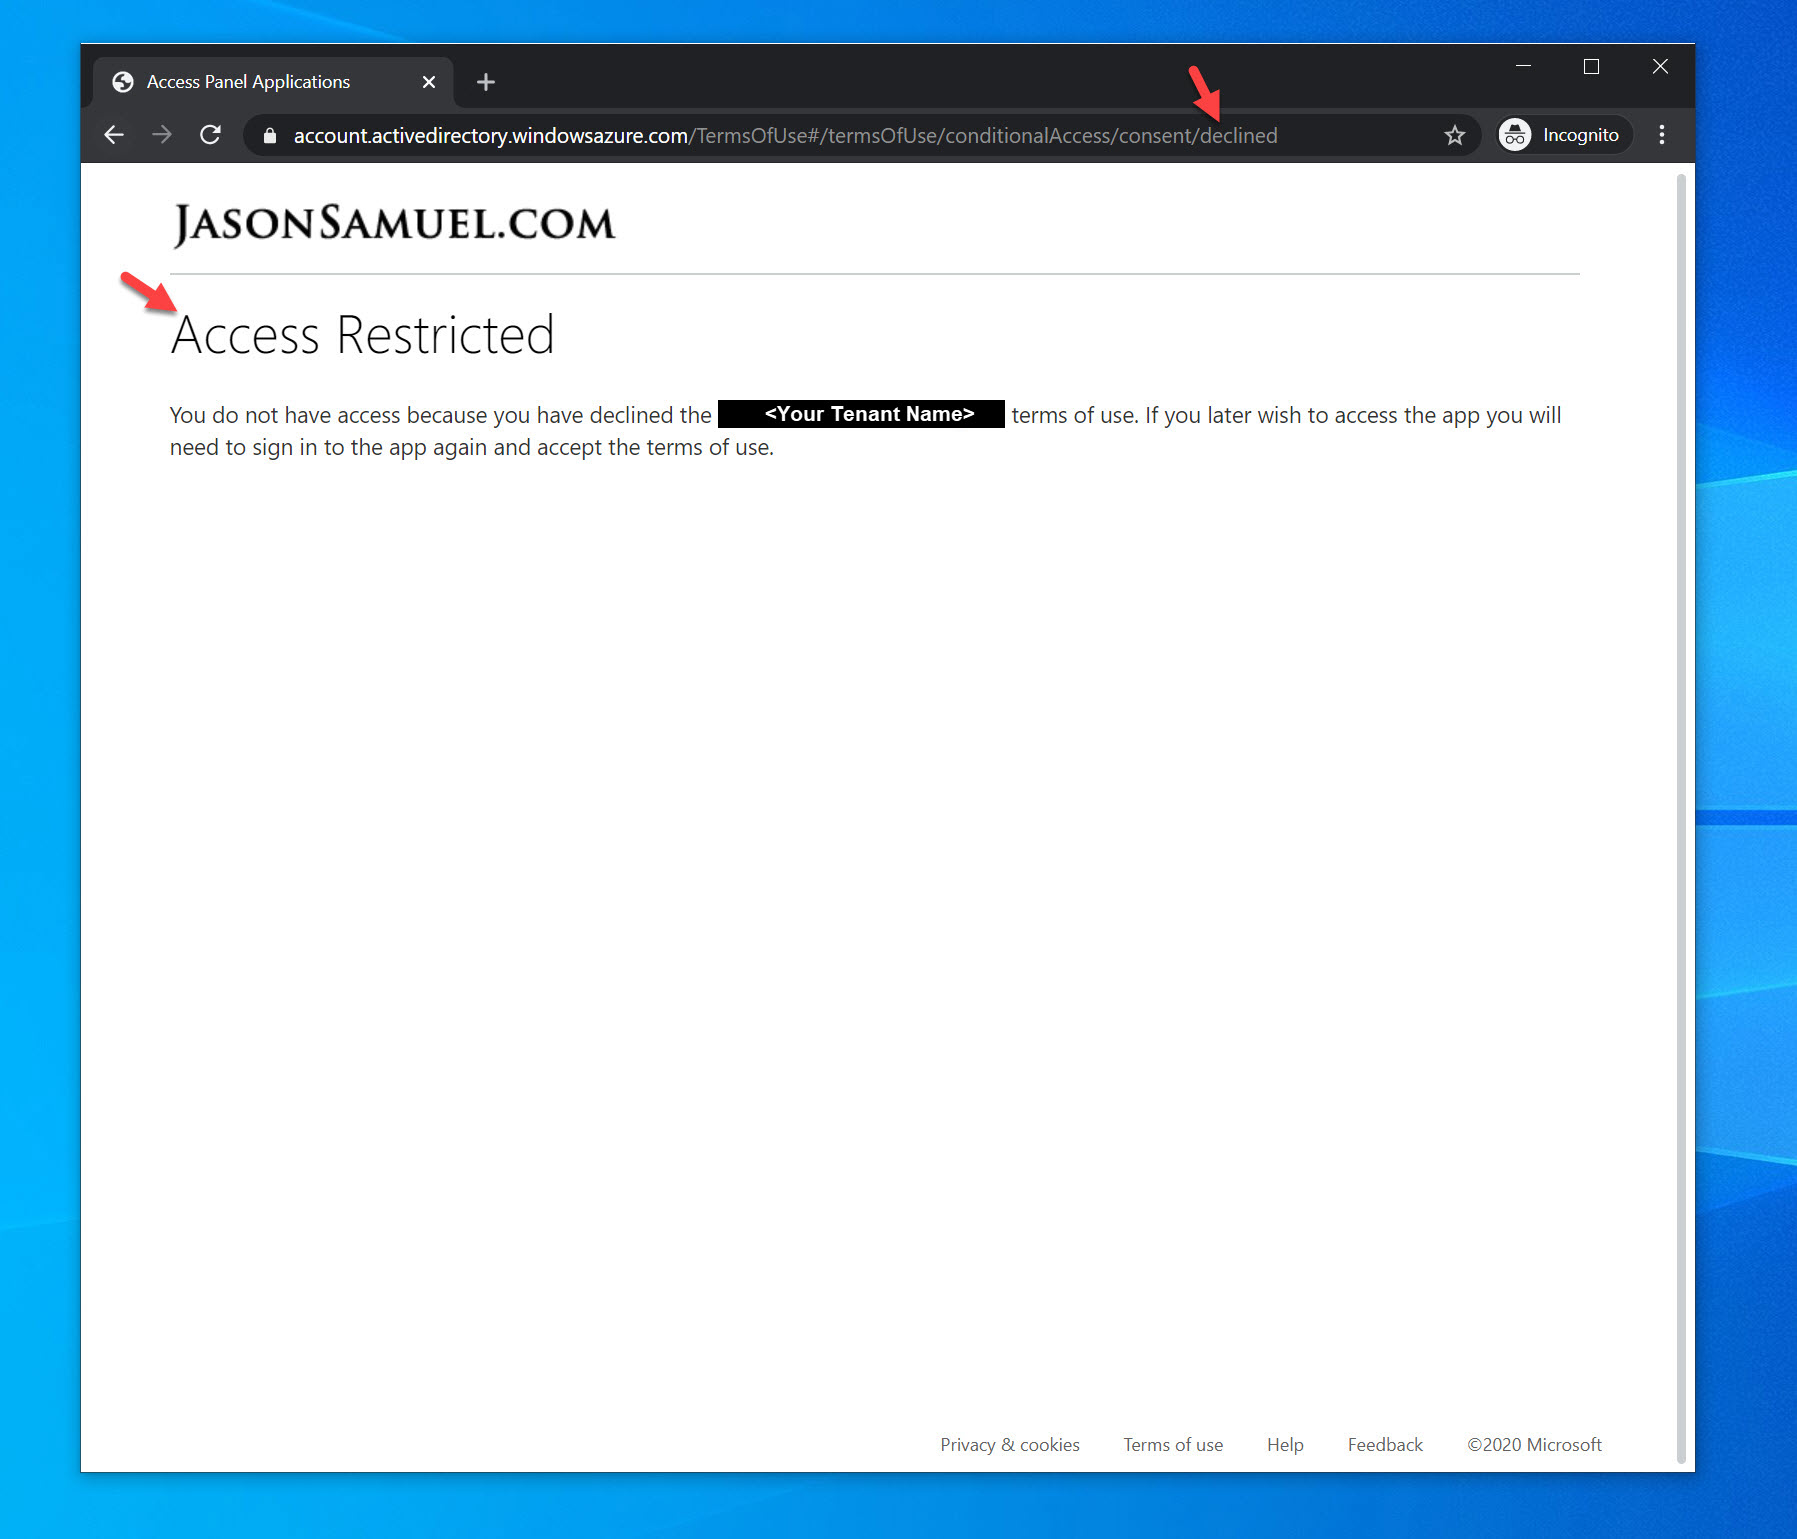
19. Now you will see the “Access Restricted” screen. You’ll see in the address bar that the consent is declined. You will be required to attempt to log in again and hit Accept at this point if you want to access the app.
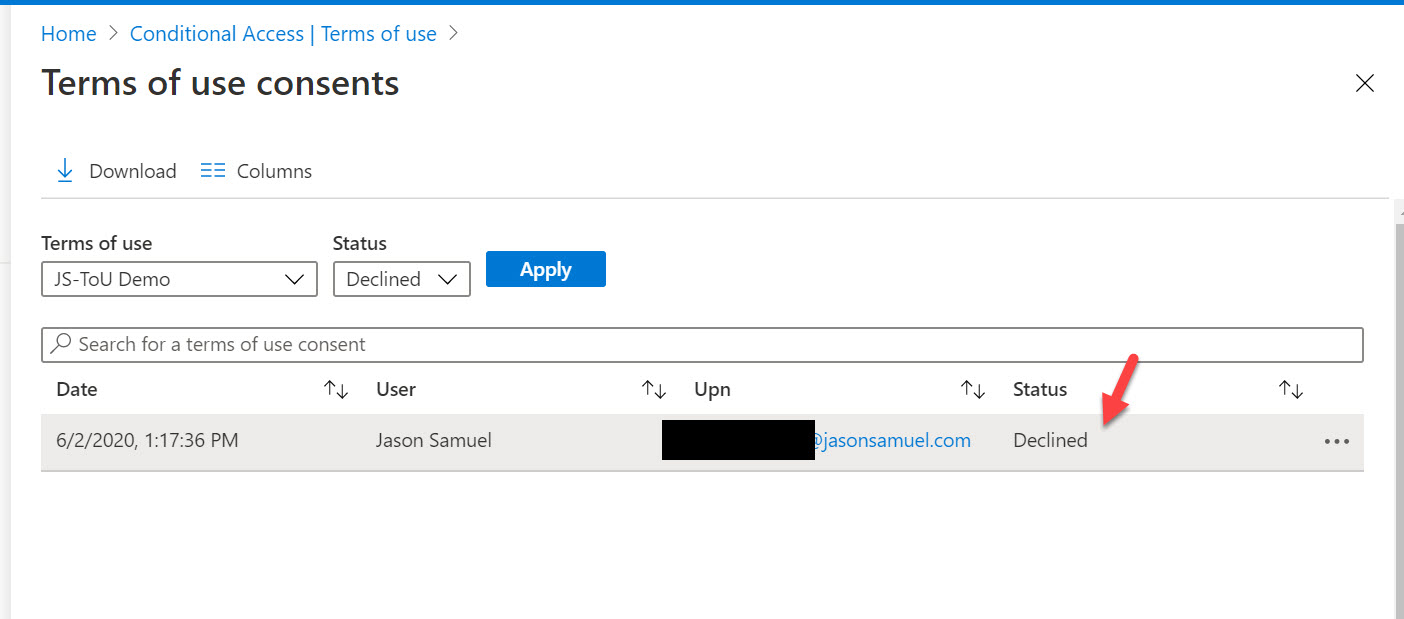
20. When you go back to the Azure Portal, you’ll notice you should see a Decline.
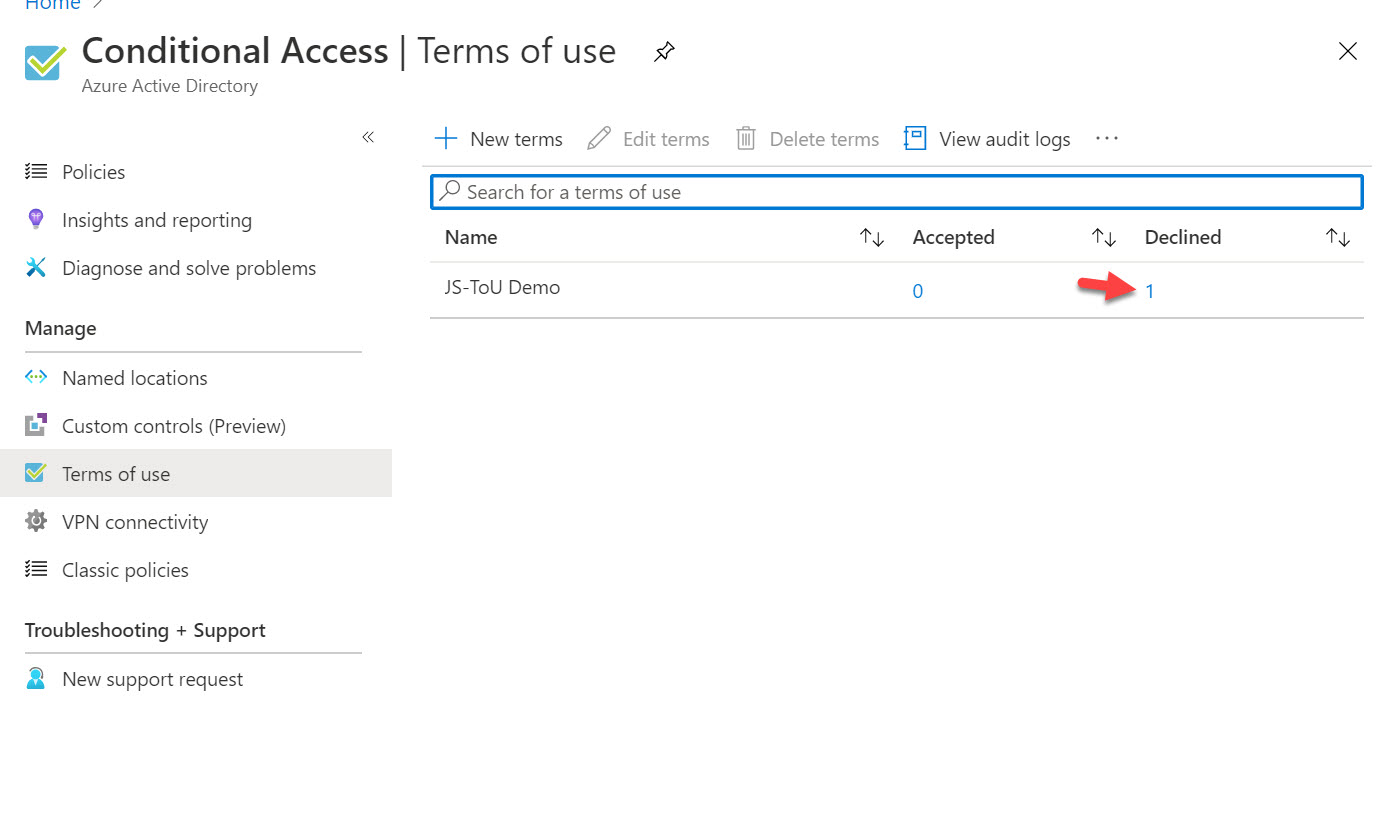
21. If you click it, you can see the date and time of when the user declined the Terms fo use:
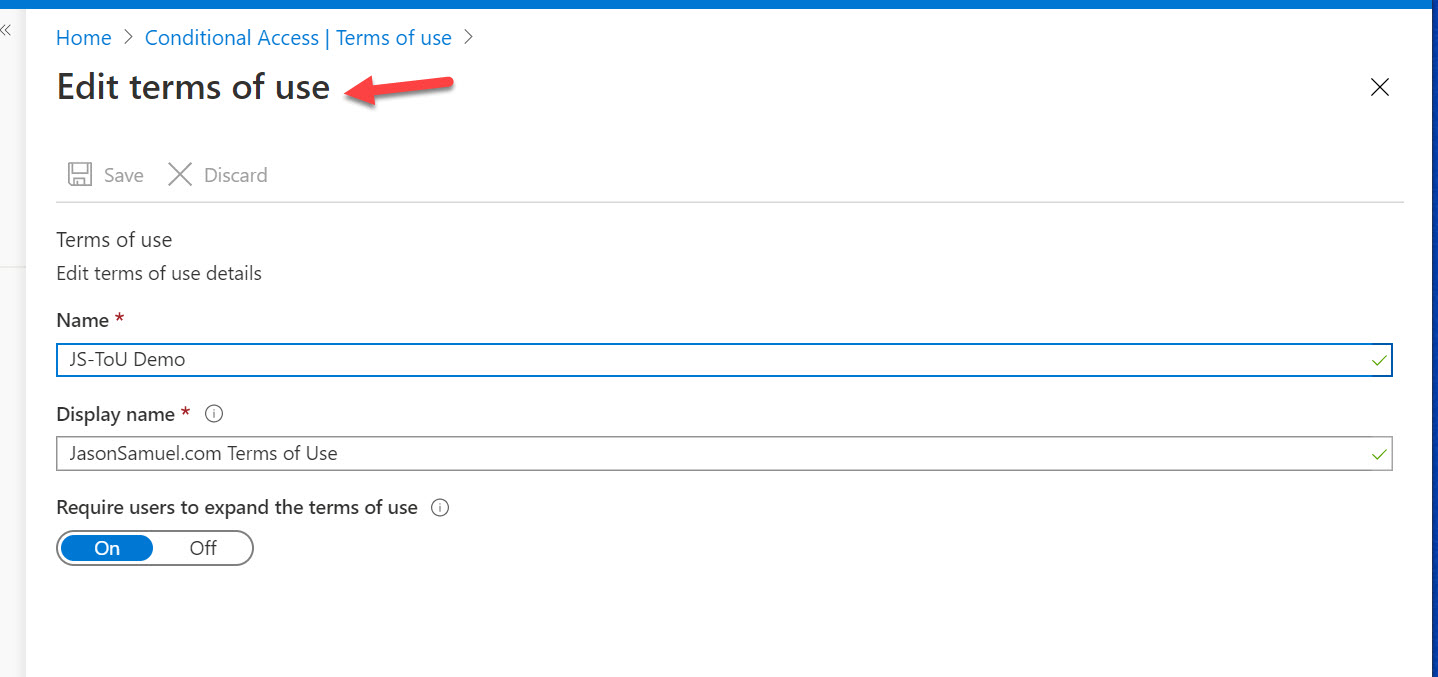
22. If you go back to the Azure Portal and attempt to edit the Terms of Use, you’ll notice it doesn’t give you many options. You have to delete the policy and re-create it every time you want to update it. I’m sure in the future this will be more admin friendly.
Tweaking your Terms of Use policy for a better user experience
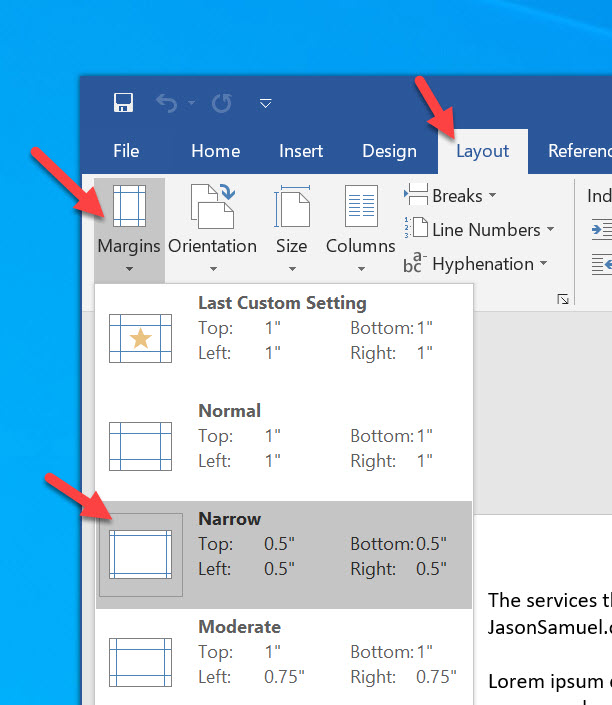
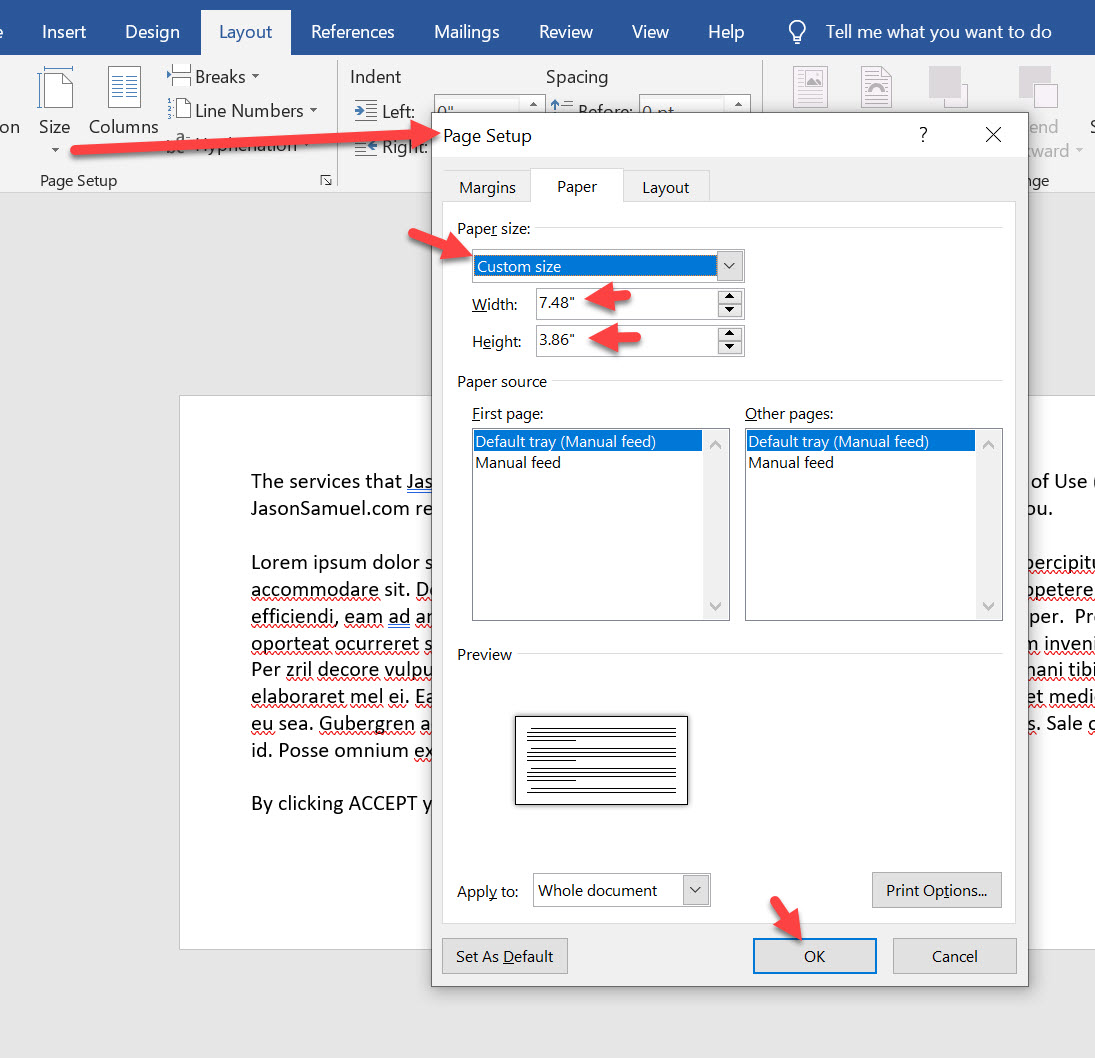
23. We need to fix the white space issue with our PDF and make it more user-friendly first. Open it up in Word and go to Layout > Margins > and set it to Narrow:
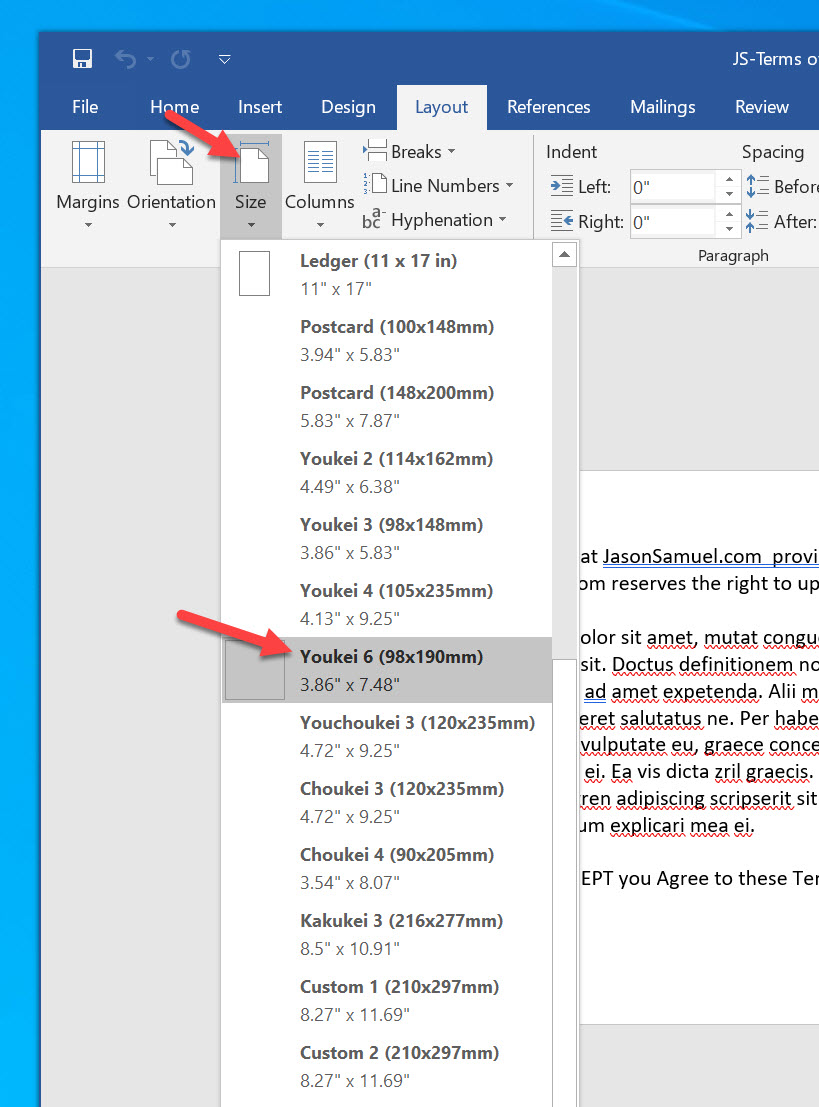
24. Now set the Size of the paper. Get it as small as you can with enough space to fit your Terms of Use verbiage to a single page. I suggest starting with Youkei 6 (3.86″ x 7.48″) and then shrinking it down even further from there if needed. Depending on the printer your Microsoft Word is defaulted to, you will see different sizes available here as well as pre-sets like Youkei 6. If you don’t see any pre-sets that work for you, just go all the way to the bottom, More Paper Sizes, select Custom size, and put in a value like 3.86″ x 7.48″ and go from there (your perfect size is dependent on your text length and font) :
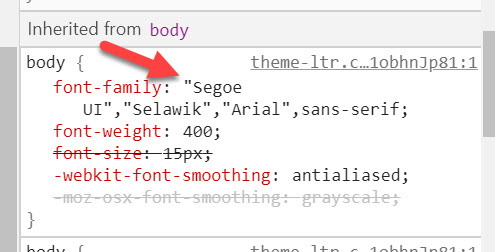
25. If you would like to match the font of Azure AD and the PDF, you’ll notice the website uses “Segoe UI”,”Selawik”,”Arial”,sans-serif”. You can change from the default Calibri font in Word to this if you wish. I found Segoe UI to be just a little larger than Calibri at 11 point font so I just left it as Calibri in my example. Once you’re done, save your Word doc and then save it in PDF format for AAD.
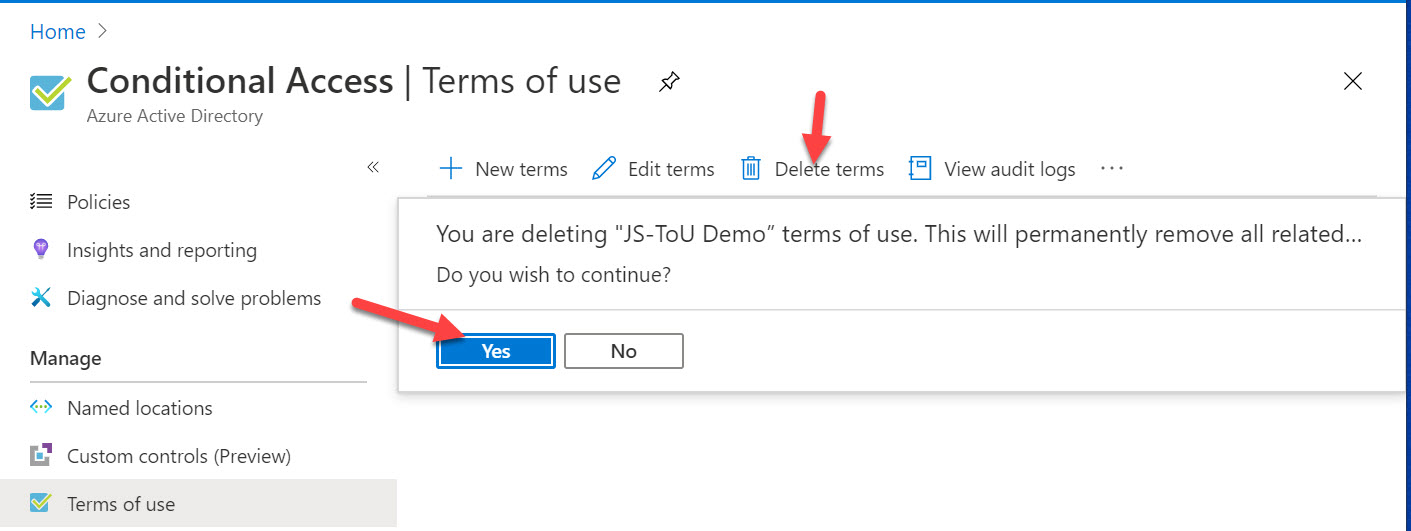
26. Now re-create your Terms of Use policy and re-create your Conditional Access policy. Please note when you delete your Terms of Use, it will also delete the linked Conditional Access policy. So both will be gone. Ensure you have capture your settings before proceeding here.
Testing your enhanced Terms of Use experience with Citrix Workspace, Microsoft WVD, and Office 365
27. Now re-test your login. This time after authentication, you will see that when you expand the PDF it all fits very well. No more crazy scrolling like before.
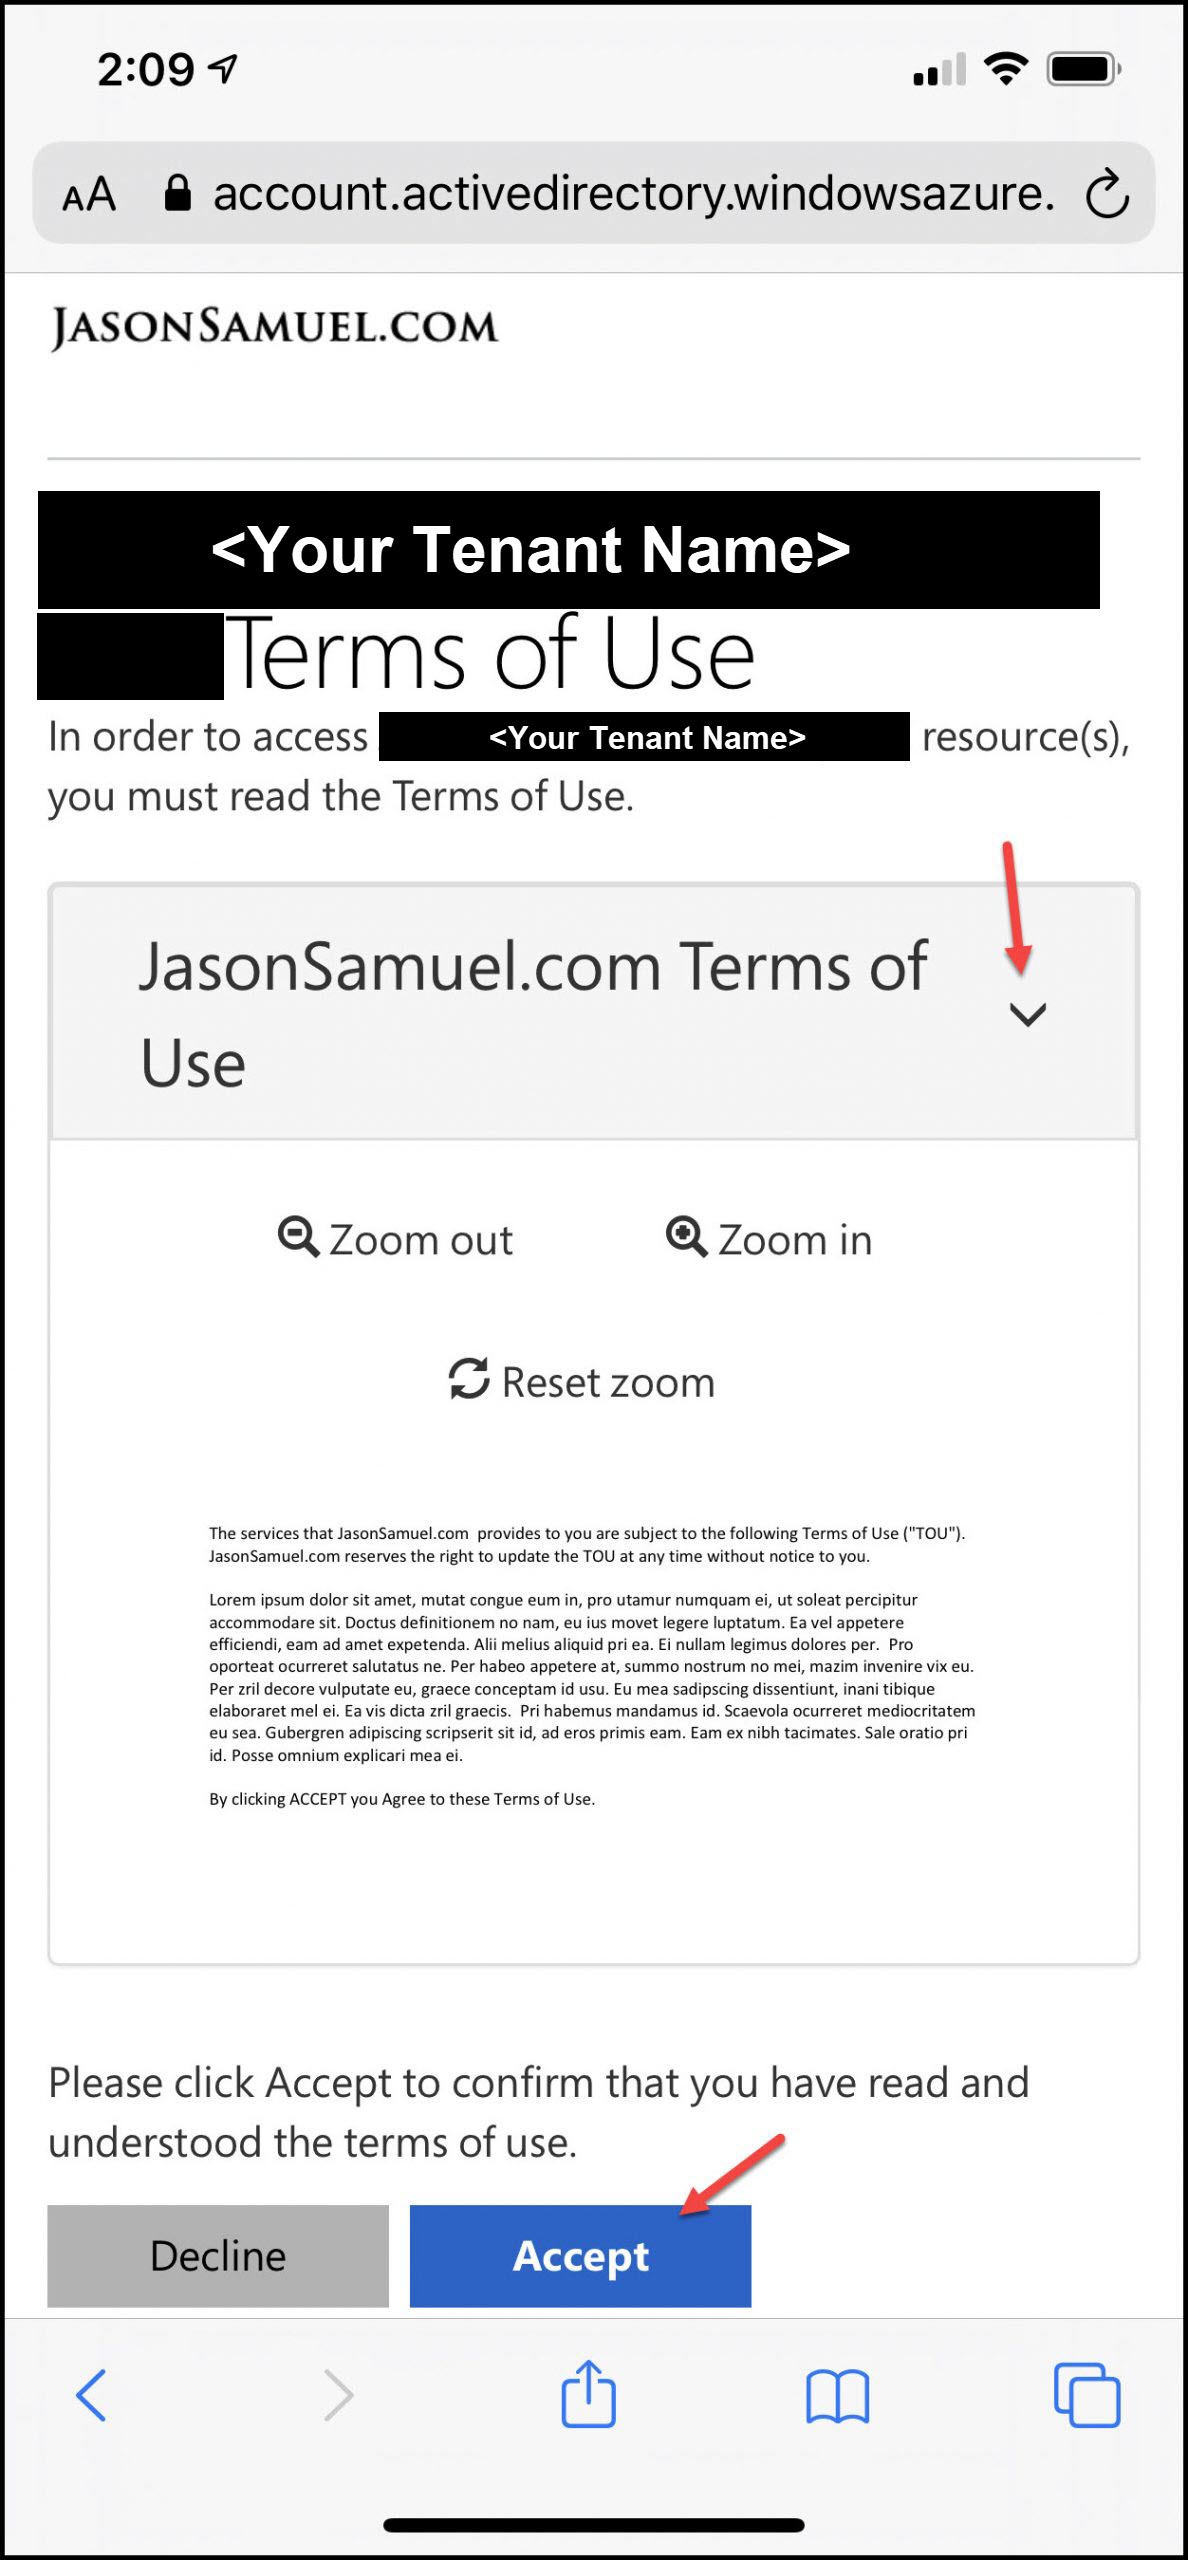
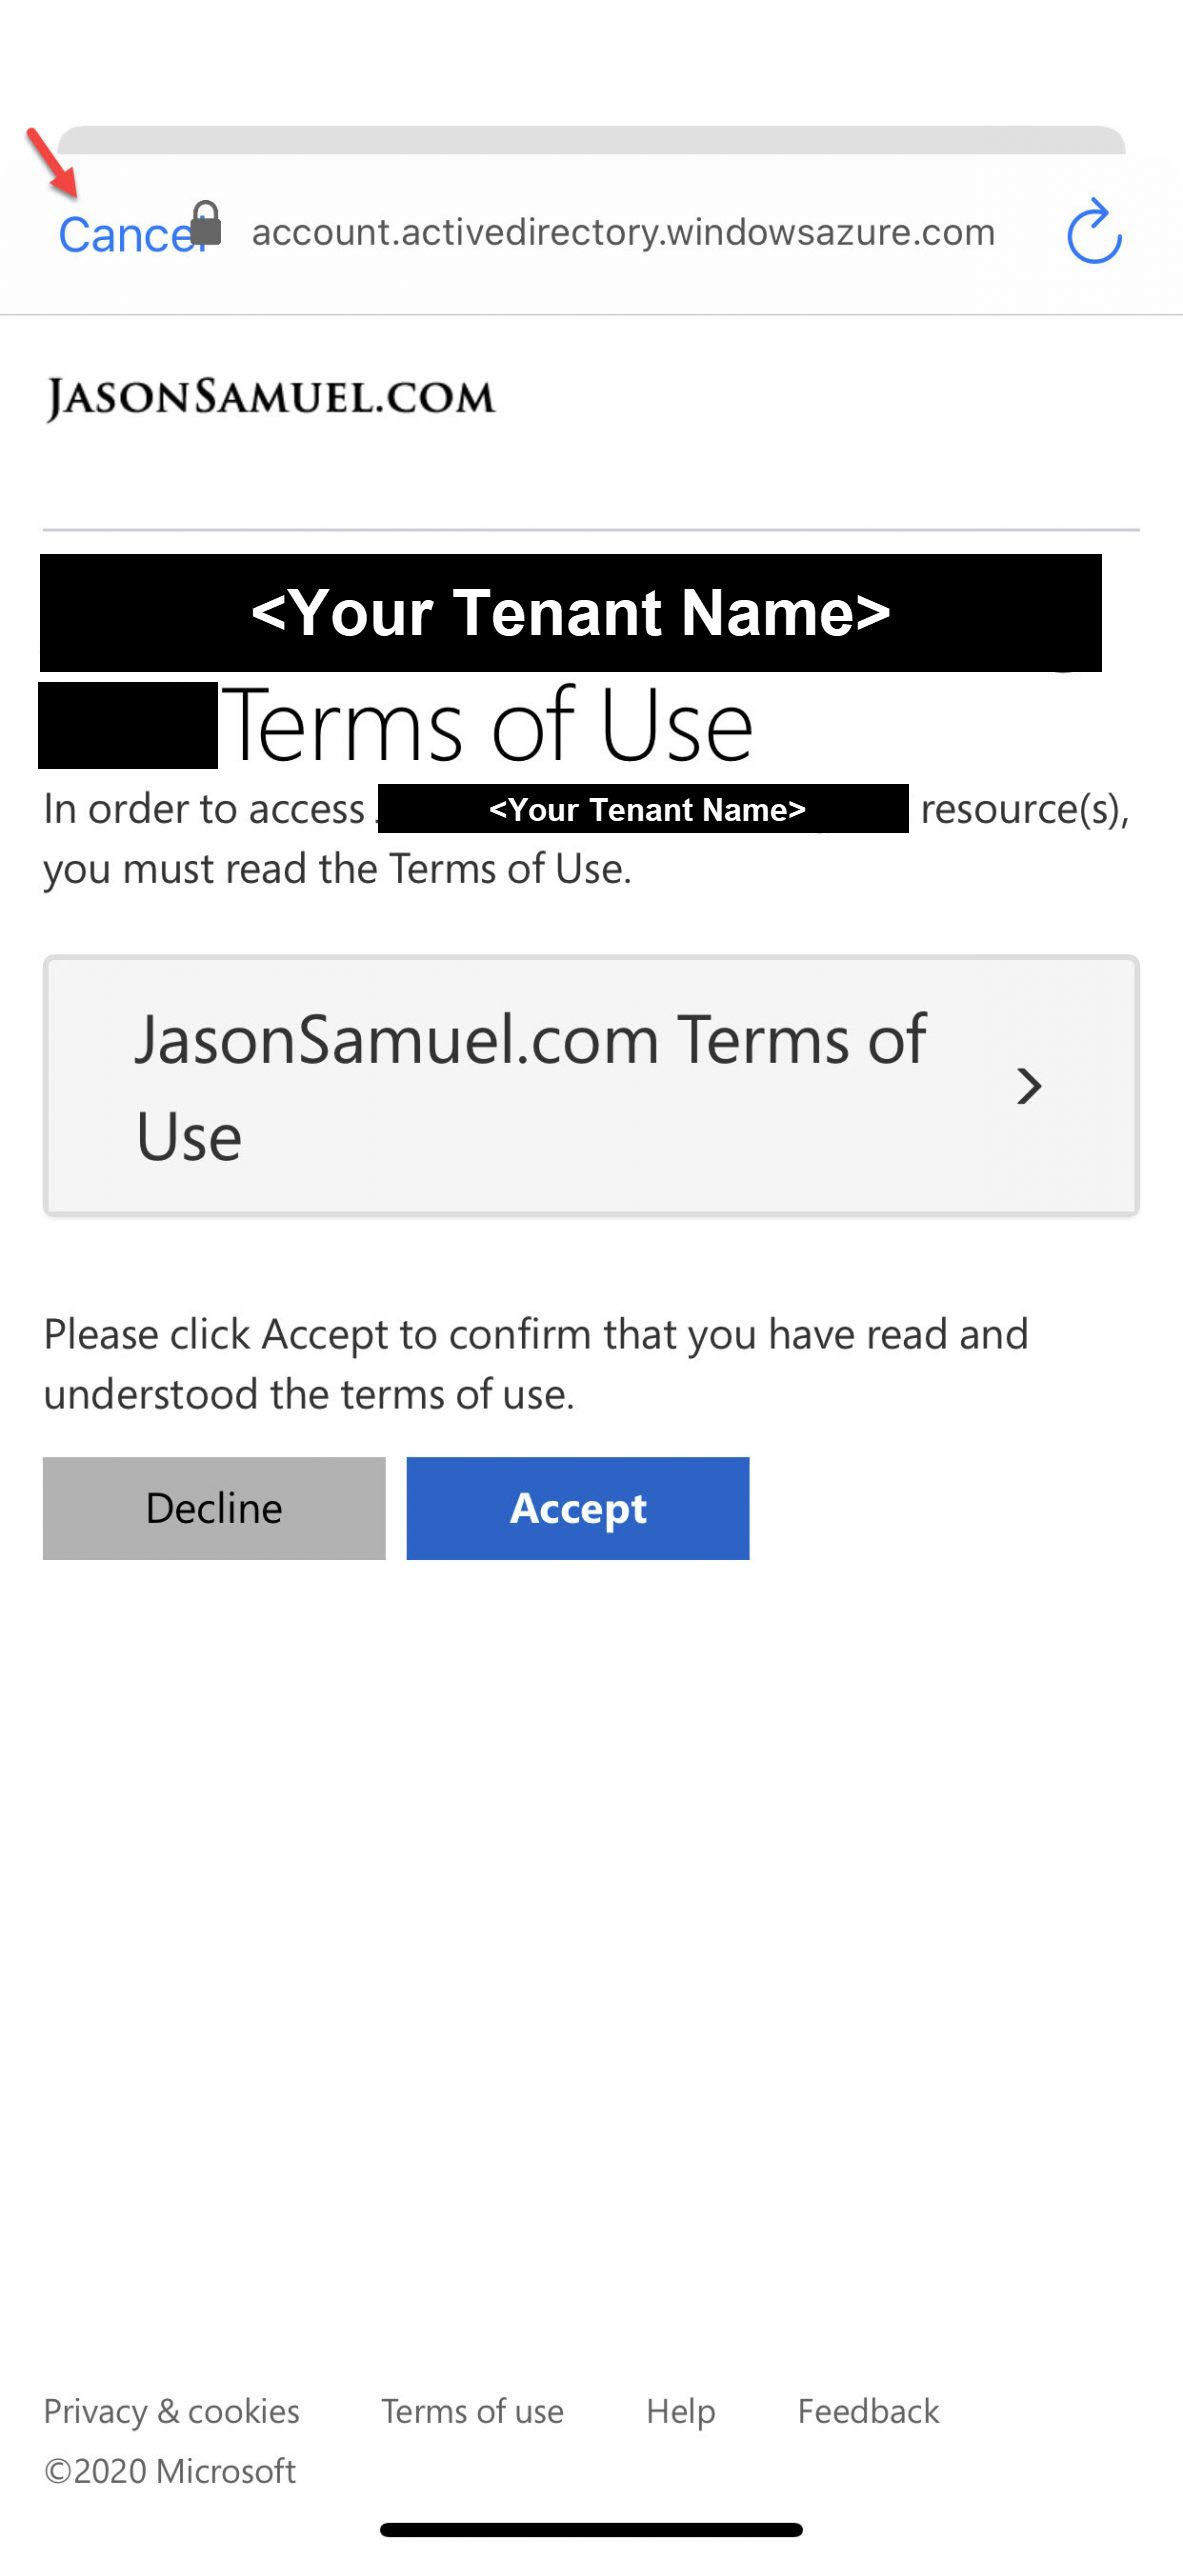
28. You will also notice the mobile user experience is quite nice too and fits just fine on one page on an iPhone iOS Safari browser after expanding the PDF:
29. Now let’s finally hit Accept after all this work 🙂
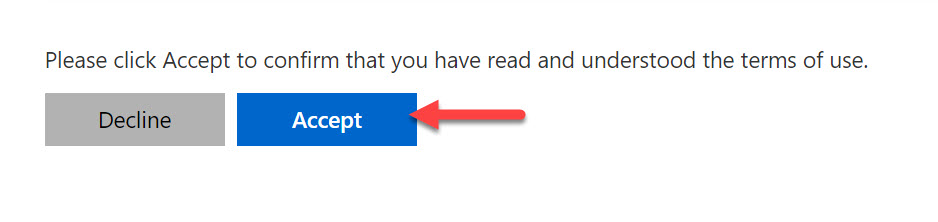
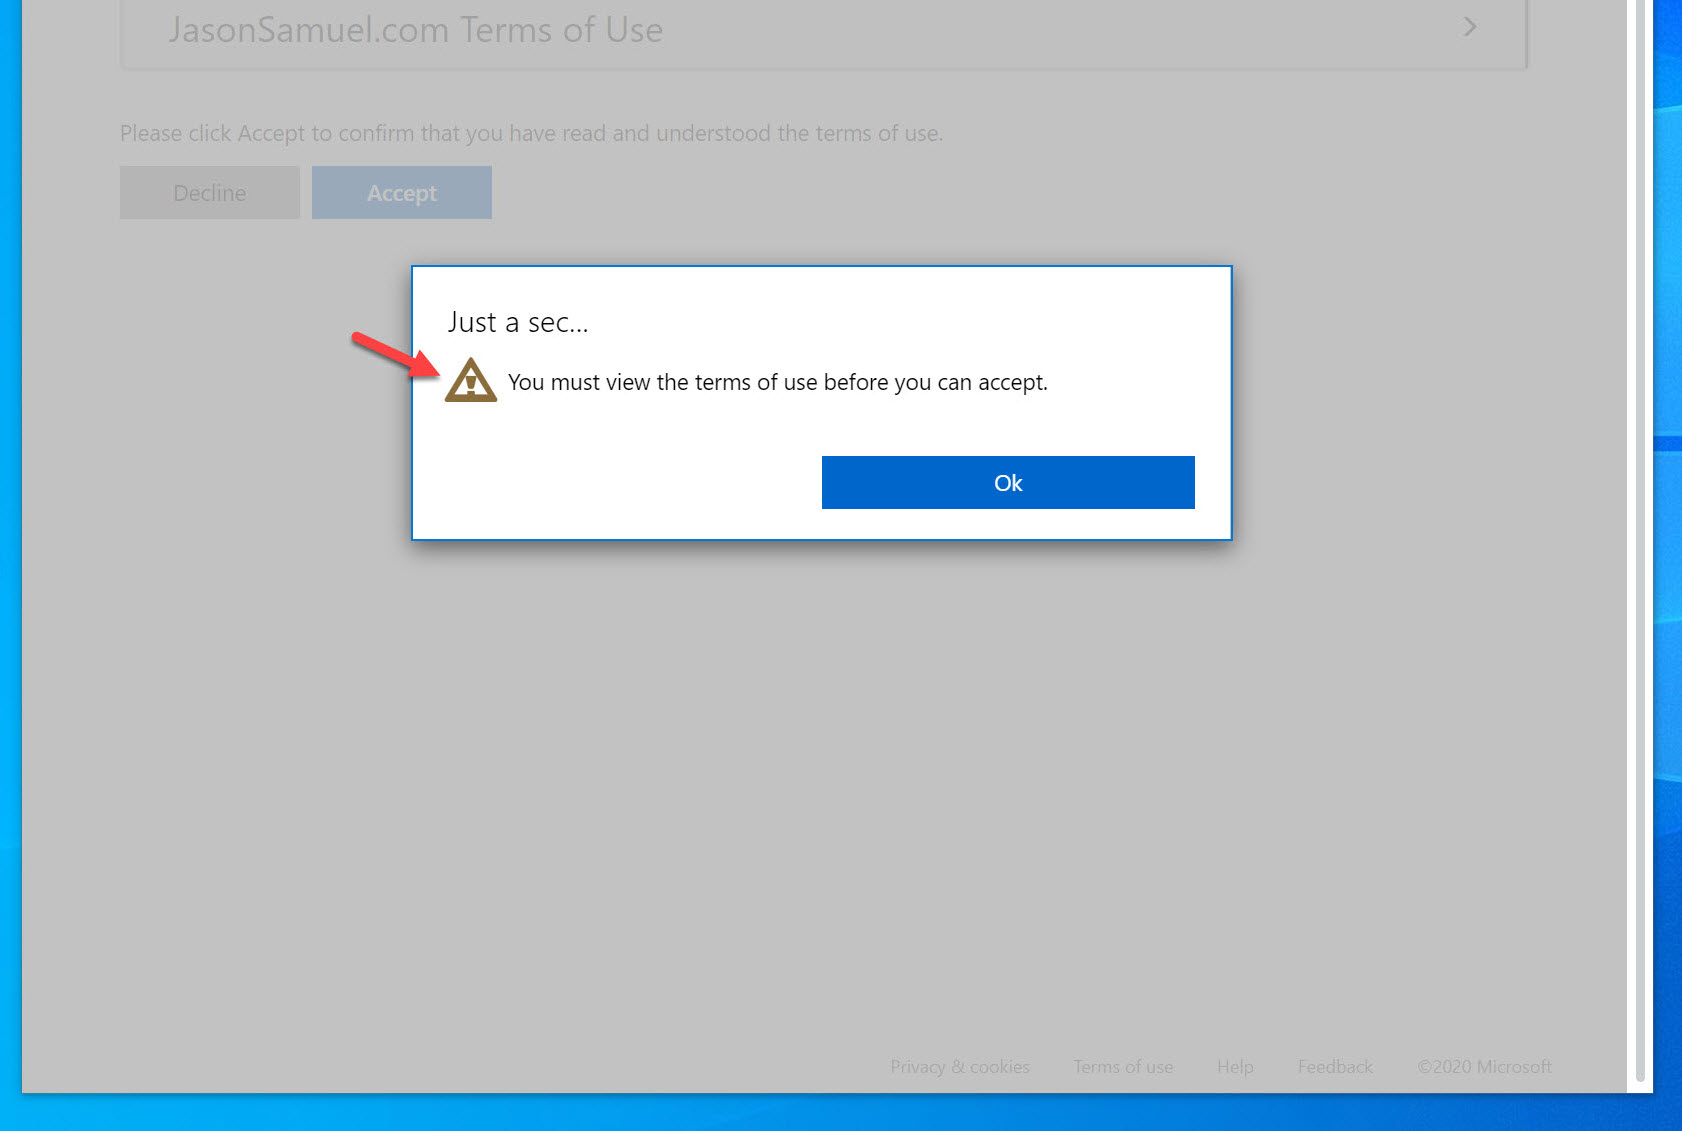
30. If I don’t expand the PDF first, I’m going to get this prompt saying “You must view the terms of use before you can accept” due to my policy setting:
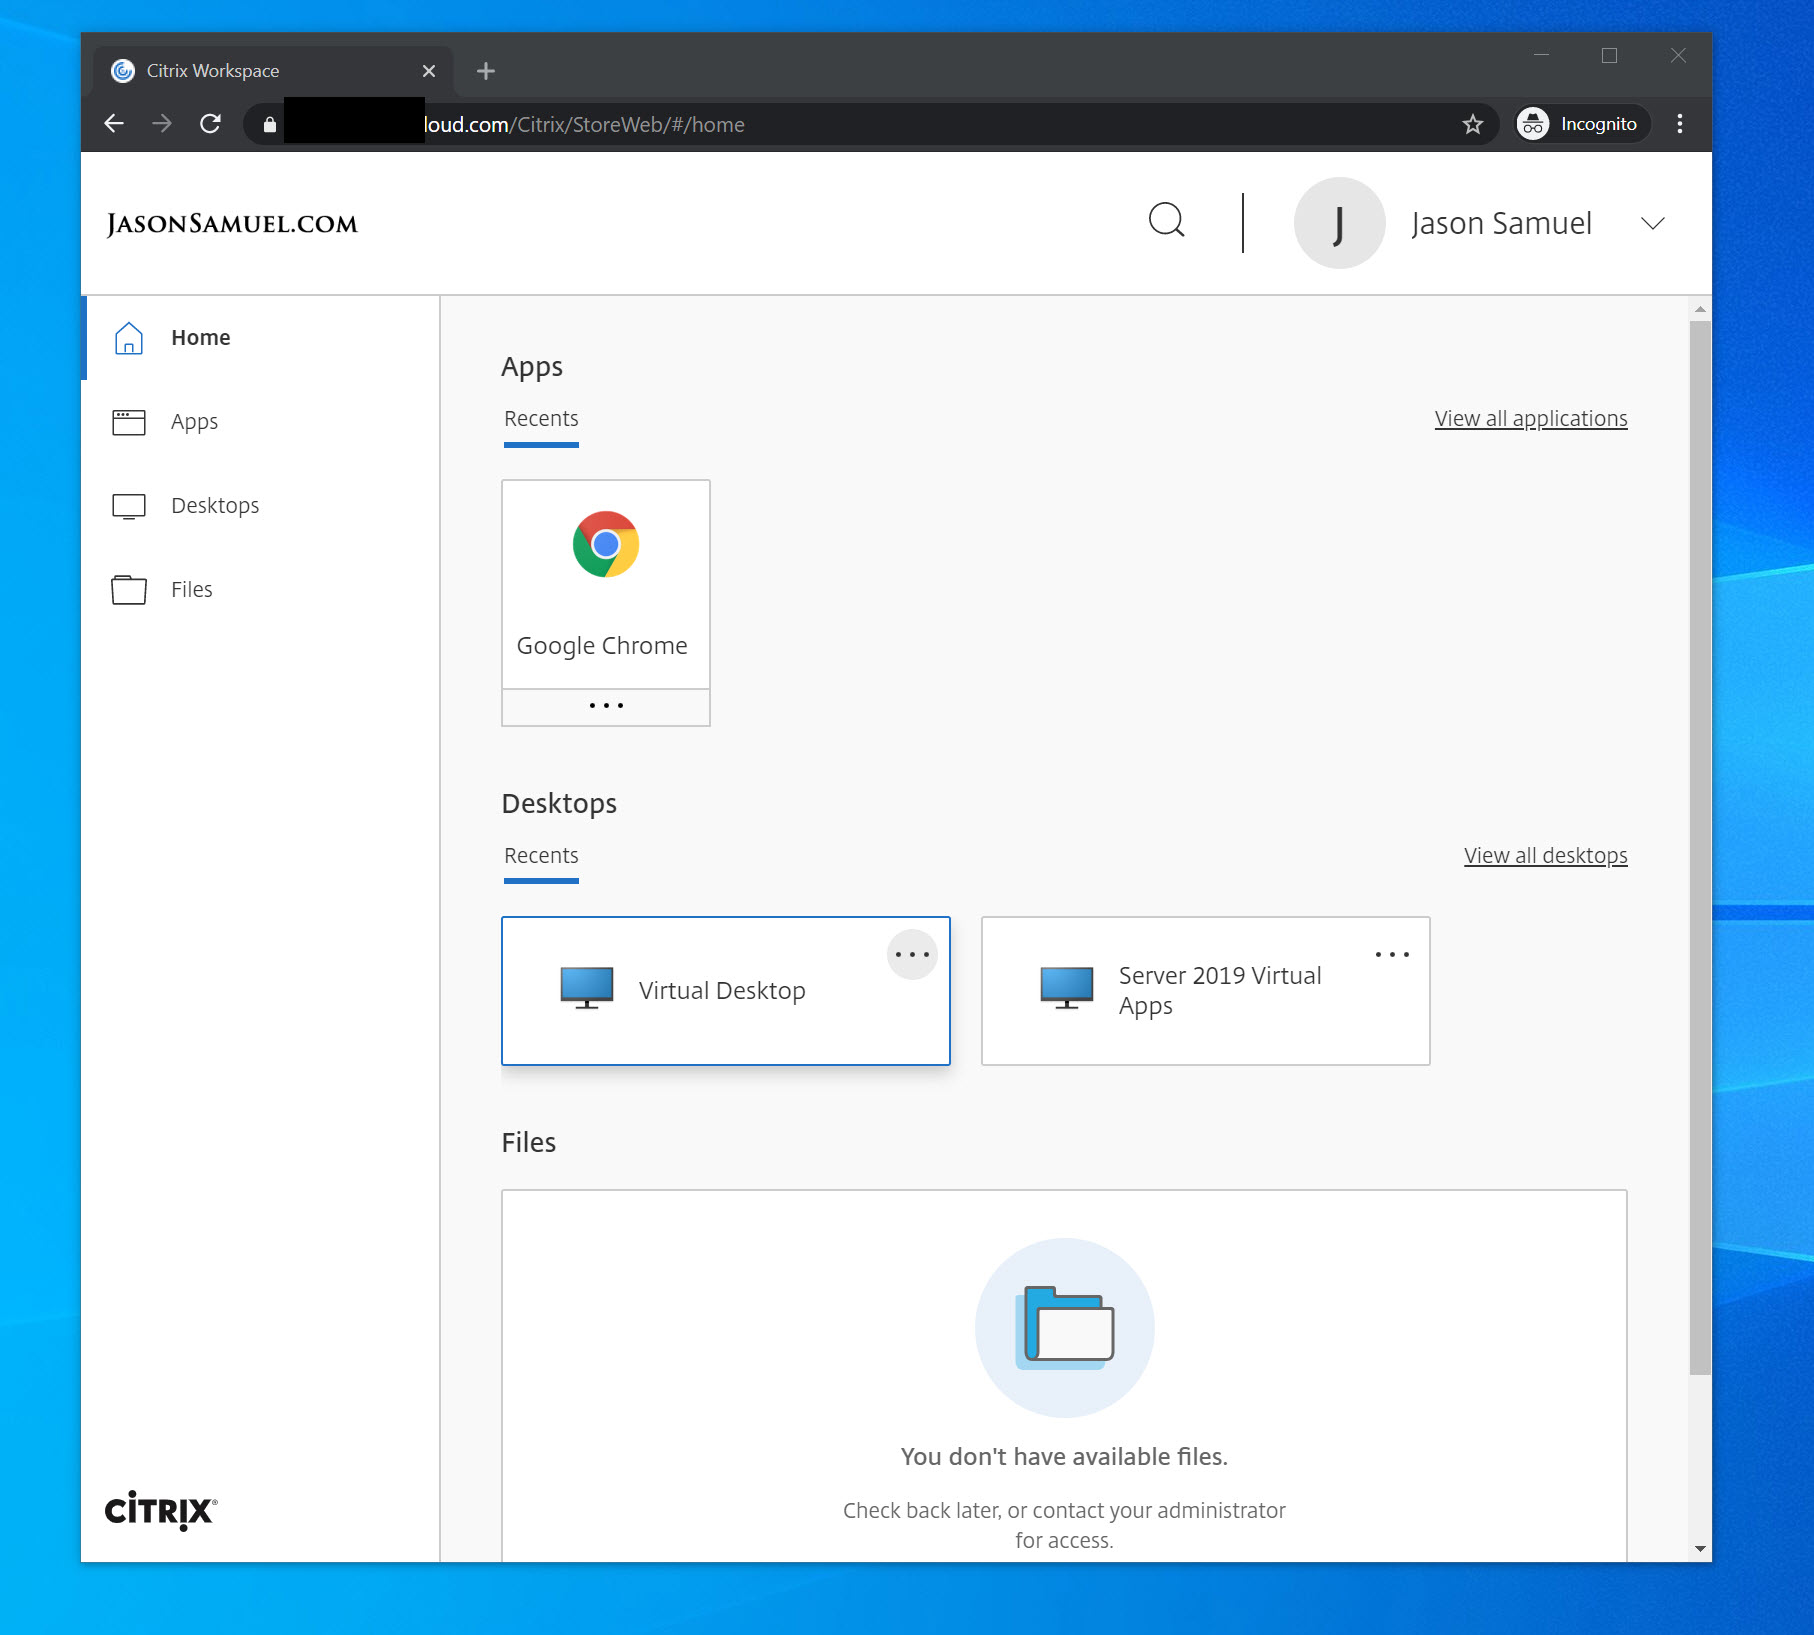
31. Once you have expanded it and then hit Accept, you’ll instantly be brought into the Citrix Workspace now and can launch any virtual app, virtual desktops, etc. you wish:
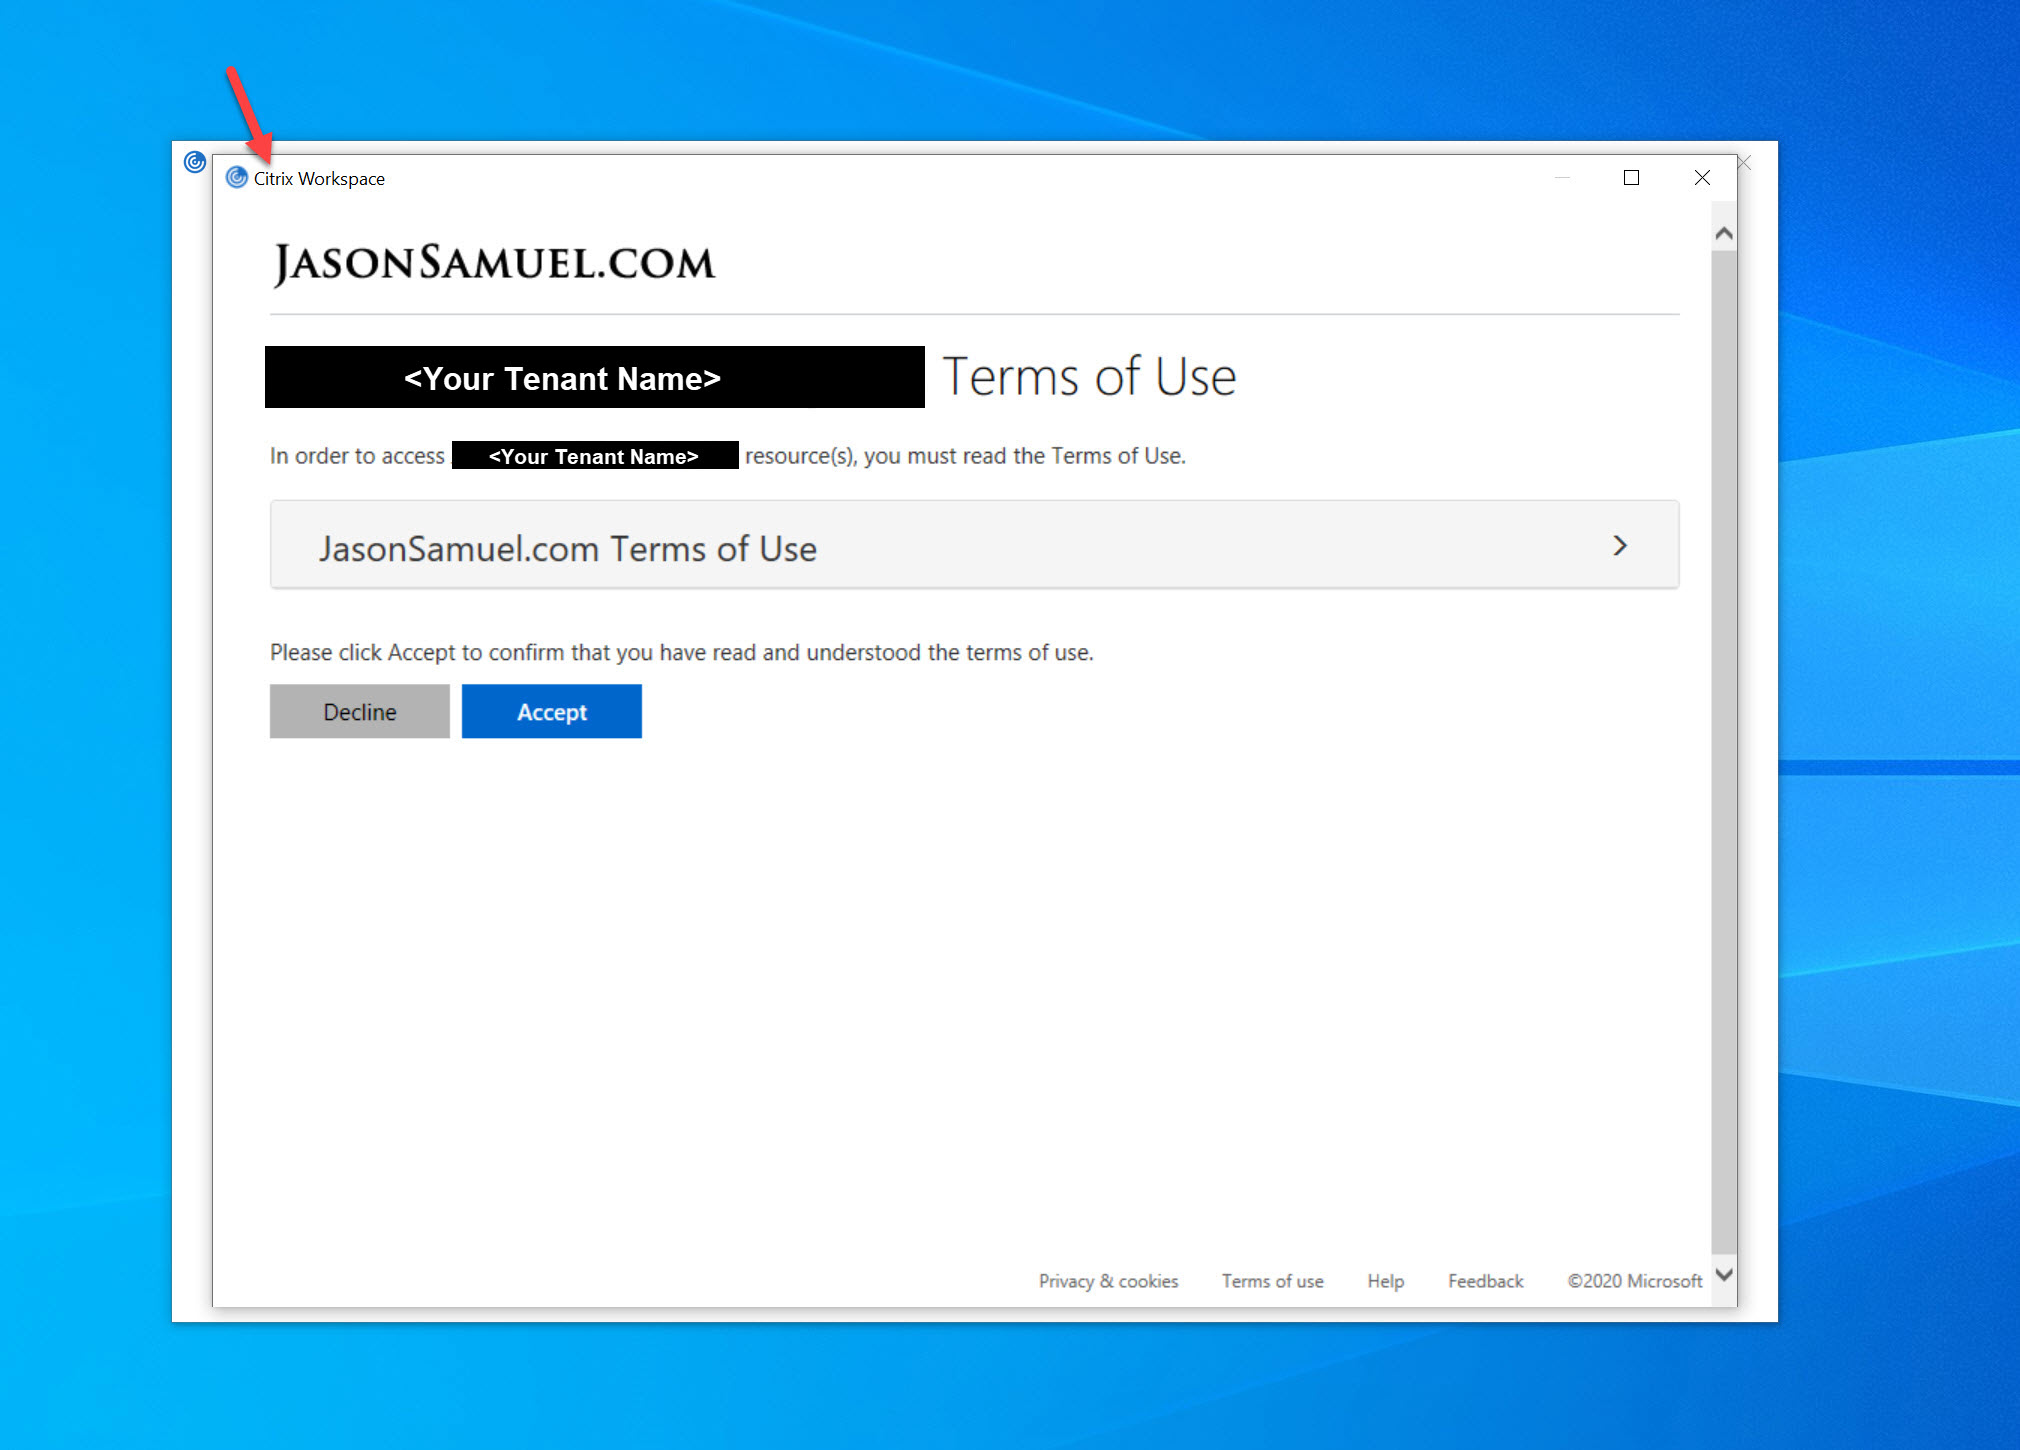
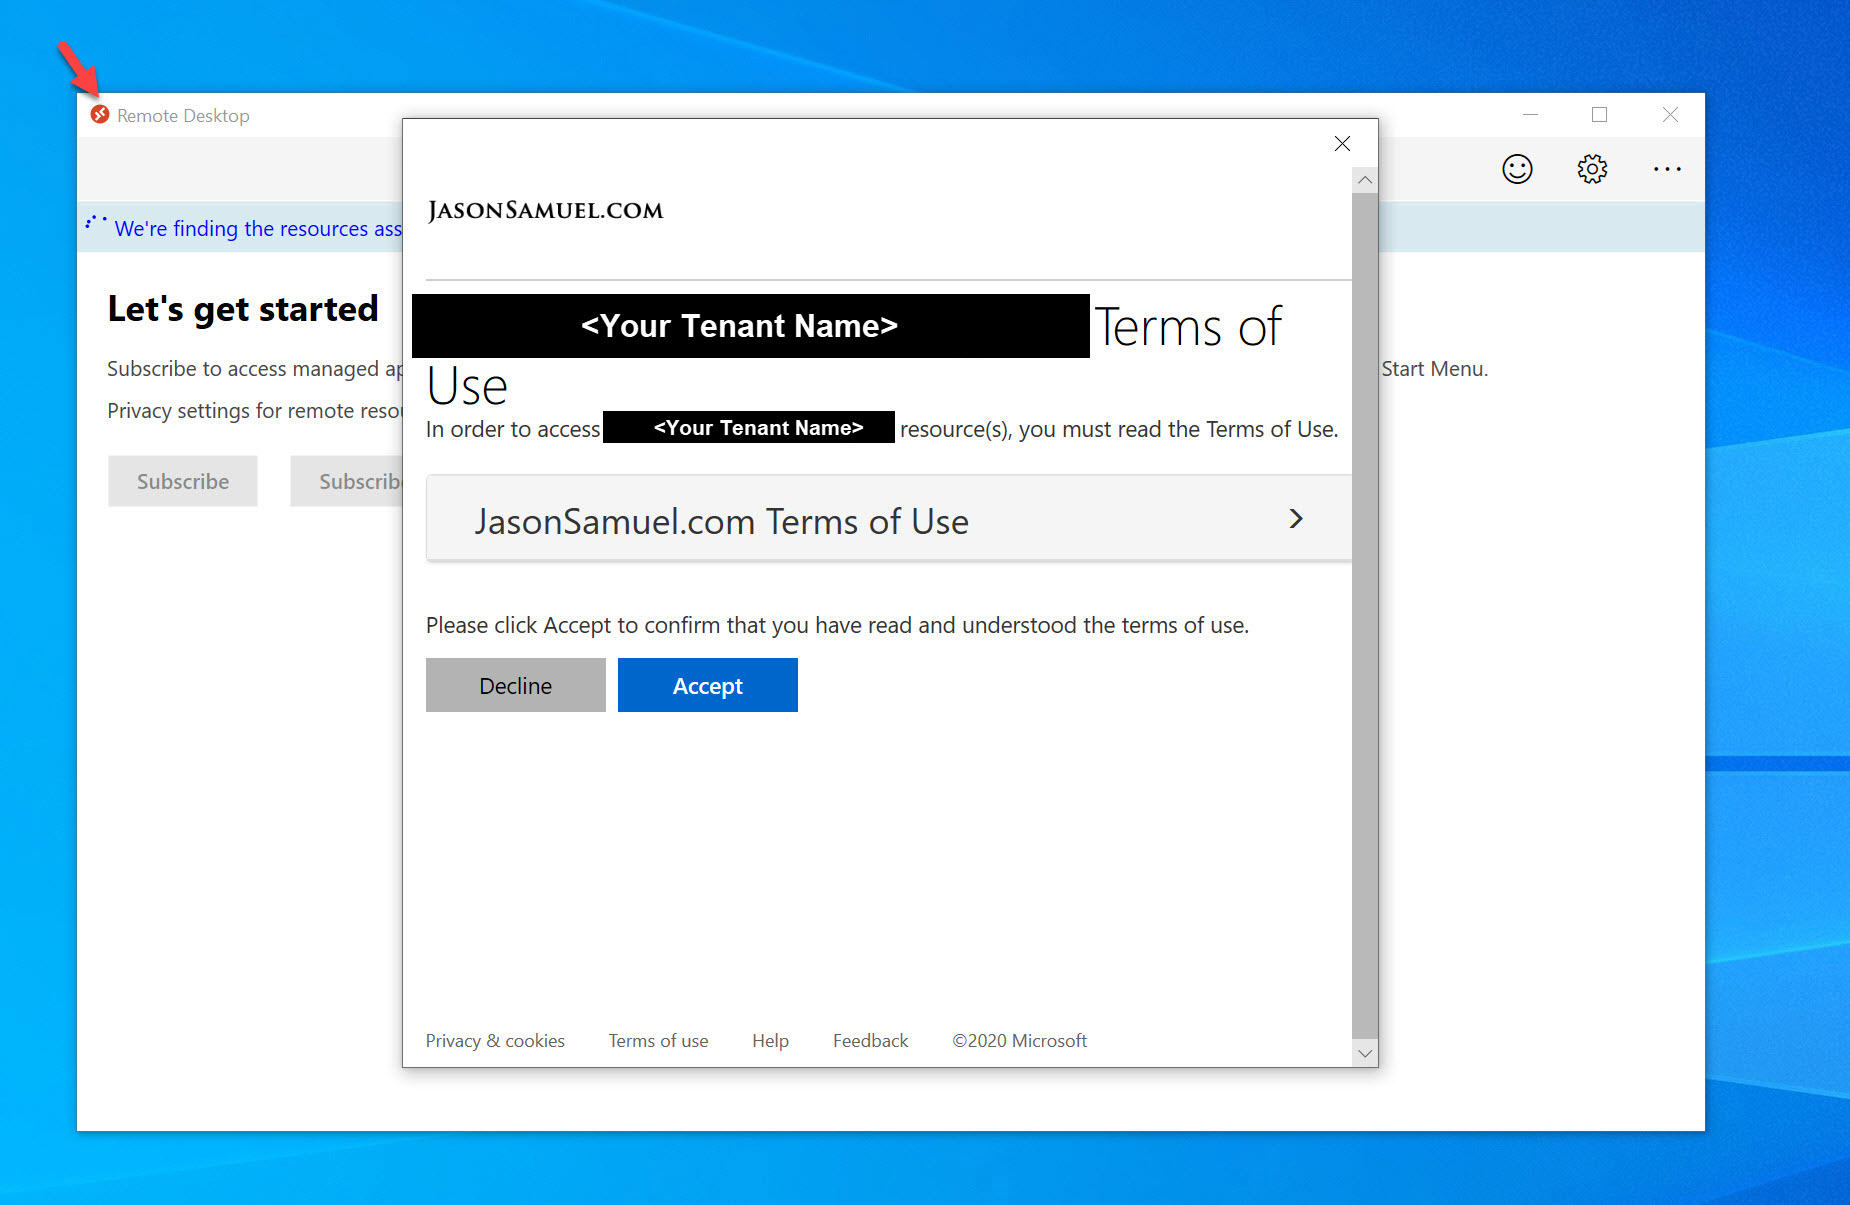
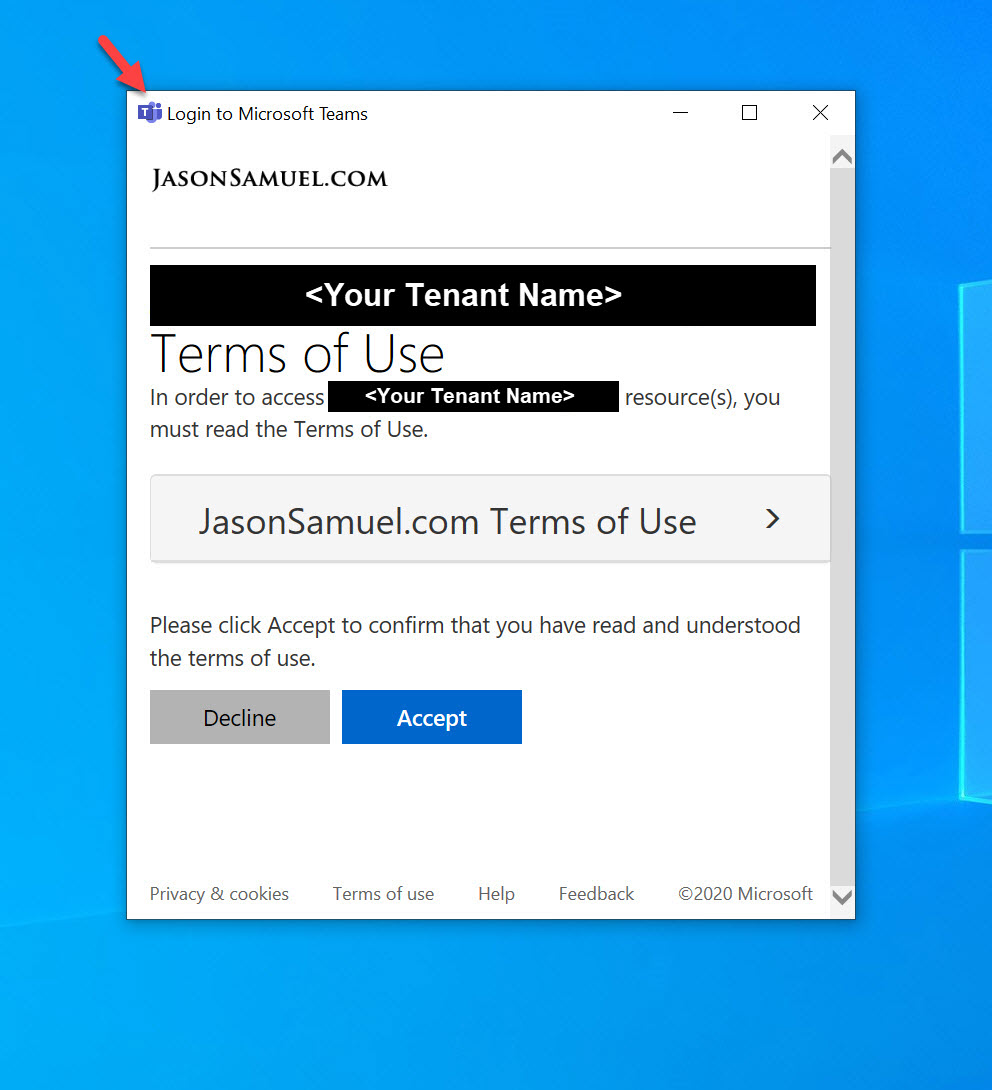
32. Many Windows and mobile applications that support modern authentication open up the Azure AD login page in a web view. Examples are the Citrix Workspace app, Microsoft WVD Client, or Microsoft Teams for example. These will also function just fine with the Terms of Use feature as I demonstrate below –
Citrix Workspace app for Windows:
Citrix Workspace app for iOS:
Microsoft WVD Client for Windows:
Microsoft Teams for Windows:
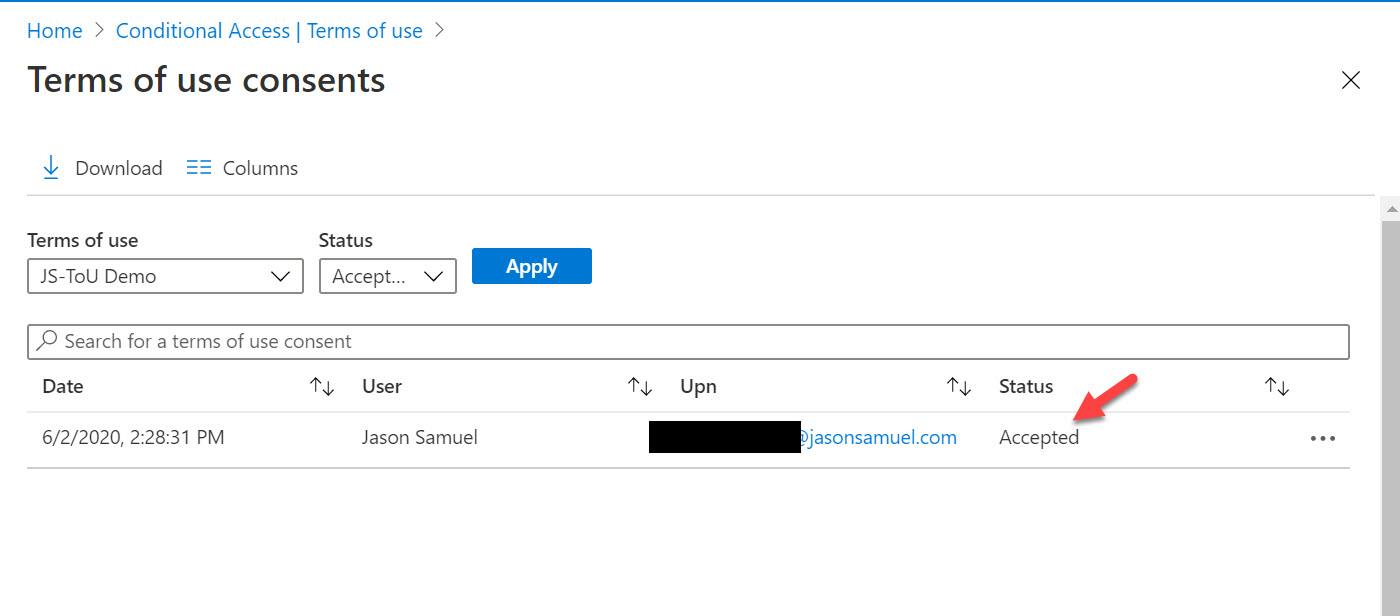
33. Once you hit Accept on any one of the above, in the Azure Portal, you will notice that there is an Accept and you can click on it and see all the users that have accepted. In my extreme expiration example policy, the user will not have to consent again for another 24 hours so all subsequent logins for that user will not have their authorization flow paused asking for consent post-authentication no matter what Windows apps or SaaS apps they use through that 24 hour period:
34. Now if you want to go and switch your Conditional Access policy to “All Cloud apps”, you may do so very easily like this. Please do ensure that all your cloud apps are ones that require end-user interaction. If you identify some that don’t like I mentioned above several steps ago, use the Exclude option to exclude these apps from your Terms of Use. I highly recommend using the Conditional Access Report-only mode feature for a period of time to understand how your apps are being used in your organization prior to enforcing a blanket ToU policy for all your cloud apps.
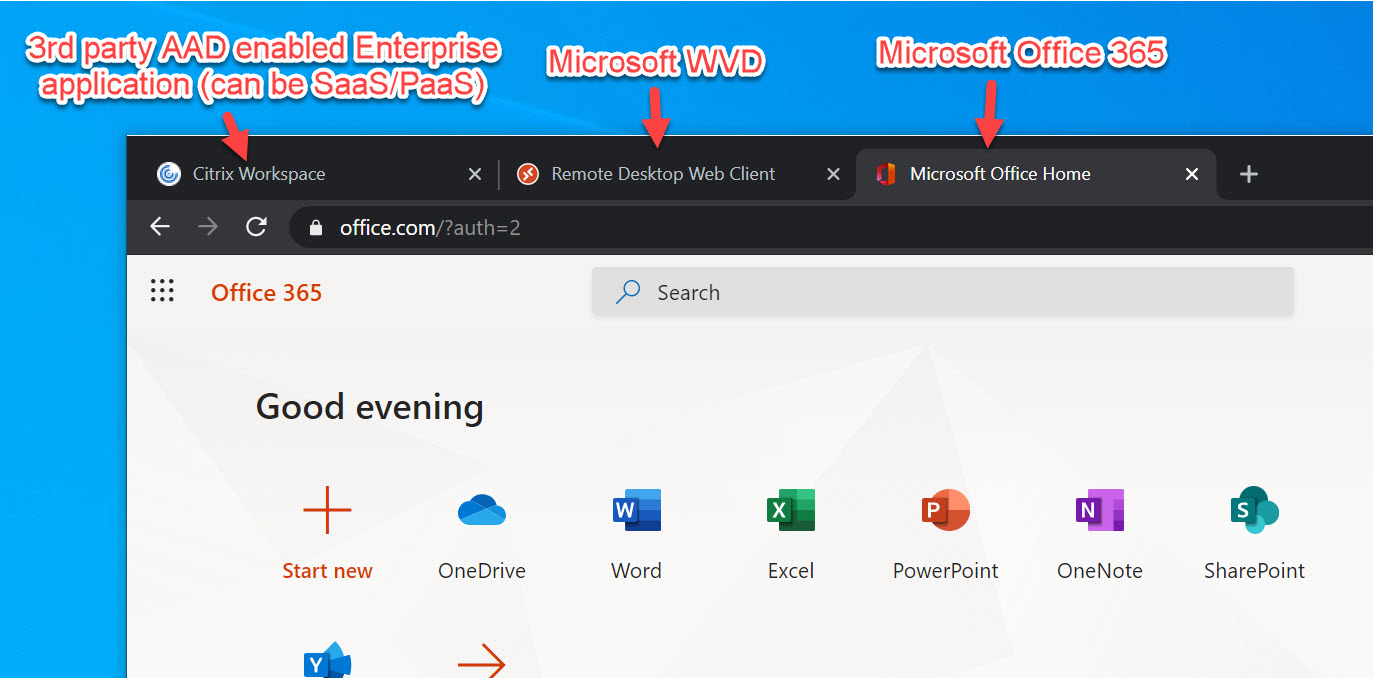
35. If you attempt to access a web app, only the first app will need consent. For example, I consented to Citrix Workspace here first, then accessing other apps uses the same authentication token from AAD as expected and now uses the same authorization policy (conditional access policy) with the same Terms of Use so I won’t be prompted again. As you can see I have opened up my Microsoft WVD web client (https://rdweb.wvd.microsoft.com/arm/webclient/index.html) and Microsoft Office 365 web portal (https://www.office.com/) and all just came right up as expected. If you do need individual ToU verbiage for each app, just create more policies and be as granular as you wish! The possibilities are endless. 🙂
Hope this helps and please leave a comment below if you have any questions.


Brian
January 17, 2023 at 12:39 PM
Does this approach work with Azure Virtual Desktop and connecting through the Windows Desktop Application Remote Desktop? I dont think it is supported.