Archive

Posts Tagged ‘ssl chain’

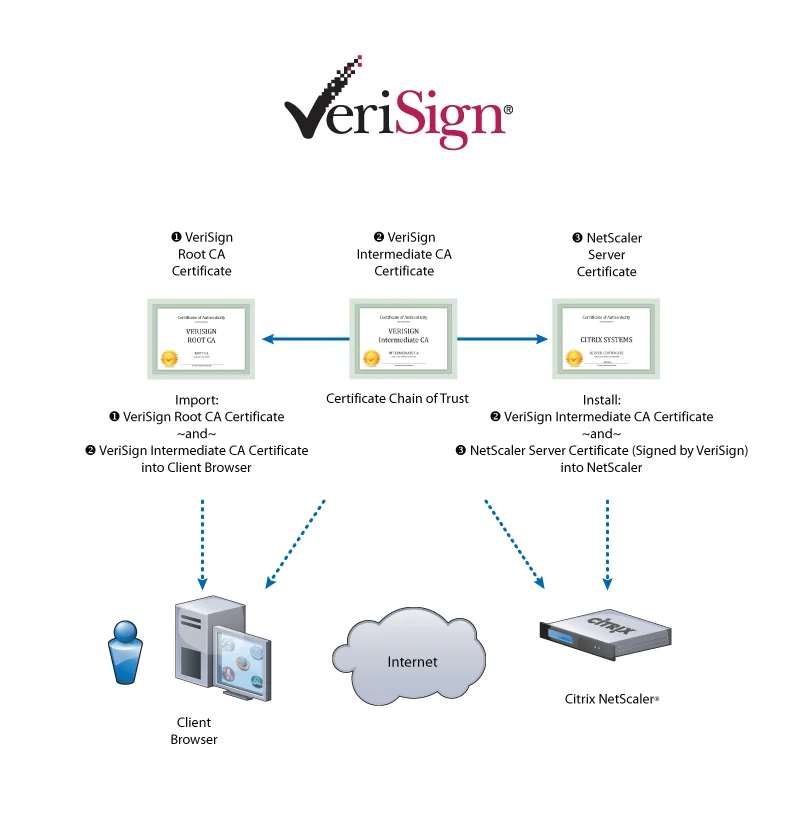
How to create and link an SSL certificate chain for a Citrix Netscaler

August 5th, 2010 2 comments

I’ve covered how to convert an SSL cert to a .pem with a private key for a Netscaler before here but sometimes you might be required to install a full SSL cert chain (read my article here on how SSL certificate chains work). I actually install the full SSL chain (root and intermediate certs) on any Netscaler I deploy as a best practice.

I’m going to use Network Solutions again in this example but this will work for Verisign, GeoTrust, Thawte, Comodo, or any other CA (certificate authority).

Here is how you do it on the Netscaler:

1. I’m going to assume you have already generated a CSR (either through the appliance or IIS, whatever your preference), had your cert validated, and have downloaded your site cert and intermediate/root certs from Network Solutions since I have covered this before in the articles I mentioned above.

2. Now just login to your Netscaler, install your website cert that was issued to you first under SSL > Certificates on the Netscaler.

3. At this point, if your website is publicly available, let’s examine the cert chain. Go to http://www.sslshopper.com/ssl-checker.html and type in your website (if it’s not publicly available, use OpenSSL which I have written about here). Since you have not installed intermediate certs on your Netscaler yet, it should report your SSL cert is good but your SSL cert chain is broken like below:

4. Now go back to your Netscaler and install the two intermediate certs and one root cert that Network Solutions has give you. You really only need the intermediate cert but I like to install them all just in case. They are in .crt format when you get them from Network Solutions and that is fine, no need to convert. Just go to SSL > Certificates on the Netscaler and click Add in the bottom toolbar. Give it a name and use Browse (Local) to find your certs and install all 3 one by one. Here is what it should look like when you are done:

5. Now here comes the most important part. You need to link the intermediate cert (NetworkSolutions_CA) to your site’s SSL cert. Right click on your site’s SSL cert and hit “Link”. Now choose the NetworkSolutions_CA cert in the drop down box and press OK. It will confirm the cert is now linked. The Netscaler actually supports up to a 10 cert chain so you can have your website cert + 9 more intermediate certs linked to it if you want. So feel free to link more if you need to at this point. You can also click on the “Cert Links” button in the bottom toolbar and it will show you all your links. For example, here is a Netscaler with 3 certs from Network Solutions that have been linked to the “NetworkSolutions_CA” cert:

6. Now go back to http://www.sslshopper.com/ssl-checker.html and try your domain again. This time it will say your SSL chain is good:

Here’s an example where I linked each intermediate cert chain all the way down to the root certificate. I would recommend you link all your certs down to the root as a best practice:

Also, Citrix put together this really good guide on SSL cert chains I am hosting here for you. It’s a great read with plenty of screenshots so take a look:

Citrix_Verisign_NetScaler_SSL_Cert_Deployment_Guide

How to install an SSL cert chain on a Cisco Wireless Lan Controller (WLC)

June 2nd, 2010 2 comments

Cisco WLC (Wireless LAN Controllers) require the entire SSL cert chain to be installed on the appliance. I like to do this via IIS since it is very quick and efficient and all my intermediate and root certs are already on there typically (double check your servers please).

1. Create a temporary site in IIS and generate a CSR. Make sure the domain matches whatever appliance you are trying to generate it for exmp: wireless.yourcompany.com.

If you are exporting a wildcard cert that might already be on your IIS server, just export it as a PFX and skip to step 5.

2. Send the CSR to your registrar and wait for them to validate.

3. Get the .crt and convert it to .cer (just open the .crt and save it as .cer). Do the same for the intermediate and root certs you received.

4. Install the .cert in IIS as well as all intermediate and root certs they send you.

5. “View” the cert in IIS (Site properties > Directory Security > View Certificate > Details Tab > Copy to File) and export it with the private key in pkcs12 (.pfx) format. Also make sure to check “Include all certificates in the certification path is possible”. Just set the password as “password” so it’s easy to remember.

6. Now you have a .pfx with your whole SSL cert chain but you need to convert it to .pem for the WLC.

7. Use this command with OpenSSL:

openssl pkcs12 -in yourcert.pfx -out yourcert.pem

8. Type the “password” when prompted

9. TFTP the new .pem containing the whole SSL cert chain and private key over to the WLC and reboot. You will have to specify the “password” when you type in your TFTP info and Save and Reboot the WLC after the download is successful. Test it out and it should work.

A quick way to troubleshoot SSL chain issues using OpenSSL

January 14th, 2010 No comments

You can use OpenSSL and run this command:

openssl.exe s_client -connect www.mysite.com:443

which will use a generic SSL/TLS client to connect to your site and give you a ton of diagnostic info.  You can see your entire SSL cert chain, the SSL handshake, SSL session info, etc.  Here’s a full list of switches you can use with it:  http://www.openssl.org/docs/apps/s_client.html

And here’s a great online tool to graphically verify your SSL chain is intact:  http://www.sslshopper.com/ssl-checker.html