I’ve covered Access Gateway quite a bit in the past and these two articles on my blog are a good primer for what I’m about to cover:
2. Quick way to brand Access Gateway and Web Interface 5.4 with company logo and colors
Now let’s throw a new scenario into the mix. You want to allow users from another domain access to resources through your Access Gateway and Web Interface. Here is what you need to do to accomplish this.
SETTING UP A DROPDOWN BOX TO PASS THE DOMAIN
On your Access Gateway, if you followed my “branding guide” article above you will have noticed on the themes available from the Citrix blogs there are 2 versions, one normal and one with a dropdown. If you chose Horizon to customize like I did, make sure to download Horizon2.gz which has the code for the dropdown already in it. You just need to add your domains in the code. This is found in these two files:
\Horizon2\ns_gui\vpn\index.html
\Horizon2\ns_gui\vpn\tmindex.html
If you have your own theme and just want to add the code, Citrix has an excellent CTX article here covering it:
How to Add a Drop-down Menu with Domain Names on the Logon Page for Access Gateway Enterprise Edition:
http://support.citrix.com/article/CTX118657
What’s happening here is that a dropdown box is created with pre-populated domain names that you specify in your code. The user selects the proper domain when logging in and then this domain name is inserted into the header and passed to the Netscaler Access Gateway vserver where the authentication policy examines it. Based on the name the Netscaler sees in the header, it forwards the request on to the correct authentication server. This works great with LDAP authentication servers. I have not tested it with TACACS or RADIUS yet.
SETTING UP ACTIVE DIRECTORY LDAP AUTHENTICATION
Now it’s time to setup your Active Directory authentication for each of your domains.
1. Download LDAP Browser 4.5 for free here: http://www.ldapbrowser.com/download.htm
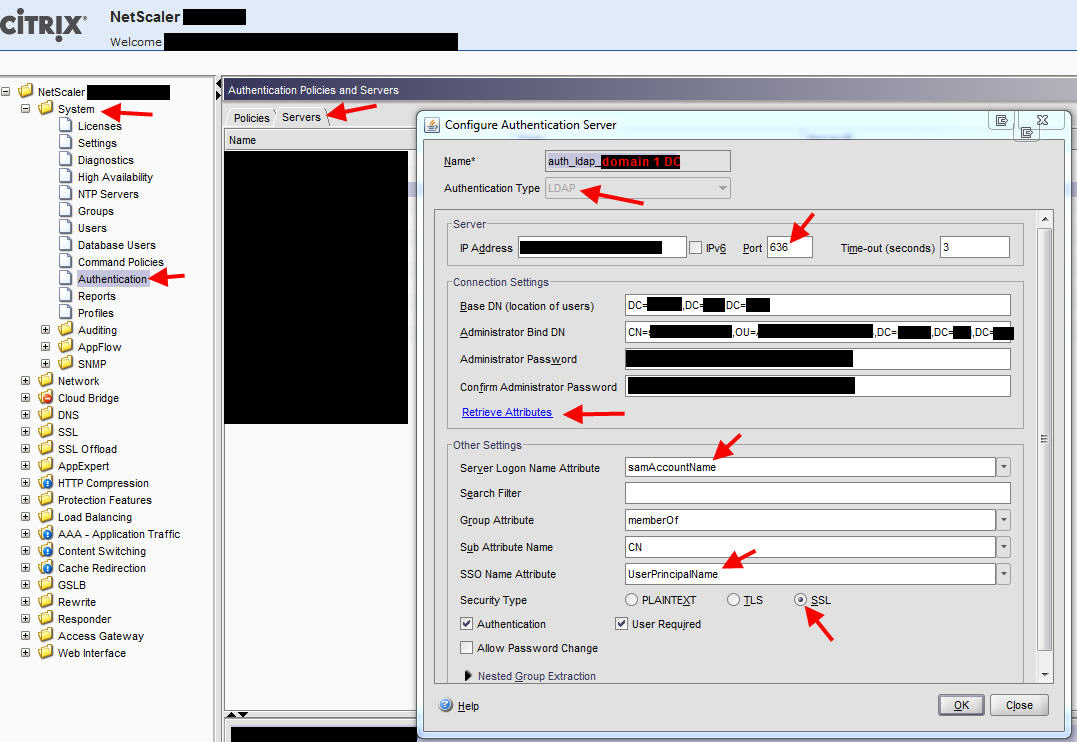
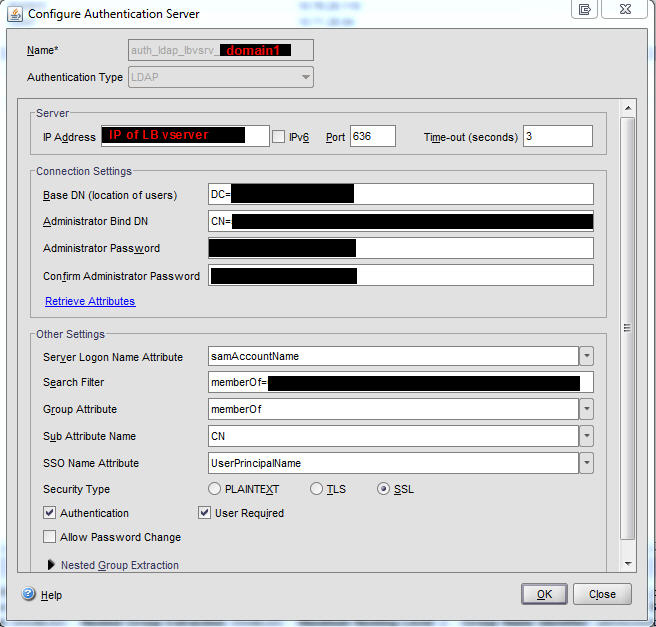
2. Go to your Netscaler under System > Authentication > Servers tab and create a new LDAP server. Use port 636 for secure LDAP instead of 389. Use LDAP Browser to get the Base DN and Administrator Bind DN. I prefer to use the app so I don’t fat finger the distinguished name and spend an hour trying to figure out that I missed a comma. Using LDAP Browser is much quicker and less error prone. The Base DN can be your entire AD domain or you can lock it down to an OU. The Administrator Bind DN is the actual account name that is used to enumerate AD. So CN = the user name, OU= the OU it’s in, etc. Add the password for this service account.
Make sure to select “SSL” for security type near the bottom. Click the blue “Retrieve attributes” link and it should talk to AD. Then the drop down boxes in Other Settings will not be greyed out anymore. Set the following:
Server Logon Name Attribute = samAccountName
Group Attribute = memberOf
Sub Attribute Name = CN
SSO Name Attribute = UserPrincipalName
So everything should look like this so far:
3. Now expand the Netsted Group Extraction arrow near the bottom. You need to enable it and set the same Group Name Identifier as you did for Server Logon Name Atrribute. In this case samAccountName. Then press OK to create the server:

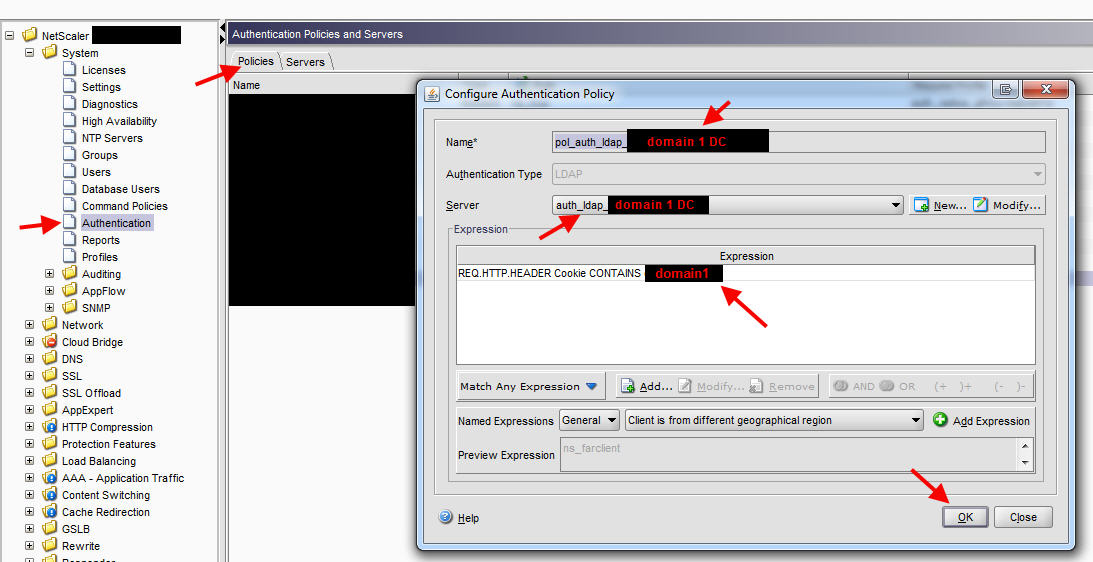
4. Now it’s time to create the policy and bind it to the server. Hit the tab for Policies and create a new policy. Choose the server you just created. For the Expression, you will want:
REQ.HTTP.HEADER Cookie CONTAINS domain1
where domain1 is the name of your first domain.
5. Now do steps 2 through 4 again but for your second domain, domain2.
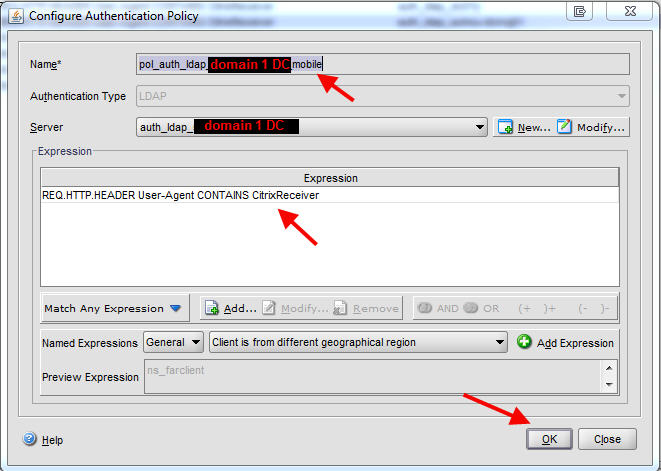
6. Almost done. What we’ve done so far is create two authentication servers and two authentication policies. These two policies are good for web browser users (IE, Firefox, Chrome, Safari, etc.) but mobile devices using the Citrix Receiver native app like iPhones, iPads, Android phones, Android tablets, etc. will not work just yet. This is because they cannot pass cookie values. Nor do they pass the domain during authentication against the Access Gateway (a traffic capture can confirm it only passes user ID and password). You need to create a different set of authentication policies for these. So you will create one for each domain. You will bind to the same authentication server as the other policies but you’ll want to add the word “mobile” or something descriptive to the end of the policy name so you know what it is for. The expression should be:
REQ.HTTP.HEADER User-Agent CONTAINS CitrixReceiver
7. Now do the same for your other domain, domain2.
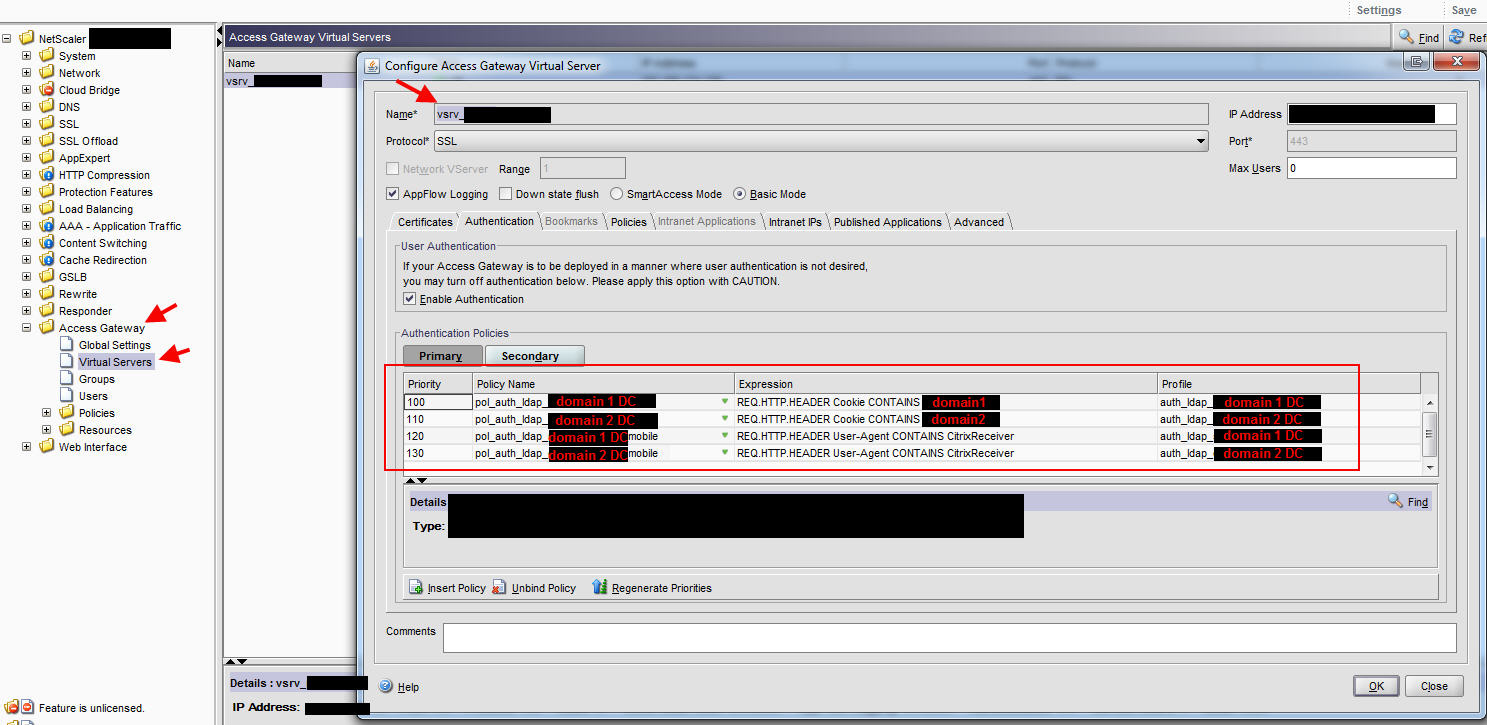
8. Now go to your Access Gateway vserver and add all 4 policies you created. Take a look at my example screenshot closely and the priority order.

Here is the logic behind this policy order:
100 – Domain1 user logs in via web browser and uses drop down/passes cookie for domain1 so authenticates against domain 1 DC.
110 – Domain2 logins via web browser and uses drop down/passes cookie for domain2 so authenticates against domain 2 DC
120 – Domain1 user logins via iPad so first two policies are automatically false since the native Citrix Receiver app can’t pass a cookie. Authentication policy is looking for CitrixReceiver in the header so it will try to authenticate against domain 1 DC. It will be successful and the user will see his apps.
130 – Domain2 user logins via iPad. The first two are false for the same reason as 120. The expression from policy 120 is true so the user will actually authenticate and fail against domain 1 DC. Then it moves on to the 130 policy and authenticates against the domain 2 DC. It will be successful and the user will see his apps. Note, if a user has the same account name on both domains, it will cause a rejected login attempt on domain 1 which depending on your Active Directory account lockout policy can eventually lead to an account lockout. Just be mindful of this and adjust your policy accordingly if you need to.
MODIFYING YOUR SESSION POLICIES
9. Now on to the session policies. If you followed my guide on How to setup your Citrix Netscaler (Access Gateway) and Web Interface for iPads and mobile devices that use Citrix Receiver you should have 2 policies. One for regular traffic and one for mobile/Citrix Receiver traffic. Should look something like this:
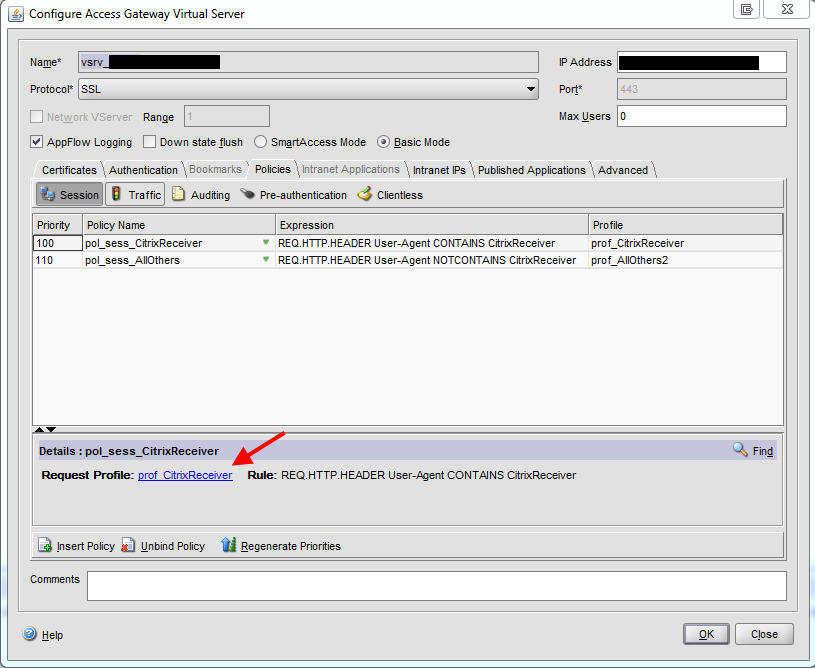
Go ahead and click on the blue profile link for the CitrixReceiver policy first.
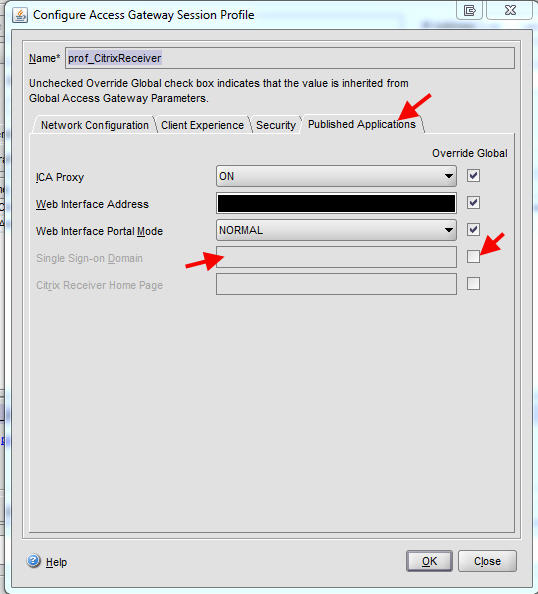
Under the Published Applications tab, clear the Single Sign-on Domain, you don’t need it anymore. SSO is being handled by the authentication server now. Specifically the SSO Name Attribute setting for each server which you set as UserPrincipalName. So it is automatically passing the UPN formatted user credentials to the Web Interface as the same time the user is successfully authenticating against the Access Gateway using the SAM account name. Pretty cool right? Now do the same for your other policy that controls regular web traffic.
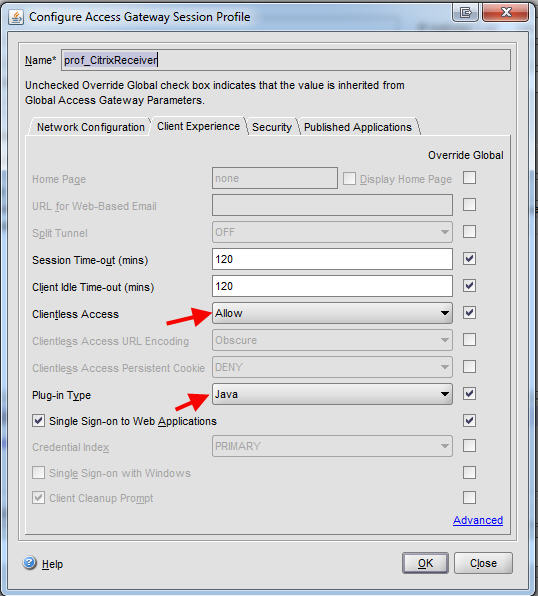
11. An extra step for your mobile traffic policy. Under the Client Experience tab, you can set the Clientless Access to Allow and the Plug-in Type to Java but it’s not necessary. It will still work but since it’s mobile traffic only, this won’t hurt.
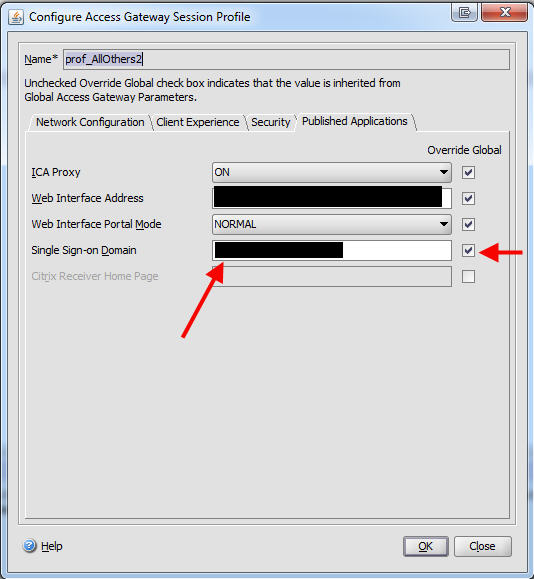
12. Now for your regular traffic, instead of using just 1 session policy as a catch all, you should create one per domain and set the SSO box so it passes the domain value. Otherwise you might land on the “agesso.aspx” page of your Web Interface with a “401 unauthorized: Access is denied due to invalid credentials” error message. Giving each of your domains a policy and forcing the SSO domain makes sure it gets passed every time to the back end web interface.
13. The correlating session policy for each domain that captures regular web traffic should check to see the User-Agent does not contain CitrixReceiver as well as look at the cookie value for the unique domain name. You will need to set the “Match All Expressions” option in your policies so it looks for both:

SETTING UP ACTIVE DIRECTORY AUTHENTICATION GROUPS
14. Now let’s move on to setting up your authentication groups. Let’s say each domain has a security group that gives users access via the Access Gateway. Again, there are 2 well documented methods for group extraction:
How to Configure a NetScaler Appliance for Active Directory Group Extraction for LDAP:
http://support.citrix.com/article/CTX111079
How to Configure a NetScaler Appliance for Active Directory Group Extraction for LDAP Using the Groups Allowed To Login Feature:
http://support.citrix.com/article/CTX125797
I prefer the first method. It’s basically just one step in one place (the authentication server object) and goes into effect at the authentication level. No fooling around trying to control it via a session policy. So go back to your 2 authentication servers you created before and take a look at the Search Filter field. It should be blank at the moment.
15. Go to LDAP Browser and get the DN for for the security group you want to give access to for your first domain.
16. Go back to the Search Filter field and type memberOf= followed by the DN (distinguished name) for the security group. So it should look something like this:
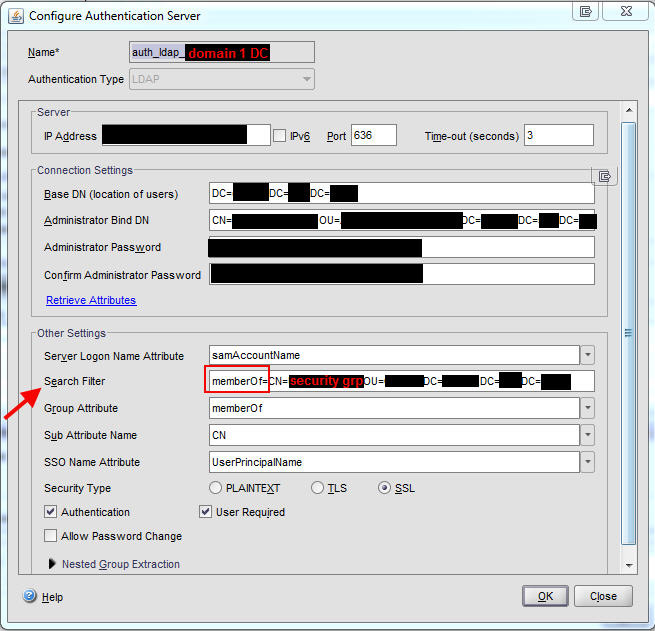
That easy. Make sure to do it for the authentication server for domain 2 as well. Go ahead and test your login scenarios and everything should work perfectly.
ADDING REDUNDANCY FOR YOUR AUTHENTICATION SERVERS
I only covered how to add a single authentication profile (domain controller) for each of the 4 policies on the vserver. Most companies are going to have multiple DCs. There is no way to add multiple DCs per authentication policy. The solution is to create a Load Balanced vserver with all your DCs behind it per domain and then add the IP of the vserver to an authentication server that is bound to the authentication policy. So in the example I’ve been showing you, I would have to create 2 load balanced vservers since I am working with 2 domains.
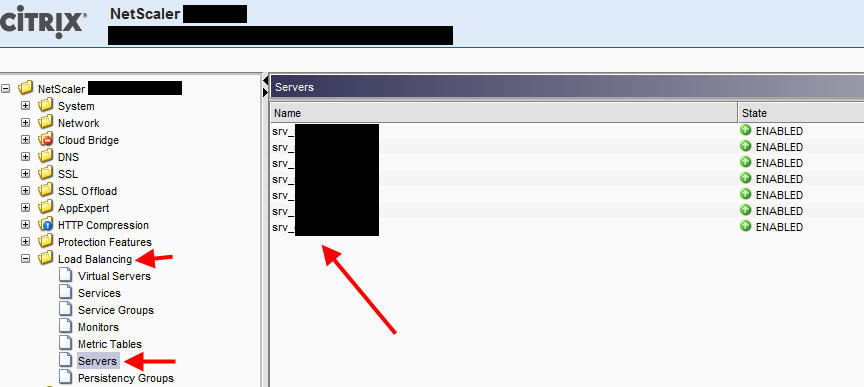
17. Go to Load Balancing > Servers > and add all your servers here:
18. You guys know I prefer to create service groups vs. services and the reasons why if you’ve read my previous Netscaler articles so go to the Service Groups section and add a new services group. Select SSL_TCP for the protocol.
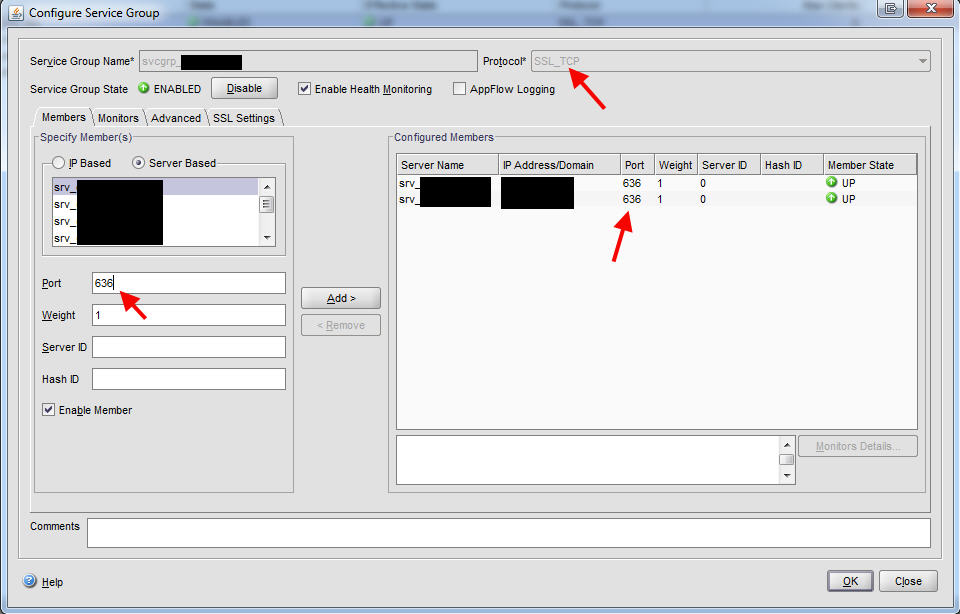
Specify the server based members and make sure to set the port to 636. You can weight the servers here if you want to. Under the Monitors tab, go ahead and add a ping monitor or whichever monitor you prefer. Do this for each group of your authentication servers. You might want to group them by city, datacenters, production vs. DR, or whatever makes sense in your environment.
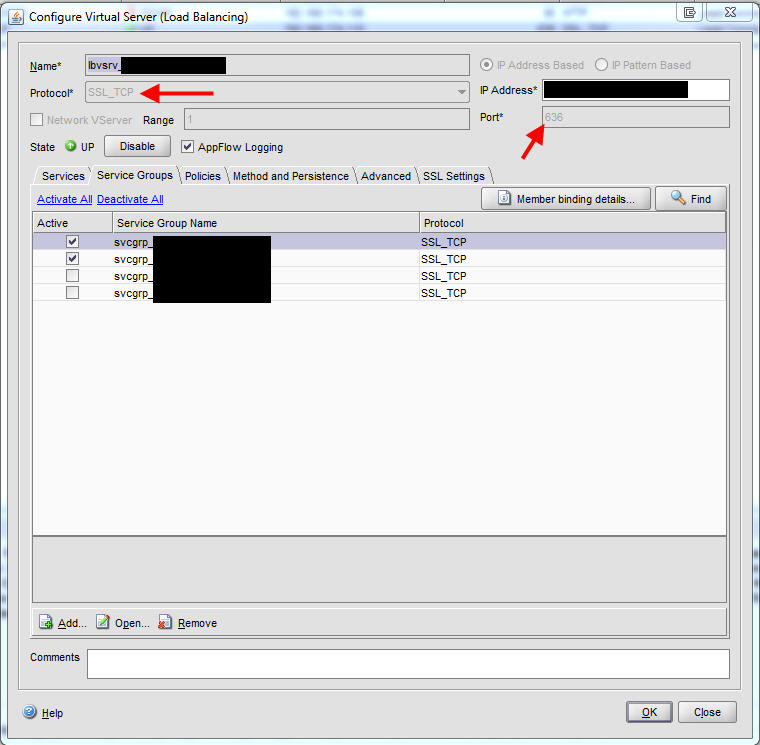
19. Now create a load balanced virtual server for your first domain. Select SSL_TCP for the protocol, port 636, and give it an IP address. Under the Service Groups tabs, add the groups you need. Keep in mind you won’t be able to see the SSL_TCP service group you created until you set the vserver protocol to SSL_TCP. Under the Methods and Persistence tab, you can get creative if you like or just leave it the default Least Connection. It really depends on your environment and where you prefer traffic to go. Under the SSL Settings tab, bind the cert you use for your Access Gateway vserver. Do all of this for your other domain as well. Both load balanced vservers should be in the UP state at this point.
20. Now go to System > Authentication > Server tab and left click on one of the DCs. Then at the bottom click Add, this will copy all of the settings on the DC you had highlighted and allow you to create a new one based off of it. So you don’t have to put all your DNs and stuff in again. Just give it a unique name and for the IP, type in the IP of LB vserver you just created for that domain:
Now do the same for the other domain.
21. Now go to the Policies tab and edit each of your 4 policies. You can simply change the server in the drop down to the new one you created for each of your 4 policies and you’re done. All authentication traffic is now going through your load balanced vservers. Keep in mind that before, LDAP traffic was going from your NSIP to each DC. When you use LB vservers, traffic is going from the SNIP to each DC. So make sure you have your firewall ports open from the correct source IPs or you won’t be able to authenticate. Retest all your scenarios and everything should continue to work just as before.
TROUBLESHOOTING LOGINS
Once you’ve set everything up you might encounter issues and need to troubleshoot. There are a few ways to troubleshoot logins. I’ve covered this before here:
How to troubleshoot RADIUS or TACACS authentication issues on a Netscaler/Access Gateway
22. First you can troubleshoot the authentication layer but capturing of all authentication happening on the device. Open Putty and connect via SSH to your Netscaler. Enter the shell by typing
shell
and pressing enter. Then type:
cat /tmp/aaad.debug
and the cursor will go to the next screen and wait. Open up your web browser and attempt to login to the Access Gateway. Immediately you will see the request happen in your SSH window. You’ll see exactly what is happening line by line like this. You’ll even see the nested group extraction taking place:

The last line will show the accept or reject:
![]()
When you’re done, press Ctrl+Z to exit.
23. The next layer to troubleshoot is all the polices. All of them, authentication, session, etc. You want to see everything a user hits when he logs in. So type the following:
nsconmsg -s disptime=1 -d current -g pol_hits
and login to the Access Gateway again using a web browser. Immediately in your Putty window you’ll see what all policies were hit:
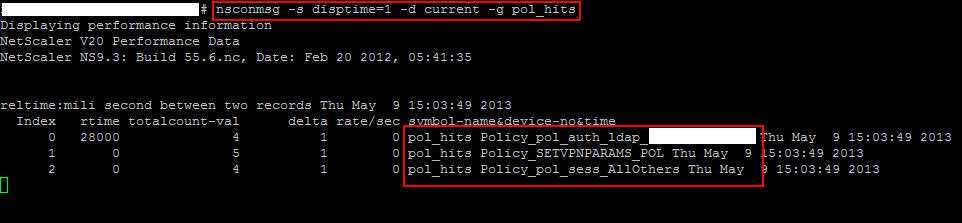
This will help troubleshoot your policy flow. We’ve built a lot of intelligence into the cascading authentication and session policies and based on the user’s device and domain, it will vary what all they hit. This is an excellent way to test each of those scenarios.
24. The last step is getting down to the packet layer and analyzing the traffic using Wireshark. I’ve covered this in my previous post but go to System > Diagnostics > Start New Trace and set the packet size to 0. Then press Start.
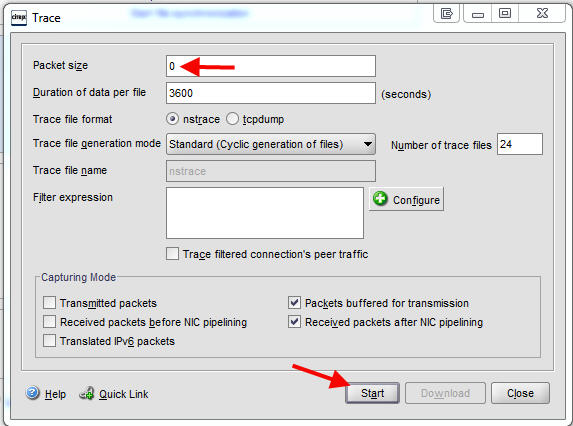
Login to your Access Gateway via web browser, stop the capture, and download it to your desktop. You will also want to WinSCP into the Netscaler and grab the SSL RSA key for the SSL cert you are using on your Access Gateway site so you can decode the SSL traffic. Then double click on the .cap packet capture file and it will open in Wireshark. Go to Edit > Preferences > Protocols > SSL > and click Edit in the RSA Keys field:

In the SSL Decrypt Window, hit New in the bottom right side and this window will popup. Type in the IP address of the Access Gateway vserver, port 443, protocol http, the exact path on your hard drive to the SSL RSA key file, and leave the password blank. Then press OK to add it:
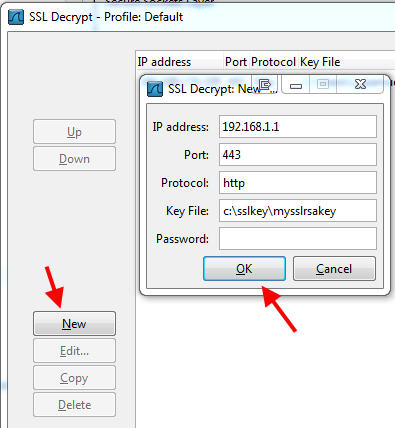
Press okay and get back to your capture. Now in the Filter field, just type the following:
frame contains youruserID
because we want to find all the instances of your user ID being passed. You should be able to find your user ID and password in plain text. Follow the TCP stream if you need to to find out exactly what is happening.
Hope this helps. Please leave a comment if this post helped you or if you have any questions and I’ll try my best to help. 🙂


Daniel
May 10, 2013 at 6:30 AM
This is great… than you
Marius Sandbu
May 11, 2013 at 8:06 AM
Great post Jason!
Jason Samuel
May 15, 2013 at 1:38 PM
Glad to help guys!
sebin
July 16, 2013 at 5:02 AM
Dear Jason,
Wonderfull post.
Can you do something similar for Client Cert Auth and LDAP for Citrix XenApp 6.5 and VPN
We are unable to find any Citrix documents.
Ryan
July 19, 2013 at 8:15 PM
Hey Jason, how would you handle multiple domains for the receiver client? I am looking to do a similar setup and leveraging the drop down domain with the cookie as mentioned in your article. The authentication takes place properly…I then have session policies with the same http header query for web sessions…but how would you do this for mobile devices? So if a mobile user logs in and I want to send them to one web interface service site…and another user to a different one.
I am thinking AAA groups but wondering if you have done it another way…
Jojy
August 20, 2013 at 4:11 PM
Jason, i wanna ask you something, i’m having a problems in NetScaler NS9.2 it is not performing load balancing between our servers.
I’ve identified that the disk was full, but i already had deleted the log files.
Even after this, the disc still full, and the load balancing is not working.
Do you know how to correct this?
Christian
May 27, 2014 at 9:19 AM
Hi Jason, i would like to know if u have used only one single web interface for your enviroment, and that web interface can acts as a collector of many farm XA or XD. What if we have 2 single web interface linked to a distinch XA or XD farm ?
Thank YOu
Jason Samuel
May 27, 2014 at 9:42 PM
@Christian
Yes, Web Interface is designed to aggregate resources from many farms. If you have 2 distinct instances you will need to create a session profile for each and route the traffic accordingly using a session policy.
Alix
April 7, 2015 at 7:20 AM
You mention above that if the same user name exists on both domains, it will fail on the first domain and you will need to adjust your policies. Could you elaborate on that please?
Conor
November 17, 2015 at 6:59 AM
Hi Jason, another great post, thanks,
I have this working away great on 10.5 but now time has come to upgrade to 11.0. Do you know of any issues if I upgrade the firmware having these customized files in place?
thanks again
Nebeel
May 3, 2017 at 6:06 AM
we have two domains domain1 and domain2. I have followed the below steps for Multi domain authentication. Everything works fine for most of the users in both the domains . But for only 2 users they get error “401 – Unauthorized: Access is denied due to invalid credentials”. When I created a duplicate user in same AD OU of the user account which have problem, the duplicate user is able to logon and see the published apps. Any suggestions on this problem from your side.
Multiple domain Authentication method :
1)Separate Auth policy for each domain with Server logon Attribiute as saMAccountname and SSO Name Attribute field as userPrincipalName
2)One session policy with no value in Single Sign on Domain
For the 2 users I can find An AD user object in first domain and a Contact object in second domain.
we use Web interface 5.4 and there are no event that is related to this problem found in web interface servers
The problem is only for two users. Other 400 + users can logon and access published resources without error. I have checked the call back fqdn by accessing in Internet explorer and do not find any cert error.
Any idea what could be the problem.
Felipe Silva
August 8, 2017 at 8:40 PM
I created one virtual server from Gateway liked you said, but I just using LDAP and Session Polices to Mobile side, however I can sign in with success between two domains BUT the SSO not works, the Citrix Receiver ask two times to logon on..
I am using NS 11.1
please help me 🙁