How to install and configure PVS 6.1 with XenDesktop 5.6

Once a company has a XenDesktop or XenApp environment that is pretty mature, they often turn to Citrix Provisioning Services (PVS) to help scale the environment. There are many reasons to use or not use PVS for your VDI or XenApp environment and that's a whole other discussion. The purpose of this blog post is to get you familiar with how to implement it. There are not a whole lot of step by step guides out there and PVS can be a real beast to wrap your head around if you are not familiar with it.
Now for the disclaimer. This guide will describe how I do things for my PVS environments. This will probably be different for your environment so make sure you thoroughly understand the reasoning behind each step and how it applies to your environment. What works for me may not work for you. So let's get started!
INSTALLATION
You must be logged into the PVS server using a service with DBO rights or the install will fail. Have your DBA set the service account to SA temporarily for the install. After install, remove SA rights and just give these rights only:
-
dbcreator; required for creating the database
-
securityadmin; required for creating the SQL logins for the stream and soap services
-
db_datareader
-
db_datawriter
-
execute permissions on stored procedures
I find this to be the most pain free method of getting PVS installed with no DB errors. Now on to the actual steps:
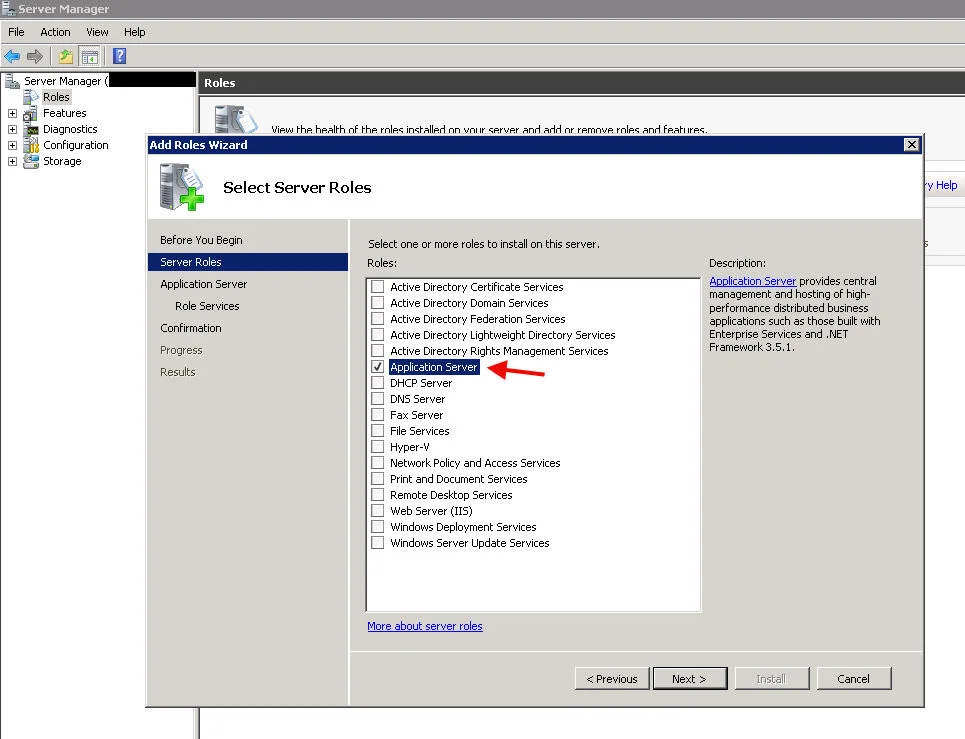
- Enable Application Server role (.NET features will be automatically installed)
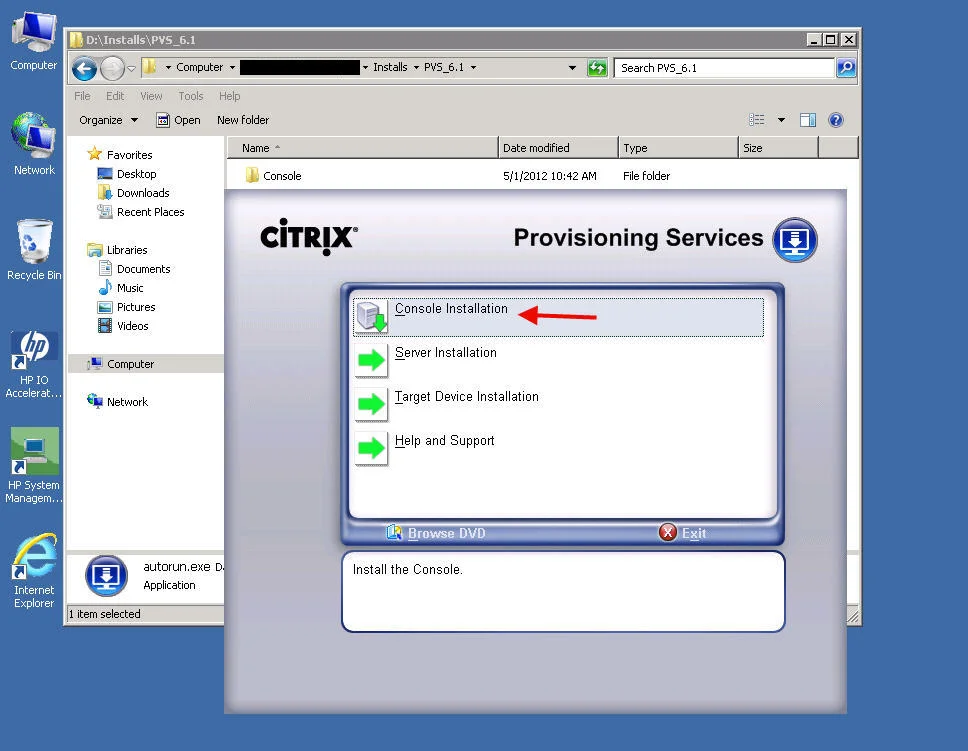
- Start Wizard, hit Console installation, run through all of it. Just hit next accept all the license agreements and let it install everything until you get to the path to install part.
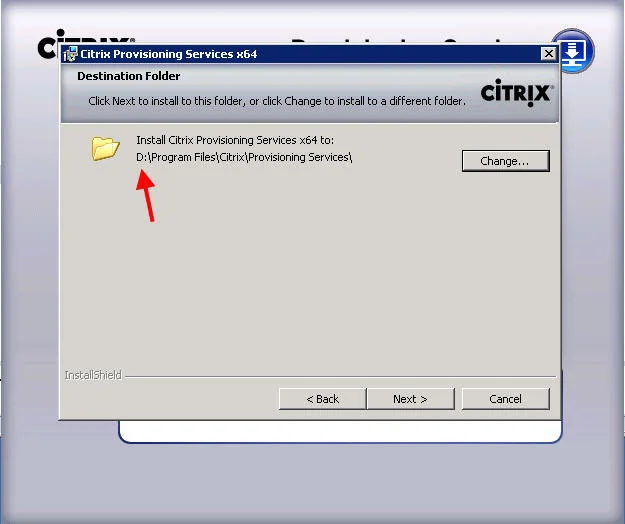
- Choose Path for install (change to D:)

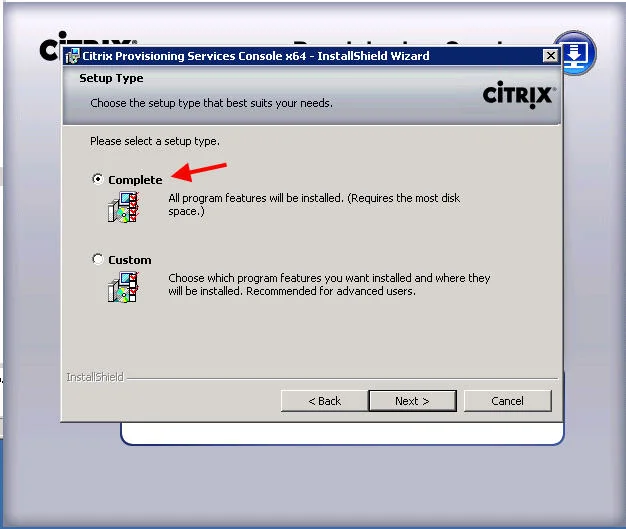
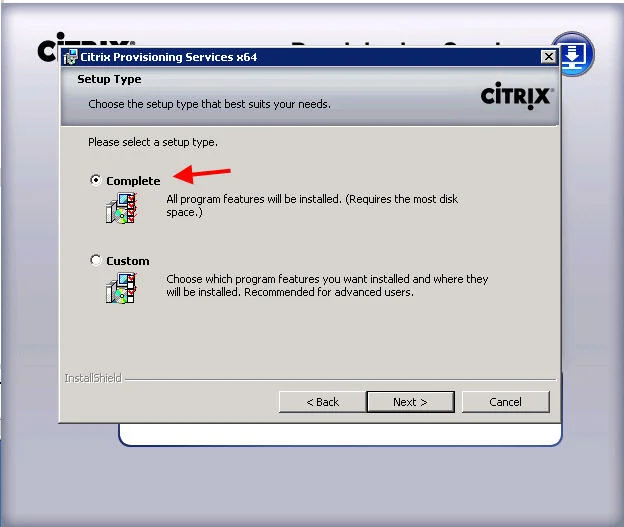
- Choose Complete install
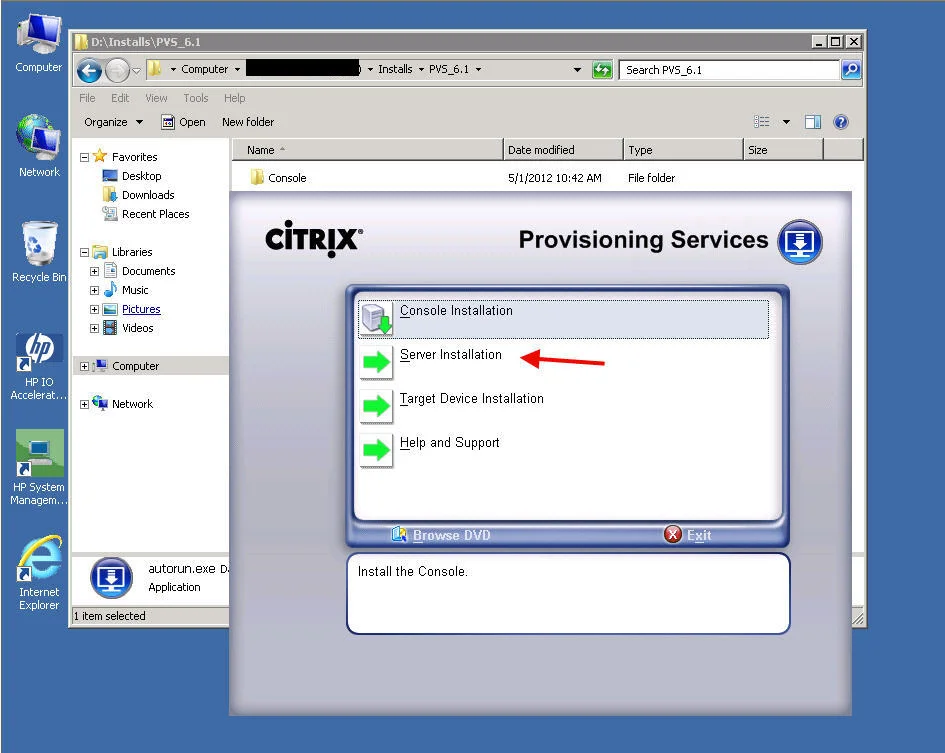
- Once done, click Server Installation on wizard home page > Install Server
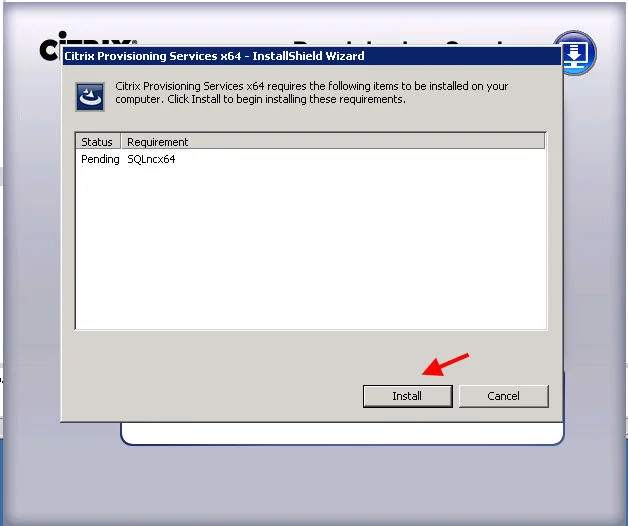
- Install SQLncx64 when prompted
- Change path to D:
- Choose Complete install
And you're done! Not very hard at all.
CONFIGURATION
Now we get to the slightly harder part, configuration. This is going to depend a lot on how you have your hardware setup. I want each of my Windows 7 provisioned desktops to have 2 NICs. One NIC is for regular network traffic and the other for streaming traffic. You don't have to have 2 NICs and separate your traffic like this but I do for production environments. It is really only beneficial for large scale implementations so if you are doing something smaller scale or for a test environment, 1 NIC will suffice. Just keep in mind everything below in my guide is written as if you have 2 NICs:
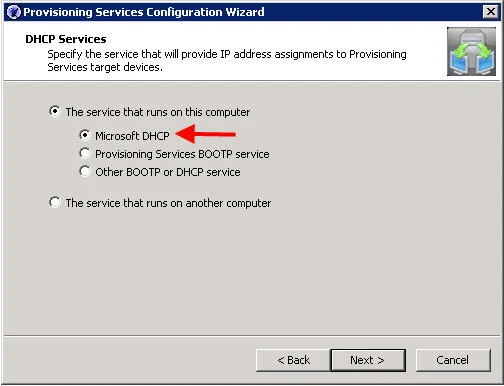
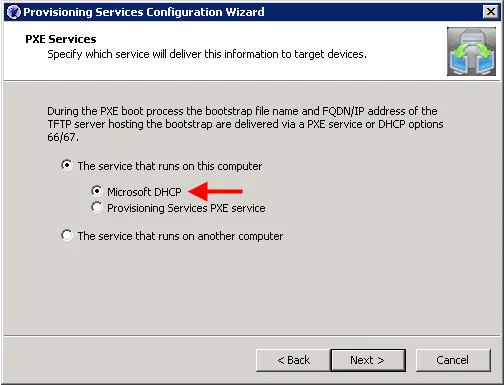
- For DHCP, choose service that runs on this computer and choose Microsoft DHCP. So the PVS server will have the DHCP server role running and it will be handing out streaming network IPs to the VMs as they boot. They will get regular network IPs from your regular DHCP servers just like any physical box on the network. More on this later.
- For PXE boot, choose service that runs on this computer and choose Microsoft DHCP as well.
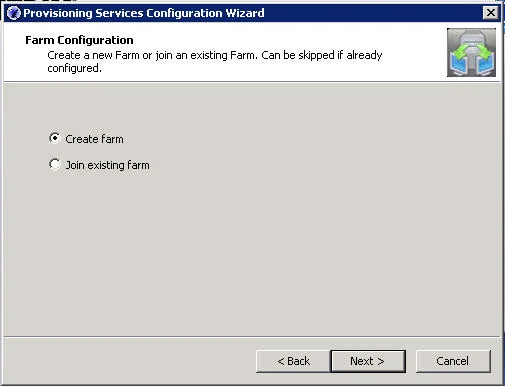
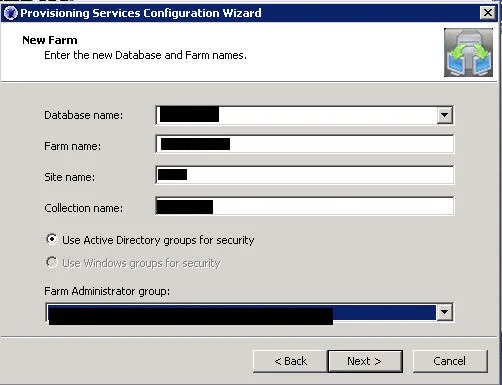
- Create farm or join farm depending on what you're doing.
- Either choice will will ask for database info on next page
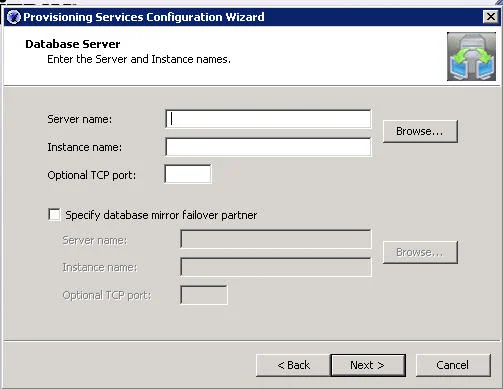
- Type in your DB info and hit Next
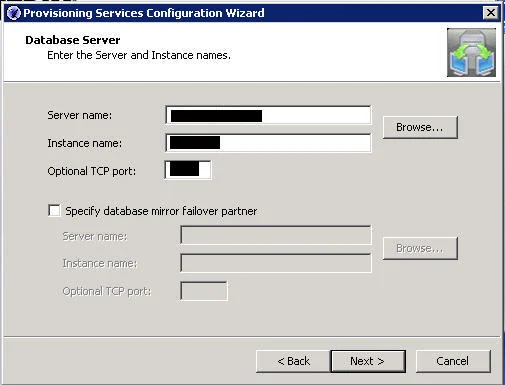
- Choose a database ***DO NOT USE A PRE-CREATED DB, just type the new DB name in the Database name box and it will create it automatically once you hit Next***. I've run into numerous issues in the past attempting to pre-create a database. I'm telling you now, get SA rights temporarily as I mentioned in the first part of this guide if you can. It will make your life easier.
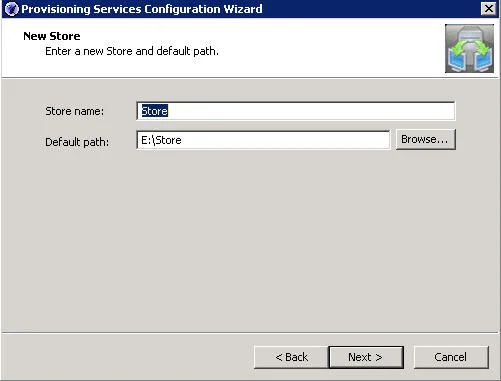
- My E: drive on my PVS Server is a high performance flash based IO accelerator card in this case. That is where I will put my Store. You will want some very read friendly storage for your Store as this is where you will be putting all your golden images.
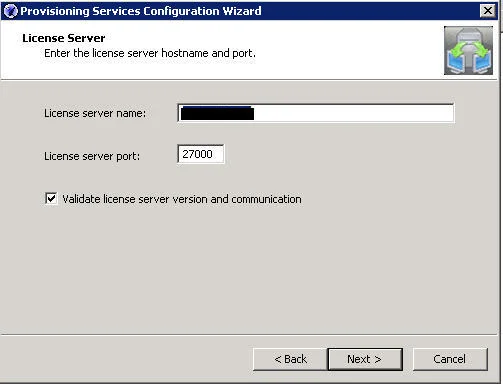
- Type in your license server info.
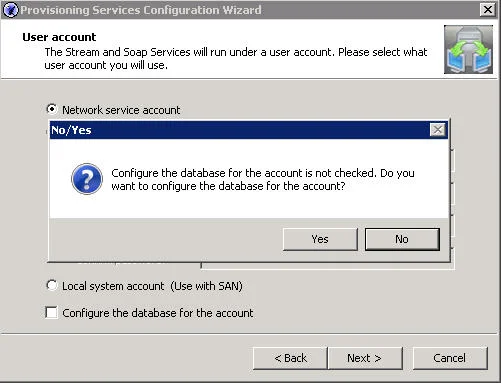
- Keep user account as Network service account
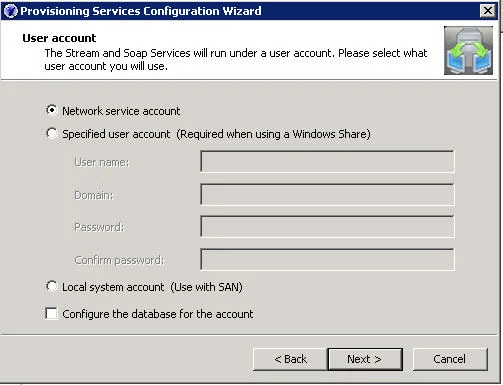
- Hit Yes wen prompted for configuring the database with the account
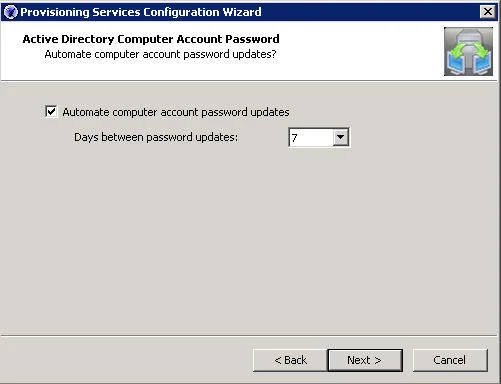
- Leave password updates to the default of 7
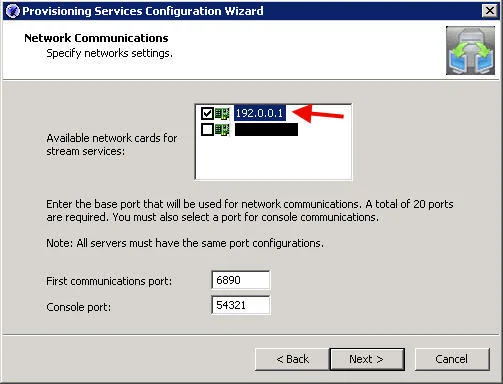
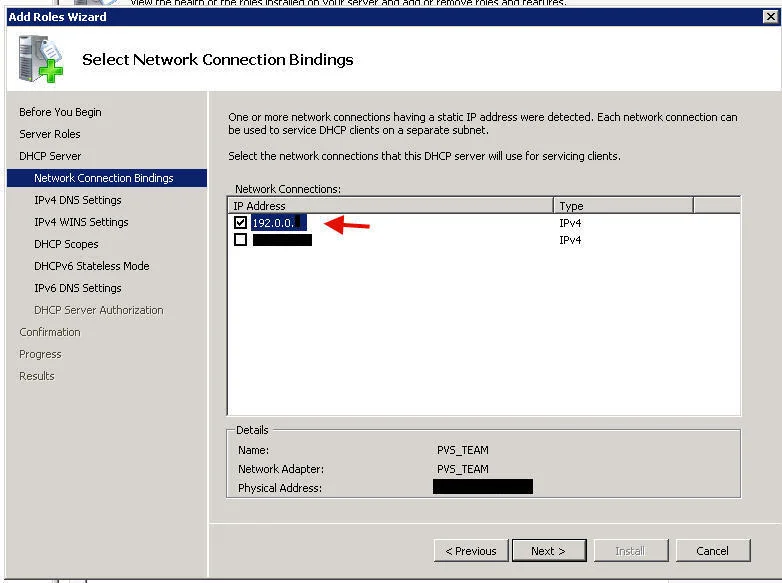
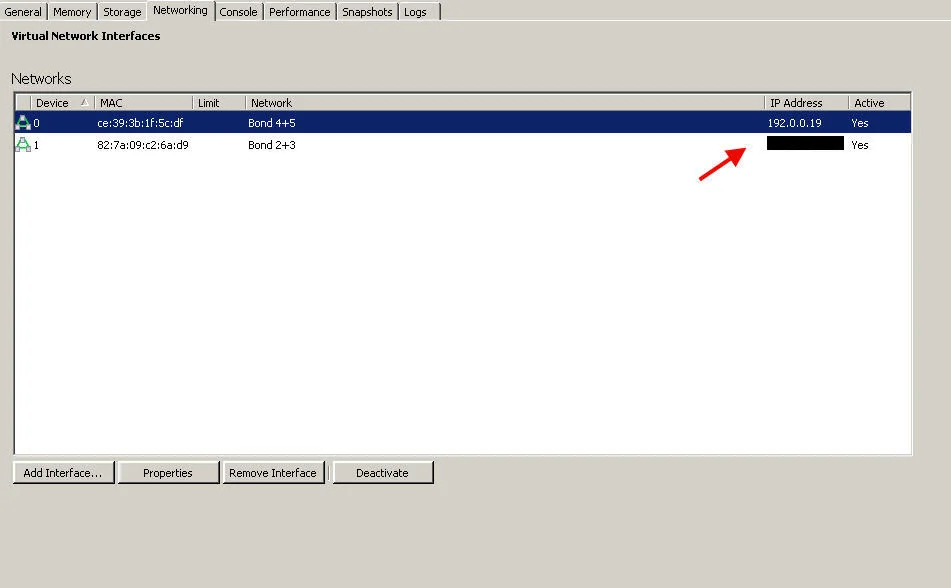
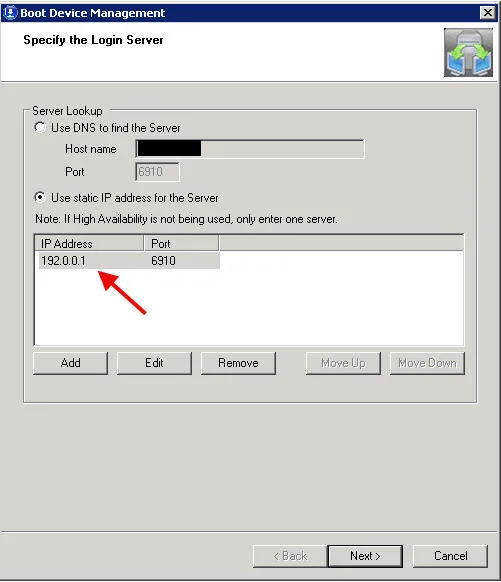
- Check the teamed NIC for the "Provisioning" network, not the regular network traffic network. In this case my streaming traffic/provisioning network is only routable within my blade enclosure and my interface has an IP of 192.0.0.1
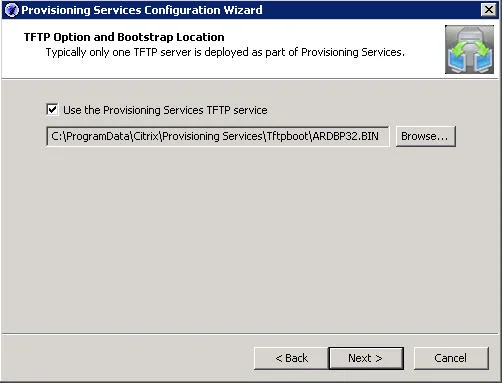
- Check the Use the PVS TFTP service option
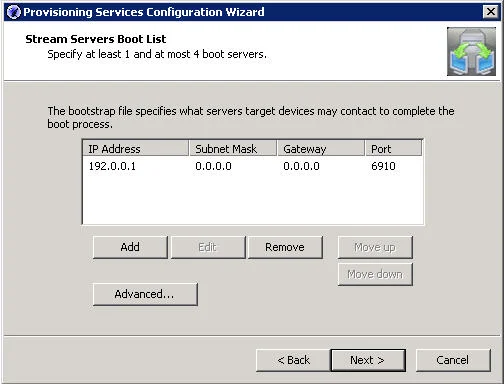
- Leave the default for stream servers boot list. It should be the IP of the server itself on the "provisioning" network.
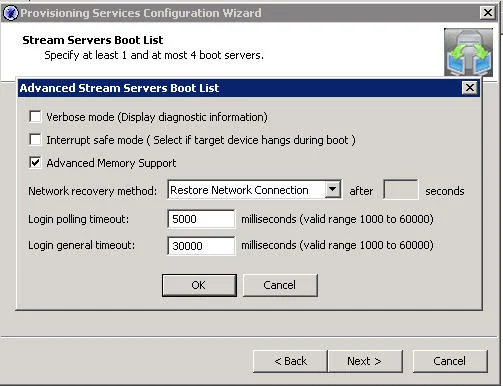
- Advanced button has some settings, leave default
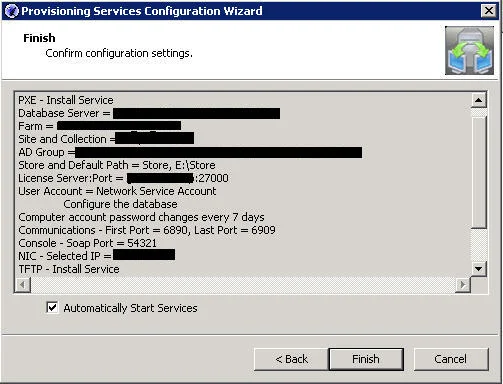
- Hit finish on confirmation page. It should look something like this.
-
Go to your NIC for PVS traffic (or teamed NIC) on your PVS server and disable IPv6. Leaving it enabled can lead to issues.
-
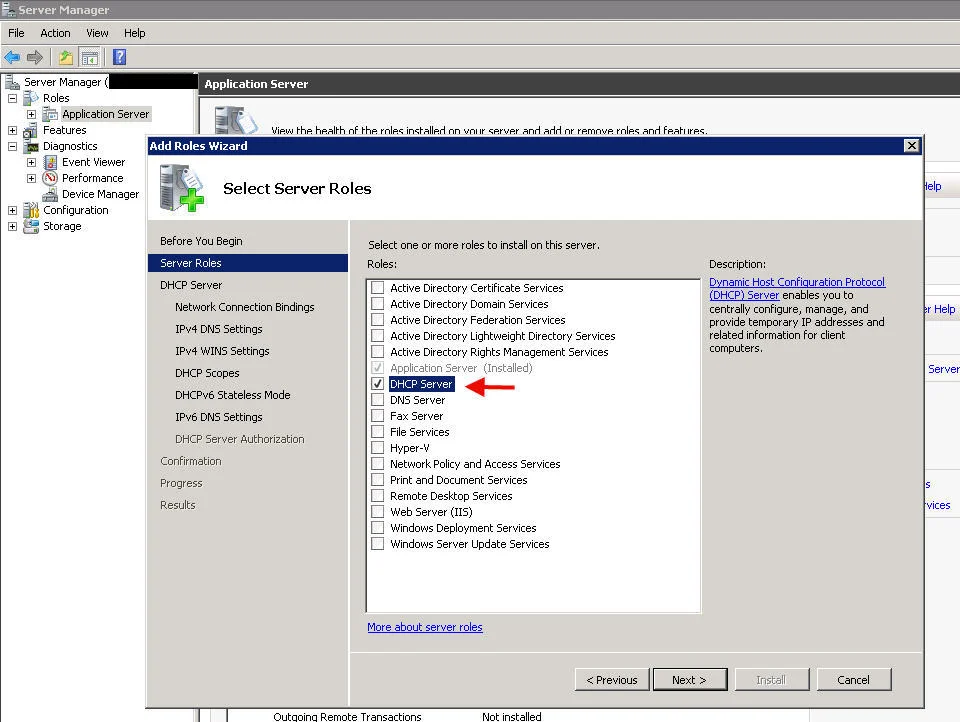
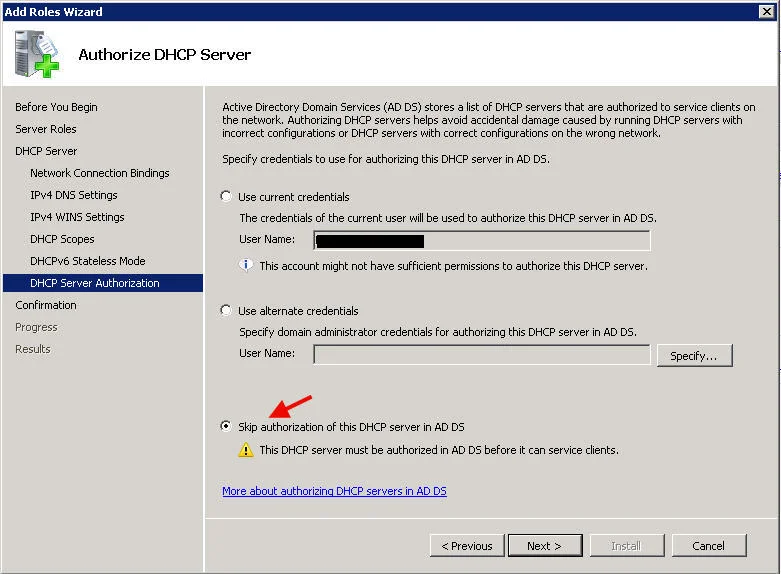
If using your server for DHCP as well as I mentioned above, install the DHCP Server role.
- Select just the PVS network
- 0.0.0.0 for the DNS servers

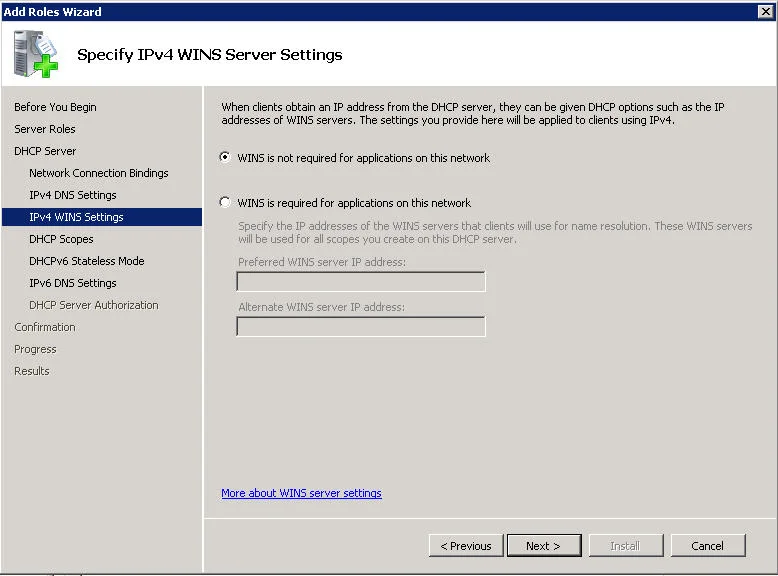
- WINS not required
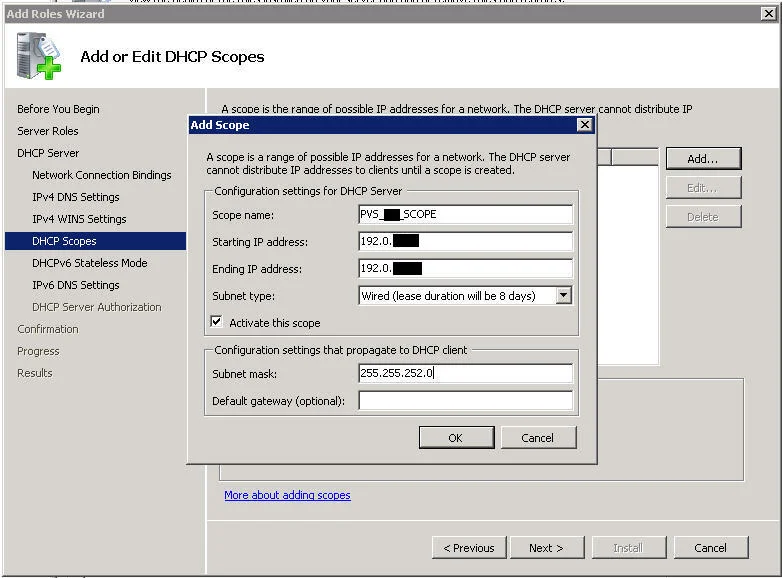
- Create your scope
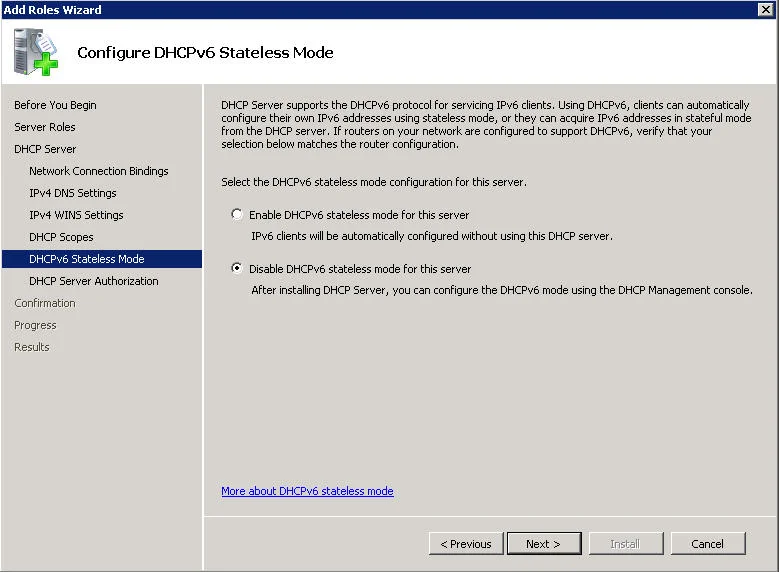
- Disable DHCPv6
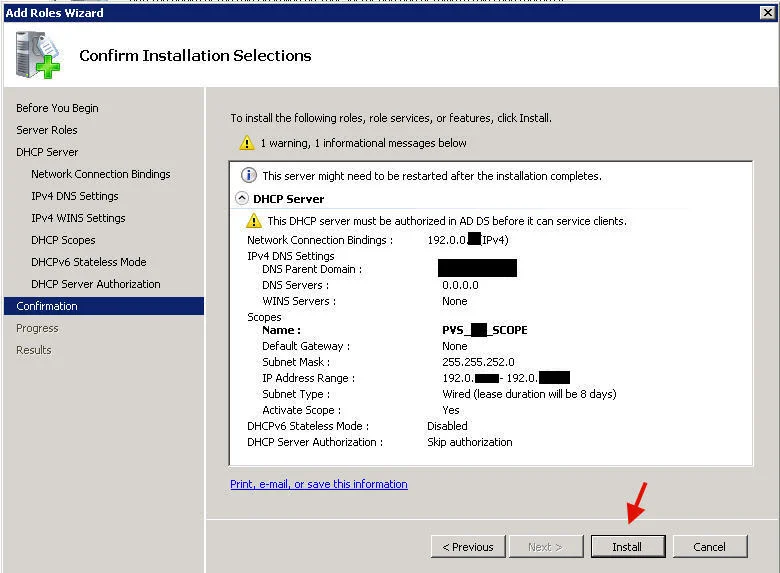
- I skipped authorization when taking the screenshots but you should do it now if possible.
- Confirm and install
BUILDING YOUR BASE IMAGE
Now on to building your Windows 7 base image. This is the base image that will be completely clean, very little customization. This will be the primer for your golden images later.
Building an image is not to be taken lightly. These two articles from Citrix are a good read so you have a solid understand of what you are going to do.
CTX121028 "Best Practices for Creating a XenDesktop Image" is an older article but still a good read if you are building your image for the first time:
http://support.citrix.com/article/CTX121028
CTX131481 "Recommended Install Order for Preparing Target Device Captured by Provisioning Server to Deploy vDisk" is a bit newer and is also a good resource you should read through before proceeding:
http://support.citrix.com/article/CTX131481
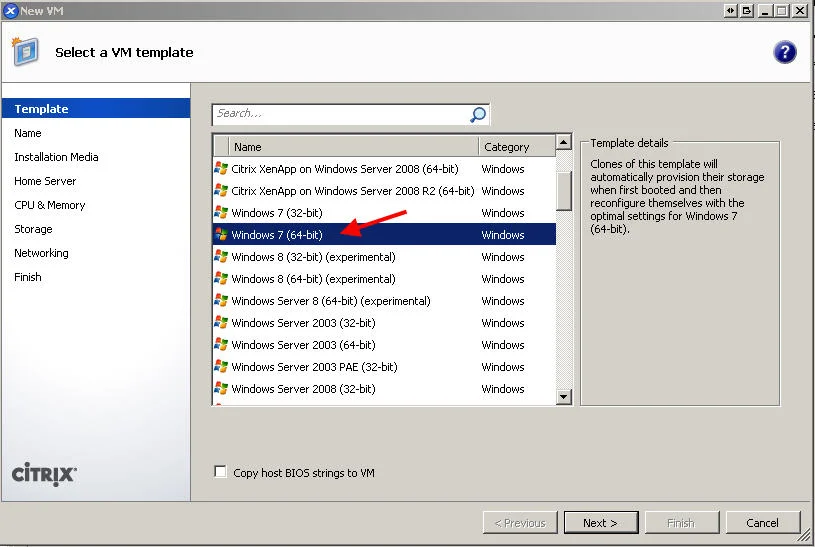
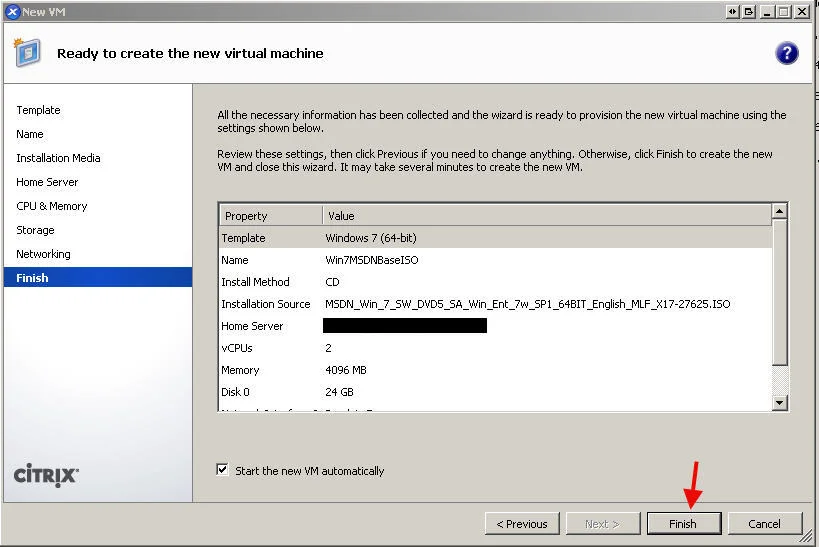
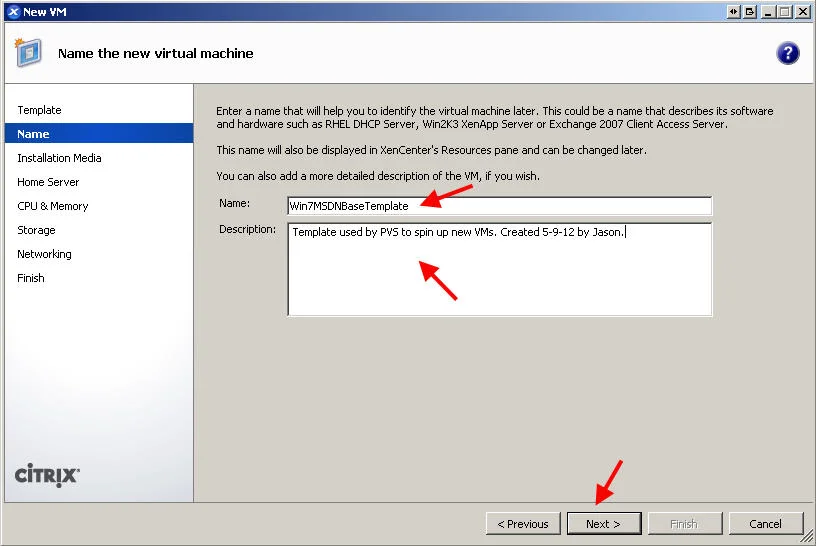
- So first you need to build a VM out. Just go to XenCenter and run the "New VM" wizard. Choose the Windows 7 (64-bit) template.
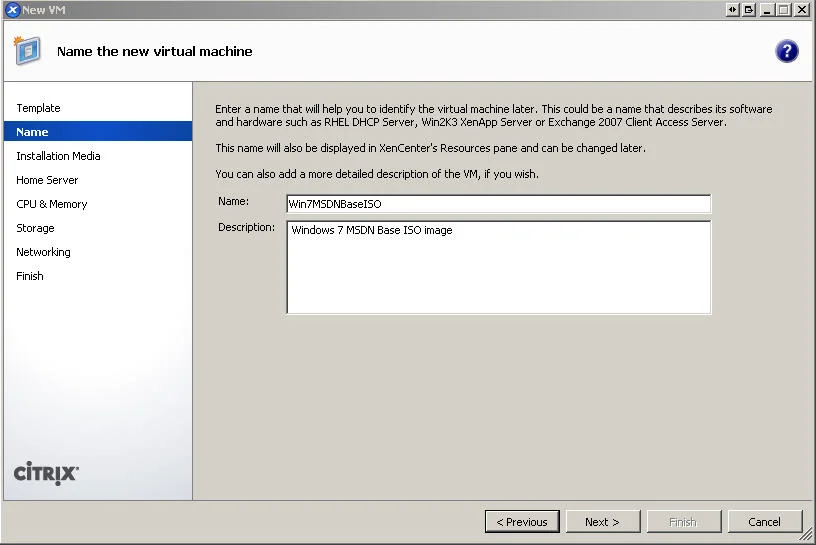
- Give it a name and description
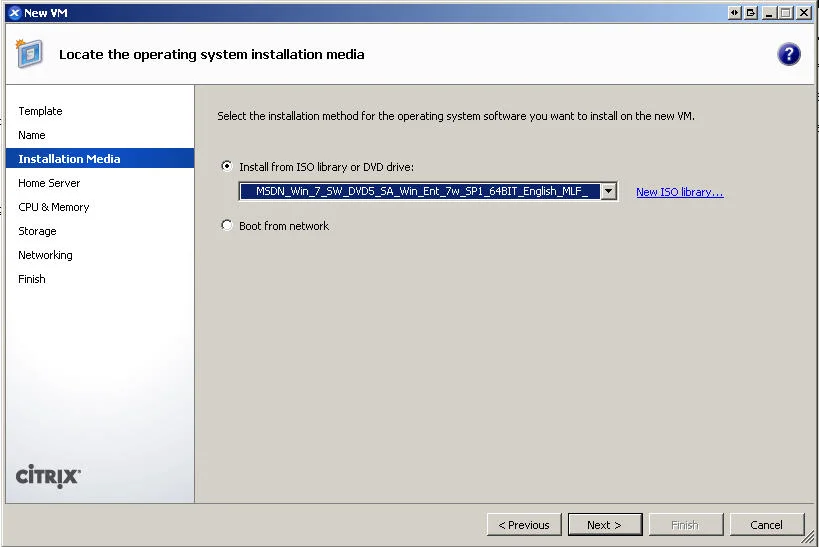
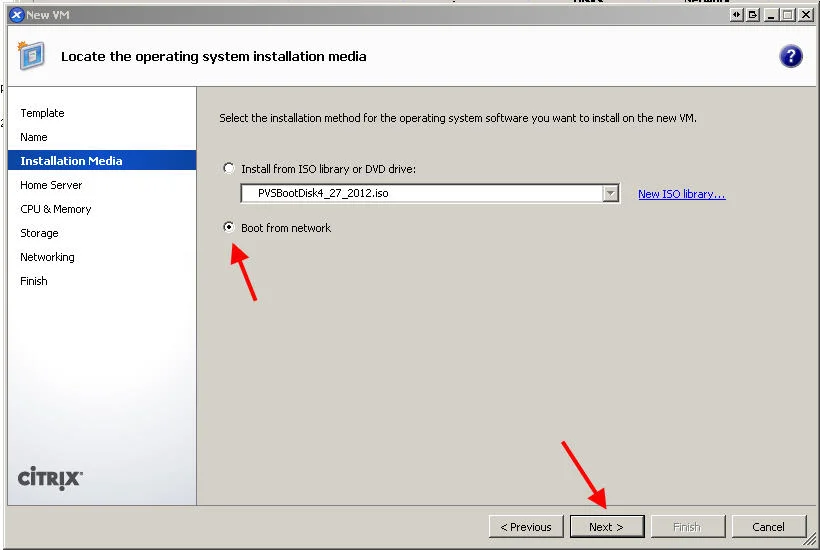
- Choose the MSDN Windows 7 ISO
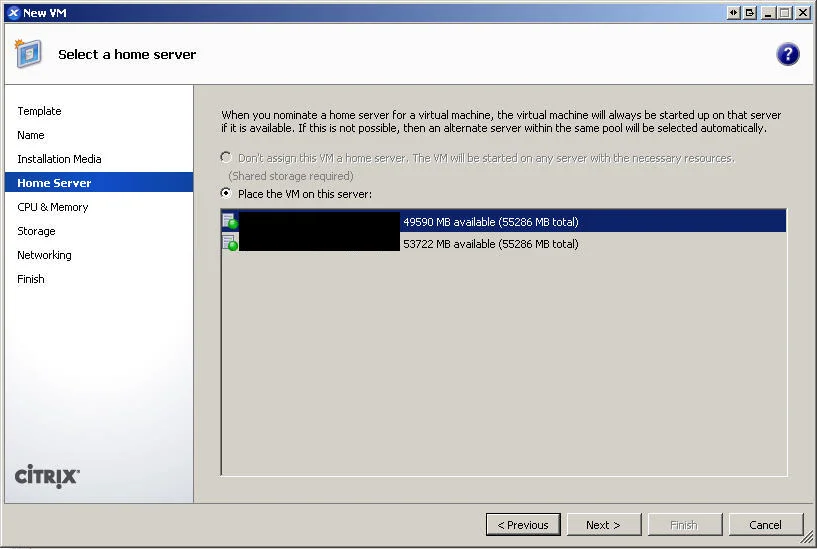
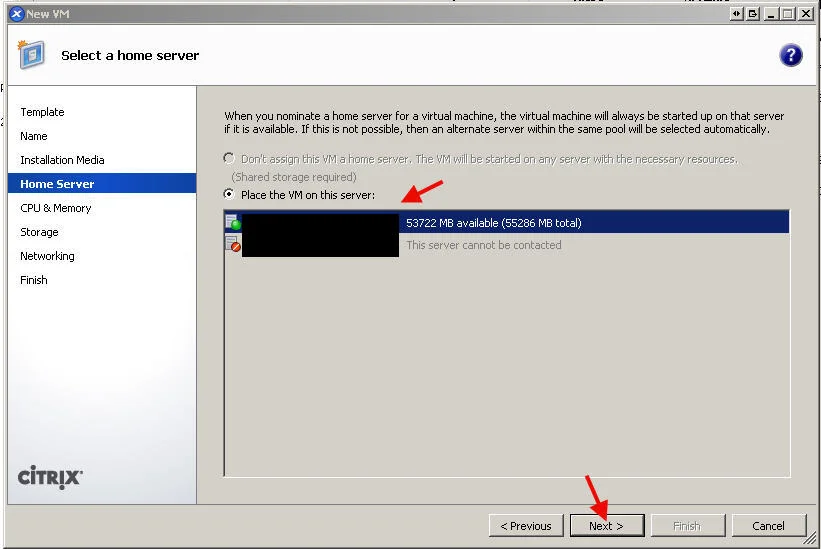
- Choose a host server
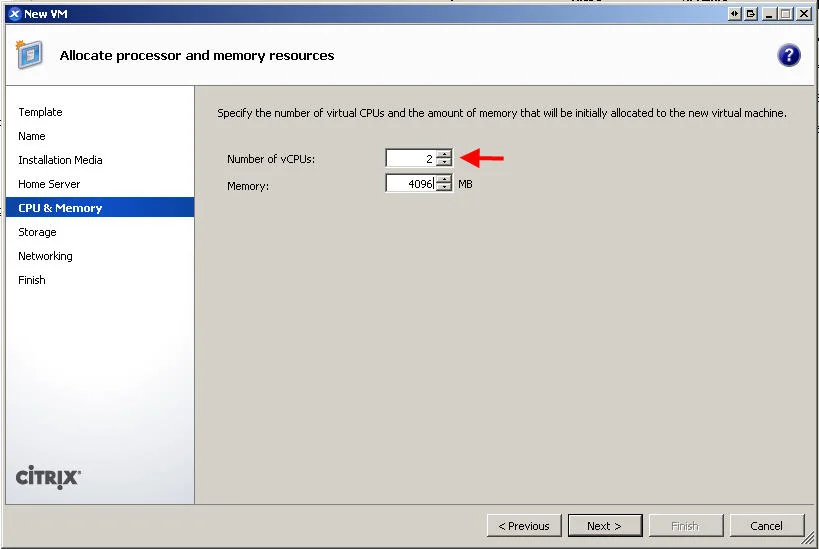
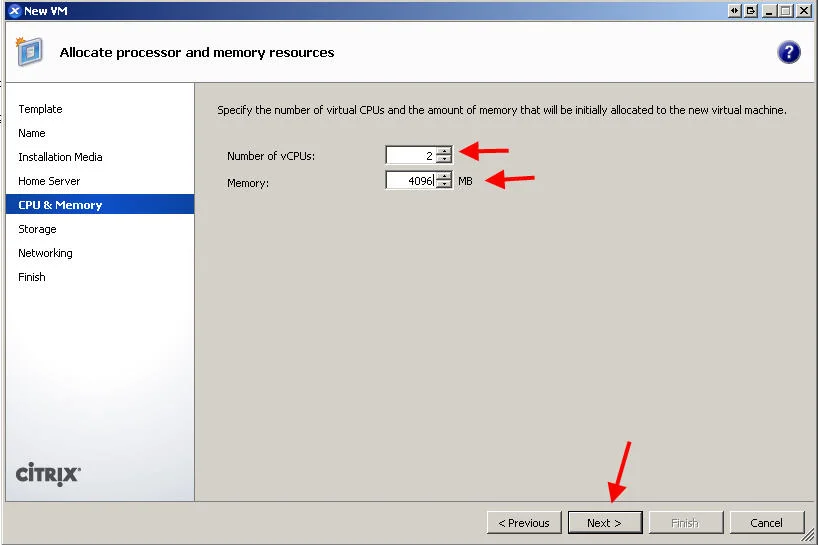
- 2 vCPUs, 4 GB RAM (4096 MB)
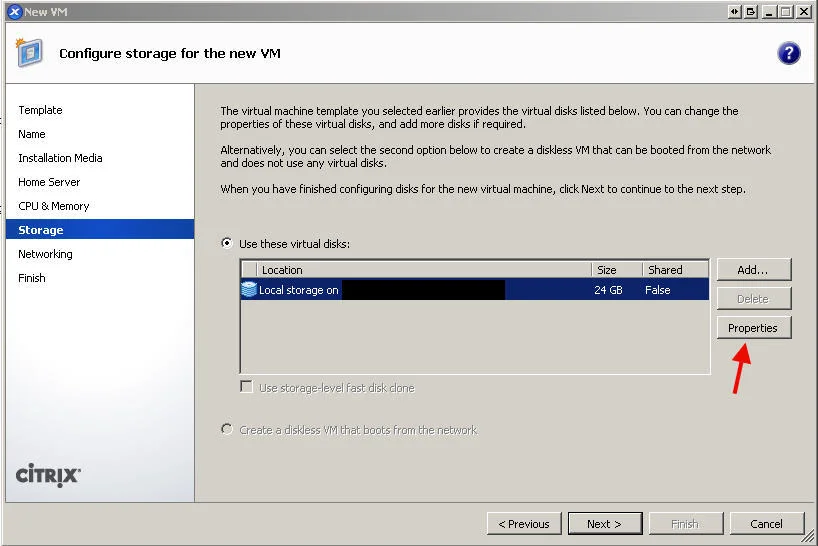
- Choose local storage for the disk. You can add more disks or even increase the size of a disk under Properties.
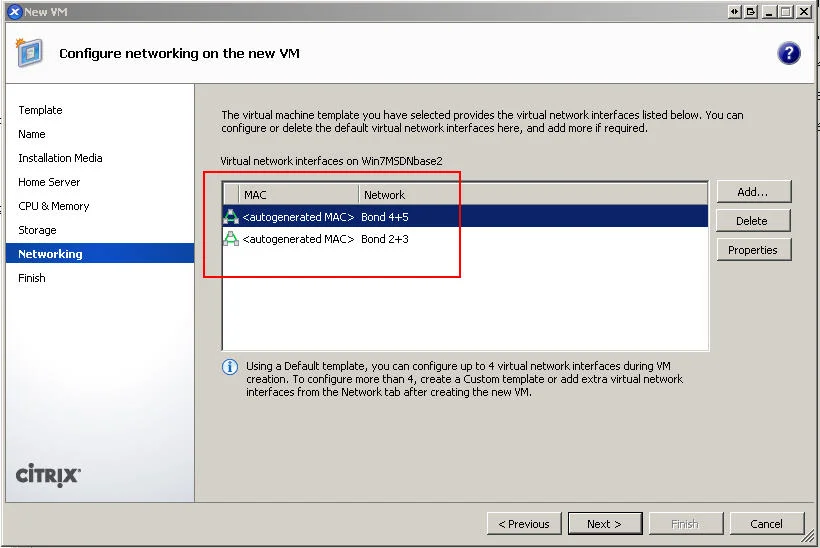
- Delete ALL the NICs, you will recreate in the right order in the next step.
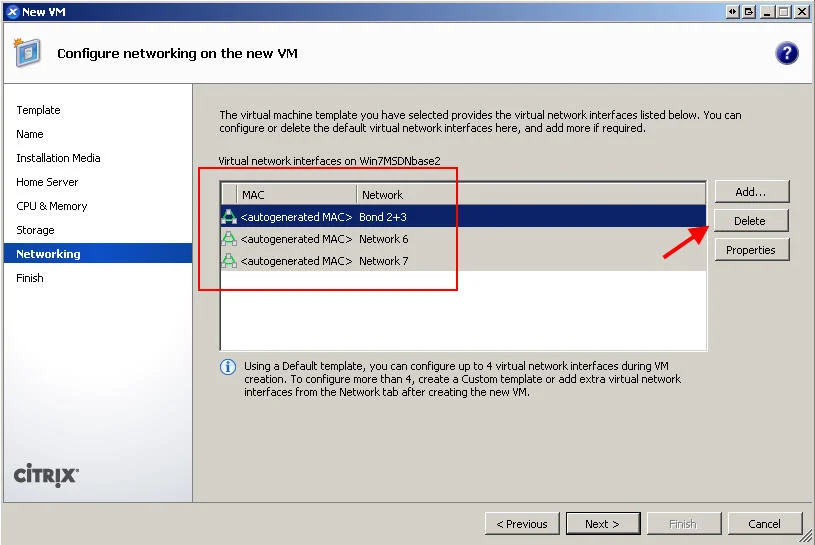
- Click Add and add the PVS bond first, THEN the network bond. So in the example Bond 4+5 first, then Bond 2+3. Note: This is a critical step. Changing the order or adding/removing NICs later is not recommended as it breaks stuff between the XenServer Tools and PVS Target agent in my experience. Get your network setup right the first time and in the right order to avoid issues. Always put the PVS network first, network traffic second.
- Hit Finish on confirmation page to build the VM
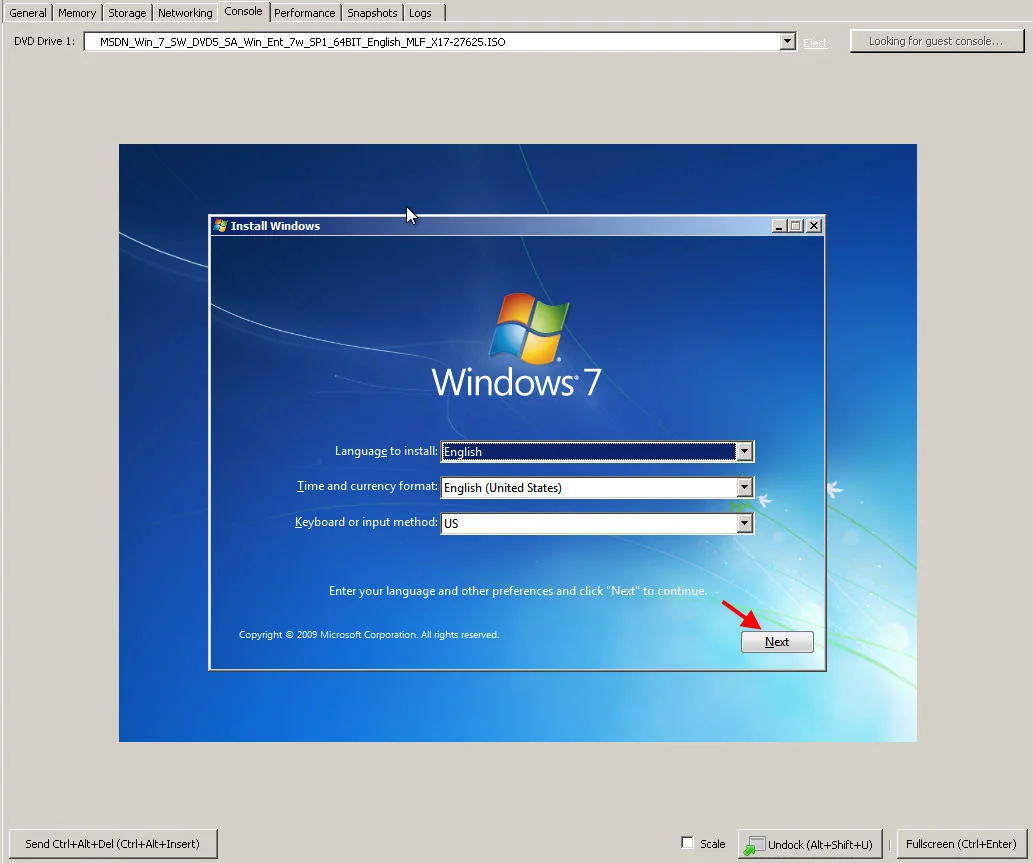
- Go to the console of the new VM and run through the Windows 7 setup wizard. When it comes time to name the PC, make sure it is not a name that already exists on your network. In this example I will use "Win7MSDNBaseISO" for demo purposes but you should come up with some kind of naming scheme for your environment since you will eventually have several golden images and you don't want to confuse them. Something like "GOLD-ACCT01" for your Accounting departments first golden image, etc.
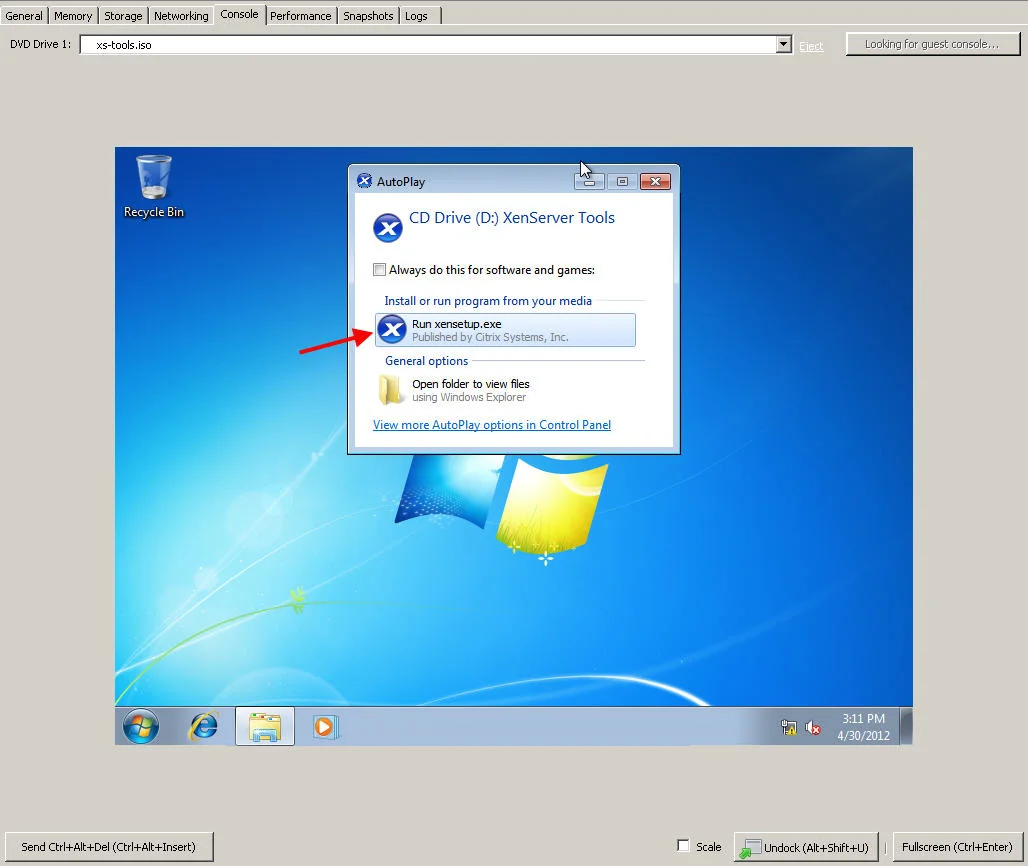
- Login and install XenServer Tools. Without it your NICs will act wonky. Like sending malformed packets and such which cause an HTTP 400 server error to any website you navigate to. You will need to reboot after the install. Once it's back up, it will detect the NICs and likely prompt you to reboot again after installing the new hardware so go ahead and do it.
- Log back in and then run your Windows Updates and/or Microsoft Updates. Don't install any company related apps yet if at all possible. Make it as generic and clean as possible. Remember, you are building a base image to suck into a vDisk, not a golden image just yet. Whether you have just one golden image for your whole company (not likely in most environments) or several per department, try to keep the base image as lean as possible. You'll also notice your NICs are now labeled are looking a lot healthier than before as well. Adapter 0 may say Unidentified network since your provisioning network should ideally be private. **NOTE: You can add the machine to the domain but, DO NOT install the VDA agent yet.
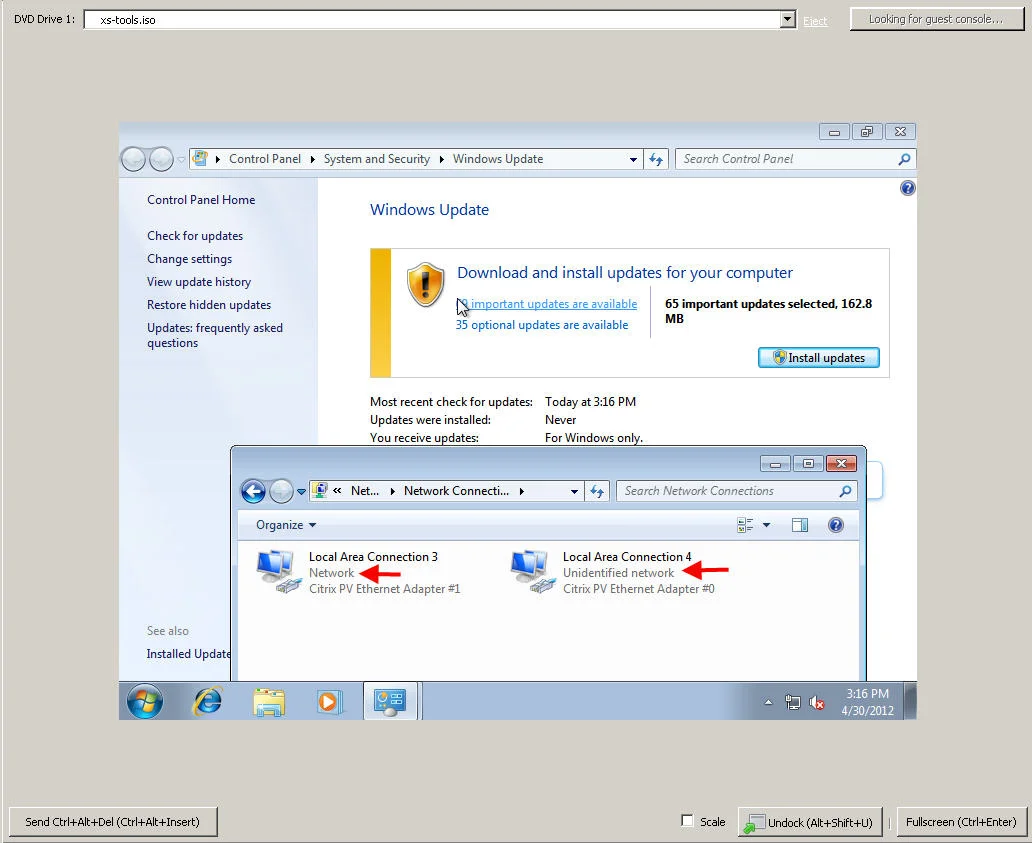
- If you click on the network tab, you will notice both NICs have IPs whereas before the XenSever tools install it was Unknown.
- Snapshot your VM. It's not necessary but I like to as a precaution. From here if I mess up on something or forgot something, it's easy to revert to my snapshot and fix whatever needs fixing. Beyond this point it becomes tricky.
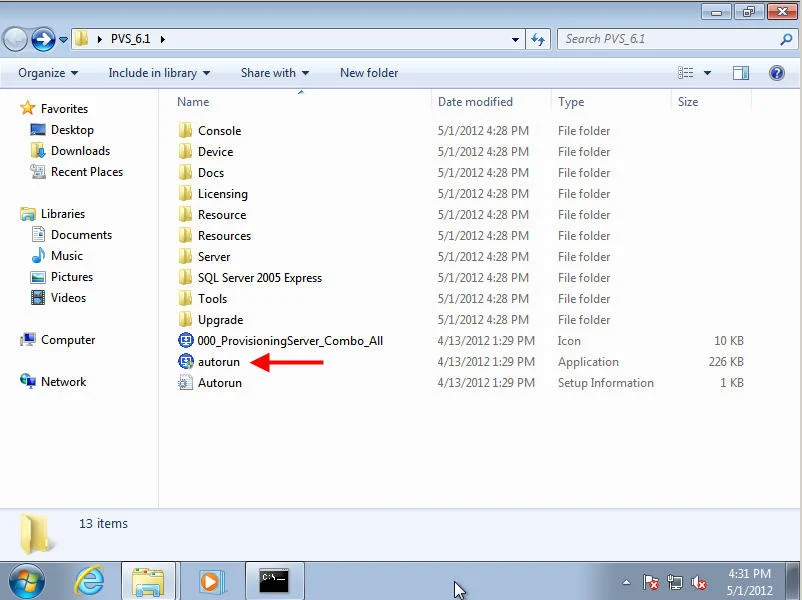
- Now install the Provisioning Server Target Device Software from the PVS ISO. Just click the Autorun.exe.
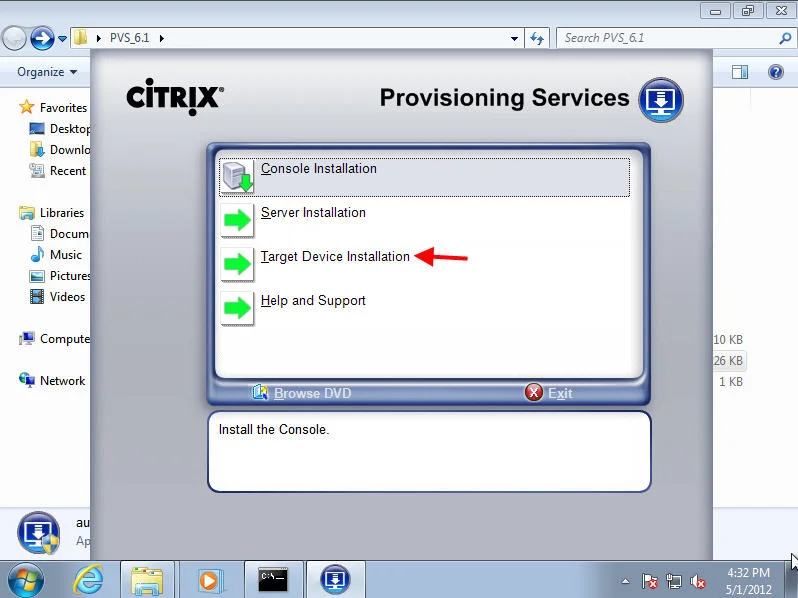
- Click Target Device Installation
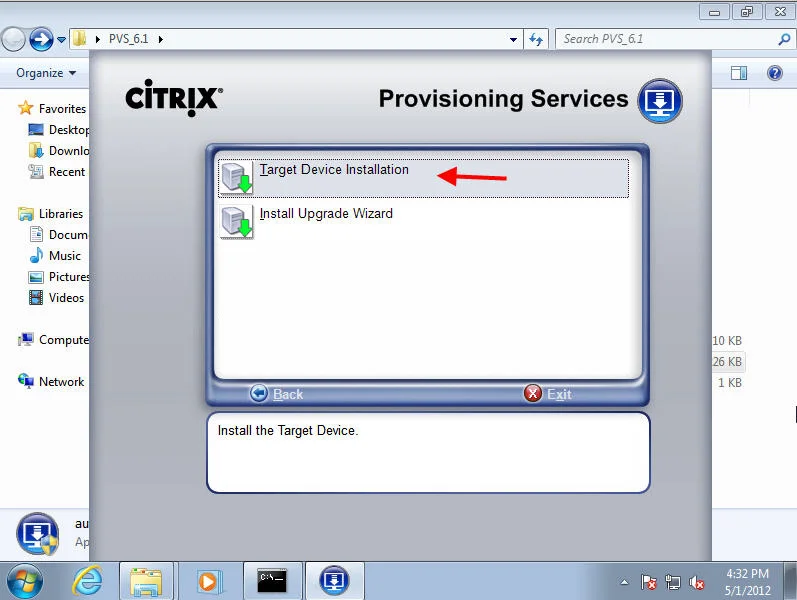
- Hit Target Device Installation on the 2nd page too and it will launch the wizard. Run through the EULA and hit Next through all the windows until the install is done.
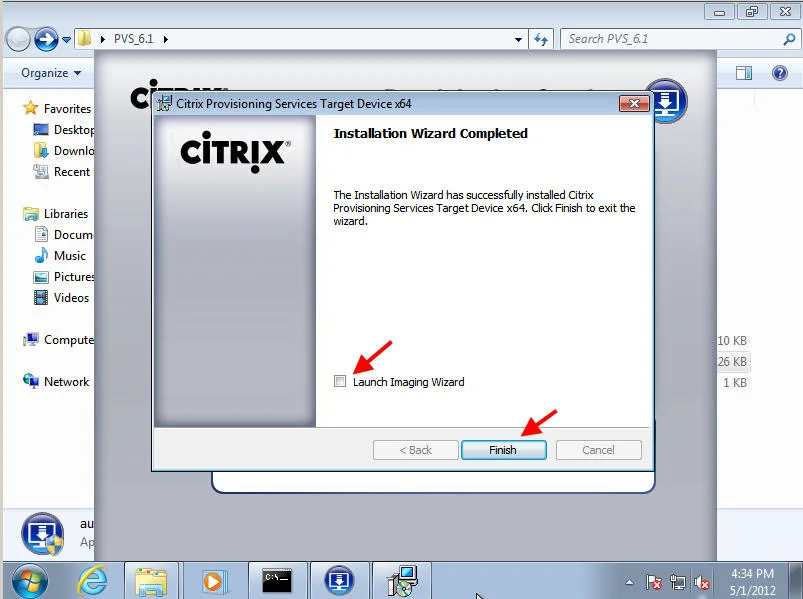
- Uncheck the Launch Imaging Wizard link and hit Finish.
- Hit Yes to reboot and mount your PVS boot disk as the VM comes back up or you can just shut down for now if you don't have one yet.

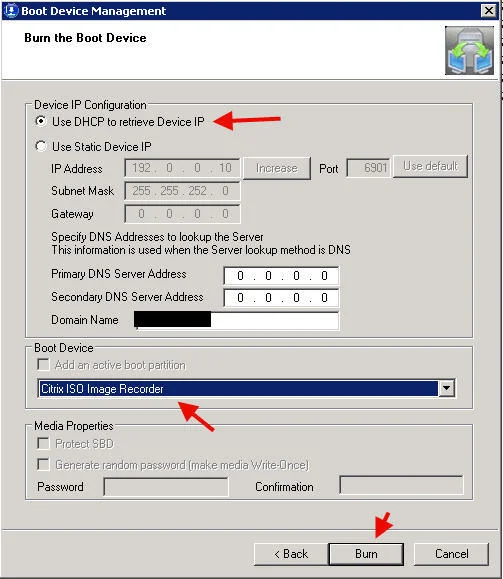
- Open up Provisioning Services Boot Device Manager (BDM) on your PVS server and create an ISO if you don't have one already. It needs to have the IP address of the server on the provisioning network NIC.
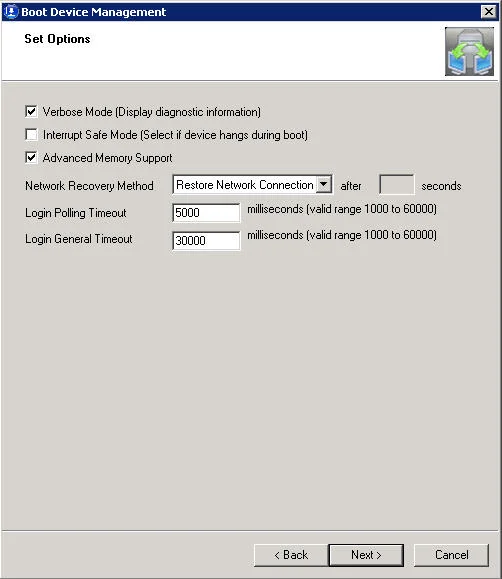
- Options can all be default
- Use DHCP, swith the Boot Device to Citrix ISO Image Recorder, then hit Burn. Drop the ISO in an ISO Library your XenCenter can see.
- Here's where things may differ for you if you have used older versions of PVS before Imaging Wizard is where its at today. The old way of doing things was pre-creating a device on your PVS server with the same MAC address as the VM's NIC, pre-creating a vDisk and calculating the necessary size, formatting it, assigning the vDisk to the device, then running BNImage to capture the system and push it into the vDisk. None of this manual work is necessary anymore. The Imaging Wizard works really well and will do everything for you. I actually first took screenshots of everything the manual way just for reference so you know where to look if something breaks. But then I figured that showing that whole process might confuse you so I will show you the Imaging Wizard way only. If you need me to, I can post an addendum to this article showing the manual way. Just leave a comment if you'd like to see it.
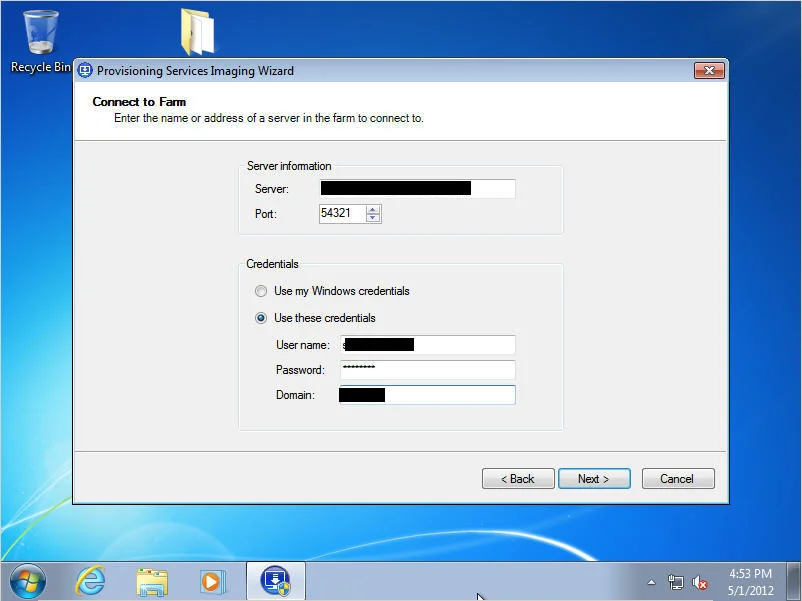
So now log back in once the VM is up and start Imaging Wizard. Enter your PVS server farm details.
- Hit next and let it Create a new vDisk. Just hit Next again.

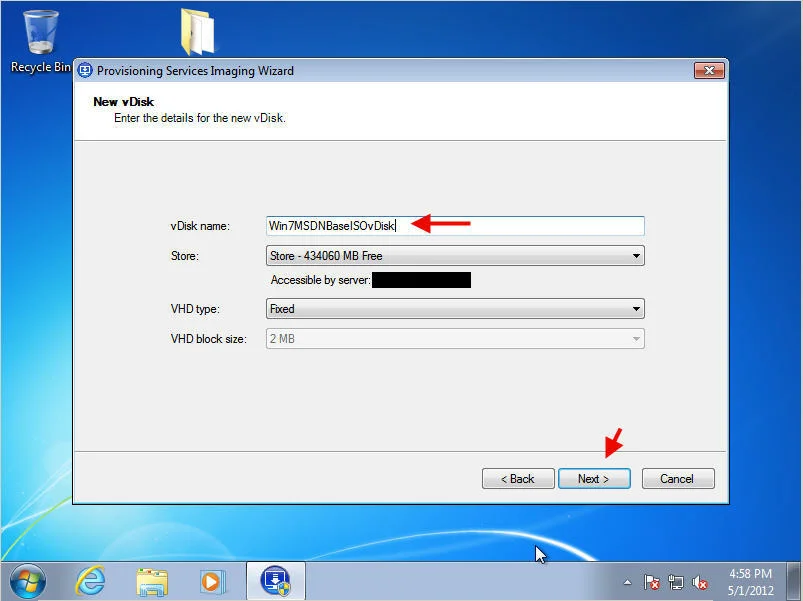
- Give the vDisk a name. The vDisk size in the store will automatically be calculated. I left the VHD type to Fixed but you can choose Dynamic. Citrix has started recommending Dynamic as a best practice these days. I like to do 16 MB block size if doing Dynamic personally. It just means it will grow in 16 MB chunks. Again, make sure you select a good naming scheme for your vDisks as it becomes very important to keep them organized.
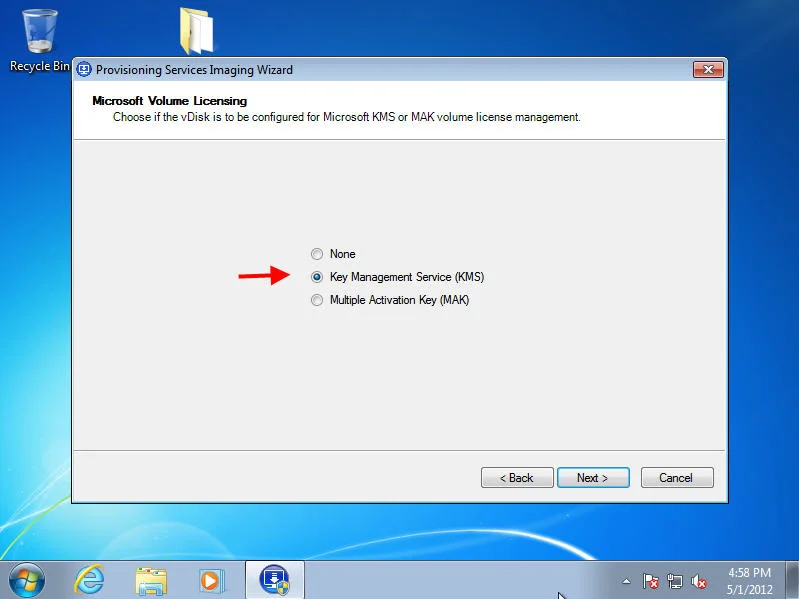
- Choose KMS for key management (assuming you are using KMS)
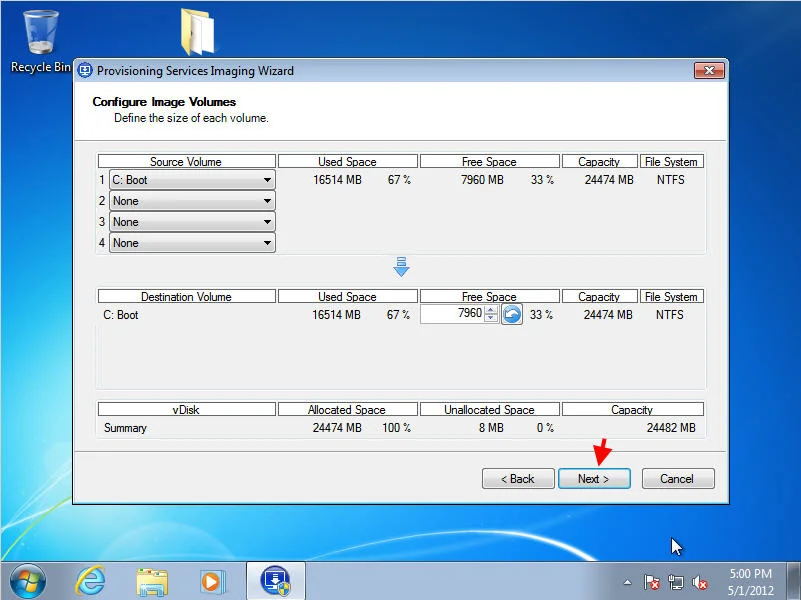
- Leave the image volume sizes all default
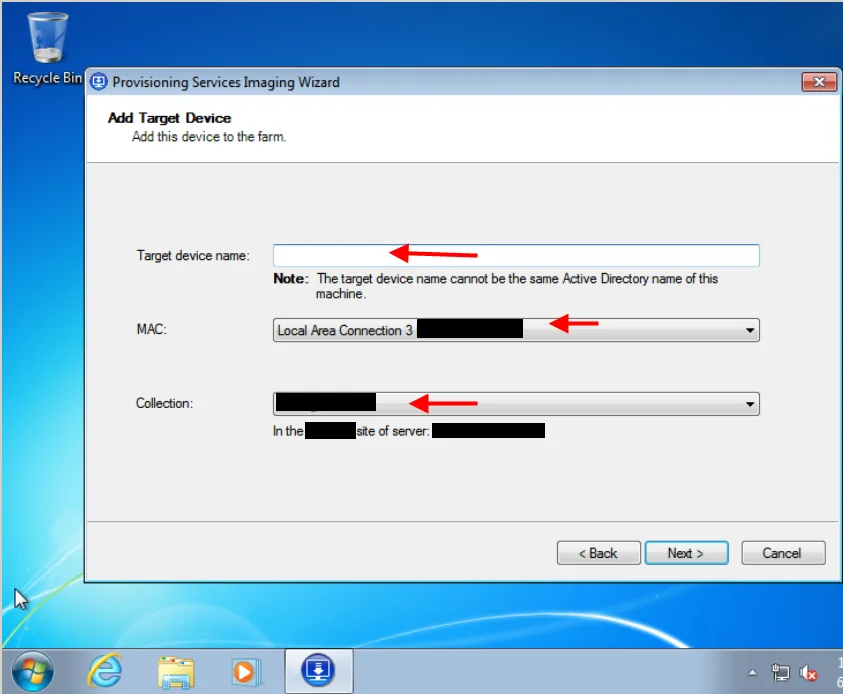
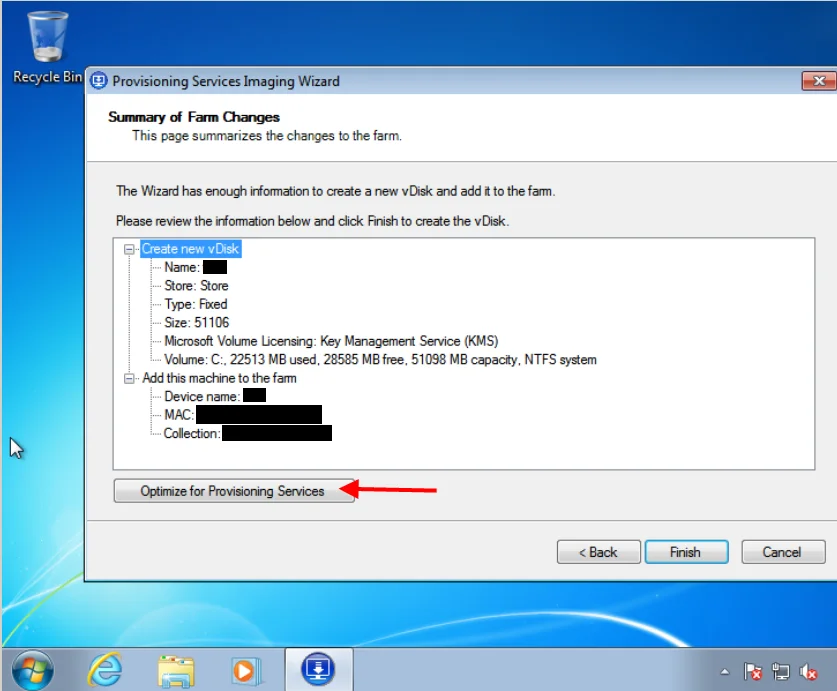
- Type in a target device name, choose your streaming traffic NIC, and choose a collection:
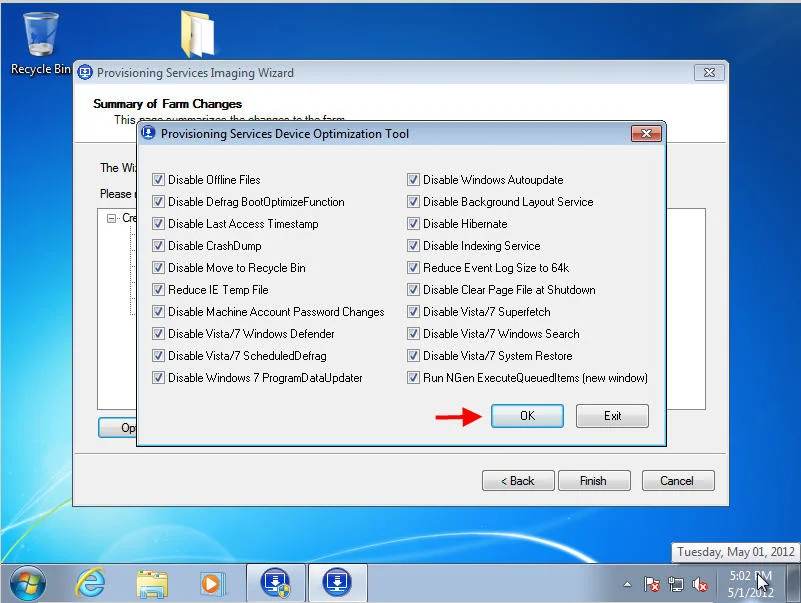
- On the confirmation page, click Optimize for Provisioning Services.
- This will make a ton of registry changes that will optimize your image for PVS using ngen.exe in a cmd prompt window. Just hit OK and wait several minutes as it completes this process.
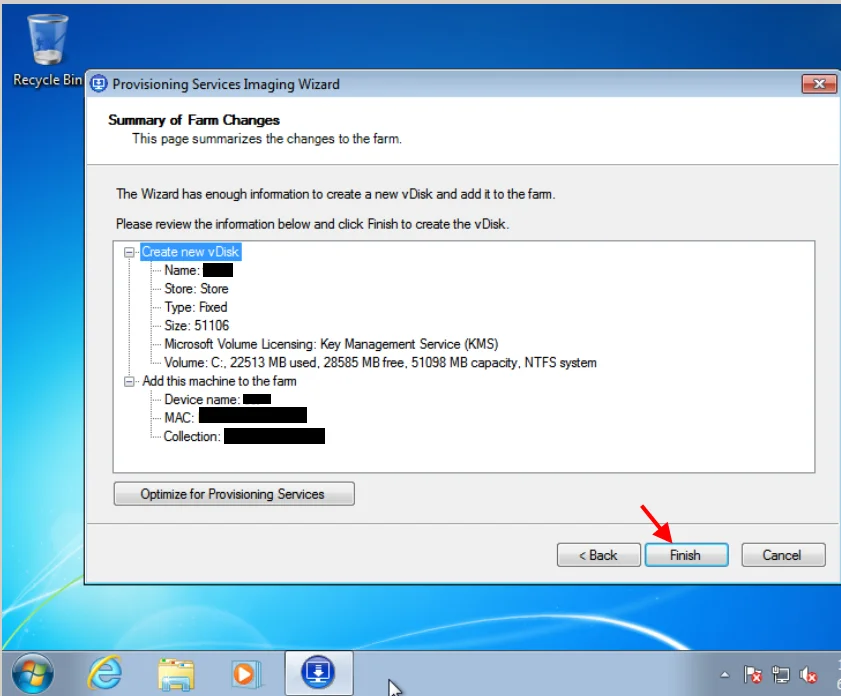
- Once it's done, hit Finish to begin prepping the vDisk on your PVS server's store. It will immediately allocate the space for the vDisk since you are using Fixed so make sure there is enough room.
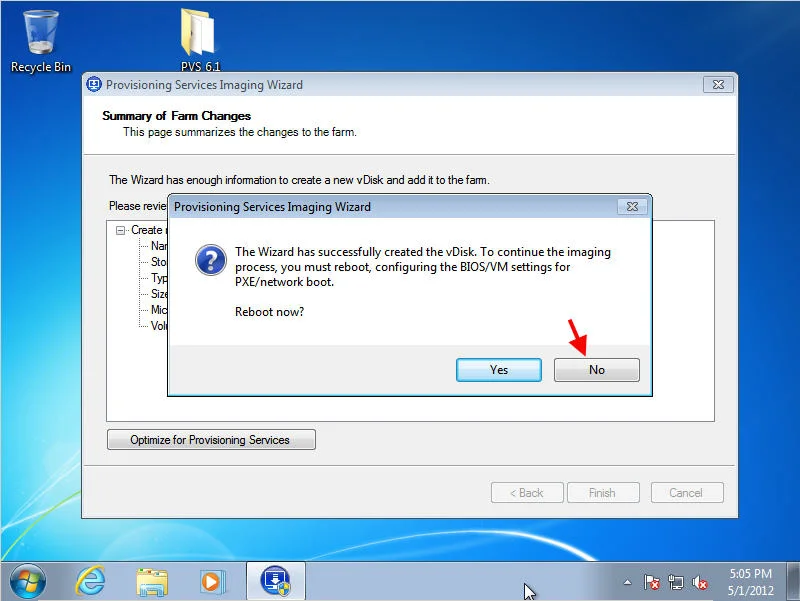
- Once it's done, it will ask to Reboot. Hit No.
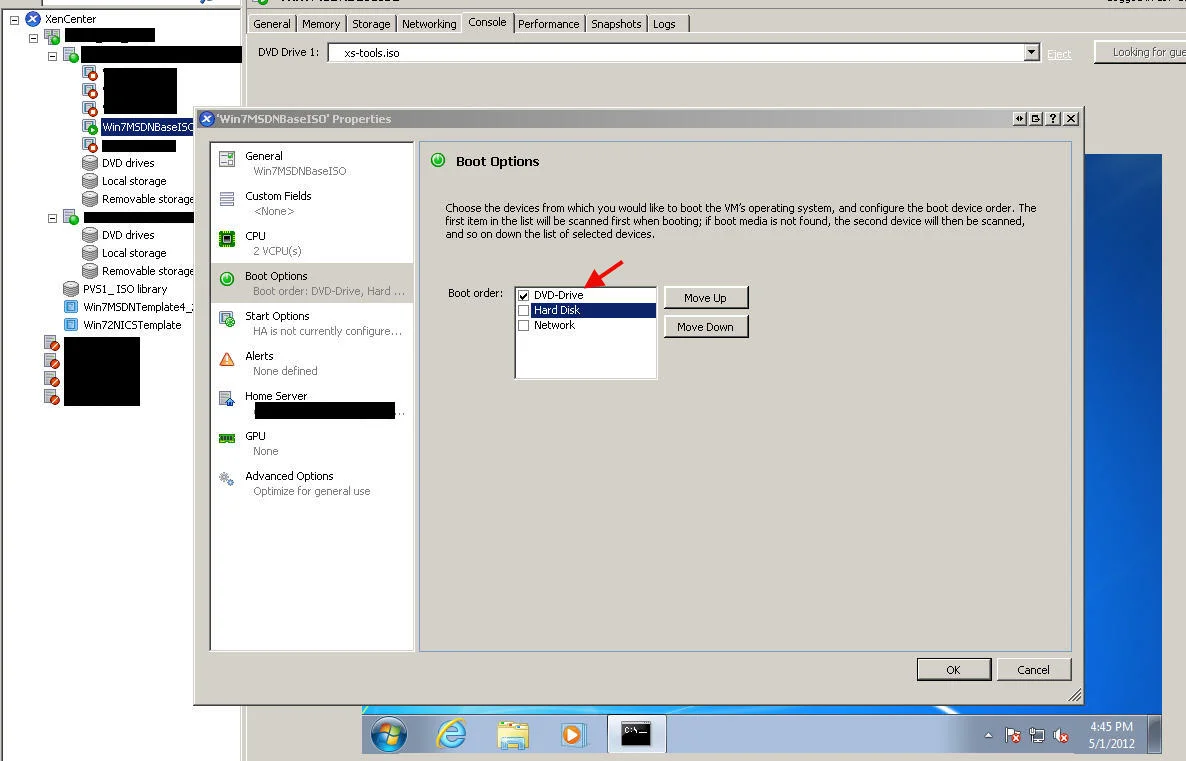
- Now right click on the VM in XenCenter and change the DVD Drive boot order to first and disable everything else.
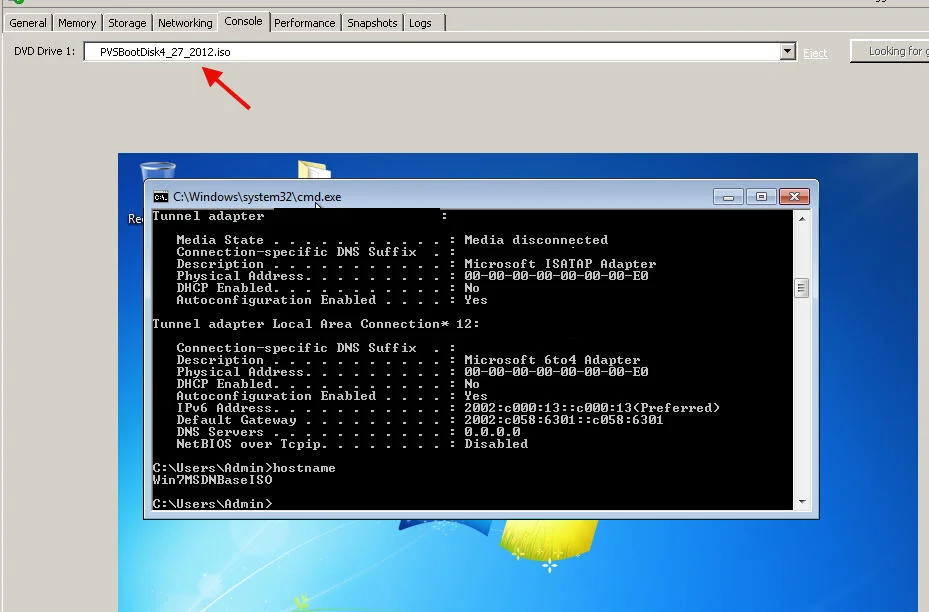
- Change the ISO in the DVD drive to the ISO you burned above.
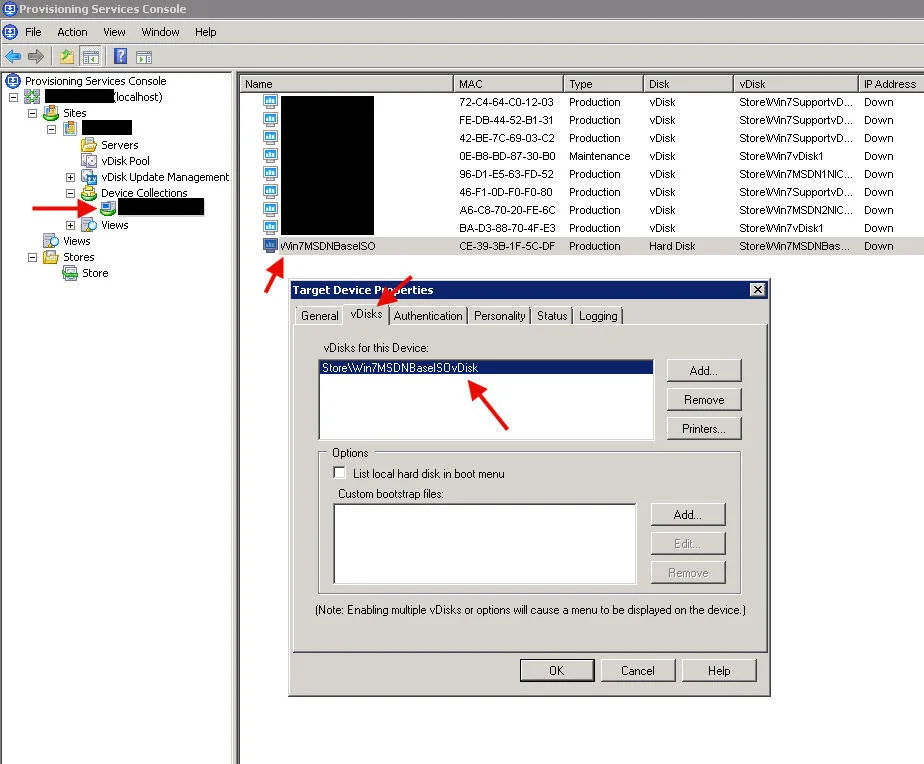
- Now go back to your PVS console and verify the device now has the vDisk attached under it's properties. You can also choose to list the local hard disk in the boot menu.
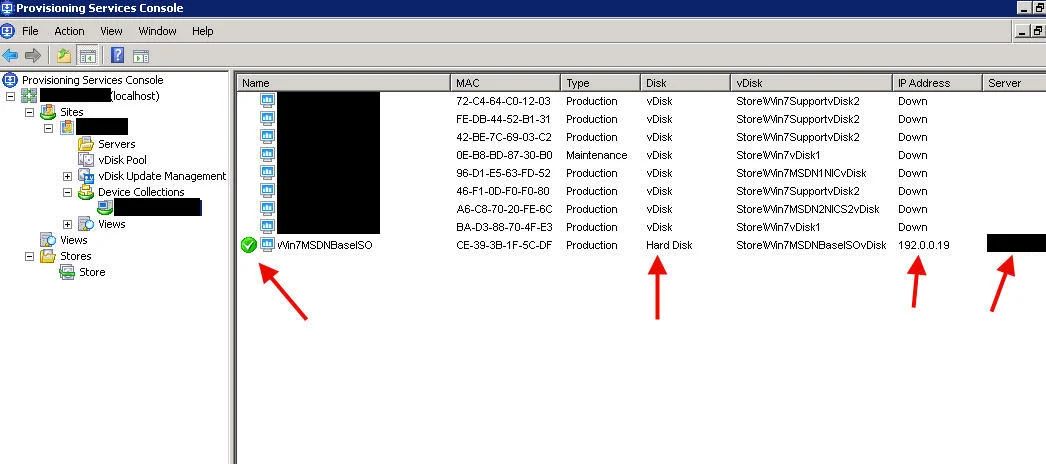
- Now you can reboot your VM. It will boot using your ISO, connect to the PVS server, obtain an IP on the PVS network, connect the virual disk you created. The vDisk is still in private mode. You can verify this in the PVS console easily. Just refresh and you will see a green check mark next to the device. It will have an IP and will tell you which PVS server it is connected to.
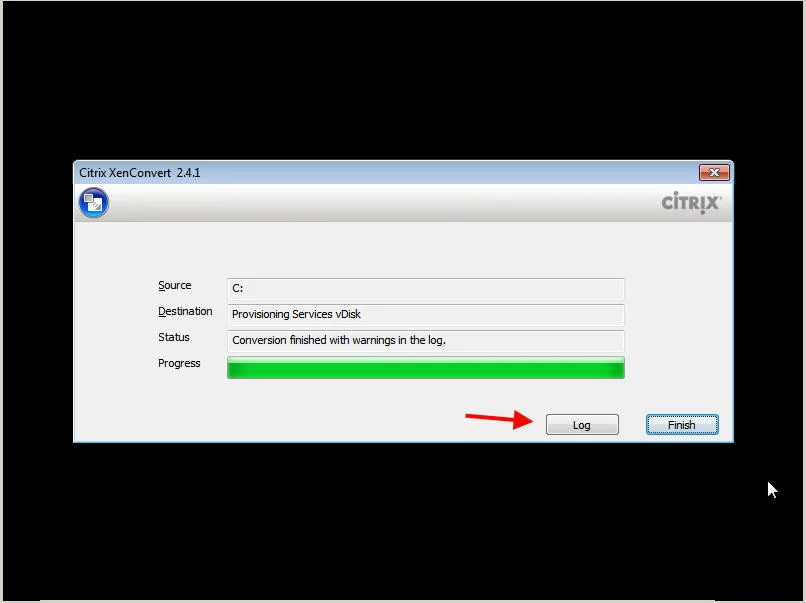
- Log back into your VM now. It will automatically kick off the vDisk capture by loading XenConvert to capture the image. It will begin pushing your image to the vDisk you created on your PVS server.
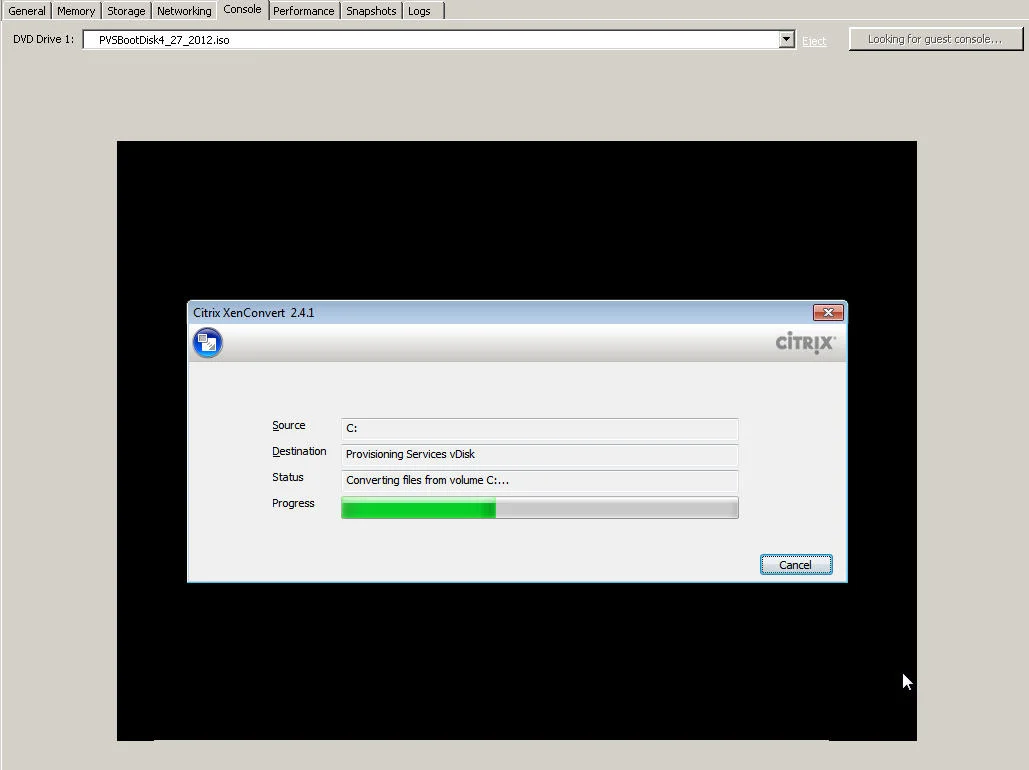
- Sometimes there may be errors (non-critical) but make sure to read the log and verify there is nothing critical in there. Then hit Finish.
-
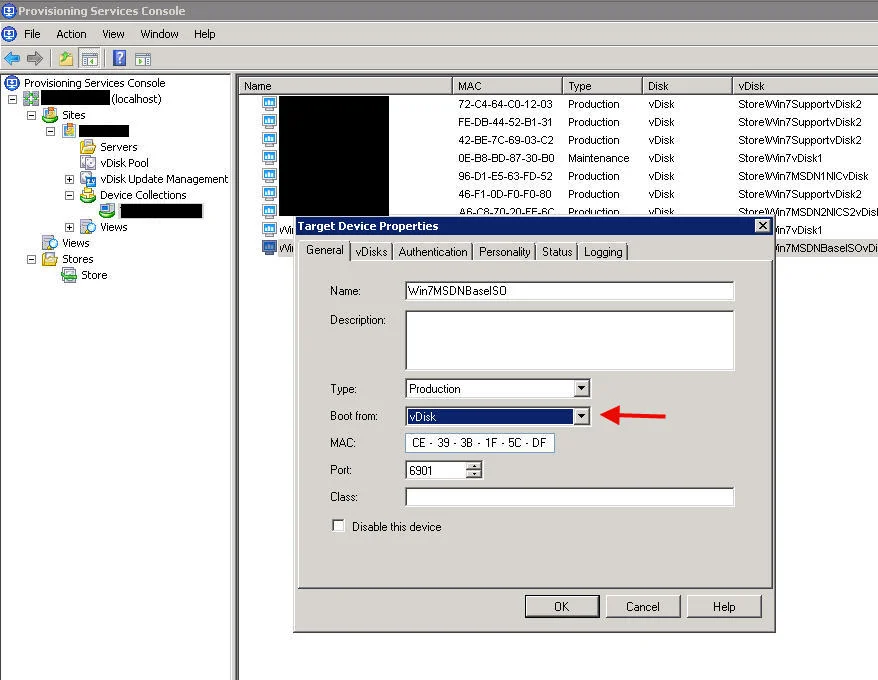
You will be logged back into your Windows 7 VM at this point. Go ahead and shut it down.
-
Go to your PVS server and change the Boot From properties on your device to vDisk.
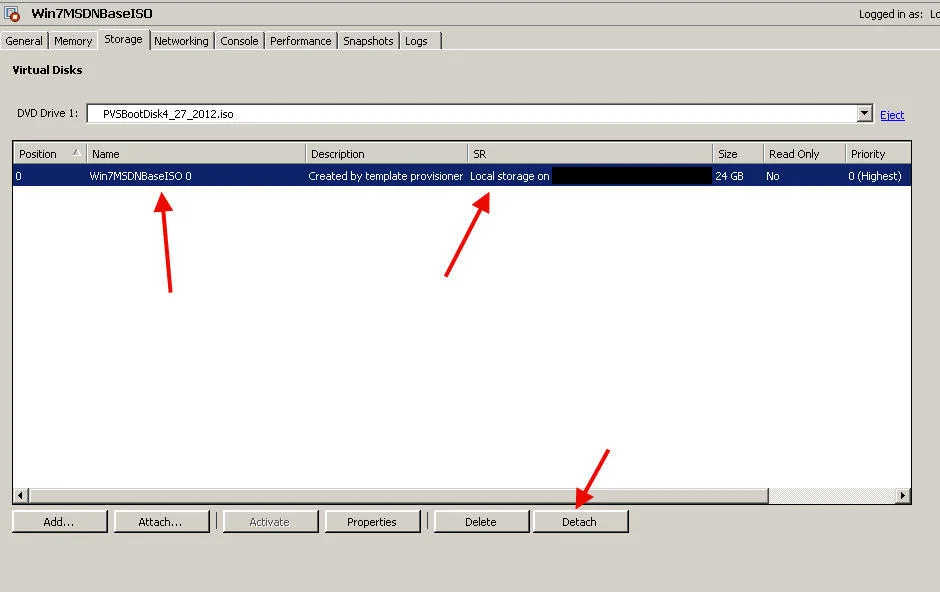
- Now go to the storage options of your VM and detach the local storage on your XenServer. You don't need it anymore. Then boot up your VM again. This time you will be booting directly into the vDisk image you had pushed across before on the server.
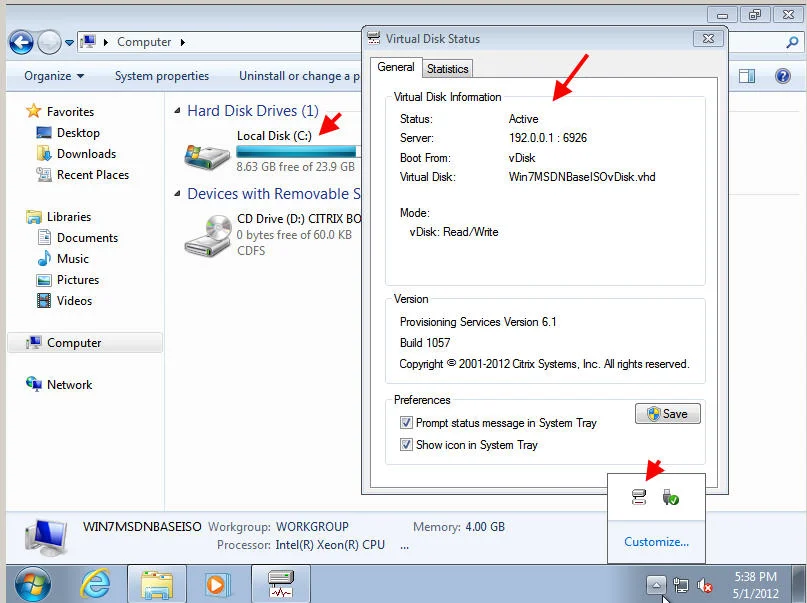
- In the system tray menu, you can verify your vDisk is connected. Also in Explorer, you will only see the c: drive which is your vDisk.
- I HIGHLY recommend you make a backup copy of the .vhd in your Store right now. It is a clean image with no apps and if something happens, this is the image you can revert back to. Think of it as your "Stage 1" vDisk. Make the copy and store it away somewhere safe. Once you do that, since it is still in private mode and if you haven't done so already earlier, go ahead and add it to the domain. Then reboot when prompted. Don't forget to add your necessary security groups as local admins before rebooting.

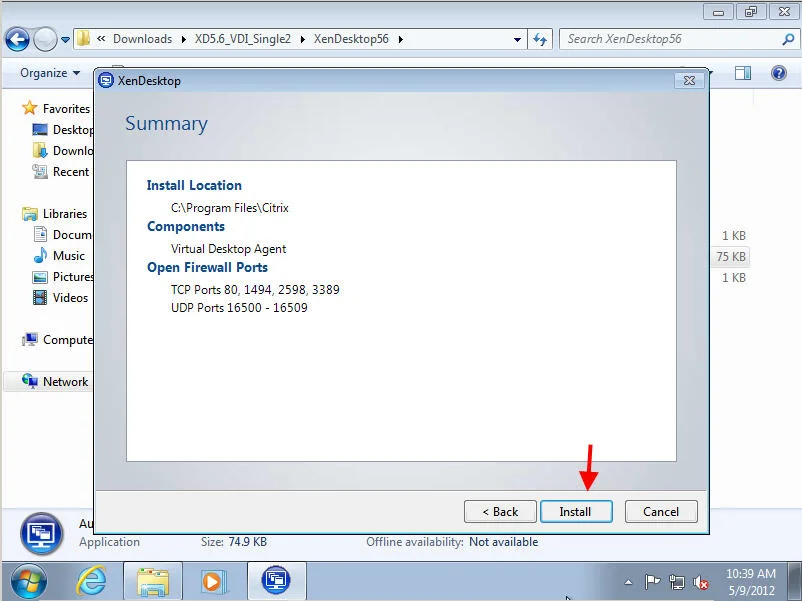
- Log back in and install and other apps your company may need for the base image. You can begin installing core applications like Adobe Reader, Flash, SEP, SnagIt, NAC agent, etc. Apps that need to reside on every PC on the network. Nothing specific. You should also do your OS customizations at this time if you have any. Then lastly, install the XenDesktop 5.6 VDA agent. Make sure you use AutoSelect.exe to install it and not the .msi on the CD or you will have issues. Your path will be something like this if you left the XenDesktop 5.6 install files somewhere on your DDC:
\\yourDDCservername\Downloads\XD5.6_VDI_Single2\XenDesktop56\AutoSelect.exe
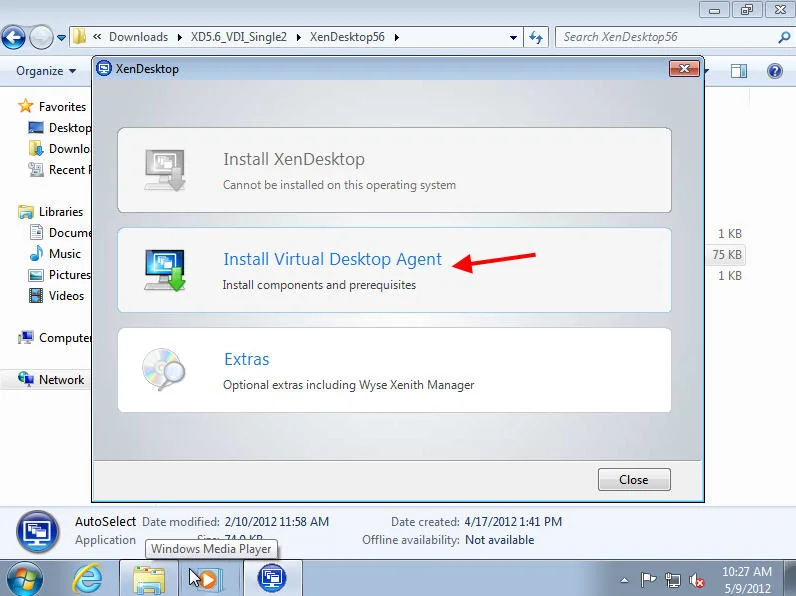
- Choose Advanced Install

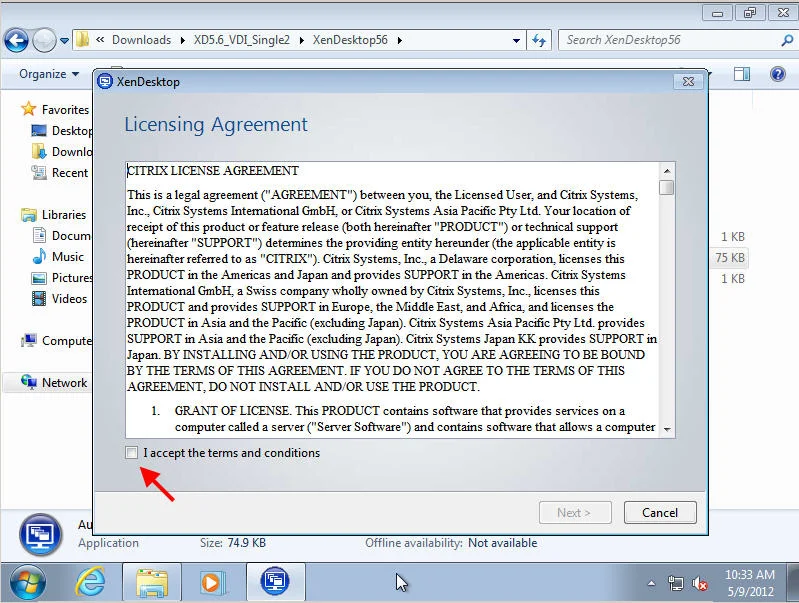
- Accept the EULA
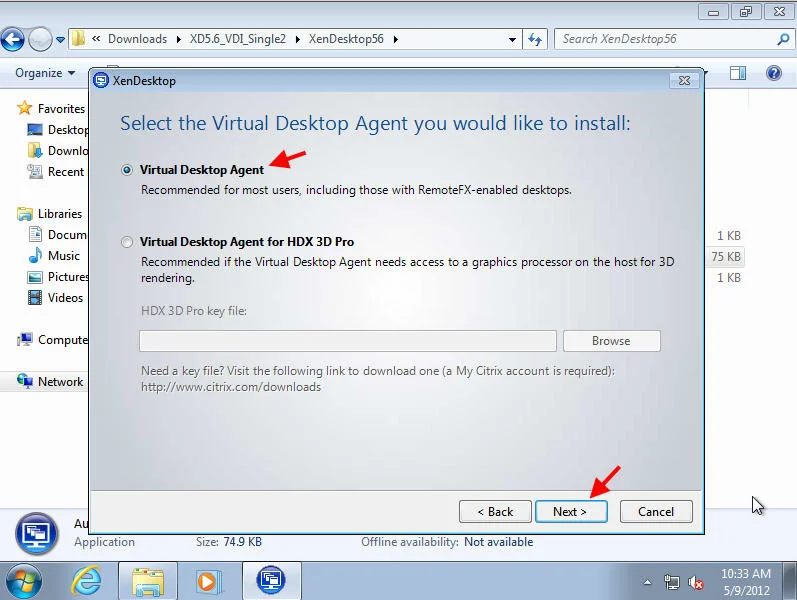
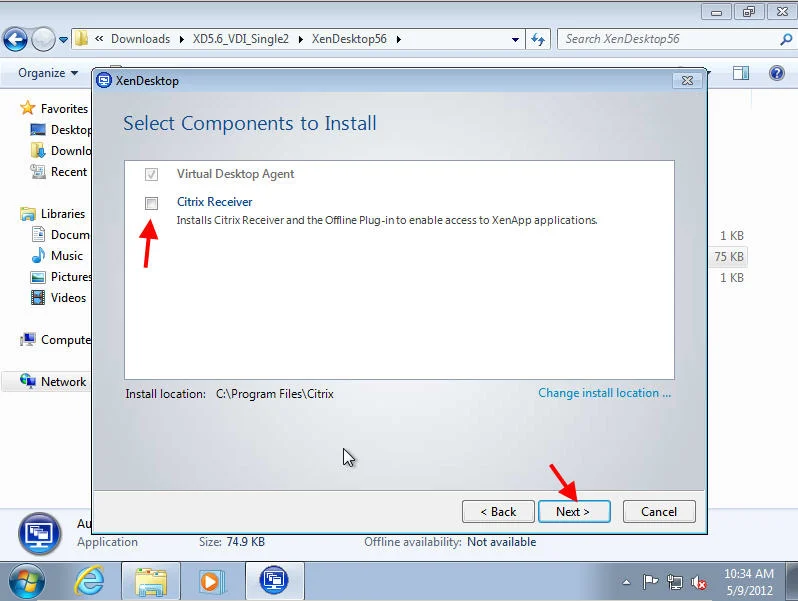
- Leave the default Virtual Desktop Agent
- I usually uncheck Receiver. I like to deploy it later using the Enterprise version I want our users to be using.
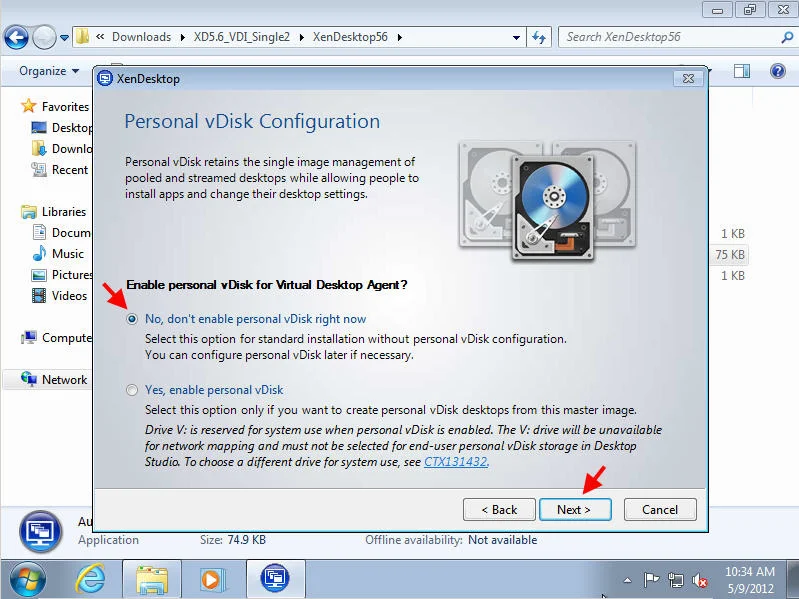
- Leave PVD disabled for now. You can enable personal vDisk later if you need to.
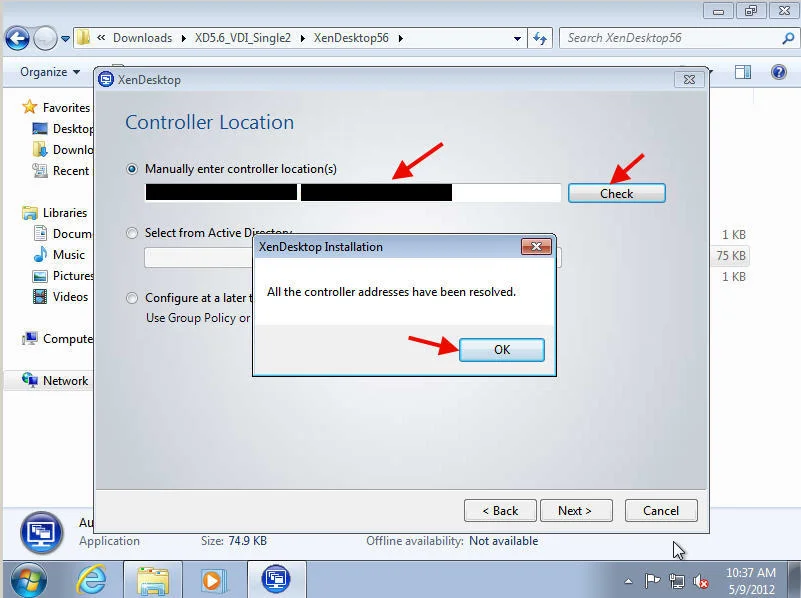
- Type in the names of the DDCs. You can seperate multiple DDCs with spaces. They must be FQDNs. Hit the Check button to verify they can be resolved. Then hit Next when done.
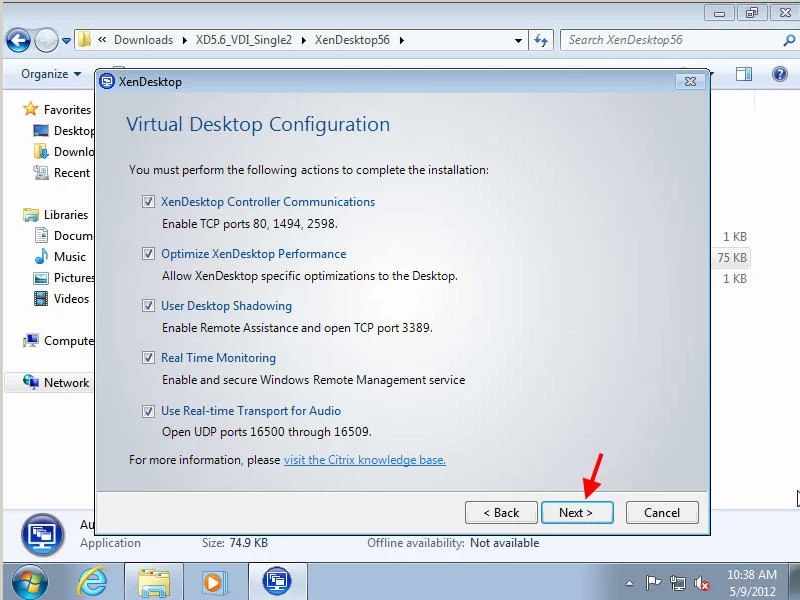
- Leave the VDA config settings the default and hit next
- Hit next at the summary page
- Hit Close and it will restart the VM.
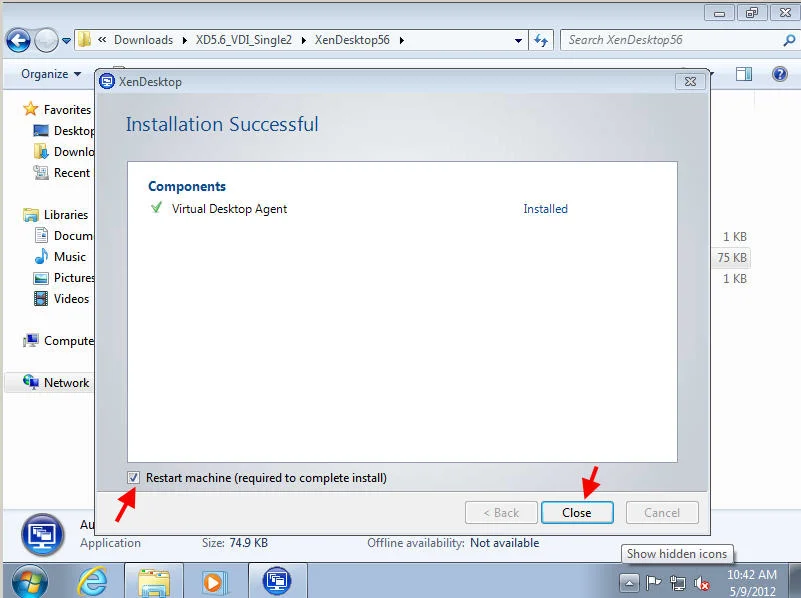
- When the VM is back to the login prompt, go ahead and shut it down. Then go to the PVS Console and swtich the vDisk from private to standard mode (multi-device) mode which makes it read-only. If you see a lock next to the vDisk, you may need to clear it first.
That's it, you are now complete with your base image setup.
CREATING A XENSERVER VM TEMPLATE
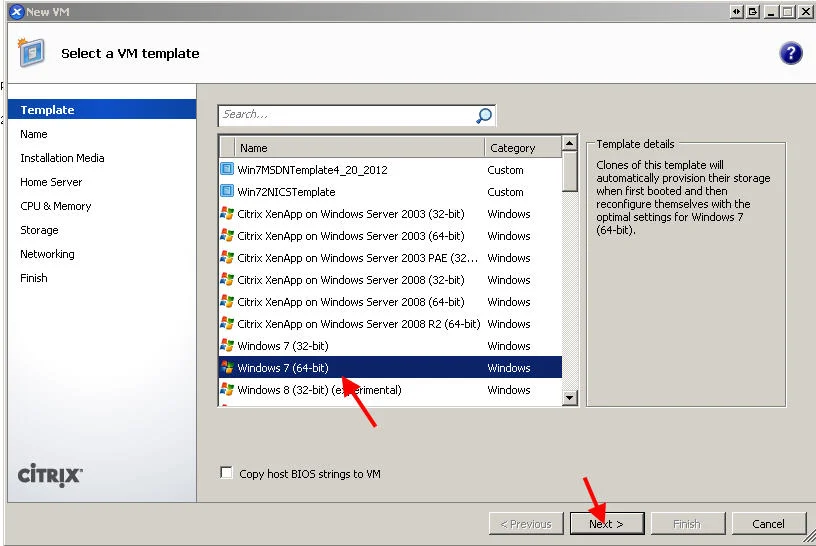
- Now you need to create a VM template that PVS will use to spin up new VMs with. You can simply create a copy of the VM you had been working on and convert that copy into a template or you can create one manually. I suggest copying and converting to a template, less change of screwing something up. If doing it manually though, in XenCenter run the "New VM" wizard. Choose the Windows 7 (64-bit) template.
- Give it a name and description
- Boot from network
- Choose a host server
- 2 vCPUs, 4 GB RAM (4096 MB)
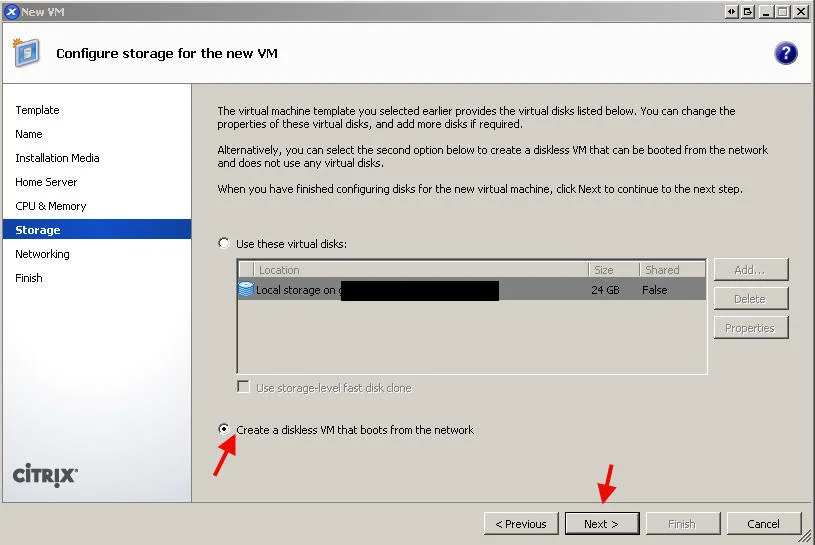
- Choose "Create a diskless VM that boots from the network" and hit Next.
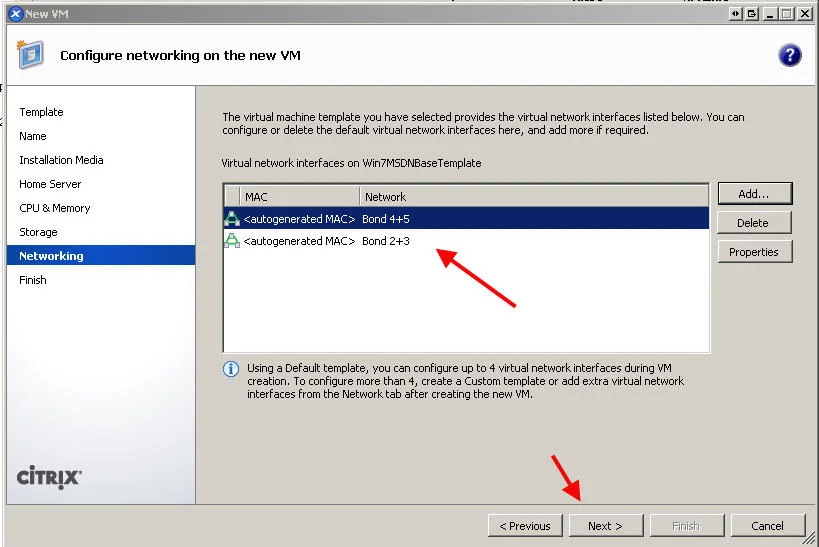
- Delete ALL the NICs, you will recreate in the right order in the next step. Click Add and add the PVS bond first, THEN the network bond. Same as before when you created the original VM. It is critical you get this right and it matches the VM.
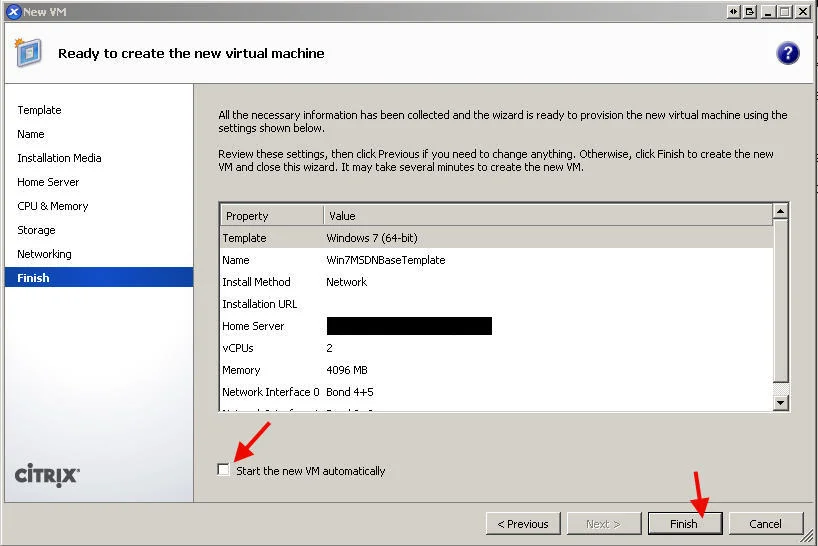
- Uncheck "Start the new VM automatically" and hit Finish.
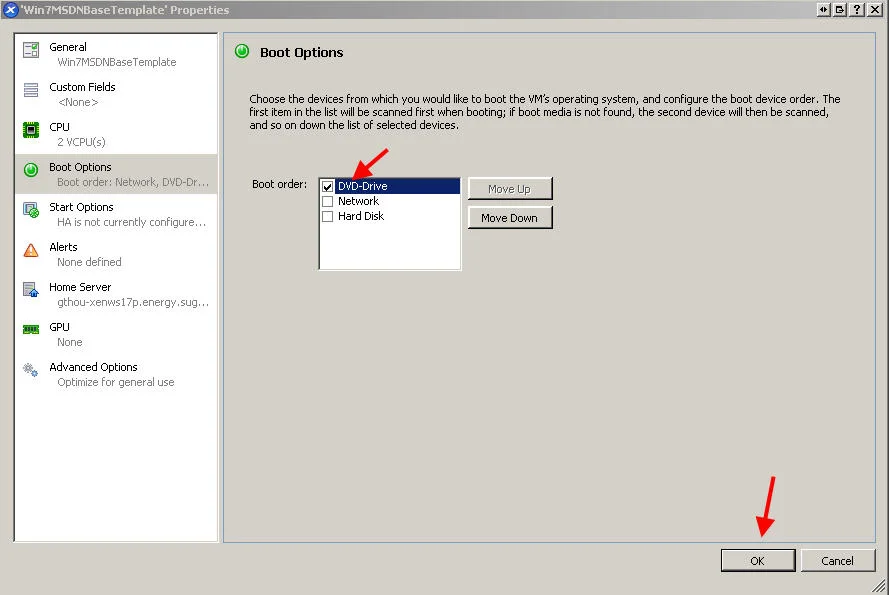
- Make sure to change the boot options to DVD drive only and move it to the top since we are using BDM (PVS boot disk). Also make sure to mount the PVS boot disk ISO at this time.
- Right click the VM and click "Convert to Template..."
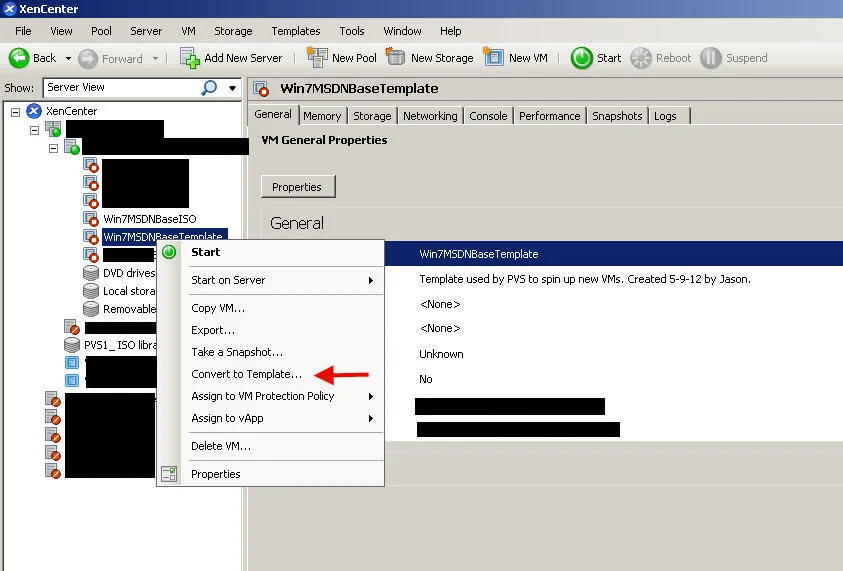
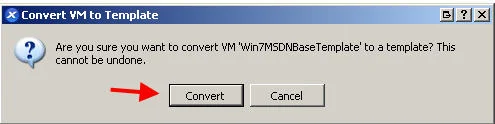
- Hit Convert at the confirmation prompt
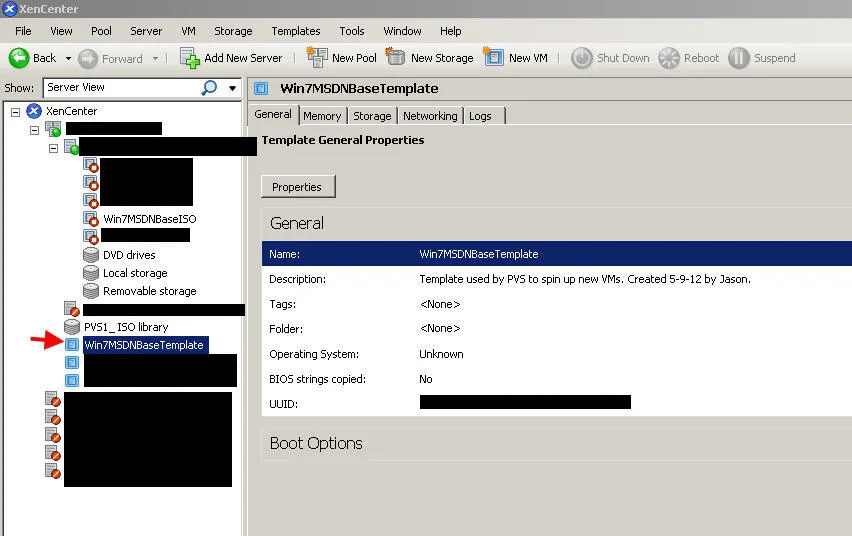
- Now you can verify it is a template (blue box next to it) in XenCenter
PROVISIONING VMS USING THE PVS SERVER AND XENDESKTOP DDC
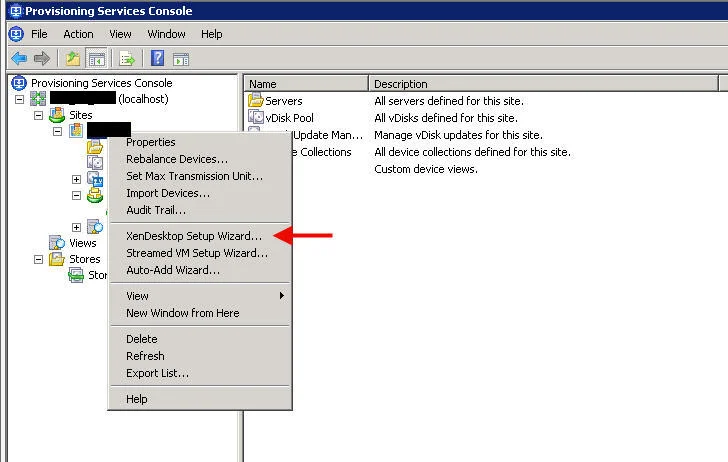
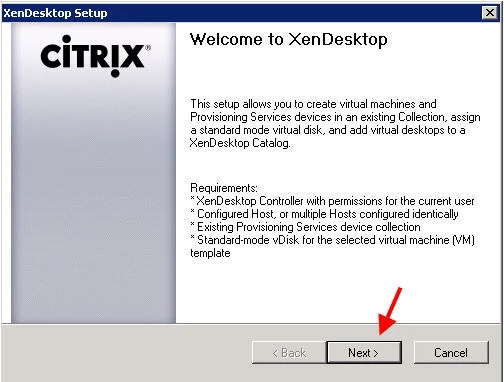
- Now it's time to start provisioning new VMs. In the PVS Console, right click on your site name and click "XenDesktop Setup Wizard..."
- Hit Next at the Welcome screen
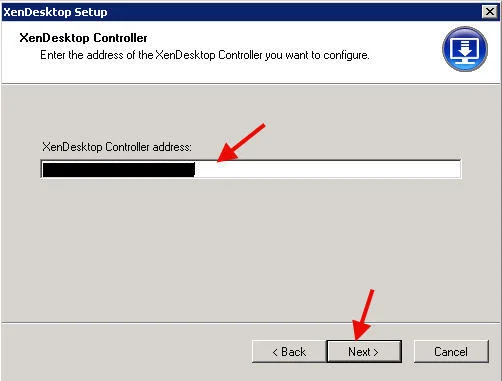
- Type in the FQDN of only one of your DDCs and hit Next
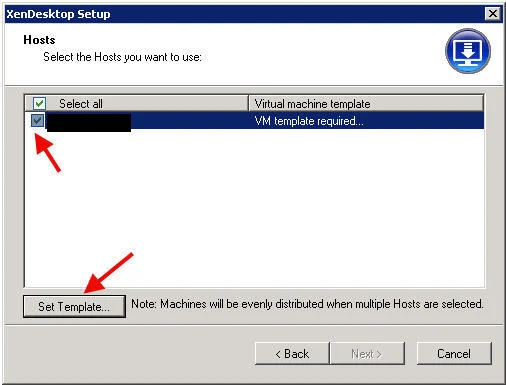
- Select the XenServer host you want to run your machines on and then hit Set Template to set the VM template.
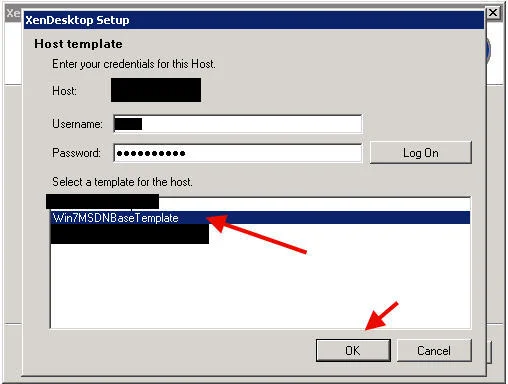
- Type in credentials for your XenServer and hit Log On, you will see all the templates on the host. Choose the VM template you had created in the steps above and hit OK and then Next.
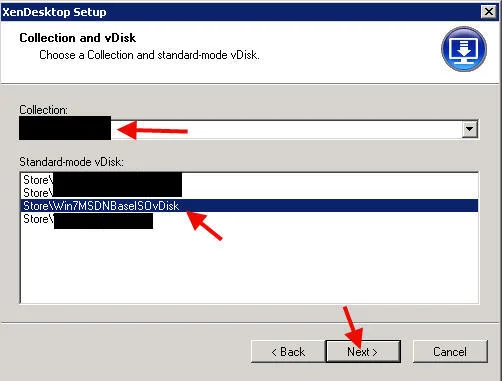
- Choose your Device Collection and vDisk
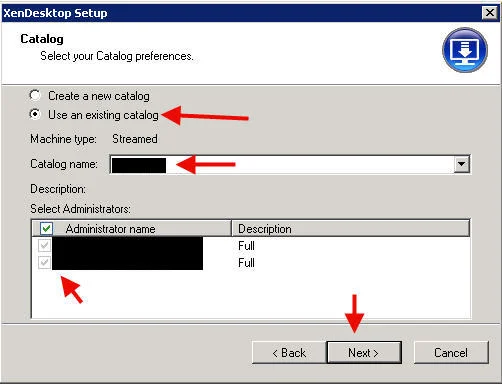
- Now you can create a new Catalog or use an existing catalog. In this example, I am going to use an existing catalog. Select your Admins and hit Next.
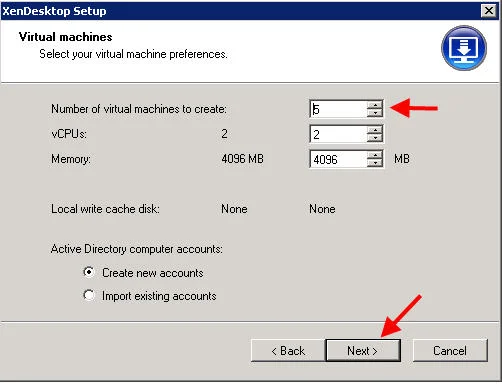
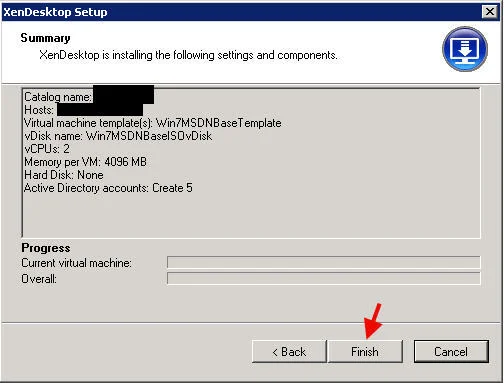
- Choose the number of VMs to create. I will choose 5 in this example. Leave the default of creating new AD computer accounts.
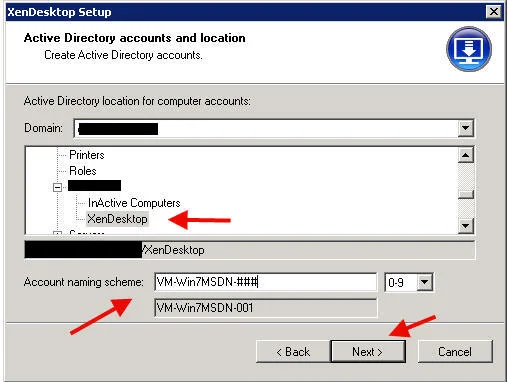
- Choose the OU you want your new VMs to be put in. You can also choose the naming scheme for the new VMs at this point. You could use something like "VM-ACCT###" for your Accounting VMs for example. Hit Next.
- You will see the Summary screen. Hit Finish and your VMs will start to be created. The progress bar will show you the progress but you can also go to XenCenter and watch the VMs beign created. They will not be powered on by default since you haven't instructed your DDC to do so yet.
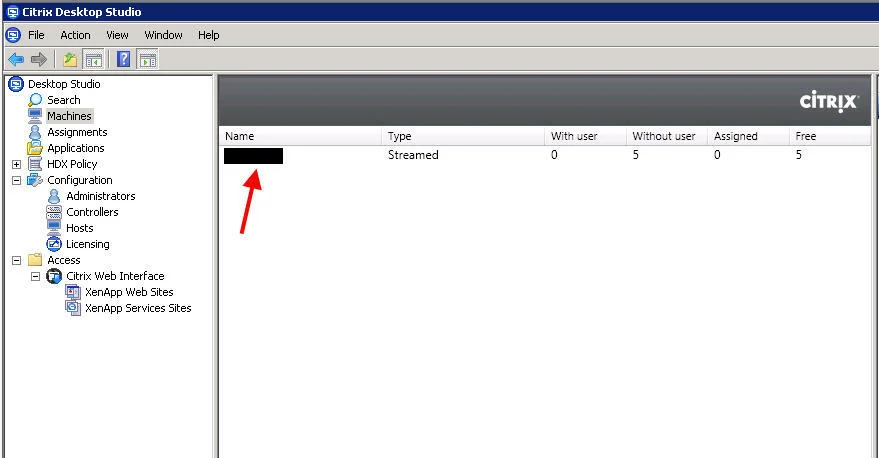
- Now go to your DDC and open up Desktop Studio. Under Machines, you will see your catalog and it will show there are 5 free machines that have not been assigned.
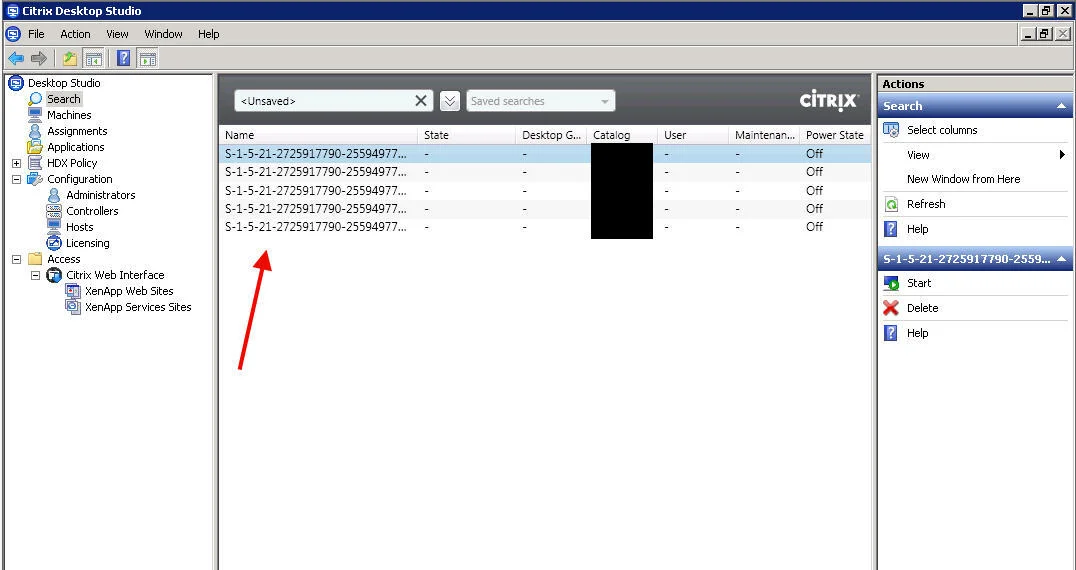
- Double click on the catalog and you will see the 5 machines but their SIDs since they have not been powered on yet.
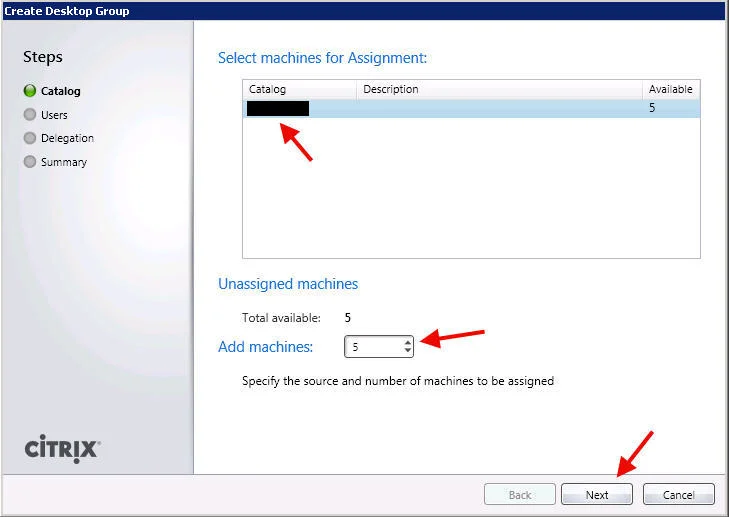
- Click on Assignments in the left and create a new Desktop Group
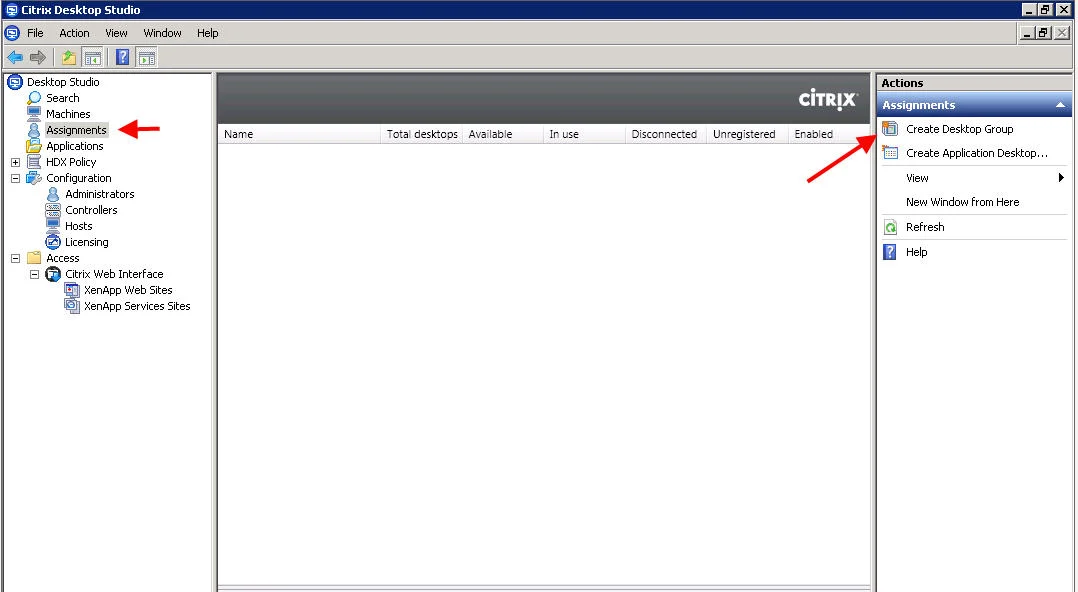
- Choose your Catalog, add all 5 machines, and hit Next
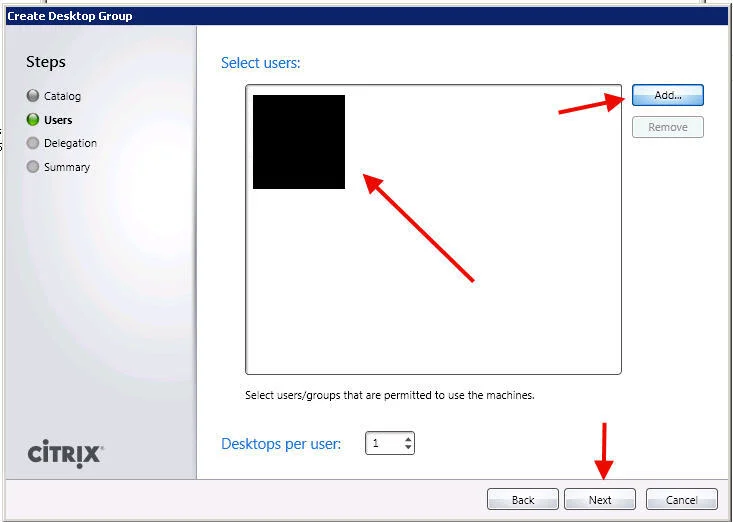
- Add your users and hit Next
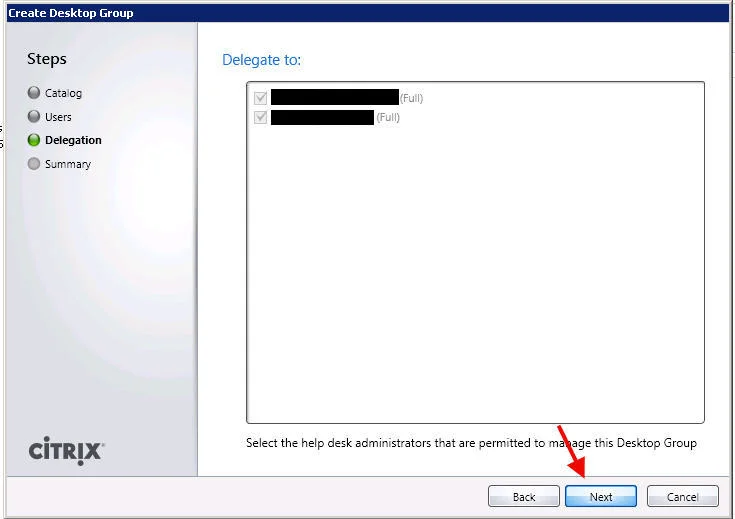
- Admins should already be selected so hit Next
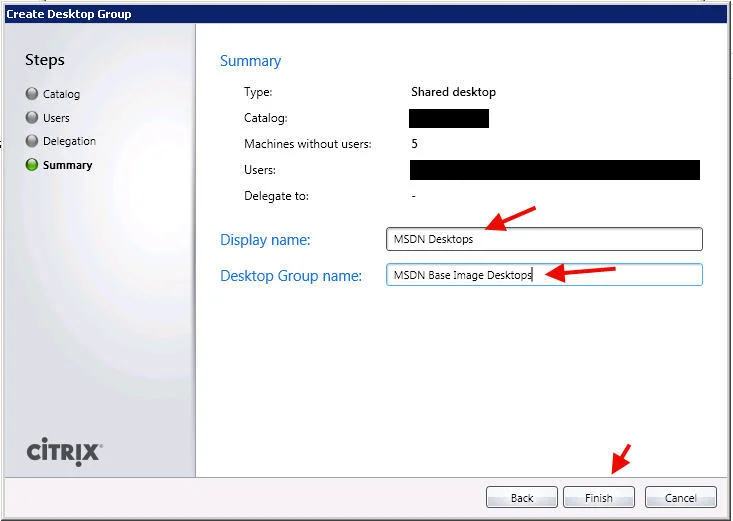
- Choose a Display Name and Desktop Group Name. The Display Name will be shown to the end user in the Web Interface. The Desktop Group name is for within Desktop Studio. Hit Finish.
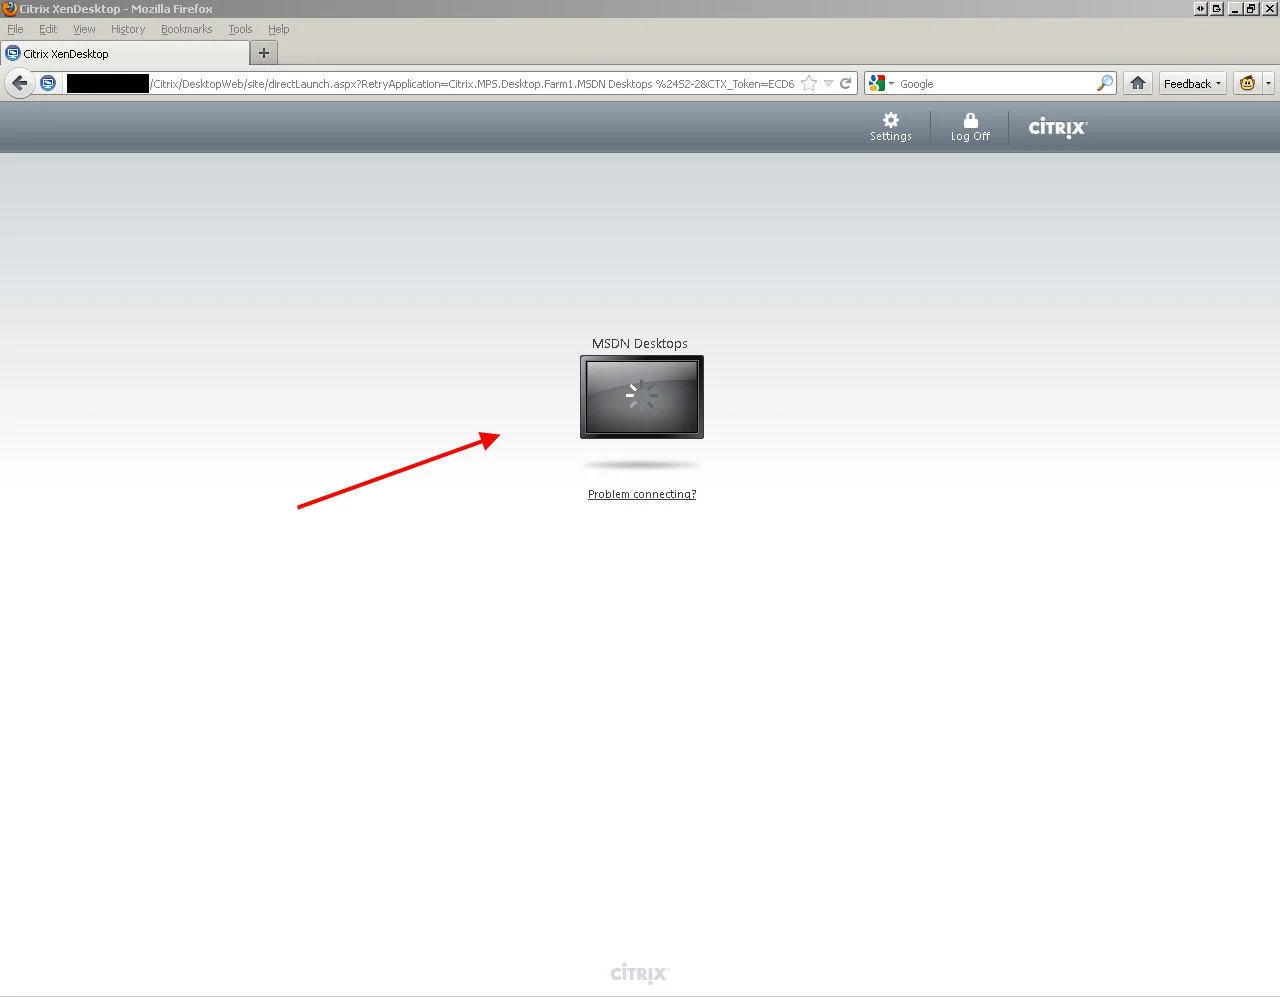
- Now go to your Web Interface (or the DDC itself in this example). Login using an account you have assigned one of your VMs to. If it's the only thing on your WI, the desktop will start booting up immediately.
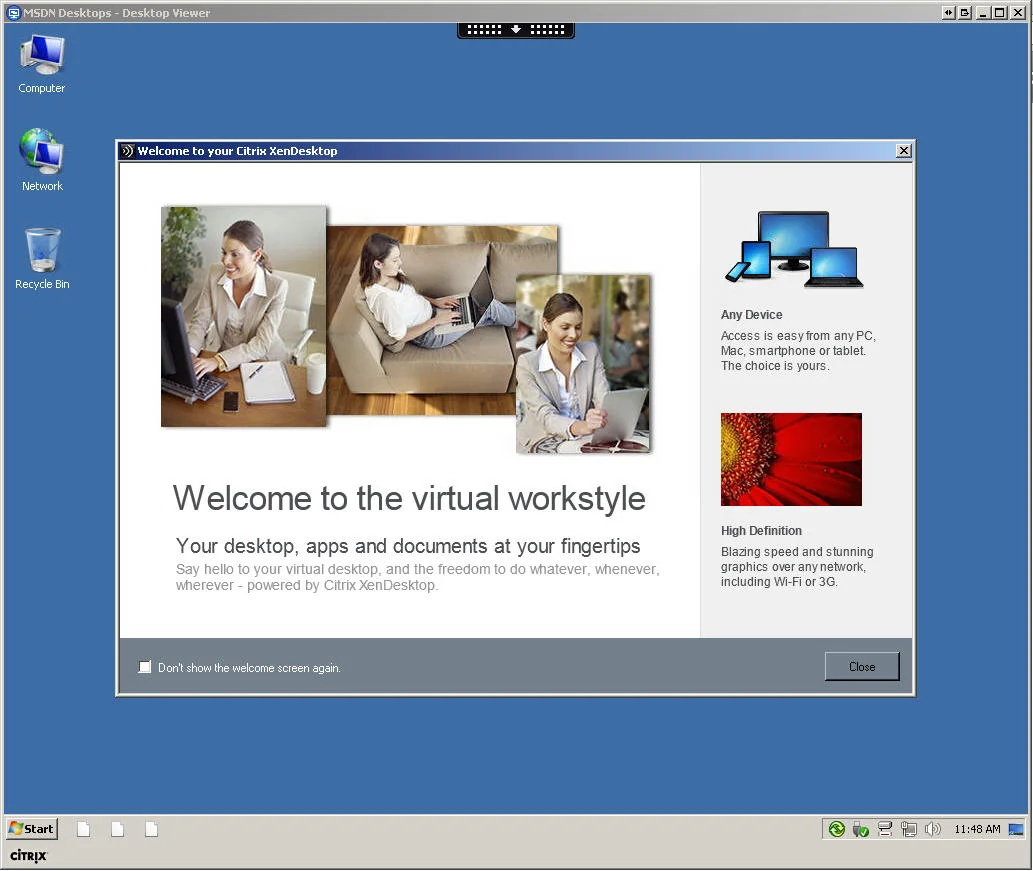
- Log into your new VM and create and you will see the Welcome message. Yes my wallpaper, quicklaunch, visualizations are different from default Win7 because I was playing with some profile customizations when I took these screenshots. Just ignore that.
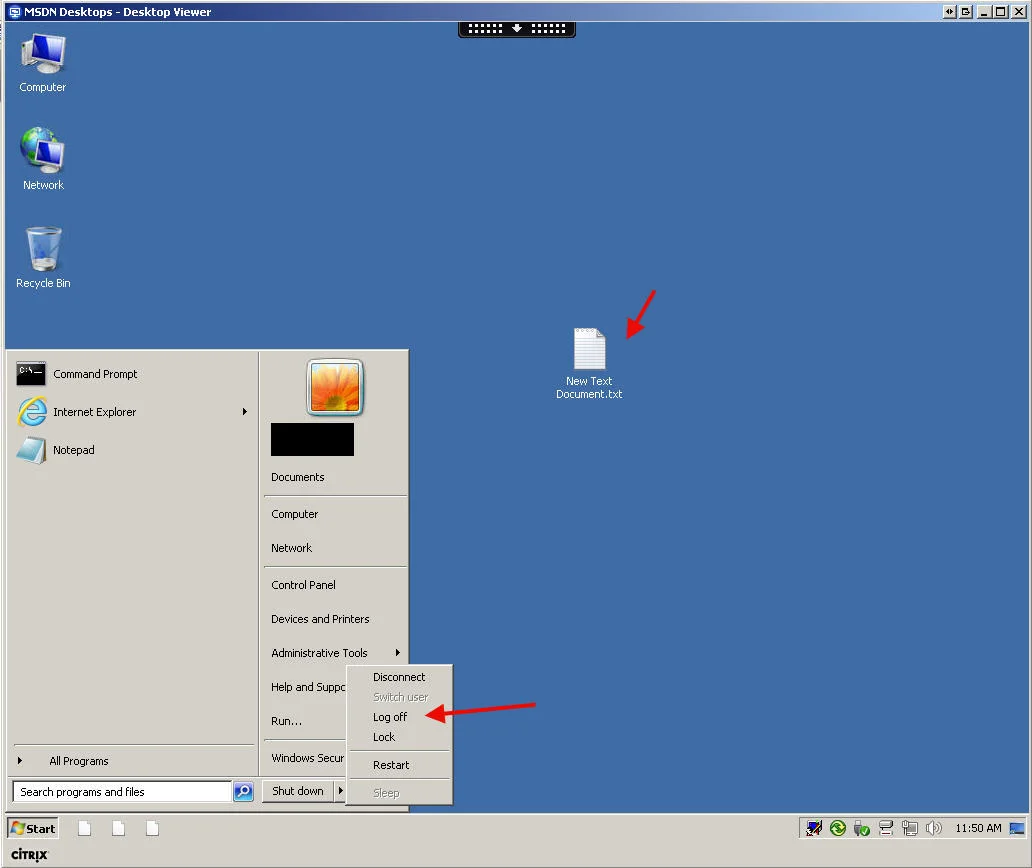
- Create a new text document on the desktop. Then log off.
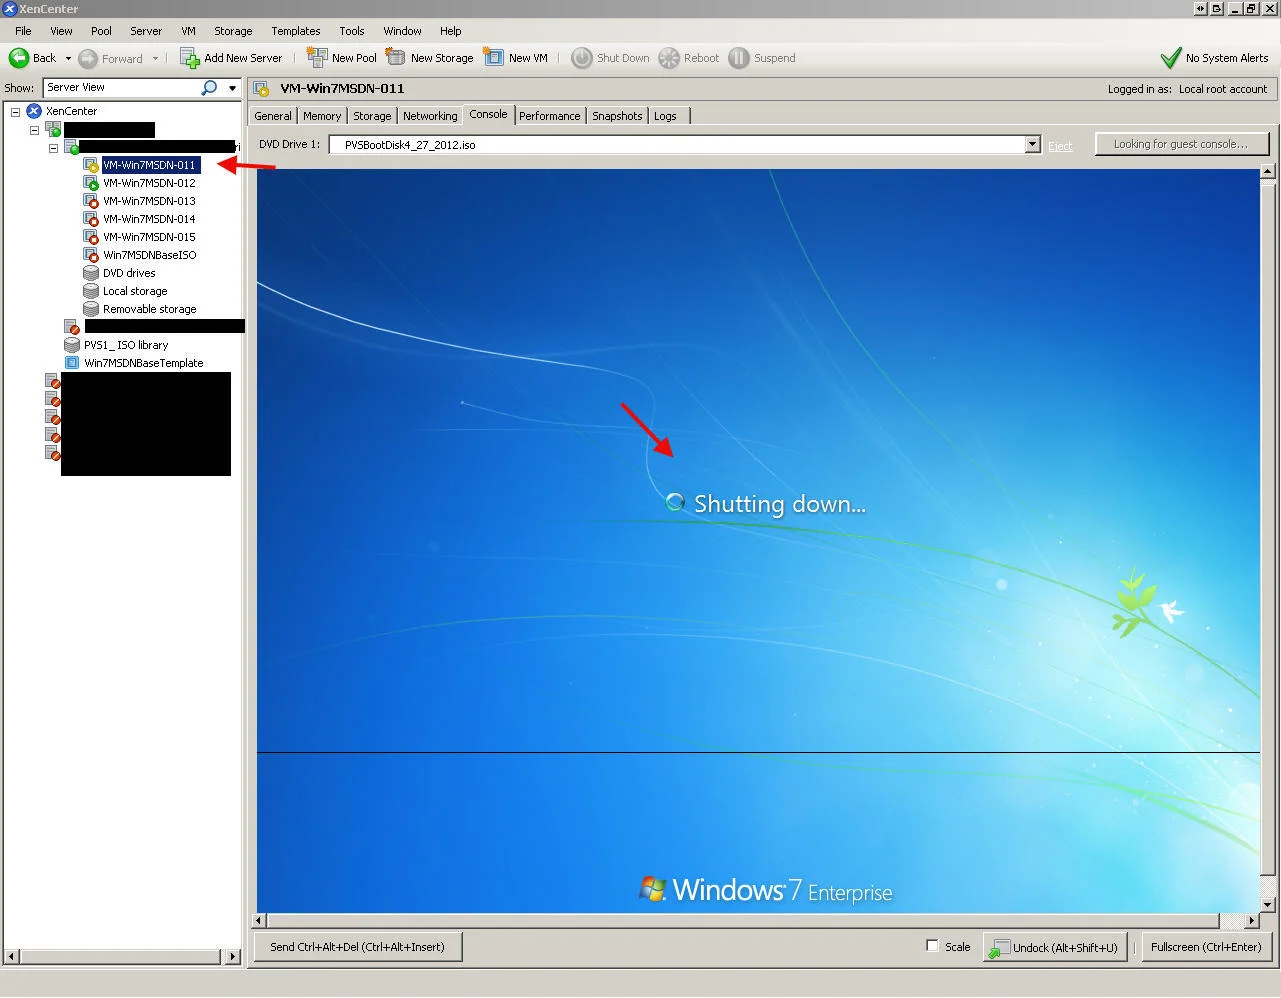
- You will notice in XenCenter the VM you were on is now being shutdown automatically. Basically getting it ready for the next user with a clean slate.
- Click the desktop icon again on the WI and it will launch the VM again. It will likely be another VM entirely you will be logging onto, but of course it will look the same. You will notice your text document is gone now. Exactly as expected.
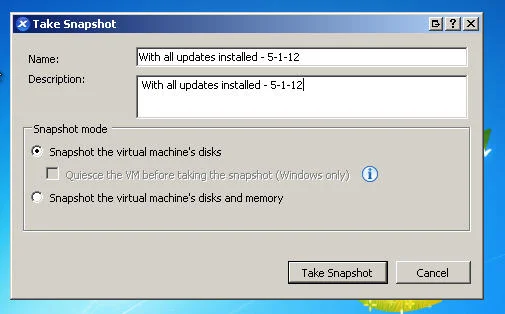
That's it! You are now up and running with your first provisioned desktops. Now you can create copies of the VHDs and begin customizing your images for different departments. Make sure the disks are in private mode when making your changes. You can also use the versioning feature for little changes to the images like Windows Updates. More on this later.
SETTING UP WRITE CACHE
So Write Cache is that big scary thing that can make or break your PVS implementation. Where you put it makes a world of difference. There are several options available where write cache can be stored. Most people opt for caching on a hidden local drive on the VM i.e. on your XenServer local disks or direct attached storage on the XenServer. It's cheap and it works well for most implementations. Keep in mind it is not shared when you do this. Citrix has a good article called "How to Add a Persistent Volume to Your Provisioned Virtual Machine in XenServer" located here:
http://support.citrix.com/article/CTX125590
and another excellent blog post here on PVS write cache size considerations:
http://blogs.citrix.com/2011/10/06/pvs-write-cache-sizing-considerations/
So in our example so far, I had created the vDisk to leave the write cache on the PVS server. You can put the vDisk in private mode and skip directly to 127 if you like. But I want to leave old vDisk and provisioned desktops intact as an example and create a completely new vDisk and set of provisioned desktops with write cache on the XenServers instead. So we're going to create a new vDisk from the old vDisk and then attach the new write cache drive to that. This is pretty straight forward but if you need more screenshots, leave a comment and I'll take some:
-
Go to your Store, copy the .vhd file, paste it in the same location. Call the new VHD file whatever you like.
-
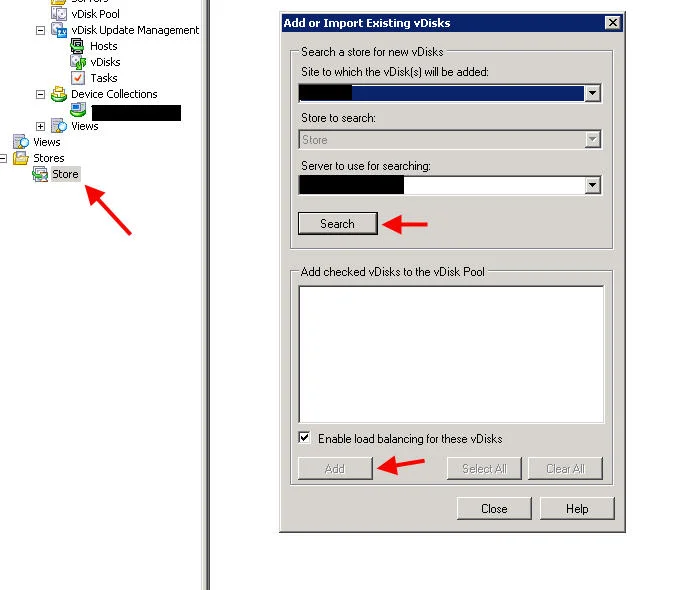
In the PVS Console, right click Store and click "Add or Import Existing vDisks. Search the store and add the vDisk you just created.
-
Under properties, make sure to enable "Enable Active Directory machine account password management" and KMS Service because they will likely not be checked when importing just the vhd.
-
Make sure the vDisk is in private mode
-
Go to your device collection and assign the vdisk to a device. You can use the original VM you were using to build out the Windows 7 image. Make sure it is set to boot from vDisk.
-
Go to XenCenter, click the Storage tab on your VM, and hit Add. You can name it something like "Win7MSDNBaseISO-WC". We will leave the size as 10 GB. That's a pretty decent size for a Windows 7 box rebooted once a week. Then hit Add.
-
Ensure the new disk was created with position 1. Position 0 should be your c: drive.
-
Now power on the VM, booting from the DVD and with the PVS boot disk in the drive. You will notice that Windows has detected a new drive under Disk Management. Initialize it.
-
Right click the new disk, New Simple Volume, choose the full size of the drive, assign it z:, and format it as NTFS, label the volume "Write Cache", then hit Finish on the confirmation page to format it.
-
Shut down the VM. Detach the c:, leaving only the 10 GB z:. Copy it. Rename it to a template name, then hit Convert to template.
-
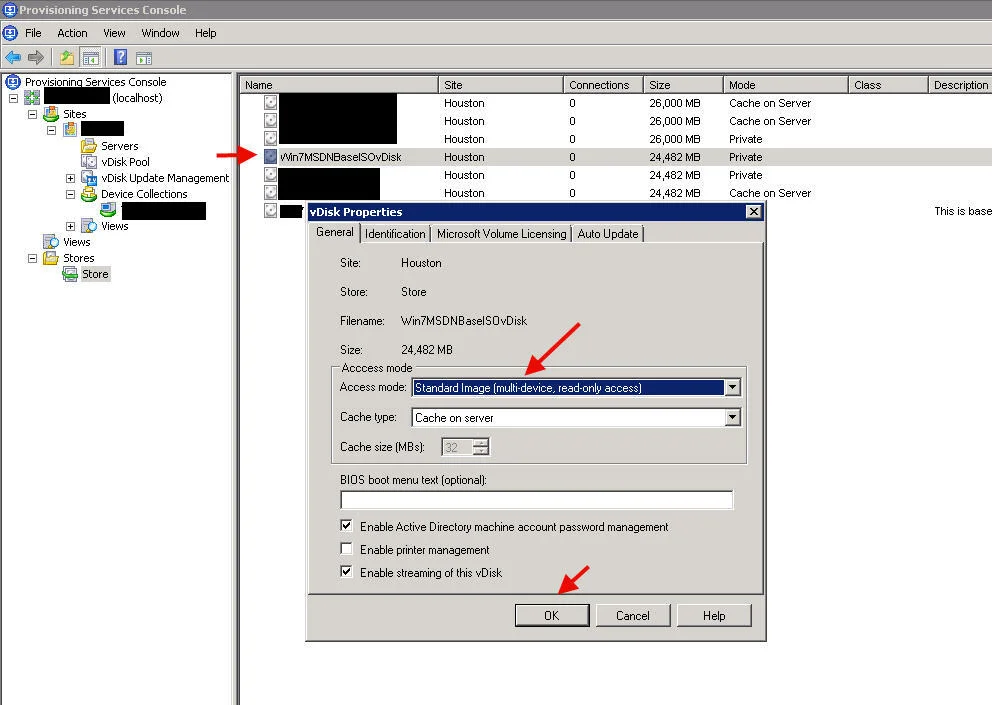
Go to your PVS console, under Store, and switch the vDisk to Standard Image and under Cache type, switch it to "Cache on device hard drive" and hit OK.
-
Go to your Site in the PVS Console and run through the XenDesktop setup wizard again like you did before but using your new template. Also go to your DDC and setup your desktop group, assignments, etc. like before but create a new desktop group so you know which ones are the new "local write cache" machines.
-
Launch one of your new VMs. You will see the Z: now called "Write Cache". Also on the XenServer under local storage, you will see 10 GB drives created for all your VMs.
MAINTAINING YOUR VDISKS
Never update XenServer Tools in a vDisk after you have installed the PVS Target. It will destroy it. The PVS Target software talks to the XenServer Tools software and if it changes, the whole thing falls apart. In my experience, even changing hardware settings like the NIC order can cause all sorts of bad behavior. The best thing to do is build a new image and vDisk if you need to update XenServer Tools or the PVS Target software. This ensures you get an absolutely clean image. But if you don't want to rebuild you can reverse image (kind of a pain) or just import the .vhd back into XenServer, makes your updates, then export back out to .vhd, then import it into your PVS Store as a new vDisk. Just make sure you delete any ghost NICs, hidden video drivers, etc. left behind by the old versions. Just open:
cmd
type:
set devmgr_show_nonpresent_devices=1
then:
start devmgmt.msc
and delete anything greyed out. Other than that, you can put your vDisk in private mode and update anything else like normal, including Citrix Receiver. When doing little changes to a VM, take advantage of versioning. Little changes being stuff like Windows Updates, app updates, etc. If installing a giant application like Photoshop or AutoCAD or something, you'll probably want to merge soon since the reads would be happening all over your disk for something that large.
I hope this post has been helpful to you. As you can see at over 130+ steps, there is a lot to know when deploying PVS with XenDesktop. Deploying with XenApp is mostly the same until you get to the OS and I can cover all that in another post. If you have any questions, comments, or tips please let me know in the comments section below. If I left out something, please let me know too. :)

Jason Samuel
Product leader, advisor, and international speaker with 27+ years in enterprise end-user computing, security, and cloud. Has deployed infrastructure at Fortune 500 scale across 34 countries. 1 of 3 people globally to hold Citrix CTP + VMware vExpert + VMware EUC Champion concurrently. 200+ articles, 1,000+ reader discussions.
Previous Comments (35)


