Archive

Archive for November, 2011

Getting Java web applications to work on Citrix XenApp

November 28th, 2011 8 comments

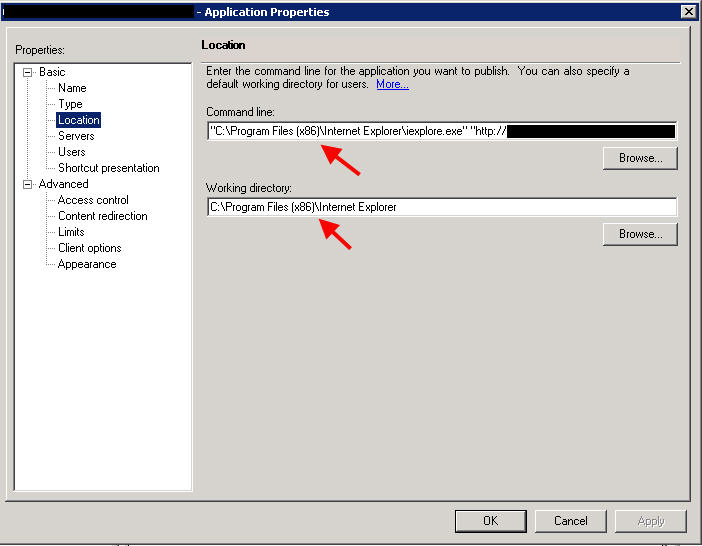
You might get a request to to publish an Internet Explorer URL/link in XenApp for whatever reason. Web applications that use Java Runtime Environment (JRE)/Java applets do not play nicely with Citrix XenApp. The main problem is the Java cache. It wants to write its cache to:

C:\Program Files\Java\Cache\username\Sun\Java\Deployment\cache

by default during a XenApp session but nothing ever gets populated past the “username” part. The directory underneath will be blank and your web application will never load the Java applet.

I’m not a Java expert and I’m not even going to claim the following is any kind of best practice. But this is what I have done in my environments to make the web apps work using XenApp. If you have a better way of doing it, please do comment in this post.

So a little background, I am using Windows Server 2008 R2 with IE9 with Java (JRE) 6 Update 26 installed because my web app requires that specific version of Java.

1. Go to “C:\WINDOWS\Sun\Java\Deployment” and create a file called “deployment.config” with the following:

deployment.system.config=file\:C\:/WINDOWS/Sun/Java/Deployment/deployment.properties

2. Now create a file called “deployment.properties” in the same folder with your custom properties. What I do is generate a deployment file and then copy it over to this directory. To do this, open up Internet Explorer and go to your web app. Once Java is invoked, you will notice the Java icon in the notification bar in the bottom right.

Right click on it > Open Control Panel > Settings and you will see a path where temporary files are kept.

This is the default Java cache and will look like:

C:\Users\username\AppData\LocalLow\Sun\Java\Deployment\cache

Navigate to:

C:\Users\username\AppData\LocalLow\Sun\Java\Deployment\

and there will be a file called “deployment.properties” that was just generated for you. Just copy it over to the “C:\WINDOWS\Sun\Java\Deployment” folder as is.

Now you need to edit this file and specify the Java cache to be somewhere else. In my case, I want it to go to a folder on my D: drive called JavaCache. So all I add is this line (make sure the slashes are just like this, I know it’s a little odd):

deployment.user.cachedir=D\:\\JavaCache

So now my “deployment.properties” file will look like this:

#deployment.properties
#Mon Nov 28 13:17:40 CST 2011
deployment.javaws.cache.update=true
deployment.version=6.0
deployment.user.cachedir=D\:\\JavaCache
deployment.capture.mime.types=true
deployment.javapi.cache.update=true
deployment.browser.path=C\:\\Program Files (x86)\\Internet Explorer\\iexplore.exe
#Java Web Start jre's
#Mon Nov 28 13:17:40 CST 2011
deployment.javaws.jre.0.registered=true
deployment.javaws.jre.0.platform=1.6
deployment.javaws.jre.0.osname=Windows
deployment.javaws.jre.0.path=C\:\\Program Files (x86)\\Java\\jre6\\bin\\javaw.exe
deployment.javaws.jre.0.product=1.6.0_26
deployment.javaws.jre.0.osarch=x86
deployment.javaws.jre.0.location=http\://java.sun.com/products/autodl/j2se
deployment.javaws.jre.0.enabled=true
deployment.javaws.jre.0.args=

Yours will probably look different than mine depending on which version of JRE you have installed.

3. Make sure to create the location you specified above. It can be a blank folder and will be populated the first time someone invokes Java. So in my case, I created:

D:\JavaCache

4. Now publish IE and the URL like you normally would in the XenApp console. IMPORTANT NOTE: If you are using 32 bit IE and installed 32 bit Java, DO NOT publish 64 bit IE by accident. It will not be able to use the 32 bit Java. You will need to install 64 bit Java if you intend to use 64 bit IE.

Here is an example of how 32 bit IE should be published on Server 2008 R2 in XenApp 6.5:

Command line:
"C:\Program Files (x86)\Internet Explorer\iexplore.exe" "http://www.google.com"

Working directory:
C:\Program Files (x86)\Internet Explorer

5. That’s it, now launch your published IE web app from your desktop via the WI and it should load just fine. Once Java is invoked, verify your Java cache is pointed at the new location. Just look in your notification area for the Java icon, right click on it > Open Control Panel > Settings and you should see “D:\JavaCache”.

One interesting thing to note, older versions of Java pull their deployment configuration from a different location. So if putting everything in:

C:\WINDOWS\Sun\Java\Deployment

does not work for you, try copying them to:

C:\Program Files (x86)\Java\jre6\lib

and everything should work. Just make sure to edit your “deployment.config” accordingly with the new path to “deployment.properties”. An example, I have a web app that requires JRE 6 Update 11 and it pulls the deployment info from the lib folder and completely ignores the one in the Windows folder:

I also want to note that Oracle has pretty good documentation on configuring the deployment configuration file to your liking here:

http://docs.oracle.com/javase/1.5.0/docs/guide/deployment/deployment-guide/properties.html

You can do quite a bit of customization to it. Some of my web apps require certain things to be configured in Java such as suppressing certain warning messages and I have used this article to set those switches. For example setting the Java System Cache:

deployment.system.cachedir=D\:\\JavaSystemCache

or Trusted Certs store:

deployment.user.security.trusted.certs=D\:\\JavaCertStore\\security\\trusted.certs
deployment.system.security.trusted.certs=D\:\\JavaCertStore\\security\\trusted.certs

or getting rid of Java warning prompts:

deployment.security.notinca.warning=false
deployment.security.expired.warning=false
deployment.security.mixcode=HIDE_RUN

or even setting Java heap size memory limits:

deployment.javaws.jre.0.args=-Xmx256m -Xms64m
deployment.javapi.jre.0.args=-Xmx256m -Xms64m

where 0 should be the Java version, but it has worked for me without having to specify it in the past. If you do want to put the version it should be like this:

deployment.javaws.jre.1.6.0.args=-Xmx256m -Xms64m
deployment.javapi.jre.1.6.0.args=-Xmx256m -Xms64m

Again, I’m not a Java expert so there may be an easier way of doing this but this is how I have been able to get my Java web apps to work with XenApp. Let me know of your experiences.

How to fix the TABCTL32.OCX is not registered error when using the Citrix Quick Launch tool

November 21st, 2011 5 comments

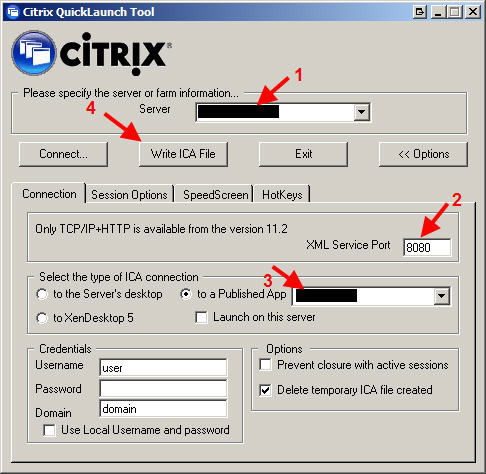
Citrix provides and awesome tool called Citrix QuickLaunch that can do many things including creating ICA files for your newer XenApp 6.5, XenApp 6, XenApp 5 farms, etc. It works great as an ICA file creator for XenApp 6.5 or any versions below it through PS 4.0. You can download it here:

http://support.citrix.com/article/CTX122536

I like the fact it talks about the TABCTL32.OCX not being registered error in the documentation:


“Run-time error ‘339’:
Component ‘tabctl32.ocx’ or one of its dependencies not
correctly registered: a file is missing or invalid”

Unfortunately it doesn’t tell you exactly where you can acquire the missing file. Instead of running around trying to fix it, I’ve hosted the TABCTL32.OCX here in zip format so you can download it and register it easily:

http://www.jasonsamuel.com/wp-content/uploads/2011/11/TABCTL32.zip

On an XP box, just unzip into c:\windows\system32 and then open command prompt. Type:

regsvr32 system32\TABCTL32.OCX

and it should pop up with a box saying “DllRegisterServer in system32\TABCTL32.OCX succeeded”.

Now you can launch CitrixQuickLaunch.exe and it will load right up. Weird thing I noticed today, the tool says “Citrix QuickLaunch Tool” but the CTX documentation says “Citrix Quick Launch”. So which is correct? :)

The screenshots in the article are very good. If you are using it just to create an ICA icon, make sure to click the “Options” button to expands the options and select “to a Published App”. Don’t forget to change the XML service port to 8080 instead of the default 80 or it will fail to connect to the XML Broker (granted you are using port 8080). Then just click “Write ICA File” and choose a location to save your ICA file.

Done! Double click your brand new ICA file and it should work fine. If you need to make any changes, use the tool to generate a new ICA icon or you can just open it in Notepad and edit by hand. You can remove the user name, password, and domain if you want. I typically just leave the domain only. I would NOT recommend storing passwords in plain text. Hope this helps.

Thoughts on Desktop Virtualization seminar with Brian Madden

November 18th, 2011 No comments

I was able to attend a Desktop Virtualization seminar by Brian Madden several weeks ago. It was a small group of attendees so it was great to interact at a personal level with him and some of the other speakers and get some questions answered. What I loved the most about this seminar was that a lot of the discussion was vendor agnostic, so I didn’t have a ton of marketing pushed at me. That’s a welcome change because I don’t want to hear sales talk, I want to hear the raw facts from other engineers on what works, what doesn’t, and why.

A lot of what was covered is stuff most everyone working with VDI may already know. I’m not going to transcribe all my notes from the seminar. But some key takeaways that I felt were important were the following:

1. VDI projects and hardware refreshes are driven by different factors than last year this time. April 8, 2014 (End of Support, patches, hotfixes, etc. for Windows XP) is looming and many IT departments are concentrating more on hardware/Windows 7 migrations than they are on VDI projects. Last year many companies were trying to do both since these projects usually go hand in hand. Many companies that are still doing POCs or extending their testing phases are now starting to feel a time crunch. Because of this, many companies are giving priority to the refreshes and letting the VDI projects become a secondary project. That’s not to say VDI is not important, it’s just that many companies need to prioritize resources and personnel and choosing to allocate these at the refreshes. It’s funny because this has been happening all around me and to friends at their companies but I didn’t fully realize how industry wide this shift of priorities was until Brian said it out loud. So the takeaway is, get your refreshes completed first if you don’t have enough resources to handle both. You DO NOT want to get caught in 2014 with any XP machines on your network or something seriously needs to be reevaluated at your company. And it may end up being your job if you don’t drive the initiative to get your refreshes done well ahead of this date.

2. With all the different types of desktop technologies out there now:

DATA CENTER BASED INFRASTRUCTURE
-Remote Desktop Session Host (Terminal Server)
-VDI (Citrix XenDesktop, VMware View, etc)

CLIENT BASED INFRASTRUCTURE
-Client VM – Hypervisor on baremetal client (Citrix XenClient, VMware View Local Mode, Virtual Computer NxTop, MokaFive, Virtual Bridges VERDE, etc)
-Client VM – Hypervisor on existing OS (VMware Workstation, Virtual PC, Fusion, Parallels, XP Mode, etc.)
-OS Streaming
-Traditional desktops

Companies are having a hard time trying to decide what is best for their users. One of the slides shown showed the enumeration of these technologies into the environment and I swear, it was like a pack of Skittles. There are so many directions to go and for many different reasons but you really have to factor everything or you are going to have end up with one of these Skittles environments over time. The biggest take away here is that there is no ONE solution that is the BEST. Your infrastructure might be a few of these. But don’t let it run away from you, plan it well from the get go. Pretty much common sense to anyone working with VDI already.

3. So my co-worker asked how do you plan your VDI environment? How do you know what is best? Brian recommended a couple of products that can help you:

-LakeSide Solutions VMP – pulls stats on your environment and spits out a report that tells you which users are good candidates for VDI vs. Terminal Server vs. staying on a traditional desktop.

http://www.lakesidesoftware.com/systrack_vmp.aspx

-Liquidware Labs – does a lot of the same and comes with 30 day trial

http://liquidwarelabs.com/products/stratuspherefit.asp

Another really good tool he suggested that was good for looking at the app compatibility and testing closer was App-DNA AppTitude. It does automated testing against 68,000 data points. They were acquired by Citrix just a couple of weeks ago:

http://www.app-dna.com/about-apptitude/automated-application-testing/

ChangeBase offers something similar and they were acquired by Quest just a few weeks ago:

http://www.changebase.com/

4. User workspace management. Let’s face it, any large VDI deployment across all the different infrastructure technologies above + across all the different OSes is going to be a nightmare if you don’t have some way of managing the user workspace. Brian talked about the concept of layering hardware, OS, application, and users. Not unfamiliar to anyone that has worked with VDI. He talked about 3rd parties like AppSense, RES, LiquidWare Labs, etc. vs. what’s being offered from Citrix, Microsoft, and VMware. I’m not going to go too much into this because I plan on writing an article about user workspace management and a comparison of the different options soon. But just know that this is a big point that will break or make your VDI project.

These were some of my main takeaways from the seminar without going into too much detail. There was a lot of information covered and I have to thank Brian & TechTarget for putting this on. Doesn’t matter if you’re just in the planning stages of your VDI project or if it’s been running great for years, I guarantee you will learn something new or what’s coming down the pipe in the VDI world at one of these seminars. You can sign up for one in your city here:

http://events.techtarget.com/desktopvirtualization/

Using LogParser to create a report of who has been hitting a web page or URL

November 14th, 2011 No comments

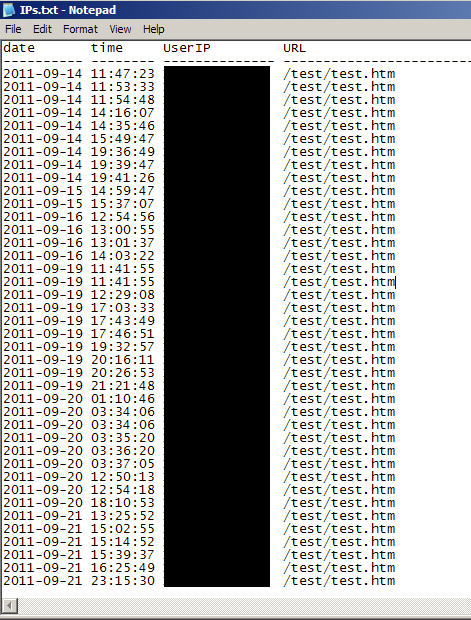
I received a request today to gather all the IPs of users that have been hitting a specific URL on an IIS web server for the last several months. Naturally, I turn to LogParser which I have blogged about quite a bit in the past. I copied the required IIS logs to the same path as LogParser since I was going to archive them anyway but you can just specify the path to your IIS logs just as easily. Then I wrote this query to quickly show the date, time, and IP for the URL I’m web page I am looking for, in this case test.htm:

logparser "SELECT [date], [time], [c-ip] as UserIP, [cs-uri-stem] as URL FROM ex*.log WHERE [cs-uri-stem] like '%test.htm%'" -rtp:-1 -i:iisw3c

This gives me a nice report of every hit in chronological order. I chose to use like statement above because sometimes there might be other URLs buried deep in your website structure and if you are not familiar with it, you might miss these hits from being calculated. It helps identify users who might be using a URL they really shouldn’t be using anymore and no one is aware they are still using these legacy hyperlinks. You can export the report to a txt file by just adding “>> IPs.txt” to the end of the string and it will drop the screen output into a file called IPs.txt for you.

Or you can use the datagrid option which I have blogged about before, just search for LogParser in the search box in the top right corner of this site.

From here, I want to find only unique IPs. So I wrote another query that did a GROUP BY on the IP:

logparser "SELECT [c-ip] as UserIP FROM ex*.log WHERE [cs-uri-stem] like '%test.htm%' GROUP BY [c-ip]" -rtp:-1 -i:iisw3c

Even gives you a nice total count at the bottom:

So now I have a list of unique IPs but I want to find if these IPs are still alive and talking on my network and if so, what their machine name is. For that, I turn to nmap (with the Zenmap GUI if you are using Windows). Just copy and paste all your IPs from before into the Target field and change the scan profile to “Ping scan”. Yes, you can copy and paste your whole list at once into that little Target window, it will take them all. In this example, I copied and pasted 3 IPs at once and it parsed the carriage returns just fine:

Once you begin the scan, it will ping sweep the IPs and do a reverse DNS lookup all at the same time.

If you want to take it one step further and find the currently logged in user, you could use PsLoggedOn from Sysinternals to accomplish this or even WMIC to pull the info via WMI.

PsLoggedOn info: http://technet.microsoft.com/en-us/sysinternals/bb897545

WMIC info: http://technet.microsoft.com/en-us/library/bb742610.aspx

WMIC syntax would be something like:

wmic /node: machinename get username

Very easy! Let me know if you have any questions or come up with a better way. :)

Categories: IIS Tags: ,