Archive

Archive for March, 2009

Outlook passwords and RPC over HTTP

March 27th, 2009 No comments

Outlook 2003 has a feature called “RPC over HTTP” which allows a remote user to use their Outlook client with an Exchange 2003 server over the Internet without the need for a VPN. The connection is made using RPC calls through port 80 (http) and 443 (SSL). Outlook 2007 has the same feature for Exchange 2007 but it is called “Outlook Anywhere” now. The version of Outlook you have is interchangeable with the version of Exchange you are running so it will work in any combination.

One of the problems users often complain about is getting a login box asking for their domain credentials every time they open Outlook 2003 or Outlook 2007. In theory, since the credentials should be cached on the client end, this should not happen but unfortunately, this is not often the case in real world scenarios.

To force your Outlook client to save the credentials and not prompt you with a login box, do the following:

1. Verify that the RPC over HTTP settings on the Outlook 2003 or Outlook 2007 client are set to NTLM authentication. By default, it uses Basic authentication which will prompt you for a login box every time. This option is found in:

Click Tools > E-mail Accounts > Account Settings > Double click on your Exchange account > More Settings > Click the Connection tab > Exchange Proxy Settings > Set the Proxy authentications settings to NTLM authentication

Press OK twice and you will be prompted to restart Outlook. Hit Next and then Finish to exit out of the setup, then close and reopen Outlook. Now try and check you email and see if it still prompts you for a login box. If it does, move on to step 2.

2. Open regedit (Start > Run > regedit) and find the following registry key:

HKEY_LOCAL_MACHINE\SYSTEM\CurrentControlSet\Control\Lsa\

In the right window to the right, open the lmcompatibilitylevel key and change the value to 2. Press Ok, close the registry editor, then restart your computer. Now try and check your email. If it still prompts you, move on to step 3.

3. Click Start > Control Panel > User Accounts > Click the Advances tab > Manage Passwords. Verify your domain login is there in the following format:

domainname\username

If it is not, click Add and enter your user name in the above format and type in your password. Now check open Outlook and see if it still prompts you (make you click on “Remember password” in the login box if you get that option).

SSL certificate chains explained

March 12th, 2009 No comments

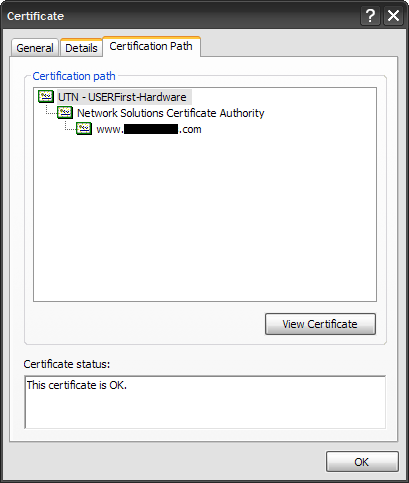
Today I would like to clear up some confusion about SSL Chained Certificates. For this example, I will use Network Solutions as the Certificate Authority (CA) you are buying the cert from. This is information you will have to know when you purchase a new SSL cert or renew an existing SSL cert for your Exchange server, IIS web server, or any other external facing server or appliance.

Network Solutions does not issue you a single cert. They issue you an SSL chained cert. So for example, if you are buying a cert for:

widgets.com

They will validate and issue you the cert, but when you download and open the zip file from their website, you will see the following certificate bundle:

AddTrustExternalCARoot.crt
NetworkSolutions_CA.crt
WIDGETS.COM.crt
UTNAddTrustServer_CA.crt

Let’s analyze these certs in your chain. The first one is AddTrustExternalCARoot.crt which is called the “root certificate”. This is the first cert in your chain. This root cert is installed to the Trusted Root Certification Authorities store on your server or network appliance.

The second cert in your chain is NetworkSolutions_CA.crt and the UTNAddTrustServer_CA.crt which are “intermediate certificates”. An intermediate cert is essentially a certificate issued by the Trusted Root CA specifically designed to issue SSL Certificates to you. The reason for this is because if the CA root cert were to ever be compromised, the entire chain fails. It is good security practice to use an “intermediary” to issue the certs from to prevent your root CAs from being exposed from the signing process. If an intermediate were to ever be compromised, you can always regenerate those unlike the root certs. This intermediate certificate sits between your website cert and the root cert. This intermediate cert is installed to the Intermediate Certification Authorities store on your server or appliance.

The last cert in your chain is WIDGETS.COM.crt which is your actual SSL cert. This is also known as your “domain certificate”. This domain cert is installed to the Personal store on your server or appliance.

So the end result is chain of certs that begins at the trusted root CA, runs through the intermediary, and finally ends with the SSL certificate issued to you for your website or appliance (widgets.com).

In most cases, any sever or appliance out there will already have the trusted root cert for Network Solutions installed. You can just install your SSL cert and not have to worry about anything else in most cases. Depending on where you buy your cert from and what you are trying to install your cert to, you may have to go through the steps of installing the Trusted Root cert and Intermediate cert first before installing your SSL cert. With some web browsers like Internet Explorer 7 for example, you can get away with not having to install any Intermediate Certificate because IE7 will automatically go out automatically download the intermediate cert the first time a user visits your website. This makes things easy for the lazy admin but it’s always best practice to go a head and add the Intermediate cert on your end instead of depending on the client and their browser’s ability to do this. There is no point in risking a certificate error for the end user when the fix is so easy.

To verify the chain, go to any site you know that uses SSL (https://) and then click on the lock in Internet Explorer, it will let you view the SSL cert info. Click the “Certificate Path” tab and you can see the chain we described above:

Trusted Root —> Intermediate —> SSL Certificate

sslcertpath
You can then click on each one of these certs and hit the “View Cert” button to view each cert in the chain individually. Good luck and post a comment if you have any questions. :)