In some companies there may be applications that require the user’s client name (PC name) to be rewritten to something specific for the application to work through XenApp. With StoreFront this can be accomplished using the StoreFront SDK. Simon Frost wrote a great blog post here on how to use the SDK to accomplish this:
https://www.citrix.com/blogs/2015/07/01/rewriting-the-session-clientname-from-storefront/
The link to the StoreFront SDK in that blog post will take you to SDK 2.5. You will want to download SDK 3.0 which is the latest release. It is not evident where it is when you try and download StoreFront standalone updates so here is the direct link to download it:
https://www.citrix.com/downloads/storefront-web-interface/sdks/storefront-30-web-api.html
The StoreFront SDK 3.0 is supported for all StoreFront 3.x releases. If using LTSR, Citrix Suport may request you disable any customizations for troubleshooting purposes but other than that the SDK will work fine in a production capacity.
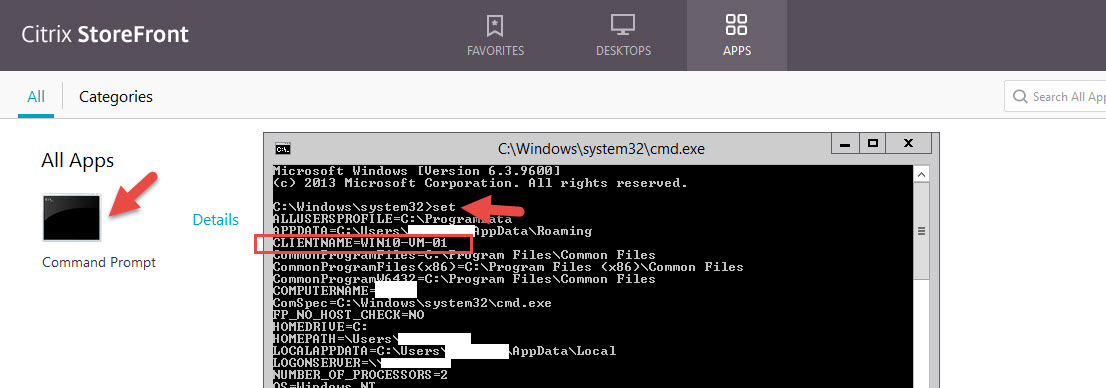
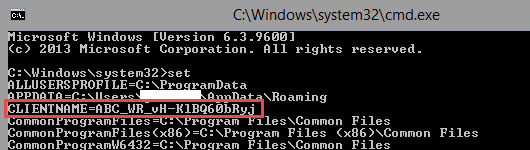
Let’s look at how a session looks with a default StoreFront deployment. I have published a command prompt to myself. I login to StoreFront using my web browser or from a Windows Receiver. After launching it I type in “set” and can see all the environmental variables. You can see the CLIENTNAME variable is set to the client name I launched the ICA session from, in this case my virtual desktop:
This is great for the majority of people but there are some applications that may require you to add a prefix, suffix, or even completely rewrite the CLIENTNAME variable to something static because of how the app was written. In other words it may not have been written with multi-user (XenApp) in mind or has some licensing requirement where it expects to see a certain client name. That’s when the SDK comes in handy.
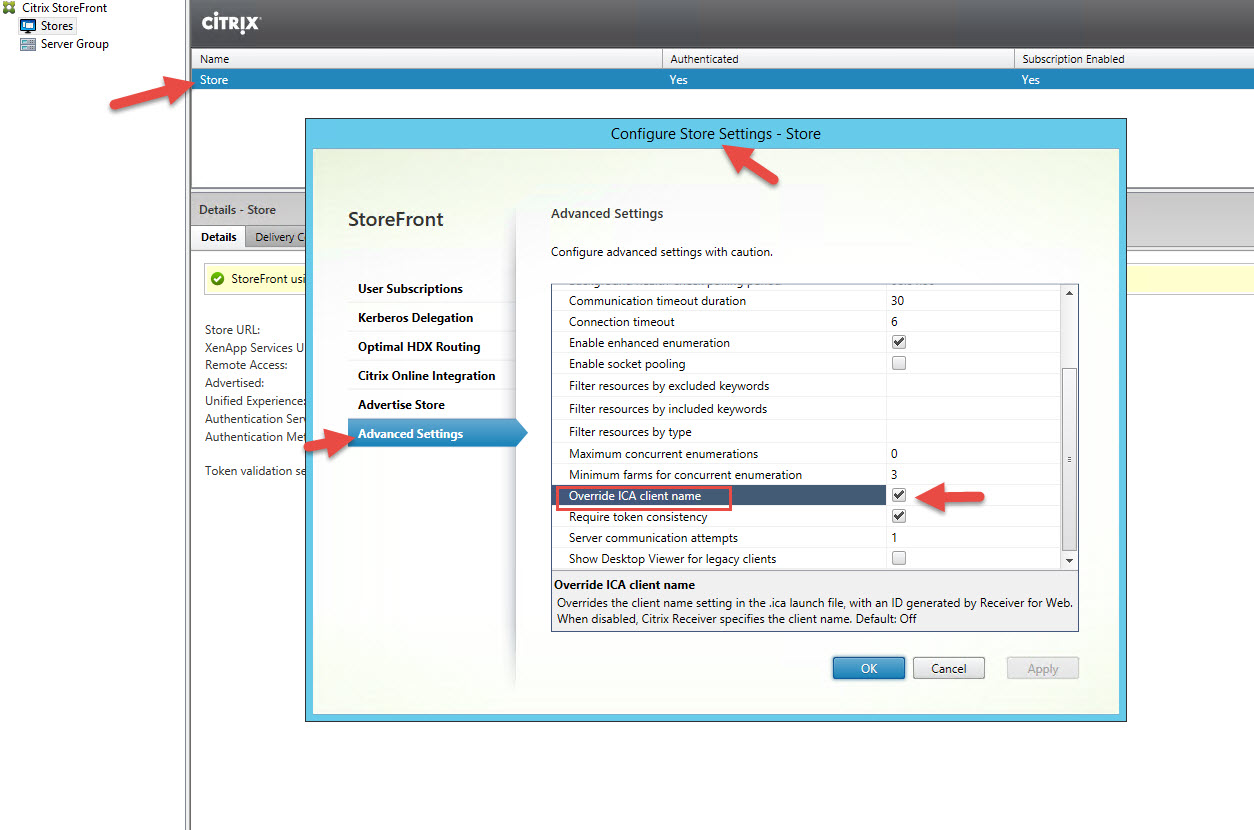
IMPORTANT NOTE: The SDK customization to rewrite the CLIENTNAME variable to whatever you want requires you to flip on the “Override ICA client name” advanced setting in StoreFront in order for it to work. This option is used to override the client name in the .ica launch file with an ID generated by Receiver for Web. We’ll be doing this in the web.config later manually but if you wanted to do it yourself via GUI it’s under Advanced Settings:
What you’ll see if you launch the command prompt from a web browser with this checked is this. You can see the CLIENTNAME variable is “WR_” followed by the randomly generated ID:

If you launch using Windows Receiver it shows the true client name however. So what this means is that if you use Windows Receiver, the filter will work as you want. If you use a web browser, then it may not be exactly what you are looking for because it’s going to add that generated ID in there instead of the actual client name. I’ll show this comparison a little later in this post.
Let me dive into how to implement the customization. I have a 2 node StoreFront 3.8 server group. I am going to use the SDK to rewrite the CLIENTNAME with a prefix, then the true client name, and finally add a suffix. Then I’m going to update to the latest StoreFront 3.9 and show how to re-apply the customizations since they do not persist StoreFront upgrades.
1. Once you download the SDK 3.0 from above, unzip it. You’ll see a bunch of folders like this:

2. If you navigate to StoreCustomizationSDK > Documentation you will find a “store-customization-sdk-guide.pdf” that will go over how to use the SDK:

in this PDF you’ll find that these are the available items to you that you can modify with the SDK:
- Post-enumeration—use this to modify the results of resource enumeration. This lets you alter a resource’s properties, and provides more advanced filtering than the simple filtering by resource type/keywords available using PowerShell cmdlets.
- ICA file—use this to modify the generated ICA file. For example, use this to change ICA virtual channel parameters and prevent users accessing their clipboard.
- HDX routing—use this to modify the choice of NetScaler gateway and/or to perform address translation to allow HDX connections from outside a corporate network.
- Post-session enumeration—use this to modify the result of session enumeration; for example, to filter out unwanted sessions.
- Access conditions (pre-launch and pre-enumeration)—use this to modify the access conditions affecting resource visibility and ability to launch resources.
- Farm sets—use this to modify the list of Delivery Controllers (‘farms’) that StoreFront will contact.
- Device information—use this to modify the device information supplied by the client, including the ClientName and DeviceId.
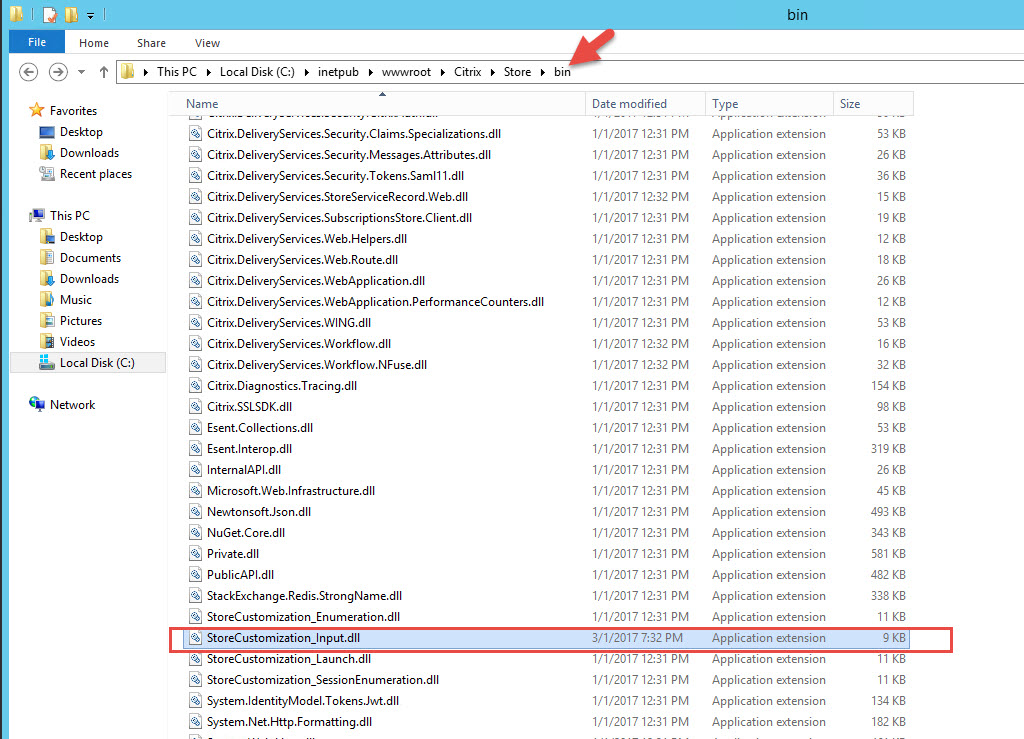
3. Navigate to your StoreFront Store’s bin folder. In this example my Store is named the default “Store”. Note, this is not the StoreWeb folder so don’t get confused here. There will be 4 place holder DLL files called StoreCustomization_Enumeration.dll, StoreCustomization_Input.dll, StoreCustomization_Launch.dll, and StoreCustomization_SessionEnumeration.dll. Copy these 4 DLL/assembly files somewhere safe as a backup. We’re only going to be overwriting one in the next step but always a good idea to have a backup of all these incase later you want to do other customizations:

4. At this point you can run Visual Studio and create your own assembly as the guide shows or you can do the easy thing, just use the “StoreCustomization_Input.dll” Simon has already created. It is about half way down in the blog downloadable via the ShareFile link he provides (https://citrix.sharefile.com/d-s3fe22c5036b4d3fa). Just overwrite the existing one in C:\inetpub\wwwroot\Citrix\Store\bin with this custom “StoreCustomization_Input.dll”. Yes it’s smaller than the 11 KB place holder was:
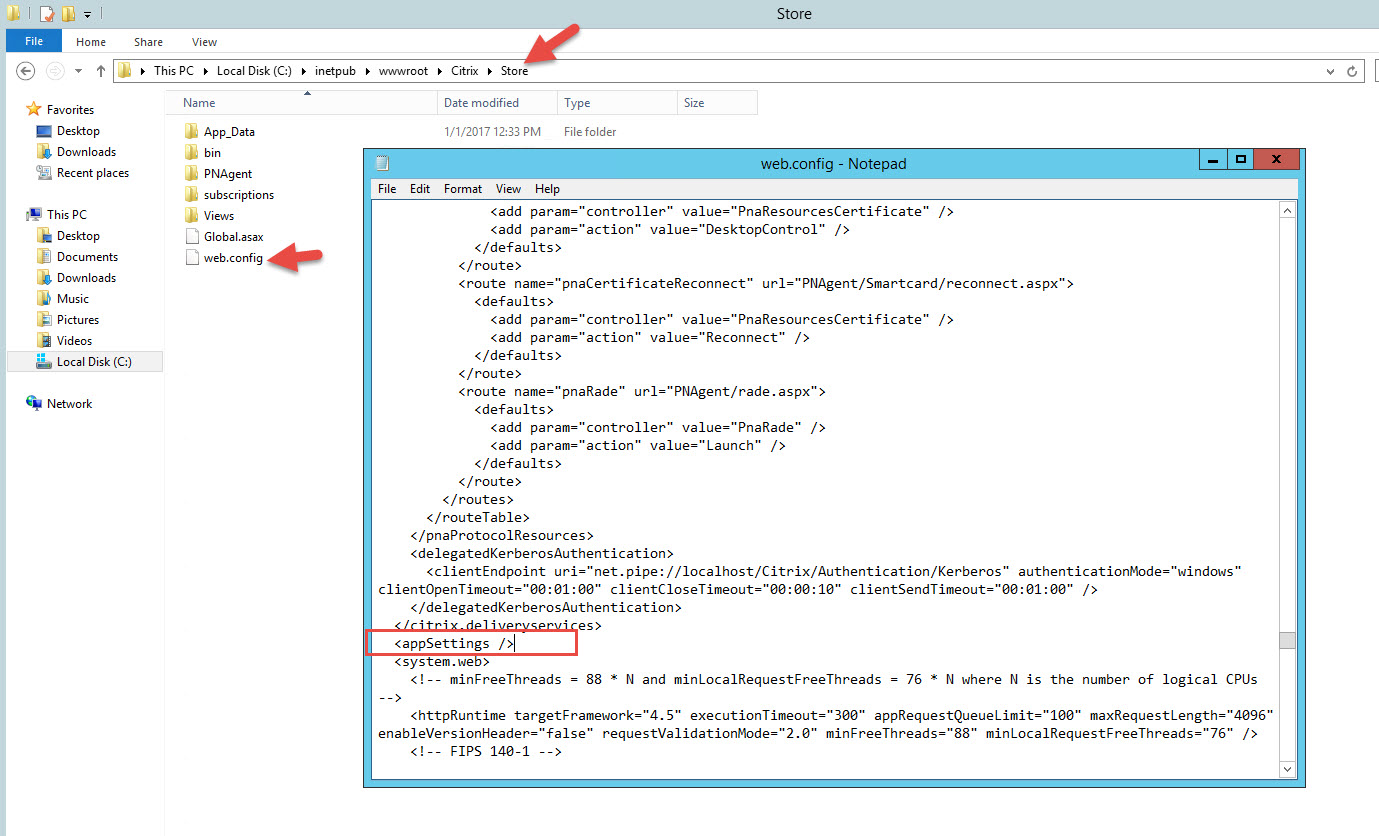
5. Now go up one directory and open up the web.config. Make sure you open Notepad as “Run as Administrator” and then go open the web.config. Otherwise you won’t be able to save your changes. Do a Find (Ctrl+F) for the word “appSettings” and you’ll see this section:
|
1 |
<appSettings /> |
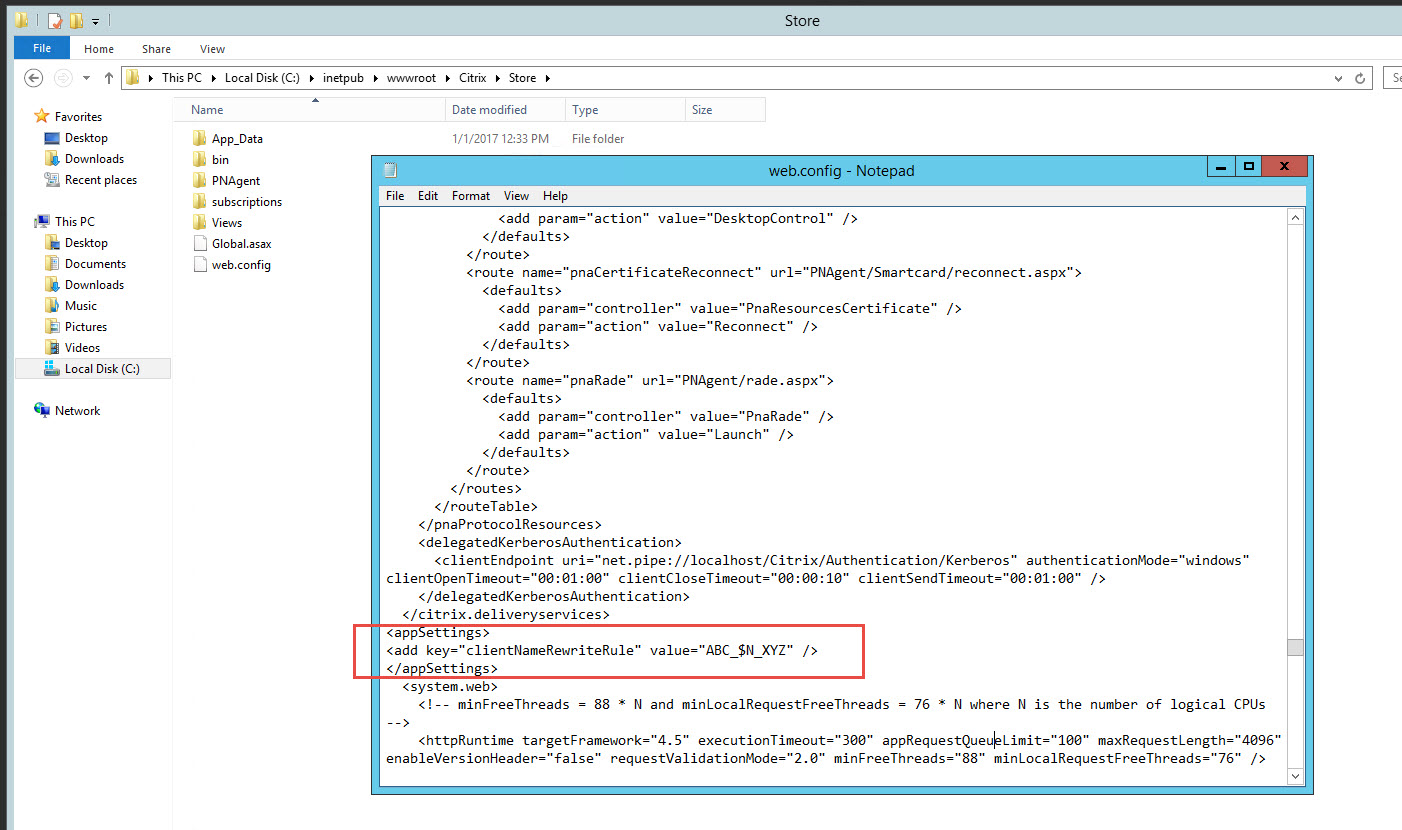
6. Change this section to look like this instead. My prefix will be ABC, then an underscore, then the client name, then an another underscore, and finally a suffix of XYZ:
|
1 2 3 |
<appSettings> <add key="clientNameRewriteRule" value="ABC_$N_XYZ" /> </appSettings> |
so here is how the web.config should look after you’re done:
7. Now search for the word “overrideIcaClientName” with the direction Up because it’s going to be near the top of the web.config. By default it will be “off”, you will want to switch it to “on” like this:

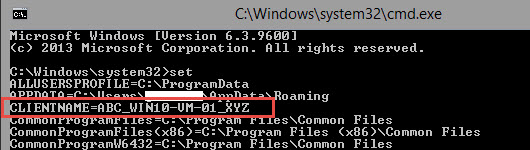
8. Now save your web.config and do an iisreset. Web.config changes don’t typically require an iisreset to kick in but I like to just to be safe. Open Windows Receiver and log into it from scratch. You have to make sure you have no open sessions or you won’t see the changes take effect. Launch the command prompt and now check the CLIENTNAME variable. It should have a prefix of ABC and a suffix of XYZ with the true client name in between:
9. Now open a private browser window and try and launch the command prompt and check the variable there. It will have the prefix but it will have the generated ID instead of the true client name. The suffix won’t even know up because it gets chopped off. The CLIENTNAME variable can only be 20 characters max and the generated ID causes the whole string to be way too long:
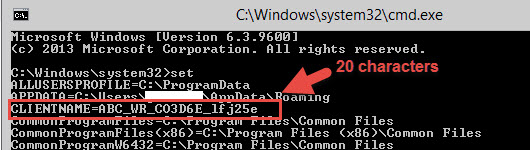
This is the behavior I was referring to earlier in this post. The web vs. Windows Receiver is going to act different. If you just wanted a static name without trying to slip in the $N variable then that’s great and it will work fine. But if you do add the $N variable in your web.config then the CLIENTNAME is going to vary depending on how the user chooses to launch their app.
If you must have a prefix and something unique, then just use the $U variable which is the user’s user ID. I also really like the $R variable which will tell you if they came through StoreFront (internally) vs. NetScaler Gateway (externally). You can use any combination of the variables that Simon references in his blog post and I have used almost all of them in my testing so far.
10. Now if you are running a 2 node StoreFront server group like me, open up the console on the StoreFront server you were applying these changes to and propagate changes.
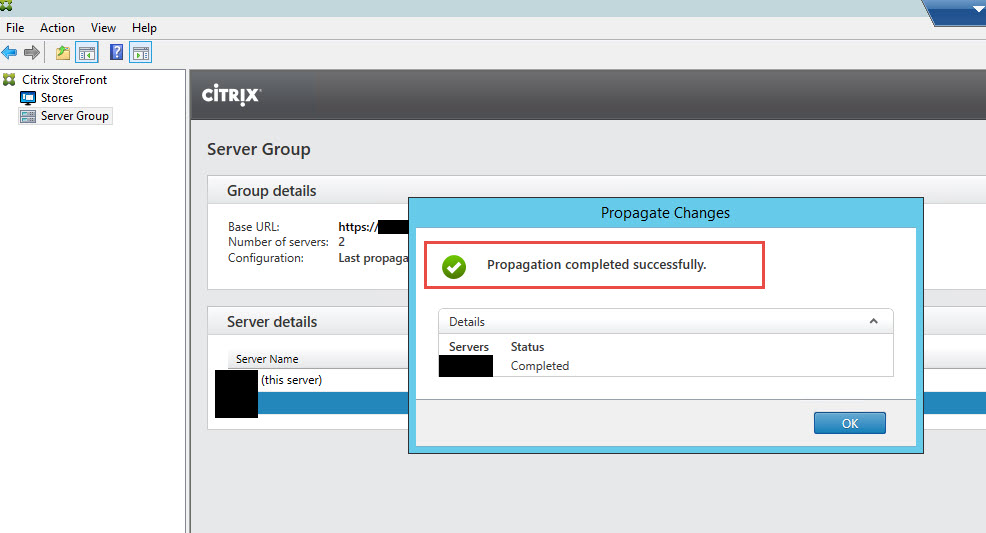
It will automatically copy over the new web.config and StoreCustomization_Input.dll file. If you have your StoreFront servers load balanced via NetScaler, now would be a good time to test through each StoreFront server individually to verify they are both working as expected. Just disable each server one at a time to accomplish this testing.
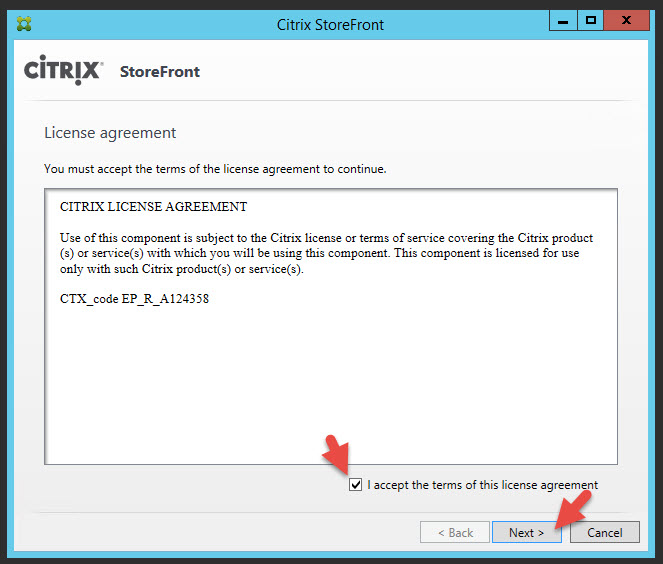
11. Now let’s upgrade this 2 node StoreFront 3.8 server group to StoreFront 3.9. As always, snapshot both your VMs and disable traffic to StoreFront at the NetScaler. This will help minimize the chance of your StoreFront upgrade failing as a busy system often means the installer can’t continue and you end up with a failed upgrade. Make a copy of the web.config and StoreCustomization_Input.dll file. Then you can run the CitrixStoreFront-x64.exe installer for 3.9. Accept the license agreement and hit Next:
12. Hit Install and wait, it’s going to take several minutes for the upgrade to complete.

13. The 3.9 installer has a few extra steps in it for you eagle eyes. Once the upgrade is complete hit finish.

14. It’s going to open up the StoreFront console and tell you the server group is partially upgraded.

15. Go to the bin folder and you’ll see that your placeholder files went from 11 KB to 18 to 19 KB. So basically your file was overwritten.
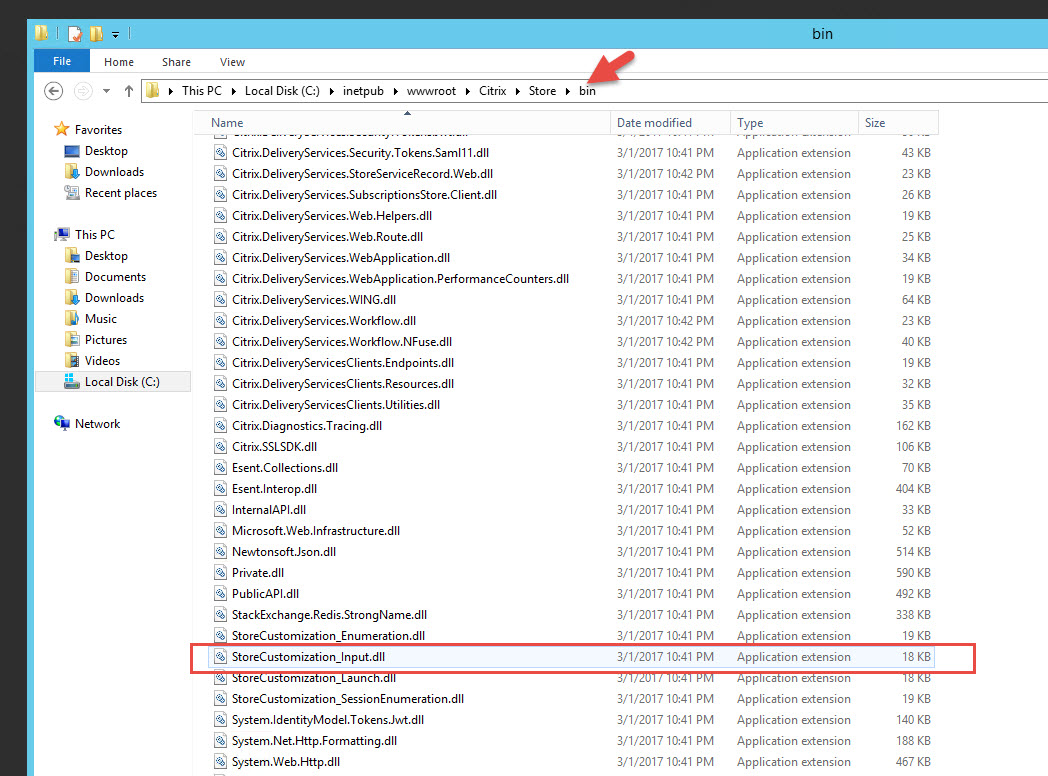
You’ll need to copy it back in from your back up. DO NOT do this with the web.config however. That old web.config was for 3.8 and if you override your 3.9 web.config you’re going to have problems. If you open your 3.9 web.config, you’ll notice the changes you made there have actually persisted so there is no need to do anything at this point. If you’re extra curious you can always do a Beyond Compare between your backed up 3.8 config vs. your 3.9 config. Now go upgrade the second node and propagate changes again. You can also do an iisreset on both nodes just to be safe if you wish.
16. Now time to test. You can see here I have launched the command prompt from Receiver for Windows and it is rewriting exactly as expected:

and through a web browser it’s rewriting as well:
So now we’ve verified how our SDK customizations can persist between StoreFront version upgrades.
I hope this has helped give you an intro into how the StoreFront SDK works. This is a simple example that barely scratches the surface. Also if you’re really interested in some advanced client name rewriting with HTTP header values, reach out to my fellow CTP Sam Jacobs. He’s got some very clever customizations he might be willing to share with you. 🙂


Stan
March 7, 2017 at 6:40 PM
Have you come across the conundrum of Receiver for HTML5 clients having RDS Device CALs issued because of the randomly generated HTML-XXXX-XXXX name?
I’m seeing a bucket load of single instance HTML-XXXX-XXXX sessions being created and a Device CAL being issued…which absolutely chews through my licenses.
Cheers
Jerry
March 9, 2017 at 12:34 PM
The fact that this does not work through the web makes it not nearly as useful as it could be. We have many remote medical offices that require their workstation IDs to be added into the EHR application database. In web interface we could hardcode the “clientname” in the default.ica so that any user who used that specific web URL would connect with the generic workstation ID. Unfortunately, Citrix seems to continuously regress with Storefront and XA7.x.
Stan
March 9, 2017 at 4:05 PM
Jerry – The annoyance with the random HTML-XXXX-XXXX client name is wreaking havoc on my RDS License server. 2,300 Device CALs are issued. 1,200 of these Device CALs are issued to HTML-XXXX-XXXX clients. Some users even have multiple Device CALs because their clientname is being randomly generated rather that keeping with their existing name from a previous session.
David Baker
January 26, 2018 at 10:16 AM
This doesn’t work for Storefront 3.12.100. Have you been able to successfully make this change on that version of StoreFront?
Michael
July 25, 2018 at 3:26 AM
Is there already a “StoreCustomization_Input.dll” available which is working on Storefront 3.12 CU1 and/or CU2 ? Thank you.