Archive

Archive for January, 2012

Changing SQL account name, password, or database server name in XenApp 6.5

January 25th, 2012 4 comments

If you have a Citrix XenApp environment and change your SQL server, you will need to edit your mf20.dsn with the new server name. Located at:

C:\Program Files (x86)\Citrix\Independent Management Architecture\mf20.dsn

If you changed your SQL credentials, you will need to specify the new user name as well here. If you just change the password only and nothing else, you don’t need to edit your mf20.dsn file. But you will still need to set the new password or the IMA Service won’t start.

Once you make whatever changes you need to the mf20.dsn or not if it’s just a password change, do the following:

1. Go to Services and stop the IMA service (Citrix Independent Management Architecture) if it is still running.

2. Open command line and Navigate to:

C:\Program Files (x86)\Citrix\Independent Management Architecture

3. Type:

dsmaint config /user:yourdomain\youraccount /pwd:yourpassword /dsn:"C:\Program Files (x86)\Citrix\Independent Management Architecture\mf20.dsn"

4. Restart the IMA Service

5. You can also recreate the local host cache database (LHC database) if you have issues starting the IMA service after this. Type:

dsmaint recreatelhc

then restart the IMA Service. It will populate the cache immediately with info from the datastore.

Citrix XenServer and StorageLink SSL cert error caused by expired SSL certificate

January 19th, 2012 12 comments

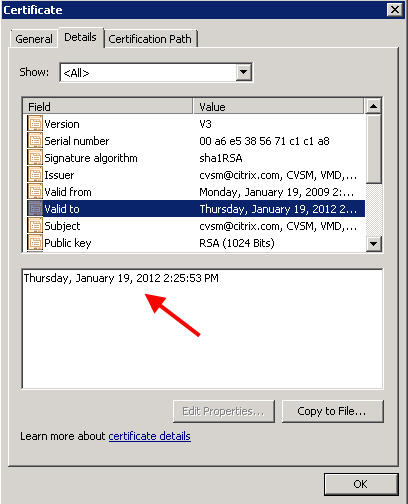
When you try to start a VM in XenServer that talks to a StorageLink Gateway server, you get:

1/19/2012 x:xx:xx PM Error: Starting VM 'xxxxxx' - Storage assignment failed
(SSL_ERROR_SSL error:14090086:SSL routines:SSL3_GET_SERVER_CERTIFICATE:certificate
verify failed)

in the XenCenter log. You can verify the SSL cert by opening up the following in a browser window and replacing the x’s below with your StorageLink server’s IP address:

https://xxx.xxx.xxx.xxx:21605

You will get a cert error message in your browser. Notice the Citrix CVSM SSL certificate issued on 1/19/2009 has expired today 1/19/2012 at 20:25:53 PM (GMT) which is 2:25 PM Central Standard Time. So basically any VM you try to turn on, reboot, or migrate after the cert expired will not work and return the SSL error above in the XenCenter log. Yeah, big problem.

I was the first to call in about this issue soon after the cert expired apparently. As I was on the phone troubleshooting this with the support engineer, others began calling in with the same problem. We have escalated it to the highest level at Citrix support and have been assured a workaround and a new cert are both being worked on and something should be available tomorrow morning. This is going to impact pretty much all StorageLink customers globally so trust me, they are working on it. Over the past several hours, I have tried numerous workarounds myself but been unable to get a full fix yet. I’ve tried self signed certs using OpenSSL, IIS & SelfSSL, etc. but to no avail so far. The StorageLink Gateway does not use a web server such as lighttpd, Apache, Tomcat, etc. either so I can’t force it to use another set of certs on that end. Apparently it uses API calls. When you restart the services, you will notice it copies the following SSL certs which are the culprits (into memory I’m guessing). I used Process Monitor to verify:

D:\Program Files (x86)\Citrix\StorageLink\Server\cacert.pem

D:\Program Files (x86)\Citrix\StorageLink\Server\server.pem

I actually did manage to get a little further than I thought on the handful of workarounds I tried, but nothing completely successful yet to regain functionality while we wait for a hotfix. If you want to try playing with the certs yourself, just remember to restart the StorageLink services after you swap out the certs each time so it pulls them in. XenCenter should see the SSL cert change and prompt you almost immediately with a warning message.

I will keep this post updated with the latest developments. Please post if you are having the same issue or come up with a temporary fix. In the meantime, call Citrix and open a case so you are in the loop when the fix is released.

UPDATE January, 24th, 2012 – Citrix has published the fix:

http://support.citrix.com/article/CTX131994

Apply the certs using the instructions in the KB. Shouldn’t take long at all.

How to fix the Error 30105 Citrix servers do not trust the server message in XenDesktop 5.5

January 17th, 2012 No comments

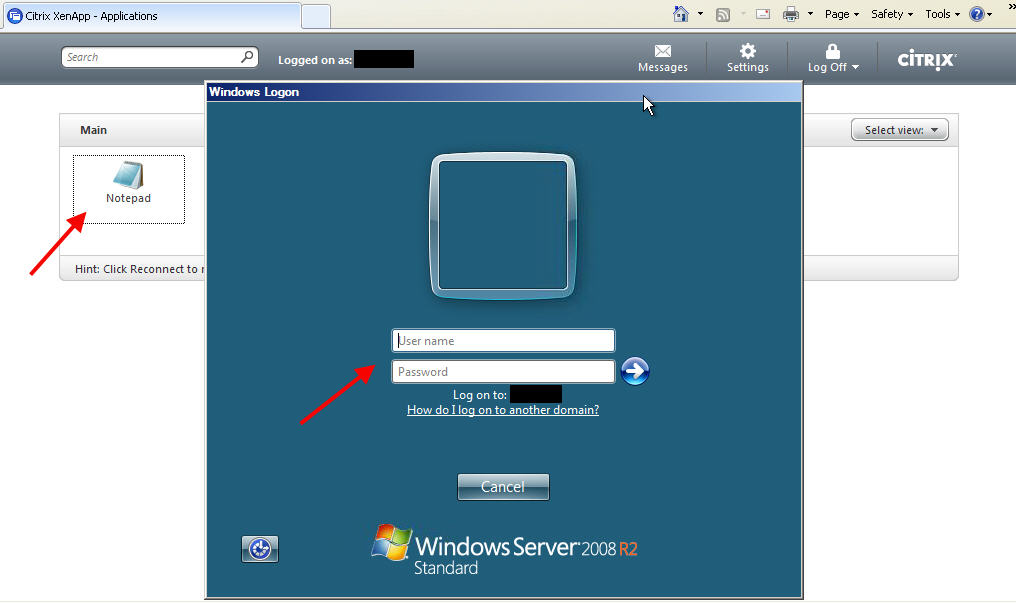
When you login to your web interface and launch a new desktop, it might not launch and you might get this error in the application event log on the server:


Source: Citrix Web Interface
Event ID: 30105  
The Citrix servers do not trust the server. This message was reported from
the XML Service at address http://localhost/scripts/wpnbr.dll
[com.citrix.xml.NFuseProtocol.RequestAddress].
  [Unique Log ID: xxxxxxxx]

In previous versions of Presentation Server, the way to set the XML Trust was to go to your Access Management Console and edit the Properties of the each server. There would be an “XML Service” property near the bottom in the left navigation you could click on. Check the “Trust XML requests sent to the XML Service” box and hit OK. For the whole farm, open up the farm Properties and go to Farm-wide > XenApp > General and check the “XML Service DNS address resolution” check box and hit OK.

In previous versions of XenDesktop, you could go to your DDC and open up the Delivery Services console, right click on the farm properties go to Farm-wide > Desktop Delivery Controller > General and check the “XML Service DNS address resolution” and hit OK.

In XenApp 6.0, 6.5, etc. you need to open Delivery Services Console or AppCenter and go to Policies and hit the Computer tab. Edit the Unfiltered policy and find the XML Service near the bottom in the left hand navigation. When you click it, you will see “Trust XML requests”. Hit Add and set it to “Enabled” so the Citrix XML Service will trust requests sent to it and hit OK.

All this is from memory so if I missed something, let me know. I don’t have any consoles in front of me for the different environments at the moment except Desktop Studio or I would post screenshots for you. Let me know if you need them and I’ll take some screenshots this evening when I have a bit more time.

And now for the whole reason for this blog post. In XenDesktop 5.0, 5.5, etc., the Desktop Studio console does not have this option if you look in the Unfiltered policy under HDX Policy. That’s a totally different policy. You have to set the XML Trust via PowerShell now. So to set an XML Trusts policy, open up PowerShell and if you haven’t already, add the Citrix snapin which will give you the ability to use the Citrix cmdlets:

asnp citrix.*

Now enable the XML Trust:

Set-BrokerSite -TrustRequestsSentToTheXmlServicePort $true

Done, if everything goes well, you should see no confirmation or error messages like this:

Now if you logout of your web interface, log back in, then attempt to launch the desktop, it should come right up and there are no more errors in your application event log.

How to fix pass-through authentication & the Windows 2008 logon screen on XenApp 6.5/Web Interface 5.4 using Citrix Receiver

January 5th, 2012 22 comments

When you launch Internet Explorer and open your Citrix web interface page, you want it to pass through the user’s credentials and see all the available apps. When the user clicks on an app, it should launch immediately with no further prompts. Plain and simple.

But this is not always the case unfortunately. Sometimes pass-through authentication breaks. Symptoms I have seen are:

1. You get prompted for credentials at the Web Interface logon (an authentication error occurred error message) like this:

2. Passthrough at the web interface works fine but when launching an app, you get a Windows 2008 R2 logon screen from the XenApp server like this:

3. You get a combination of both issues above.

Don’t worry, there are a number of things you need to check that can resolve these issues for you. One or more of these factors may be the cause of errors in your environment. Just run through the bullet points below and verify everything:

1. You need to be using Citrix Receiver Enterprise if possible and not just the plain Citrix Receiver. The latest Citrix Receiver is 3.1 but 3.0 behaves the same way. It comes with Online Plugin 13.1.0.89 enabled out of the box. You can go to the “Receiver for Windows 3.1 – Admins” download page here:

https://www.citrix.com/English/ss/downloads/details.asp?downloadId=2319945&productId=1689163

You will need to download the 55.1 MB zip file. Inside you will see both “CitrixReceiver.exe” and “CitrixReceiverEnterprise.exe”. The one you want to install is the Enterprise version. This version will install with pass-through authentication support automatically for you as well as Single Sign On (SSO). You can always install and enable SSO with the standard Receiver using the “/includeSSON” and “ENABLE_SSON=Yes” command line switches and this actually will give you pass-through authentication features (more on this in bullet point 7 below). Receiver Enteprise will require administrator access to install on PCs unlike the standard/regular Citrix Receiver. The difference between the two versions is described here:

http://support.citrix.com/proddocs/topic/receiver-31-windows/ica-clients-deciding-v2.html

Note how Enterprise has “Single sign-on/pass-through authentication” but standard only has “Single sign-on”?

Now here’s a big problem. When an end user tries to download the Receiver off the Citrix website, it will not show Enterprise:

http://www.citrix.com/receiver

Go ahead and choose Windows in the drop down. The next page will show the download for Receiver. It does not specify if it is Standard or Enterprise. If you download the executable, it is just CitrixReceiver.exe which is the Standard version you had downloaded above.

So if you are troubleshooting pass-through authentication, the first thing you want to make sure of is go to Add/Remove programs on the user’s PC and verify it says “Citrix Receiver (Enterprise)” like below and not just “Citrix Receiver”:

I’m guessing Citrix only offers the standard version to end users so they are not confused on which one to download. The problem is if you are in an environment where Receiver Enterprise is not deployed centrally or if users take it upon themselves to install the latest Receiver from Citrix’s website (which does not require admin rights btw), they can cause a big mess and you are stuck troubleshooting it.

Another tip, you need to restart your PC for the pass-through authentication to work after you finish installing Receiver Enterprise 3.1. It will sometimes not start the Single Sign On process until you restart your PC. Or it will start it but it still not correctly passthrough credentials for whatever reason. So your best bet is to restart your PC to make sure everything is working correctly. Once you restart your PC, open Task Manager and verify “ssonsvr.exe” is running like below:

Here is another screenshot from Process Explorer which shows the dependency a bit better:

You can also go to the registry and under “HKEY_LOCAL_MACHINE\SOFTWARE\Citrix\ICA Client\SSON” it should have a string value called “Enable” with a value data of “True” like this. This means SSO was installed. This key will be there if you installed Enterprise or forced the SSO install using Standard. Here is a Windows XP example:

Another thing you can do, and I’m on an XP 32 bit box right now, is navigate to “C:\Program Files\Citrix\ICA Client” and open up appsrv.ini in Notepad. You should see “SSOnUserSetting=On” at the very bottom which means that single signon is enabled.

Another check to verify for Enterprise installation, go to “HKEY_LOCAL_MACHINE\SOFTWARE\Citrix\PNAgent” in the registry and look for the DWORD value “EnablePassThrough”. It should have a value of “1″ meaning it is enabled. Standard Receiver doesn’t include the PNA plugin so you won’t even have this key if you were using it.

2. You need to verify the Citrix Receiver group policy allowing pass-through authentication has been applied to the PC you are working on. If you are just working on a test machine, you can apply this policy to just that PC for testing purposes instead of through AD. Just open up gpedit.msc on the PC, right click on “Administrative Templates” and then click “Add/Remove Templates…”. Click Add and choose the following file:

C:\Program Files\Citrix\ICA Client\Configuration\icaclient.adm

Once you have added it, navigate down to Computer Configuration > Administrative Templates > Citrix Components > Citrix Receiver > Authentication and you will see an option called “Local user name and password”. Double click on it and set it to Enabled. You need to have “Enable pass-through authentication” and “Allow pass-through authentication for all ICA connections” enabled. So it will look like this:

If you expand the User Configuration section, you will see the same settings under there as well. I usually have it set there as well but it is not necessary. In my testing, you can leave it enabled at the computer level and it will work. The changes should be instant from my testing but if they don’t take, try doing a “gpupdate /force”, restarting your browser, and/or rebooting your machine.

3. There is a known issue with XenApp 6.5 where pass-through authentication will not work. You need to apply Hotfix XA650W2K8R2X64001 to all your XenApp servers. You can get it here:

http://support.citrix.com/article/CTX130794

This will update your ccticket.dlls among other files that will fix the issue.

4. Verify on your XenApp servers that the RDP connection is set to not prompt for passwords. Under the Remote Desktop Session Host Configuration console, doubleclick on RDP-Tcp, then click the Log on Settings tab. Verify “Use client-provided log on information” is selected and “Always prompt for password” is NOT checked:

5. Verify in the Web Interface console that you have specified pass-through authentication for the XenApp site. Just open the Web Interface Management console, right click on your site, and click Authentication Methods. Pass-through should be checked here:

It should also be done on the XenApp Services site if you need it.

6. Pass-through authentication will not work in Firefox. I’ve added my web interface to the Trusted URIs config in FireFox but it won’t work. NTLM Passthrough authentication works fine on the web interface, but it won’t carry to the XenApp server when launching an app. You can add your WI to the list by typing this in the address bar in FireFox:

about:config

Then just type “NTLM” in the filter box. Add the URL (without the http:\\) in the “network.automatic-ntlm-auth.trusted-uris” box. If you do manage to somehow getting pass-through authentication to work in Firefox, please leave a comment below. I’m not a huge IE fan. :)

Quick note in IE, you do not need to add your WI URL to the Trusted Sites security zone for passthrough to work. Local Intranet is all you need from my experience. Sometimes you may get prompted at the web interface for credentials. Just make sure the site appears in Local Intranet and not Internet. I’ve seen issues where NTLM passthrough may not work in this scenario.

7. One final note, I did some additional testing using the Standard Receiver and command line installation. If you install Standard Receiver using command line with the following:

CitrixReceiver.exe /includeSSON ENABLE_SSON=Yes

You will see in Process Explorer or Task Manager that “ssonsvr.exe” is indeed running after the install. In my testing I was able to get it to actually pass-through but on certain XenApp 6.5 servers only. They had the pass-through hotfix I talk about below in bullet point 3 above applied. This was the only exception. And it only worked immediately after the Citrix Receiver install without rebooting the system. After rebooting the PC, it behaved like all other regular unpatched XenApp 6.5 and below farms. I would get the Server 2008 logon.

I then added the .adm template and configured it as described in bullet point 2 above and pass-through authentication worked fine with both patched and unpatched XenApp 6.5 servers. It even worked on XenApp 5 Feature Pack 3 farms with Web Interface 5.3 just fine.

If you check Process Explorer as you launch an app, the whole chain is there from the single sign on service to the connection manager down to the ICA client/Online Plugin:

So bottom line, you can get standard Receiver to work with passthrough but only if using these command line switches during install. I would just deploy Receiver Enterprise to begin with to avoid having issues down the road. It just seems to make more sense to me.