Archive

Archive for October, 2011

How to force an uninstall of Citrix XenApp or Presentation Server via command line

October 26th, 2011 2 comments

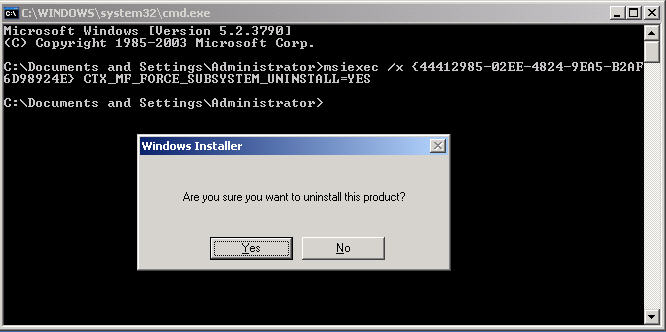
If you ever wanted to force an uninstall of XenApp or Presentation Server, you can do it with just one command. There are many scenarios where you might have to do this. Forcing an uninstall should always be a last resort though. You just navigate to your setup files to where mps.msi is located and run the following. In this example, I have copied the XenApp 6.5 install files to my D: drive:

D:\InstallFiles\XenApp6.5\XenApp Server\w2k8x64

and type the following command:

msiexec /x MPS.msi CTX_MF_FORCE_SUBSYSTEM_UNINSTALL=YES

This will bring up the following prompt:

and then you just run through the uninstaller and reboot when it prompts you.

Now if you don’t have mps.msi on your server and don’t have time to find the media and copy the install files over, here is a nice trick. Open regedit to edit your registry and navigate to:

HKEY_LOCAL_MACHINE\SOFTWARE\Microsoft\Windows\CurrentVersion\Uninstall

Now find the key with the Display Name of Citrix Presentation Server or XenApp, here is a screenshot from a Presentation Server 4.5 box for example:

Right on the key and copy the key name:

Paste it into Notepad. It will be the full path of the key but just copy the key part only:

Then open up a command prompt and type the following but with the key you saw on your server. Here is mine for example::

msiexec /x {44412985-02EE-4824-9EA5-B2AF6D98924E} CTX_MF_FORCE_SUBSYSTEM_UNINSTALL=YES

Once you hit enter, it will pop up with the uninstall dialog and you can run through it to complete your uninstall:

Just keep in mind that the force uninstall switch only uninstalls XenApp/Presentation Server. It will not uninstall all of the little plugins and other modules that were install when you original setup your Citrix server:

BEFORE:

AFTER:

VMware PowerCLI script to set the Memory Resources limit on your VMs to Unlimited in bulk

October 19th, 2011 No comments

Had a situation where I needed to reset every VM in one environment to Unlimited that had previously had a an explicitly set memory limit. Here is a nice VMware PowerCLI script that will reconfigure all the affected VMs one by one automatically for you:

get-vm|get-vmresourceconfiguration|where-object{$_.memlimitmb -ne '-1'}|set-vmresourceconfiguration -memlimitmb $null

VMkernel ports change automatically when applying a Host Profile

October 18th, 2011 1 comment

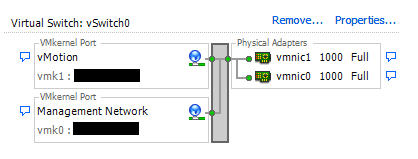
Wonderful little vSphere bug we came across today. Let’s say you have a host with the following VMKernel ports configured on the vSwitch:

-vmk1 = vMotion
-vmk0 = Management Network

When you create a host profile from the host, then apply that profile to a new host you are adding, the VMKernel ports get swapped! They will be:

-vmk1 = Management Network
-vmk0 = vMotion

My co-worker came up with a good workaround. Put your affected host into maintenance mode, then go edit the Host Profile you had applied. It appears the kernel ports are created in the order in the Host Profile. So you just change the order from:

-vMotion
-Management Network

to:

-Management Network
-vMotion

You do this by renaming “vMotion” to something like “vMotion2MN”. Then change the name of “Management Network” to “vMotion” and change “vMotion2MN” to “Management Network”. From here you need to make changes to each port group which are:

-make sure the NICs are ordered correctly
-specifying the correct service for the port group
-making sure the IP is set to explicit

So for the vMotion port group, order the NIC:

Choose vmotion for the service:

Set the explicit IP option:

And for the Management Group, order the NIC:

Choose management for the service:

And set the IP to be explicit:

Make sure to press the OK button in the lower right button after every page or when you navigate to another page, it will lose whatever changes you made. Save the profile and re-apply it to your new host. Now it will recreated the VMKernel ports in the correct order.