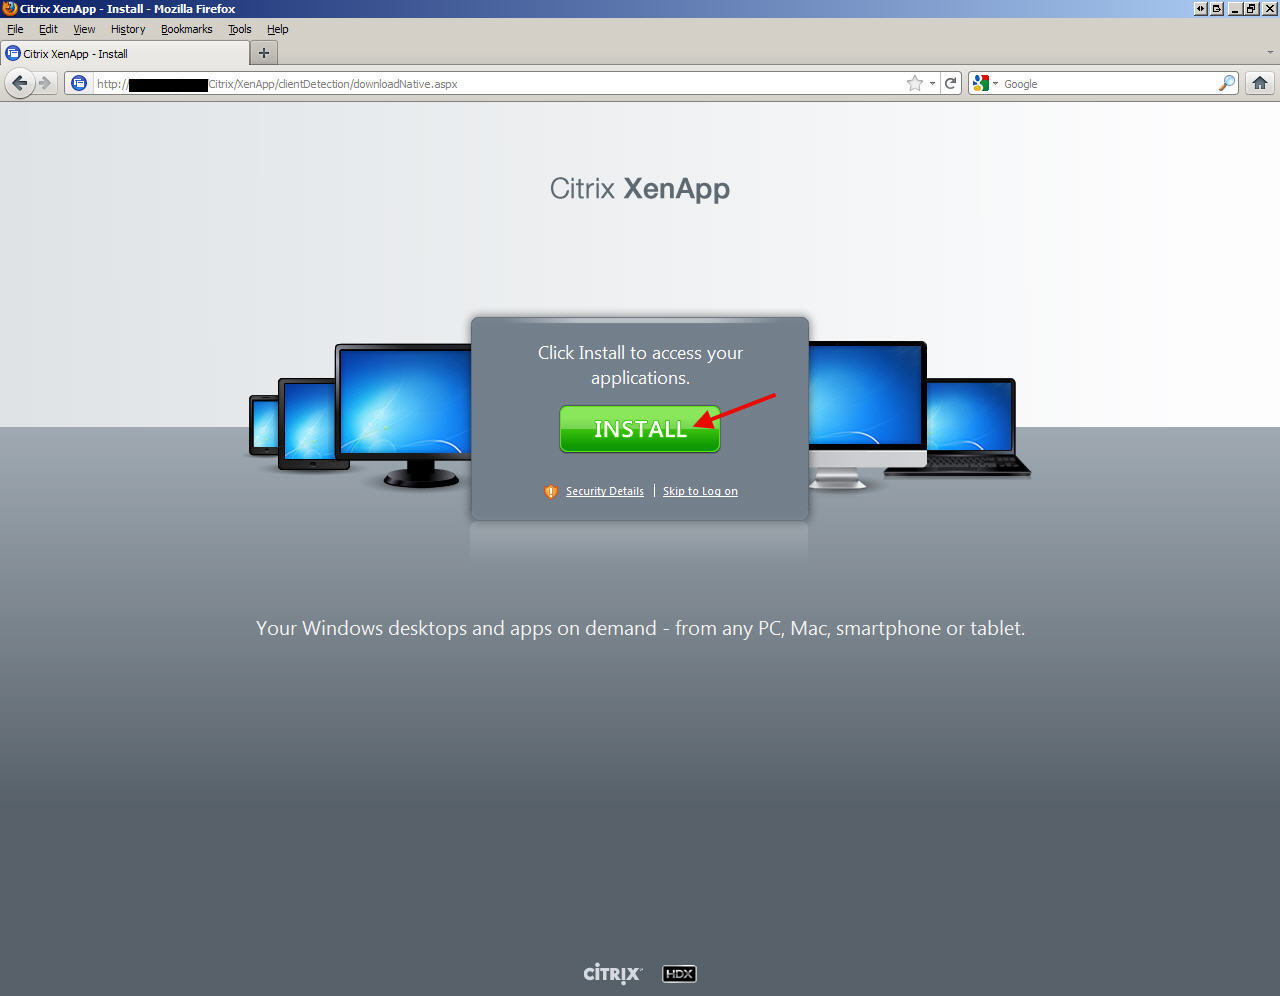
Archive

Archive for August, 2011

How to Deploy Citrix Receiver or Online Web Plugin for XenApp 6.5 on Web Interface 5.4

August 29th, 2011 28 comments

After your install XenApp 6.5 and setup your web interface site under Web Interface 5.4, you may notice that going to the web interface will show you a plugin install page like this if you don’t have the right web plugin installed on your system:

The problem is when you click on this install button, it takes the user to:

http://www.citrix.com/site/SS/downloads/index.asp

where they have to dig around and find the proper plugin. This is a horrible end user experience because they don’t know what to download and can get confused and frustrated.

So instead, you can host the web plugins for the different OSes on your web interface server itself just like previous editions of Web Interface. Here are the steps to do this. I installed on XenApp 6.5 and Web Interface 5.4 on a Server 2008 R2 for this example so these are 64 bit paths. Just edit the path below to regular “Program Files” if you are using a 32 bit OS.

1. Go to:

c:\Program Files (x86)\Citrix\Web Interface\5.4.0\Clients

you will notice it is empty like below:

2. Now go to your XenApp 6.5 media/install files and drill down to the Windows clients folder:

Citrix Receiver and Plug-ins\Windows

3. Copy the “Windows” folder into the “c:\Program Files (x86)\Citrix\Web Interface\5.4.0\Clients” folder. You can also copy over the Java, Linux, and Mac folders if you support those clients but in this example, I am only copying over the Windows clients.

4. Once everything is copied, go into the Windows folder and you will see all the clients listed:

5. Now go to the Web Interface console and click Client Deployment on your XenApp website. Make sure “Offer upgrades for clients” is checked if you want users to be prompted to upgrade their clients when they hit the WI and are detected to be running an old version. By default this is unchecked and that is fine if you don’t want to give them an option to update just yet.

7. Now the fun part, go to:

c:\inetpub\wwwroot\Citrix\XenApp\conf

and open the WebInterface.conf file in Notepad. Scroll down till you get to the ICA clients section which is commented out by default.

8. Since Citrix Receiver 3.0 that is currently shipping with XenApp 6.5 has the Online Plugin version 13.0.0.6684 embeded, you can uncomment this line and instead of “CitrixOnlinePluginWeb.exe” type “CitrixReceiver.exe”. This will give users the option to install the Citrix Receiver instead of a legacy Online Plugin:

9. You don’t have to do an iisreset as the change should be instant but for good measure, you can:

10. Now when you go to the web interface in your browser, you will notice the green Install button is there but there is also a little check box underneath that says “I agree with the Citrix license agreement”. This means the install file is being hosted on the web interface server now. Check the box and hit Install:

11. Save or Open the file depending on what your browser prompts you with (I am using Firefox):

12. Run the file to install the Citrix Receiver:

13. It will prompt when complete unlike some older Online Plugin versions:

14. Click Continue on the Web Interface once the installation is complete:

15. Now you can logon. If you have passthrough authentication enabled, it should log you in automatically if using Internet Explorer. In Firefox, make sure to enable NTLM passthrough for the URL and it will do the same. Here is my article I wrote a while back on how to do this targeted at Sharepoint admins but the same steps will work for your web interface URLs:

http://www.jasonsamuel.com/2010/02/08/getting-firefox-to-pass-active-directory-credentials-to-sharepoint-2007/

Otherwise it will give you the Explicit logon prompt:

15. Now you may not want to deploy Citrix Receiver to your end users and just want to remain on a legacy version of Online Plugin. This is fine too. All you have to do is manually create a “Online Plug-in” folder under:

c:\Program Files (x86)\Citrix\Web Interface\5.4.0\Clients

and drop your legacy plugin executable in there:

and then make sure your WebInterface.conf is uncommented and says “CitrixOnlinePluginWeb.exe”:

16. If you want to force your users to run a minimum version of the Online Plugin or otherwise get the “Install the latest plugin” screen, you can append the version number to the end of the string. In this example, I only want to let users connect and bypass the Install screen who are using 11.2 or greater so I typed:

ClientIcaWin32=Filename:CitrixOnlinePluginWeb.exe,Directory:Windows,Mui:Yes,ClassID:238f6f83-b8b4-11cf-8771-00a024541ee3,Version:11.2.0

A few things to note on client detection and Firefox vs. Internet Explorer. IE can detect the difference between lets say version 11.2.0.31560 vs. 12.0.3.6. But Firefox cannot. Firefox can only detect if a client is installed or not, it cannot detect version numbers. So if you specify in your WebInterface.conf that only 12.0 clients can connect without the update screen and the user connects using 11.2 with Firefox, they will not get the update screen. If you run a manual client detection under Settings > Run Client Detection, it will say “The preferred client is already available on your computer.”

In IE, it detects the client version just fine. To test, make sure a legacy online web plugin is installed on your system such as 11.2.0.31560 for example. Edit your WebInterface.conf like above and set the version to “11.2.0.31560″. Hit the web interface and you will passthrough with no issue. Now edit the string again and change it to “11.2.0.31561″. Try going to the web interface and you will now get a prompt asking you to update.

So please keep the browser client detection issues in mind if you do allow your users to run browsers other than Internet Explorer. There are better ways to rollout a client update to your user base that are more controlled and less “error prone” if browser flavor is a concern in your environment.

Citrix EdgeSight report server symmetric key error

August 11th, 2011 No comments

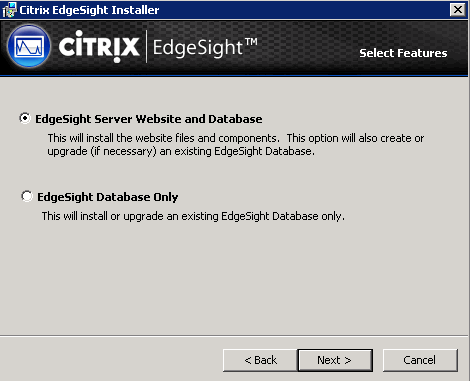
If you just updated your EdgeSight server and you get an error message like this when hitting the web console:

The report server cannot decrypt the symmetric key used to access sensitive or encrypted data in a report server database. You must either restore a backup key or delete all encrypted content. Check the documentation for more information. (rsReportServerDisabled) (rsRPCError) Get Online Help Bad Data. (Exception from HRESULT: 0x80090005)

the solution is very easy. Just go to your SQL Server and delete the existing keys by opening command prompt and typing:

rskeymgmt -d

then:

rskeymgmt -s

to recreate them. Restart the “SQL Server Reporting Services” windows service for good measure if you like and refresh your browser. EdgeSight should load up fine now. There is a good article here by MS that goes into more detail about the Reporting Services encryption keys here:

http://technet.microsoft.com/en-us/library/ms156010.aspx

Getting admin access on a SQL Server when you don’t know the SA account password

August 9th, 2011 5 comments

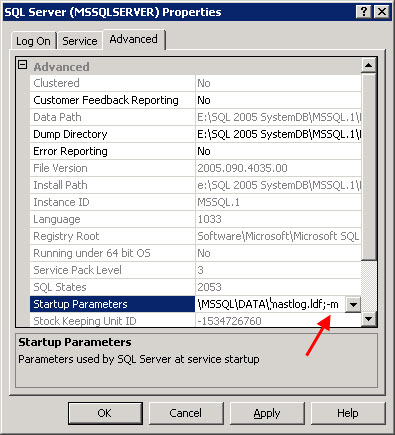
I was on an inherited SQL box this morning and didn’t know the SA account credentials. There was another admin service account but I didn’t have credentials for that either and unfortunately I wasn’t given any documentation on it. At first I was thinking through ways to go about resetting the SA account but then I remembered a trick to use your Windows local administrator credentials to override the SQL login and create an admin account for yourself. This ensures you don’t break anything by resetting an existing account. As long as you are logged into the server as a local administrator, this will work in a pinch.

1. Go to:

Start > Programs > Microsoft SQL Server 2005 > Configuration Tools > SQL Server Configuration Manager

2. Right click on the SQL server you want to add an account for and click Stop.

3. Once it has stopped, right click on it and open Properties. Go to the Advanced tab.

4. Under “Startup Parameters”, copy and paste that whole string to Notepad as a backup. Go back to the box and add the following right at the end of the string:

;–m

It should look like this:

Press OK when done. What this does is forces SQL to start in single user mode.

5. Now right click the SQL server you had stopped before and start it.

6. Now if you go to SQL Management Studio, it will error out. The only way to get into it is using sqlcmd. So open a command prompt and type:

sqlcmd

which should give you a “1>” prompt denoting line 1. If it gives you an error saying “Login failed for user ‘xxxxx’. Reason: Server is in single user mode. Only one administrator can connect at this time. (Microsoft SQL Server, Error: 18461″, make sure all management consoles are closed and there are no other users logged in using it. Also go to your Windows services and stop all the following services:

SQL Server Agent
SQL Server FullText Search
SQL Server Integration Services
SQL Server Reporting Services
SQL Server VSS Writer

Only SQL Server and SQL Browser should be running. Try “sqlcmd” at the command prompt and it should let you through.

7. Now type the following to add your domain user account with admin privileges:

EXEC sp_addsrvrolemember 'domain\useraccount', 'sysadmin';
GO

it should give you blank line if it was successful.

8. Now go back into the SQL Server Configuration Manager and remove the “;–m” you had placed under Startup Parameters. Restart the SQL server again.

9. Now hit SQL Management studio and login using the account you have created using Windows Authentication. You should have full admin privileges to create additional accounts, reset the SA account, change server roles, change user mapping, etc.

Hope this helps. :)

Using Firefox in an environment with roaming profiles

August 2nd, 2011 1 comment

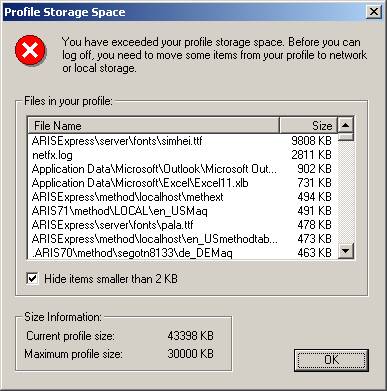
By default, Firefox stores it’s profile cache in "C:\Documents and Settings\yourusername\Application Data\Mozilla\Firefox\Profiles". This can be problematic when using roaming profiles with a limited amount of profile storage space due to quotas. As you add extensions, it grows even bigger. This is a big problem in XenApp/XenDesktop/View and other VDI environments using roaming profiles. You’ll soon start getting errors saying you are almost out of profile storage space or that you have exceeded your profile storage space. Something like this (note I just grabbed this screenshot from a Google Image Search, you would normally see a bunch of Mozilla Firefox related files in there eating up the space):

The solution is to move the profile out of the user folder and into another local folder or onto a network drive/home folder, thus reclaiming the profile storage space. For example, I created "c:\FireFoxProfile" to house the profile. Here is what you need to do to begin using this folder:

1. Edit "C:\Documents and Settings\yourusername\Application Data\Mozilla\Firefox\profiles.ini" in Notepad and change:

IsRelative=1

to

IsRelative=0

What this does is allow you to use an explicit path that you specify for the profile.

2. Change the next line from:

Path=Profiles/xxxxxxx.default

to

Path=c:\FireFoxProfile\xxxxxxx.default

3. Save profile.ini and restart Firefox. You will notice that immediately, the new profile folder is populated. Keep in mind when you open Firefox for the first time, it will be like a brand new install and you will lose all of your bookmarks, extensions, customizations, etc. unless you restore them from the old path.

4. You can delete everything in your old profile path once you have Firefox working in the new profile path. This will immediately reclaim your roaming profile storage space.

NOTE: If deploying to the entire corporation, there are other methods to centrally manage Firefox and control the deployment. This solution is good for the one off users though.